Steamboat
-
Posts
261 -
Joined
-
Last visited
Content Type
Profiles
Forums
Articles
Gallery
Downloads
Events
Everything posted by Steamboat
-
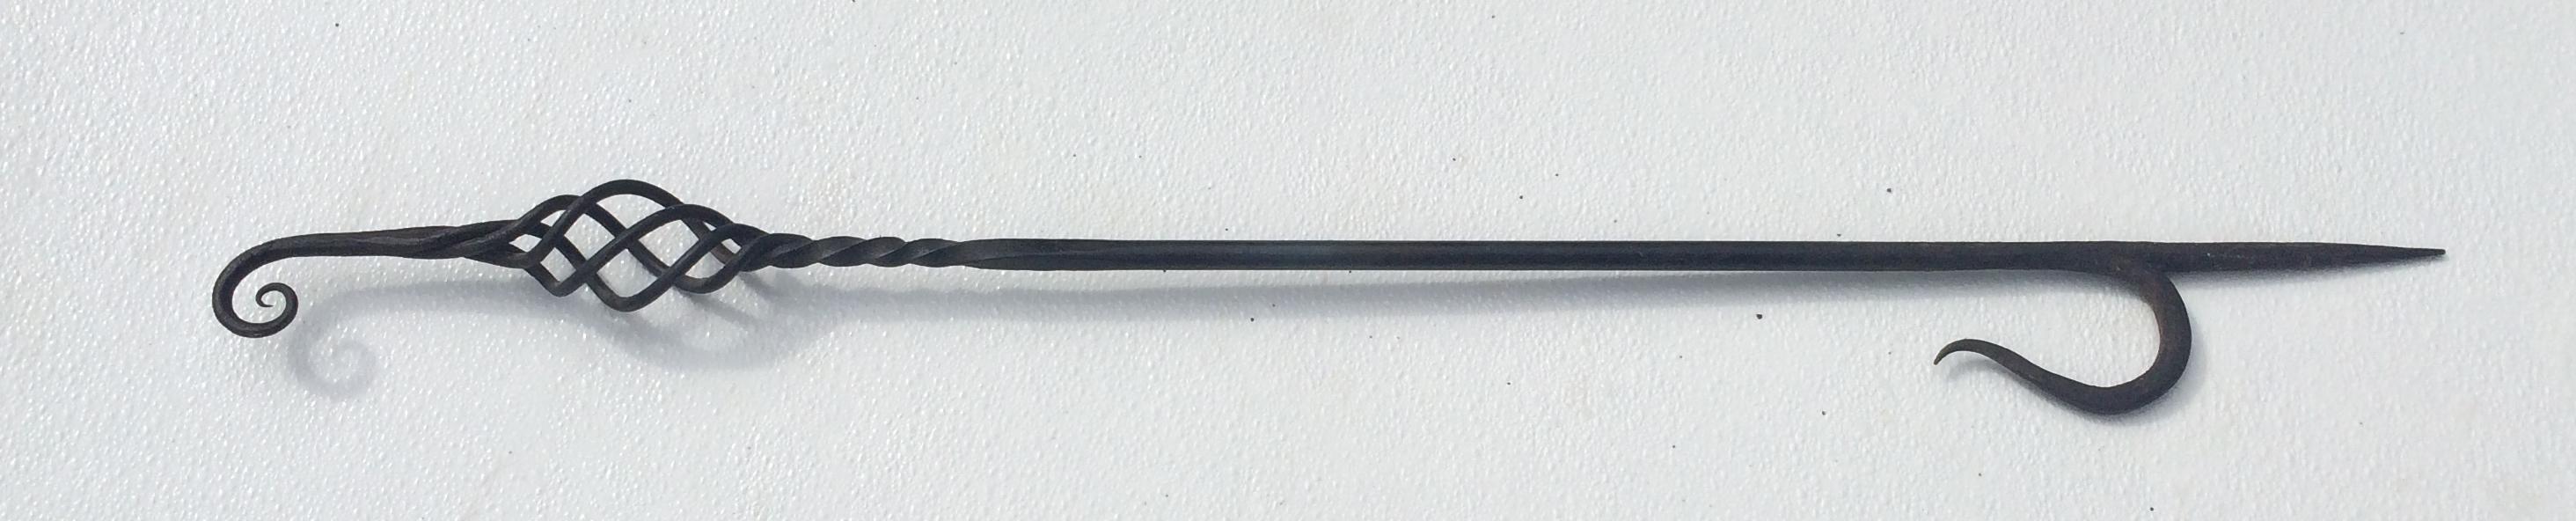
Thanks, Das. I've done a sizable number of metal fabrication projects over the years, but not much in the way of blacksmithing, so now I'm trying to gradually build up my skill set in that area as time permits. Jeremy, excellent work on the fireplace screen. What mesh and gauge of woven wire cloth did you use? Do you have a preferred source for wire cloth? I'm planning to make screens, tools, and accessories for at least four fireplaces and possibly five in the Federal-period house that we're restoring. By the way, the basket-handle poker that I posted above is NOT intended for our old-house project...it was just a learning experiment. Al (Steamboat)
-
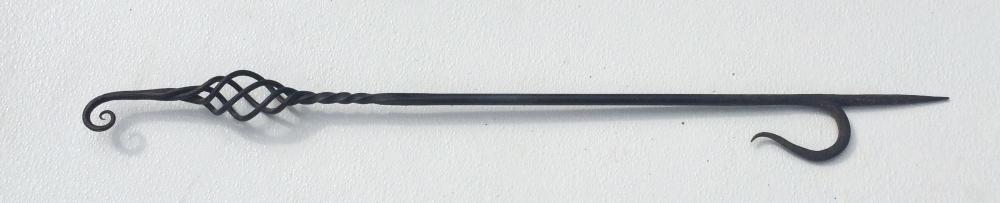
This fireplace poker represents my first attempt at making a twisted basket handle. It's not perfect, but it was a good learning experience. Next time I'll go for smoother transitions into and out of the basket and use a different finial design with more weight to it. I used four rods to make the basket and made it without using a mandrel rod. However, when I make another basket I think I'll probably use six rods and employ the mandrel method that Jennifer demonstrated in her video. She has made some truly elegant basket twist handles. https://www.youtube.com/watch?v=dBtnzbdZ93g Al (Steamboat)
-
You should be able to bend the clamping band of an exhaust rain cap into an oval shape fairly easily, so the oval tuyere shape is probably not a serious issue. I think you'd need a 5-inch exhaust rain cap to cover the 4-3/4" tuyere opening, but that might make the clamping band a bit too long, in which case you could either shim it or re-bend and drill the end(s) of the clamping band. Using leather as a shim is questionable (to me). If I needed a shim, I might use something like a piece of wood stove door gasket. By the way, were you able to drill and tap the rusted-in screw? If so, assuming that there is enough remaining cast iron around the screw to be strong enough, you could consider just using a steel plate, a shoulder screw as a pivot, and a spring to hold the plate snugly against the bottom of the tuyere, in which case you could just rotate/swing the plate around the pivot screw. Other approaches could also be used to make an ash dump door, depending on your tools, skill levels, etc. If I were doing this, I might construct a custom hinge bracket that could be mounted at the end of the tuyere via a couple of screws through the wall of the tuyere. That would probably not be too difficult to do, although it would require some careful measurements. For that matter, I suppose that the clamping band of an exhaust rain cap could be removed from the cap assembly and discarded, and then the cap assembly could be attached to the side of the tuyere with a couple of screws. Again, some careful measurements would be in order, and you would still have to add some extra weight to the counterweight. I guess my point is that there are lot of different ways of approaching something like this. At least that might give you some ideas. NOTE: Just to avoid any confusion, I thought I'd mention that in the images above where I drew in the added bars/counterweights, I flipped the photos upside down before drawing the bars in. That's because I wanted to simulate the flap being closed by the added counterweights. Otherwise, the flap would have been hanging open when held upside down without the added weights. Al (Steamboat)
-
I used high-temp silicone gasket maker compound to seal the air gate of my forge where it attaches to the tuyere, and I know that particular part of the tuyere...at least on my forge...remains cool to the touch while the forge is running. My air gate is also secured to the tuyere via several extended point set screws, which reflects my design preferences. I haven't checked the temperature next to the ash dump door after using the clinker breaker. Next time I fire up the forge I'll check that. Al (Steamboat)
-
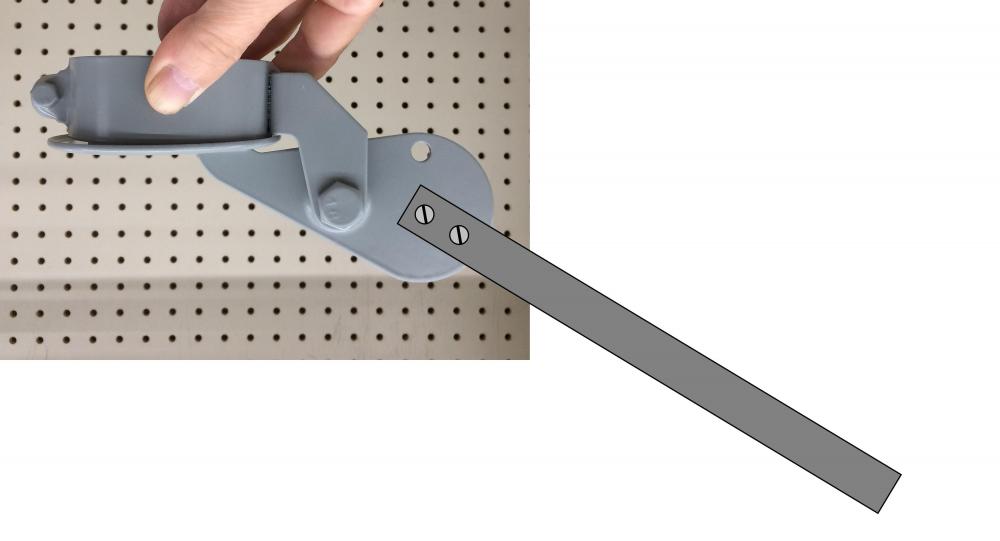
Pr3ssure, if you're talking about adding a flat bar to a flapper valve to act as both a handle and a heavier counterweight, yes, you could do that, and you would not have to modify the pivot. You could, for example, drill a couple of holes in the counterweight area of the flapper and attach a length of flat bar with a couple of screws, as shown below. Just be sure that the bar is heavy enough to hold the flap closed against the air pressure and clinker buildup, and also make sure that you have full travel for the handle so that the flap will open all the way. You might find that attaching it at an angle as shown in the second image below would give you more clearance. You'd have to look at the geometry of the tuyere and firepot to make sure that it has full travel. To experiment with movement/travel, you could temporarily attach the flat bar with a small C-clamp. If the bar turns out to be too light, you can always add weight to the end of it by bolting more metal onto it. I hope that was helpful. Al (Steamboat)

-
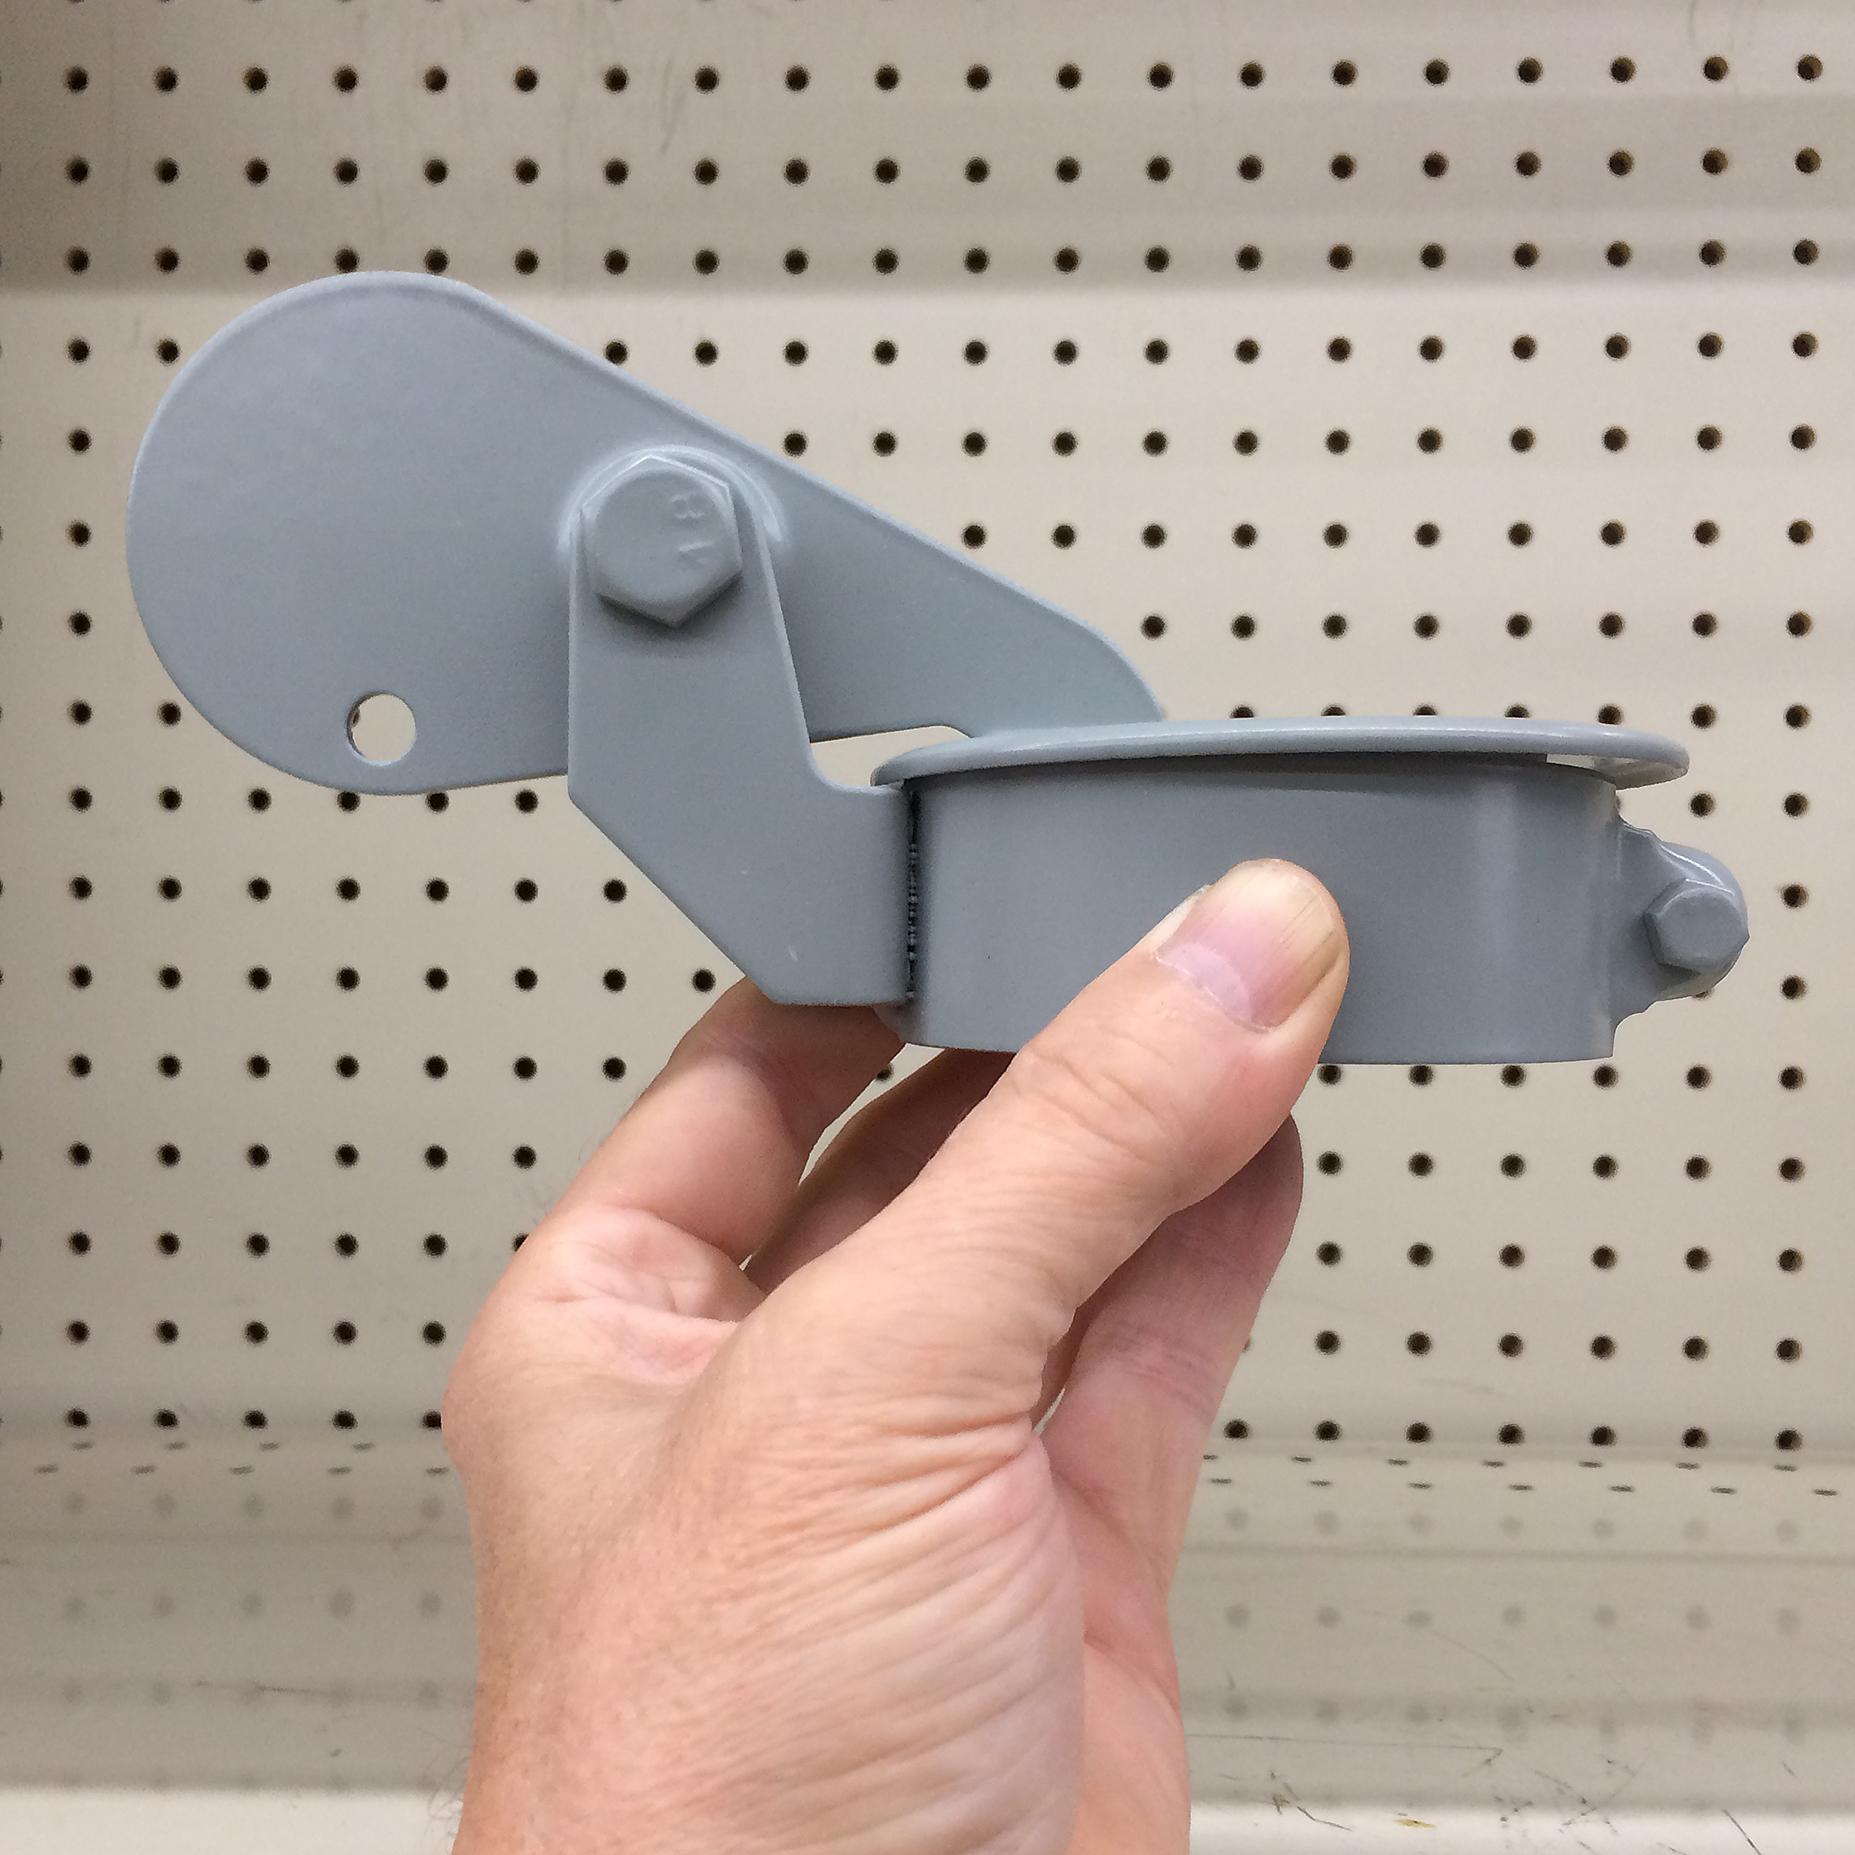
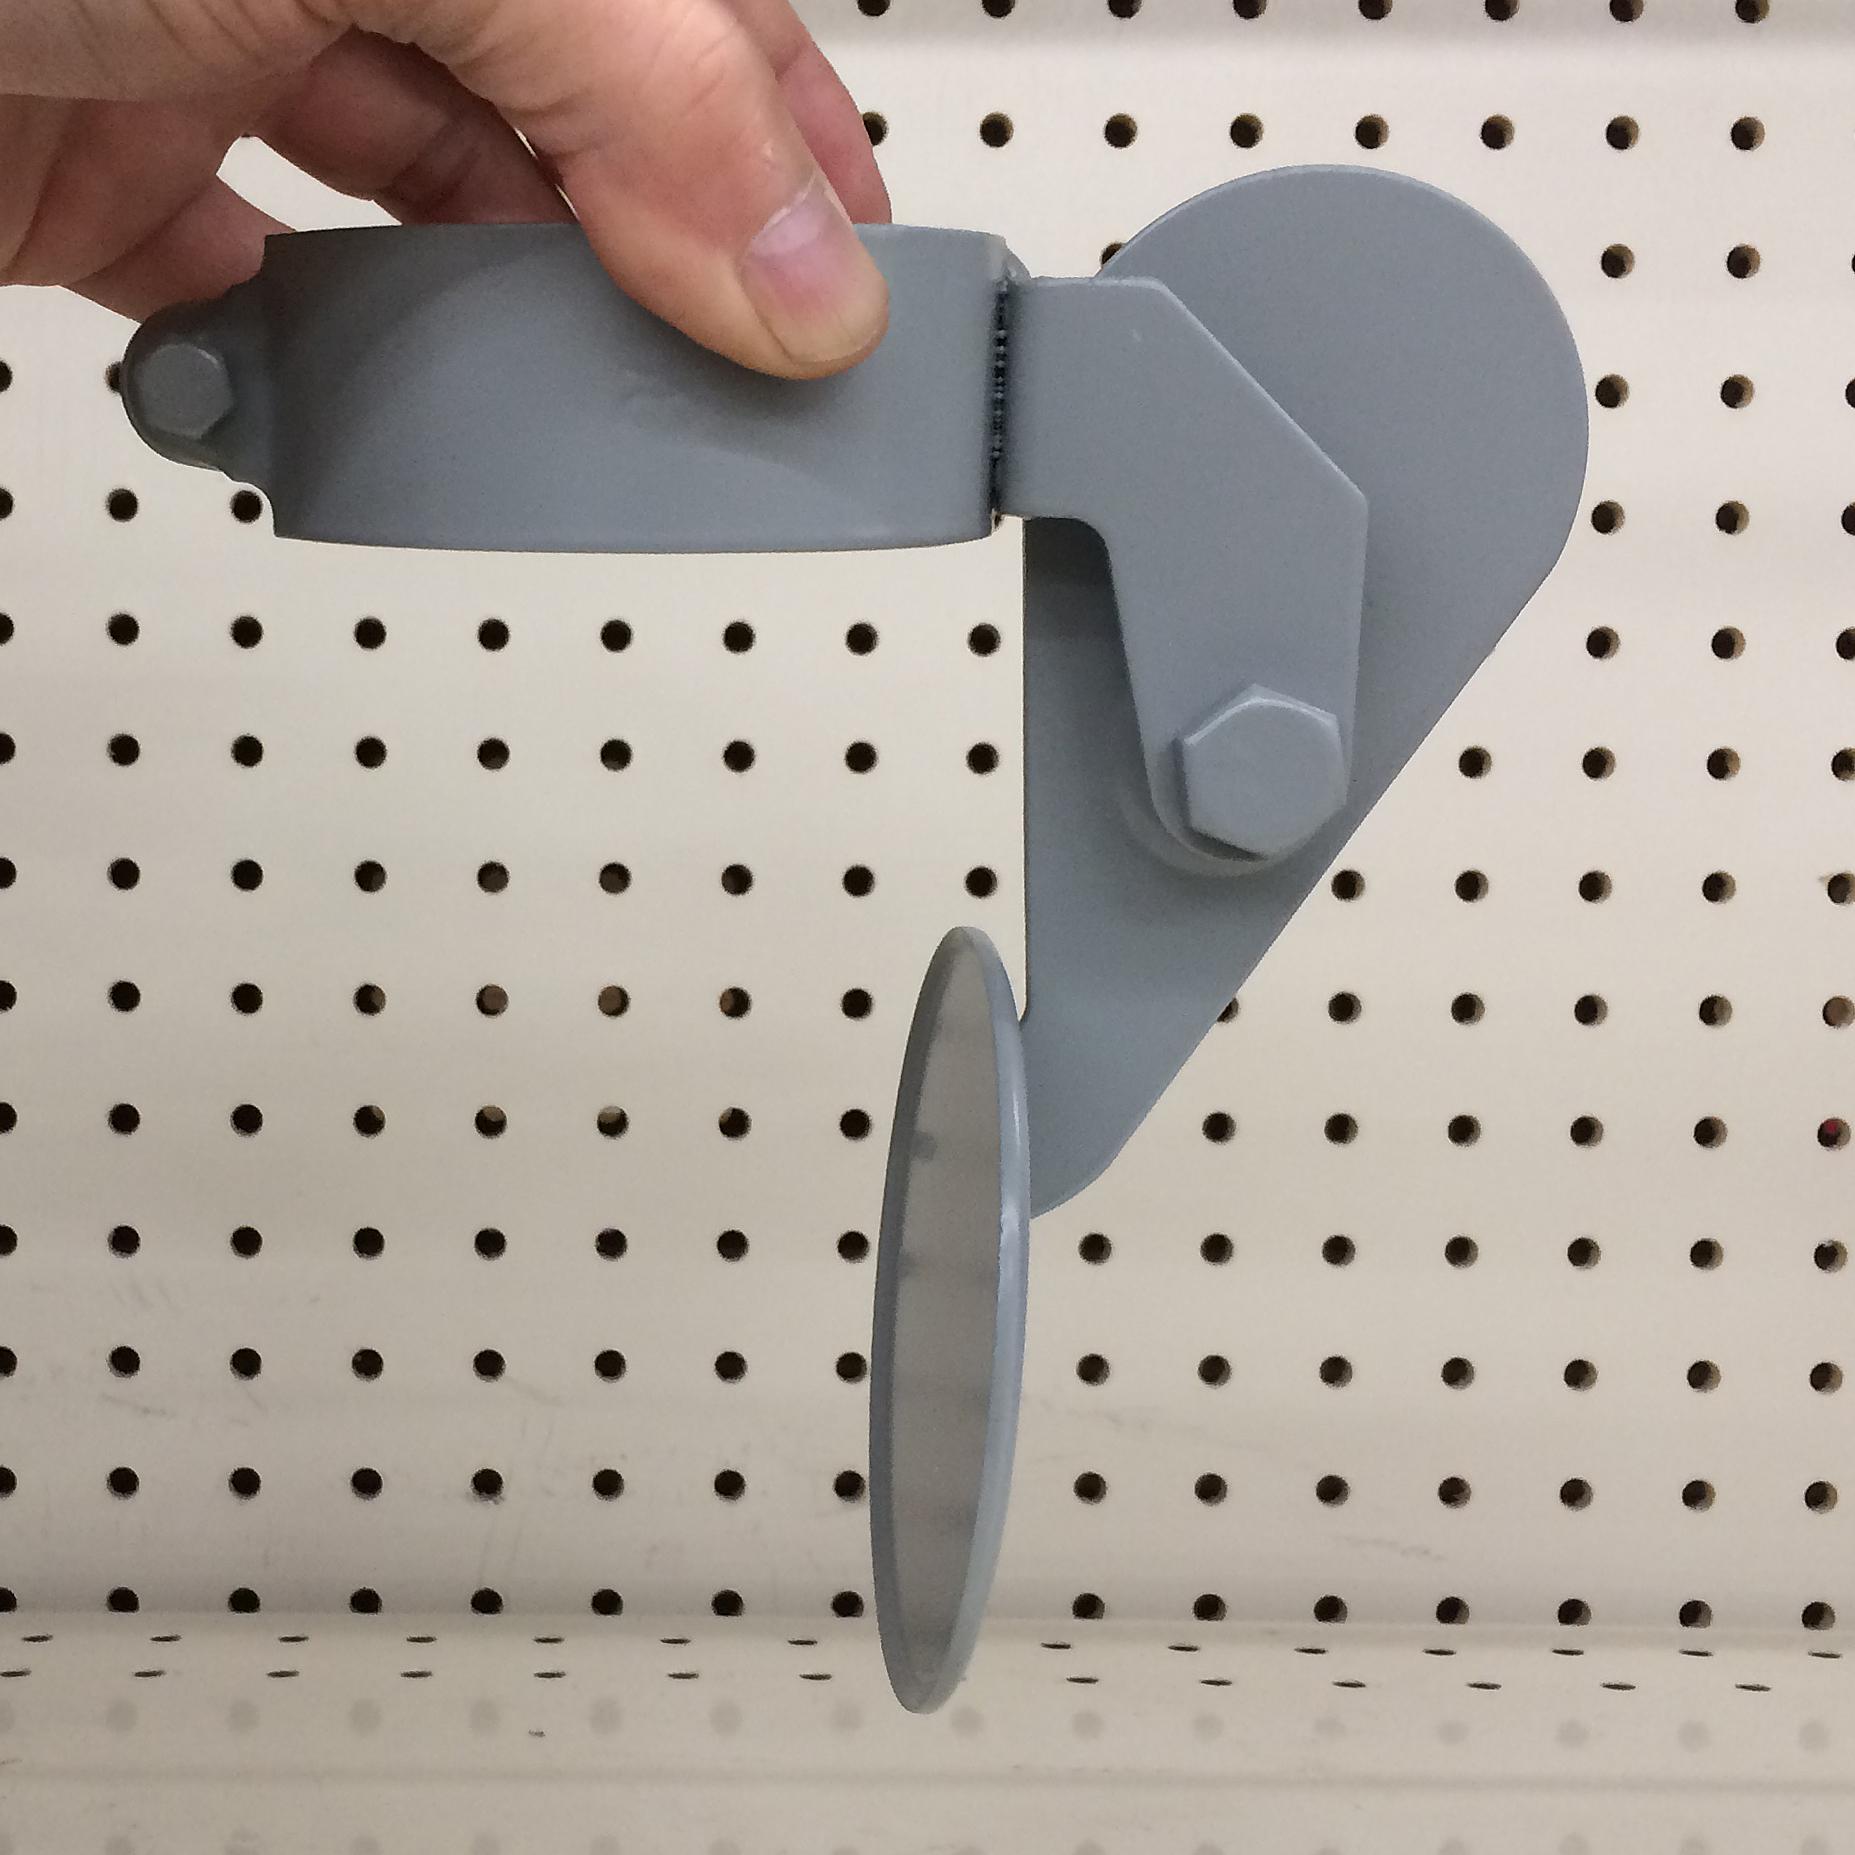
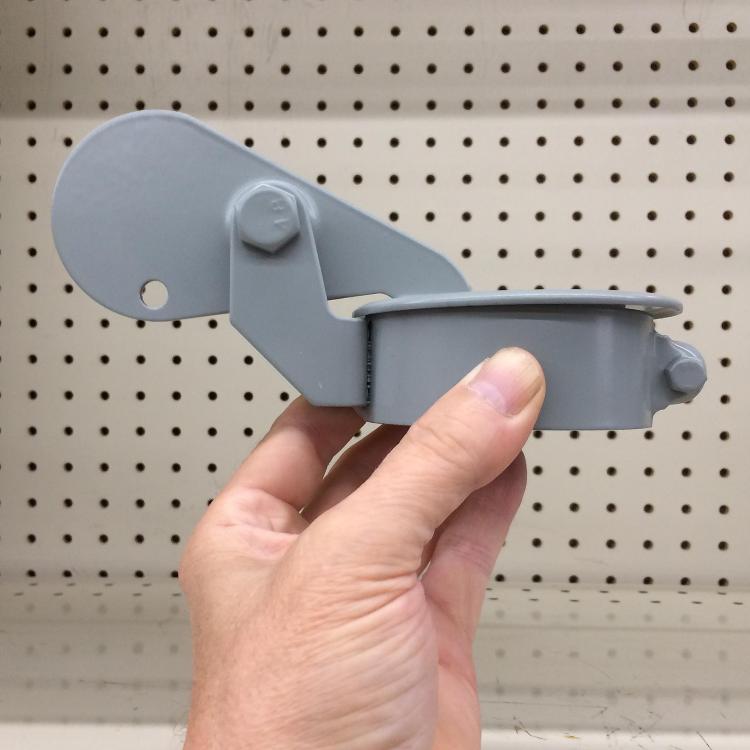
Frosty, the counterweighted exhaust rain caps (flap caps) that I've seen and used will fall open if mounted upside down, as demonstrated in the photos below, since taking geometry and weight distribution into account, the cap side of the pivot is effectively heavier than the counterweight side of the pivot. If you added enough extra weight to the counterweight side, it would keep the cap closed when mounted upside down. A handle extension could be a good way to add that weight. Al (Steamboat)

-
I also like Frosty's idea. Note that your cast-iron tuyere appears to have a bit of taper to it, so if you decide to use a clamp-on exhaust rain cap, you could further secure it by drilling some holes through the exhaust cap's clamp band and into the tuyere, and then tap the holes in the tuyere so that you can install some screws to help secure the clamp band to the tuyere. Also note that since you would be using the exhaust rain cap upside down, you would need to add some weight to the cap's counterweight to keep the cap closed, since the weight situation is reversed, but that's very easy to do; just drill a hole through the counterweight portion and bolt on some washers. What is the exact outside diameter of the ash-dump end of the tuyere? Is it nice and round, or is it oval shaped? Al (Steamboat)
-
Yeah, I think Buzzkill is right. That looks like hot-dip galvanized all-thread. The hot-dip process applies a pretty thick coating of zinc. Personally, I'd save the rods for other uses, since galvanized threaded rod comes in handy for many construction/fabrication projects, and hot-dip threaded rod tends to cost more than plain unthreaded mild steel rod. I'd suggest buying some ordinary mild steel rod from a metal supplier, which should be considerably cheaper than from the "convenience" rack at the big box stores. Al (Steamboat)
-

What did you do in the shop today?
Steamboat replied to Mark Ling's topic in Blacksmithing, General Discussion
I don't poison the wasps either. I'll just clear a nest out of an enclosed area that I live or work in and hope they go elsewhere, and sometimes they do. Wasps might not be as efficient as bees for pollination, but they still do their bit. Al (Steamboat) -
What did you do in the shop today?
Steamboat replied to Mark Ling's topic in Blacksmithing, General Discussion
Mudman, the brackets should hold the stump in place quite well, but you might want to consider using the anvil/stump for a while before you bolt it down to the concrete, just in case you find that there might be a more convenient location for it. If the leveling shims make it pretty stable, it shouldn't move around very much, and leaving it unbolted (is that a word?) could give you a chance to experiment with placement. Maybe you were already considering this approach, but I thought I'd suggest it anyway. FWIW, I haven't bolted my anvil in place, and that works fine for me, but a "secured" location obviously works well for others, so I'm not suggesting you do otherwise. Thomas, the wasps at our old house in Alna, ME don't seem to be willing to negotiate. Every time I open the shipping container that I use for 'temporary' (going on ten years) storage, I get down on bent knee and gaze upward into the padlock cover to make sure that there is no new wasp nest before I stick my hand under the cover to remove the lock. My neighbor probably thinks I'm either crazy or praying to Maersk, the god of shipping containers. It doesn't matter how many times I've cleaned out a wasp nest there, they just keep building new ones in the same place. I've been successful in deterring repeated groundhog incursions by applying coyote urine, but I don't know if there's a wasp equivalent. Al (Steamboat) -
Workpiece losing heat
Steamboat replied to YaAqob's Hammer's topic in Blacksmithing, General Discussion
What Thomas, Daswulf, and Anvil said. Also, the surface area of a piece relative to its mass will make a difference. For instance, a wide, flat, thin piece of metal will cool off faster than one with a round or square cross-section. Al (Steamboat) -
Old/New, Compact, "Convertible" Solid-Fuel Forge (photo heavy)
Steamboat replied to Steamboat's topic in Solid Fuel Forges
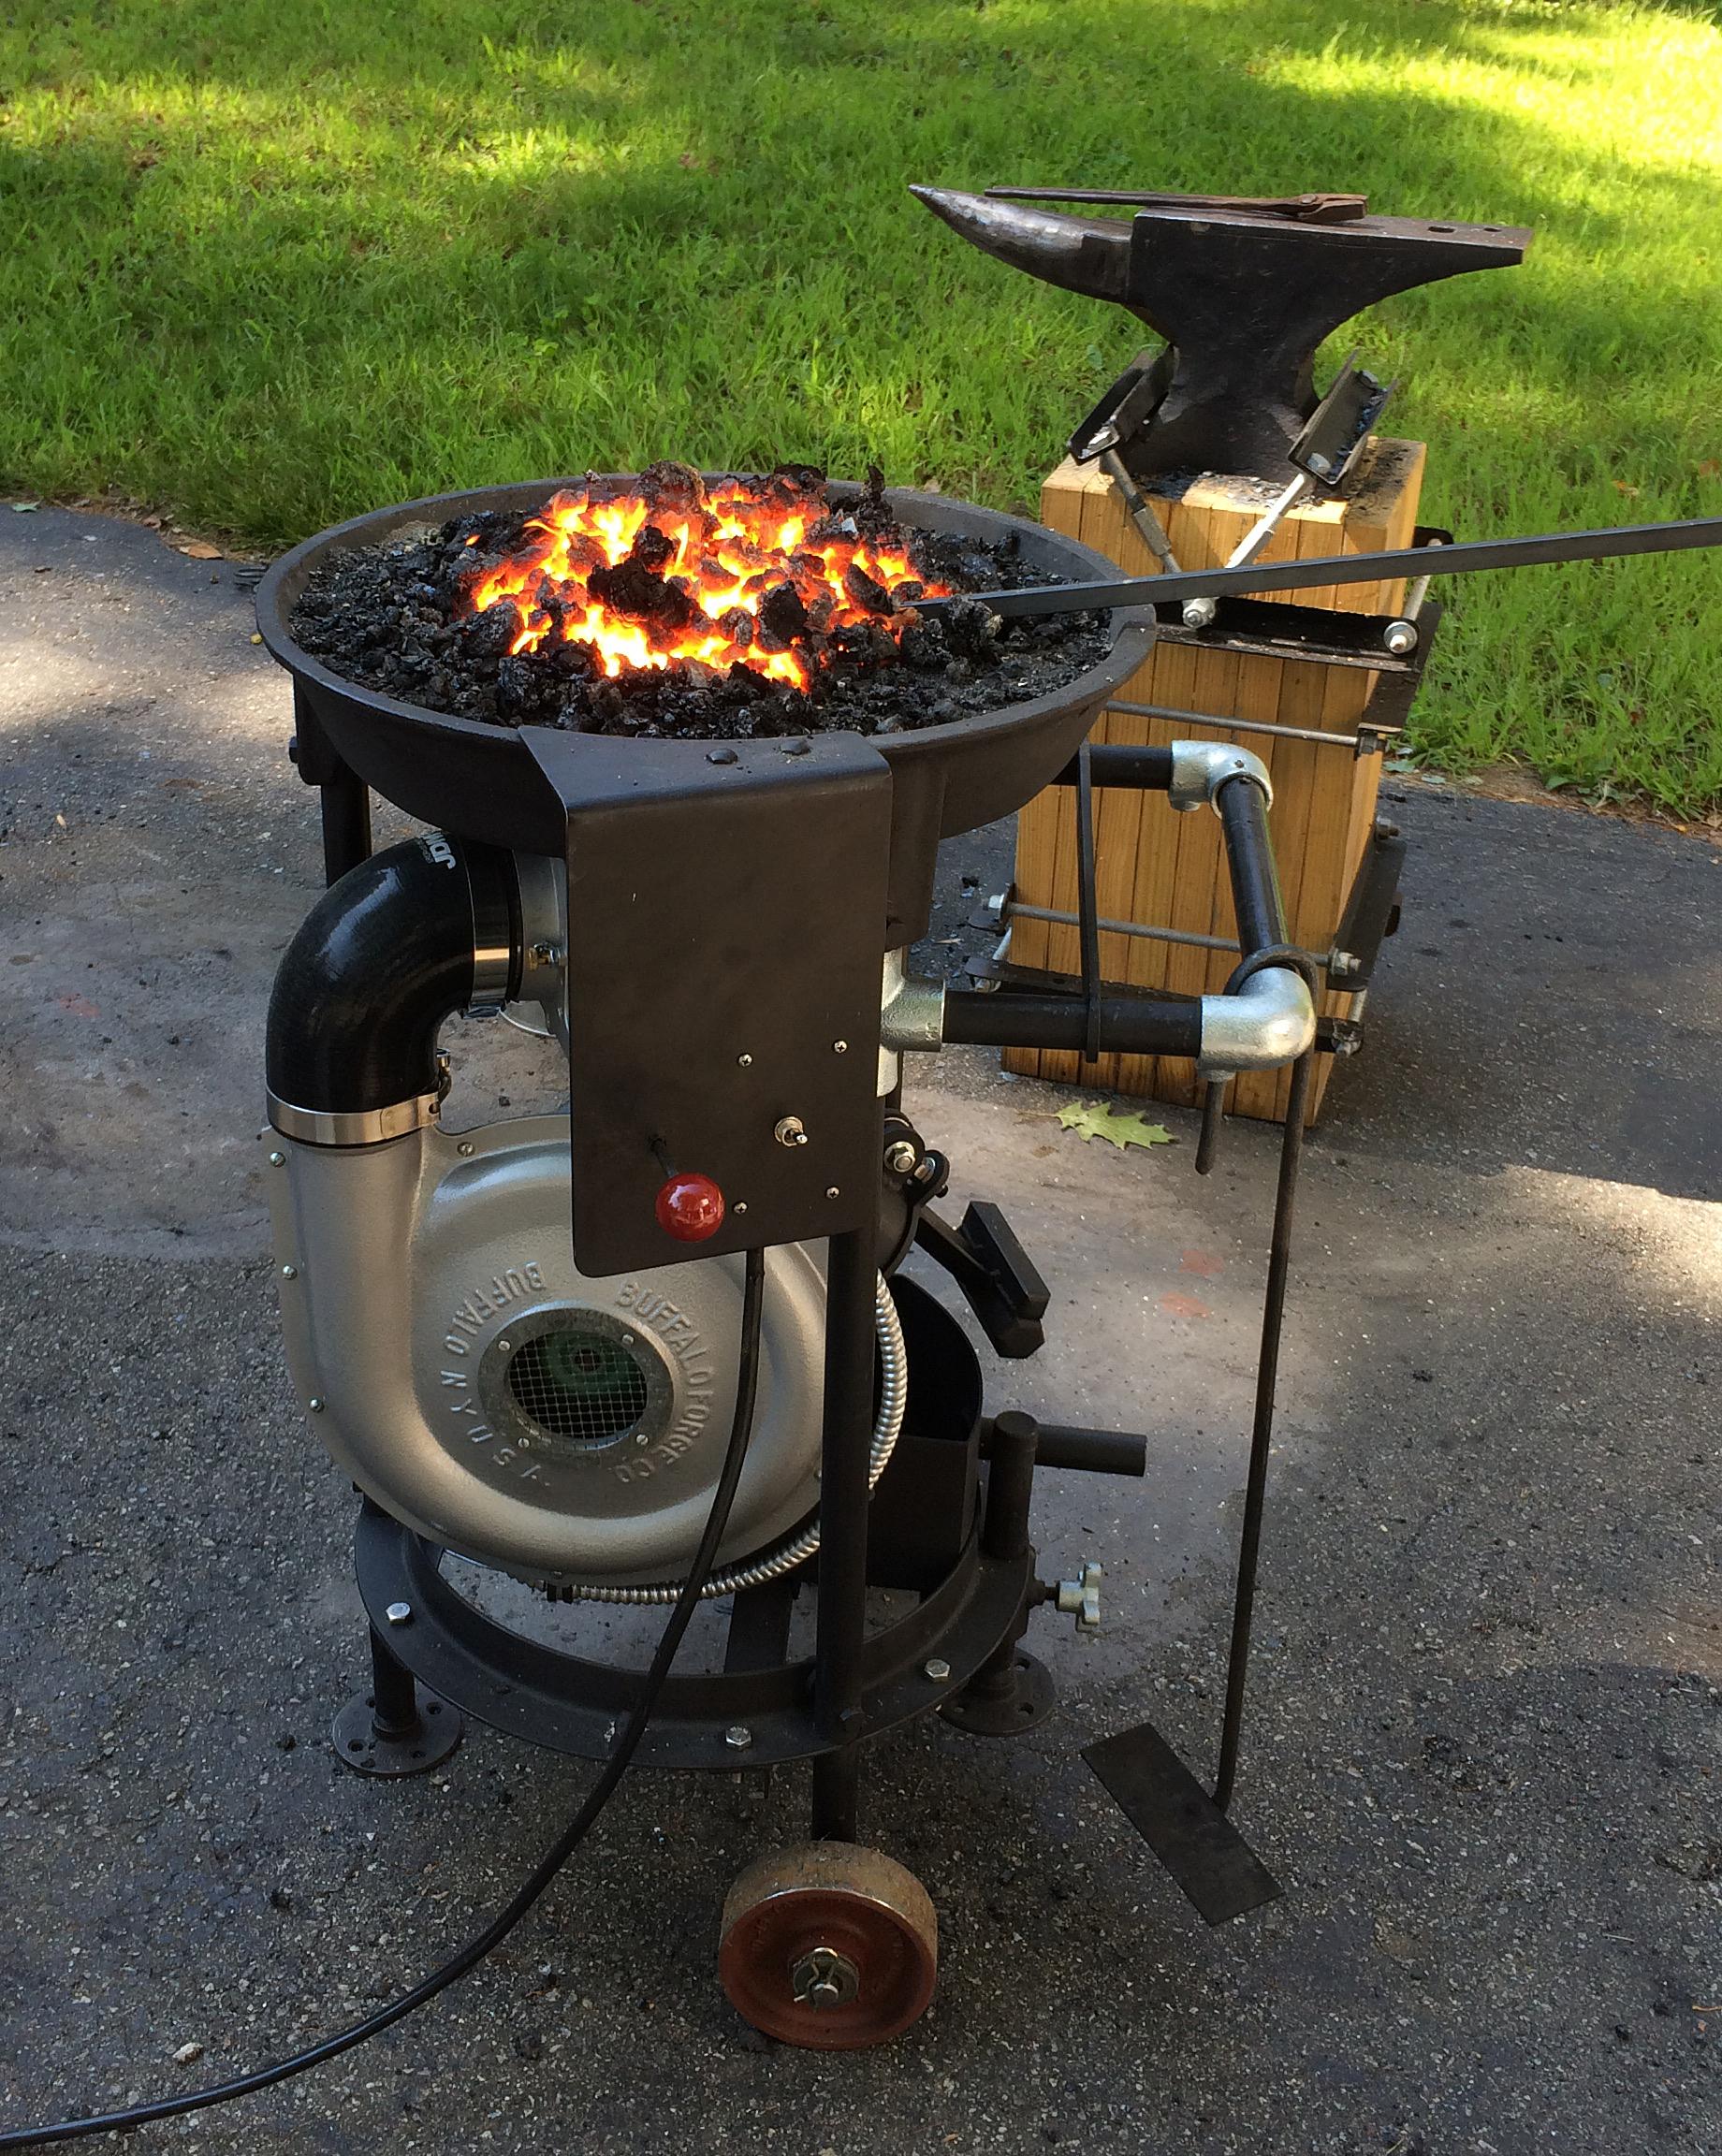
Well, I finally got around to firing up the little forge again to give it a better test run. Today's firing was intended to check out the operation of the forge in more detail, particularly how hot things got under the hearth during an extended run, although my wife made a coal rake while we had it running. I tried both the small and large duck's nest sizes, and both of them worked great. I ran it continuously for about four hours, only taking a couple of minutes to change duck's nest sizes, and I'm glad to say that all of the equipment under the hearth stayed nice and cool. In fact, I could even put my hand on the tuyere right next to where it bolts onto the hearth, and it was barely even warm. As Frosty predicted, the electrical switch box remained cool to the touch, as did everything else under the hearth. I could even touch the underside of the cast-iron hearth for a few seconds at a time without discomfort, due to the castable refractory liner, which, by the way, held up fine. There were some bits of slag sticking to the Kast-O-Lite, but they chipped off fairly easily. If the castable refractory ever does break down, I'd probably replace it with some kind of fire clay. The coal I used (ostensibly "smithing" coal) wasn't the cleanest I've used, leaving more rock chips and slag than I'd like. Nor was it very uniform in size. I had to break up a lot of larger chunks of coal. However, when I ran the forge with the grate removed, the clinker breaker did a good job in getting rid of clinkers without having to rake them out. Maybe this bag of coal was just a fluke, but If the next bag isn't any better, I may start looking for another coal source, or maybe even a good source of coke. It's a very quiet blower, which is nice, and it doesn't have to work hard at all. For the larger duck's nest size and heating some heavier stock, I'd guestimate that I had the air gate roughly 30-35% open on average...maybe very briefly up to 40% at times. For the smaller duck's nest size, I had the air gate perhaps 20-25% open on average. So there's good reserve capacity for any situation where you might want extra volume and pressure. And as mentioned earlier in this topic, the blower motor draws less current when the air gate is mostly closed than when it's wide open, so the motor was just loafing along, and even if I were running it with the air gate wide open, it would still draw less current than the motor's continuous-use amperage rating. I tried heating a couple of pieces of 1/2" and 3/4" square bar stock, and they reached welding temperature very quickly. The larger duck's nest size is nice for creating a wider and somewhat deeper sweet spot (see photo below), but I'll probably be using the smaller duck's nest most of the time. All in all, so far, so good. Now it's time to start putting it to use and making some stuff. One possible project might be a fireplace screen or two for the old house we're restoring. Al (Steamboat)
-
Here's a portion of his blog about a forge that he built, which I found on archive.org via their Wayback Machine. Quite interesting. Some of the photos of the forge will enlarge when clicked on, but the ones of the plumbing under the forge won't enlarge. Maybe the larger versions of the plumbing photos weren't archived...I don't know. There is some verbal explanation, however, which you might find helpful. https://web.archive.org/web/20111204182938/http://www.artmetal.com:80/blog/rich_waugh/2010/01/new_forge_project Al (Steamboat)
-
Glad the link was helpful. And thanks to Anvil and Jennifer for suggesting and endorsing the book. I hadn't seen it before and I've already found some useful material in it. The section on building a chain hook with a swivel looks like a particularly challenging exercise. Al (Steamboat)
-
Old/New, Compact, "Convertible" Solid-Fuel Forge (photo heavy)
Steamboat replied to Steamboat's topic in Solid Fuel Forges
Thanks for the compliment, J.P. Hall. It's my nature to over-engineer things that I build. No plans for a PID or any computerized control for it (yet) . On the other hand, it might be cool to install a manometer, flow sensor, and thermocouple, combined with a linear stepper motor on the air gate and programmable settings for different forging scenarios. Just kidding. That would be overkill...even for me! By the way, welcome to the forum. Al (Steamboat) -
A FREE ebook or pdf version of that book is available here (move the cursor over "READ EBOOK" or "EBOOK - FREE" and make your selection): https://books.google.com/books/about/Plain_and_Ornamental_Forging.html?id=PjpVAAAAMAAJ Al (Steamboat) Or Click here
-
Quite a clever clamping system. You didn't mention this, but it appears to me that you offset the posts/bars for the sliding arms so that the sliding arms can be rotated 180 degrees, which would give you some options as to the distance between the screws. Did I get that right? I'll have to keep this system in mind as a possible future tool project. Al (Steamboat)
-
"Charcoal," she retorted
Steamboat replied to Ohio's topic in Solid Fuels: Coal, Coke, Charcoal, Wood, etc
I'm glad you found it interesting, Zrognak. Circular features can sometimes still be discerned in the landscape that resulted from the use of the round mounds where wood was burned/heated to convert it to charcoal. Round, lime-burning "ricks" could also leave circular patterns. Airborne LiDAR data can be processed to filter out vegetation and create a "bare-earth" image of the ground that can make some of these often-subtle circular features stand out clearly. Zrognak, this is a bit off-topic, but you might be interested in this article about lime burning in Sweden: https://uu.diva-portal.org/smash/get/diva2:704117/FULLTEXT01.pdf Al (Steamboat) -
"Charcoal," she retorted
Steamboat replied to Ohio's topic in Solid Fuels: Coal, Coke, Charcoal, Wood, etc
Here's an article about some historic approaches to making charcoal on a large scale. I suppose that one might lump them together and call them the JAPOD method (JUST A PILE OF DIRT...or sod, or clay, or stones, etc.). I imagine that the life of the average professional charcoal burner was dirty, difficult, unpleasant, dangerous, low-paying, and probably boring at the same time, but they did convert vast stretches of woodland into charcoal for a myriad of purposes over the centuries, helping to fuel (literally) social and economic change. http://www.vtarchaeology.org/wp-content/uploads/200_years_ch5_optimized.pdf Al (Steamboat) -
Ted, what size, shape, and length of needles did you use? I've seen both ribbed and straight needles. I haven't had any issues with the needle-reinforced castings that I made (at least not so far). I used very small-diameter needles, although it's been a while and I can't recall what the measurements were. Just a note to anyone thinking about using needle reinforcement: The commercially-available needles are so cheap that I don't recommend making one's own needles. I made my own, but I would never do that again...too much hassle to save only a few bucks. And the commercial needles can be had in a range of sizes and shapes. Al (Steamboat)
-
Good feedback, Buzzkill. I wonder, though, what "Castable #2" is made of, or comparable to. By the way, I, too, have found Kast-O-Lite 30 LI to be quite durable. I used Kast-O-Lite for collars around the front and rear portals of my gas forge, and they have been holding up very well so far. I added home-made stainless-steel needles for internal reinforcement in those castings, and I haven't seen any cracks so far. However, I think that if/when I make more castings with any kind of castable refractory, I would like to do more research on the expansion/contraction characteristics of refractories and how casting size and shape may factor into the design, with the idea of reducing internal stresses in the castings. I'm not an expert, so more research is in order. As I might have mentioned earlier, I have not yet tried casting a ribbon burner. It could be fun...maybe in a future forge project. Al (Steamboat)
-
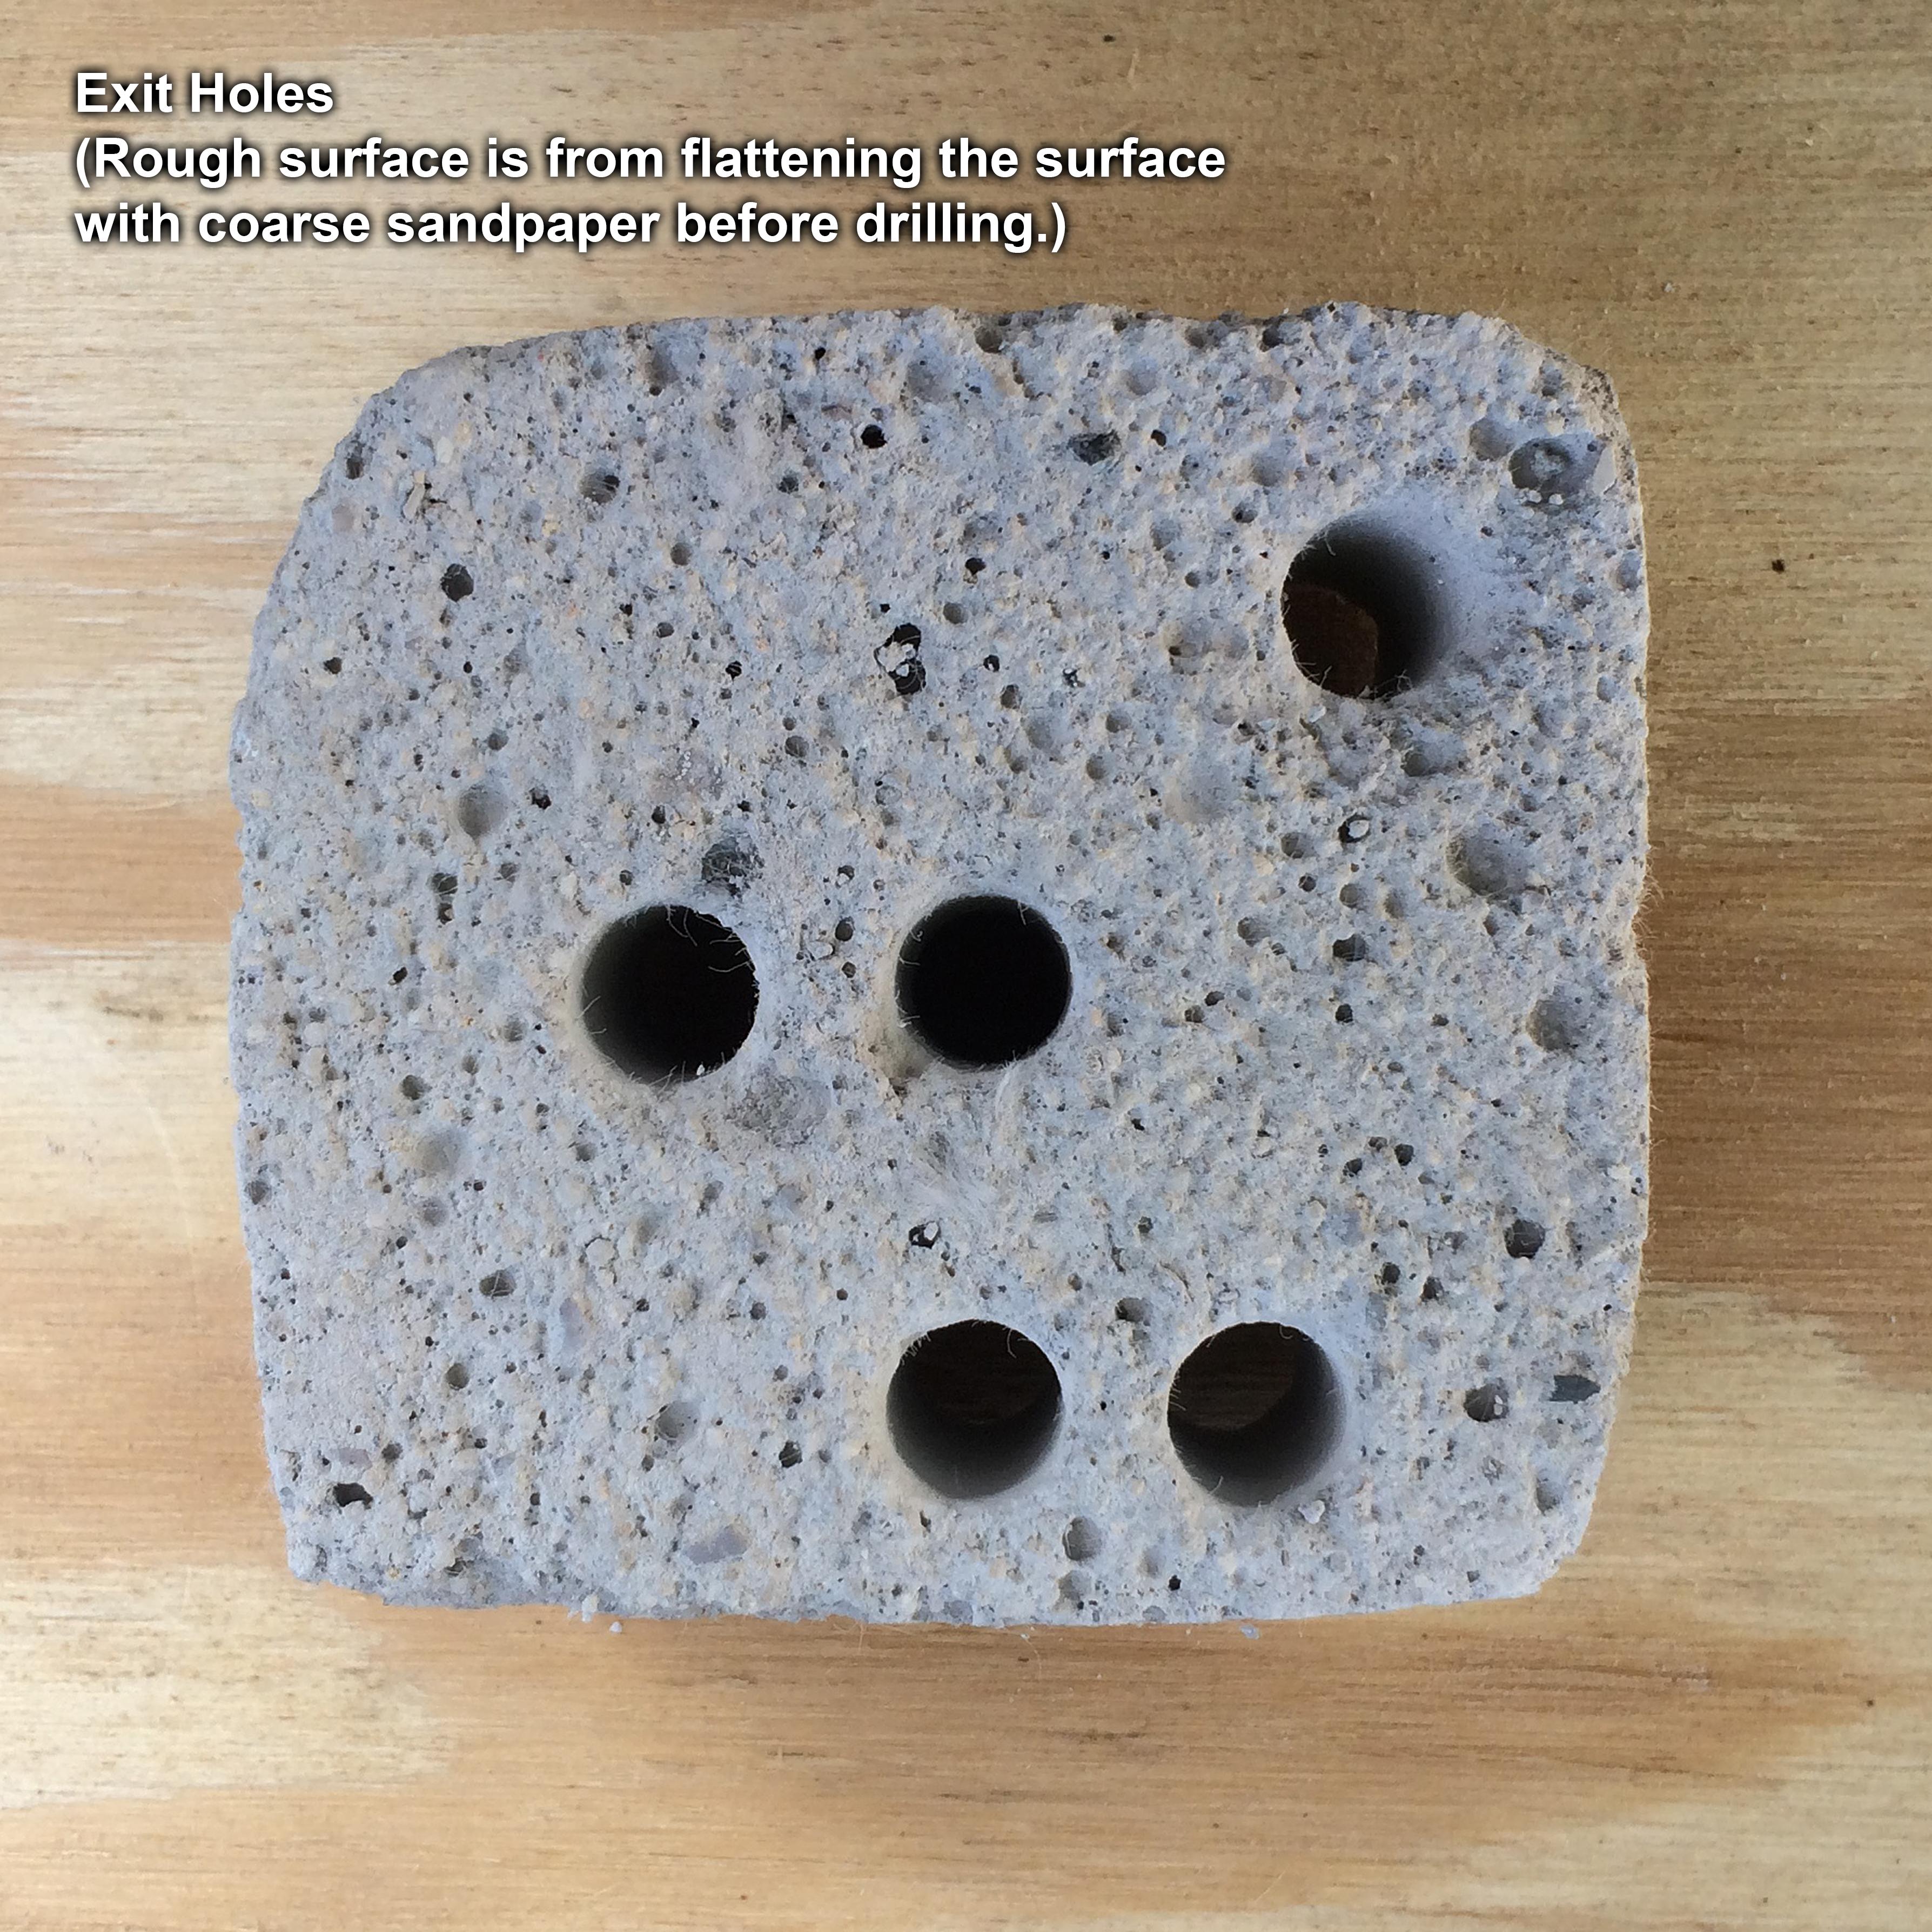
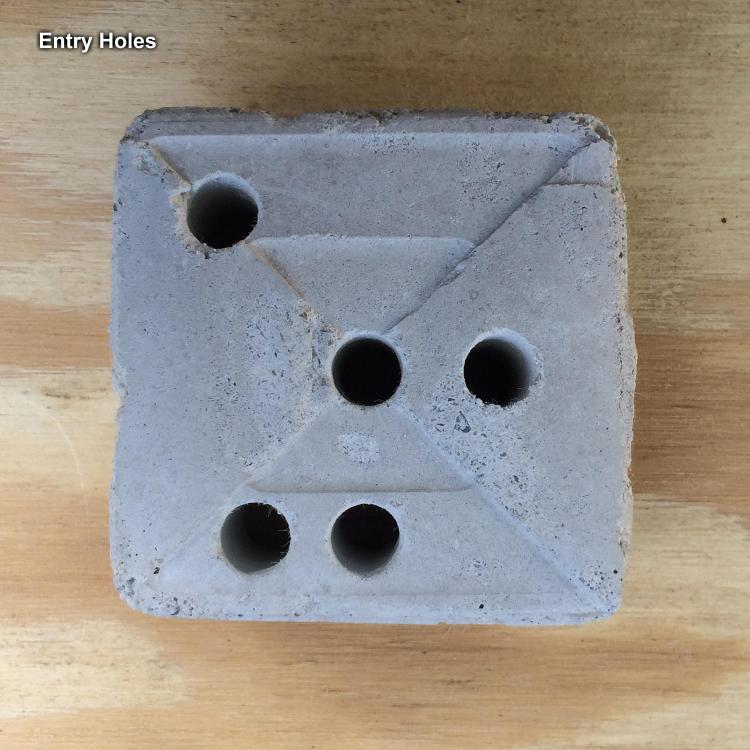
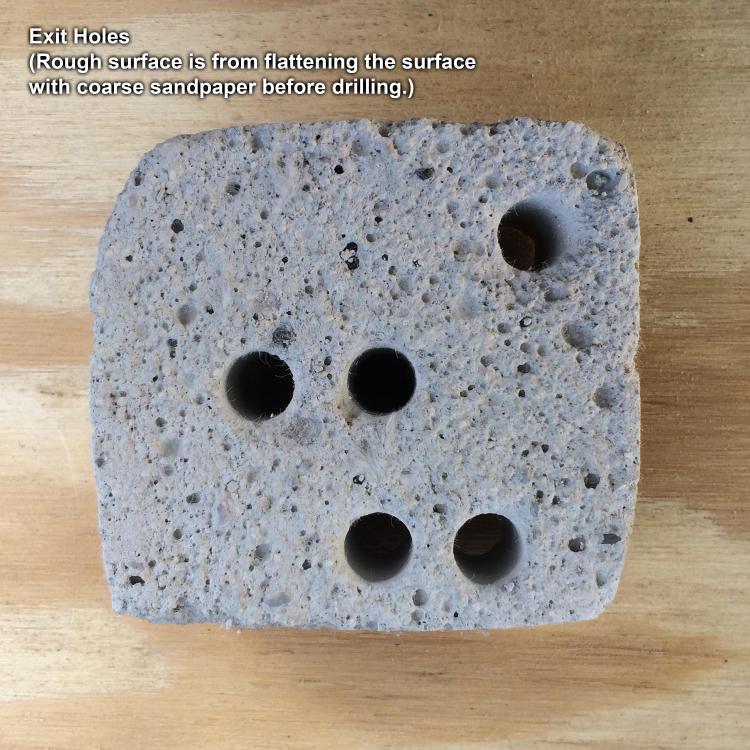
Okay, as mentioned, I found a chunk of Kast-O-Lite 30 that was left over from an earlier project. This is some extra mixture that I had dumped into a quart-size milk carton (as you can tell from the impression of the folds in the cardboard). I drilled a few 3/8” holes in it with an old masonry bit that still had relatively good edges on the carbide tips. It drilled quite easily without cracking. This particular chunk of Kast-O-Lite had been lying around for a while and was thoroughly air dried, although it had NOT yet been through the manufacturer’s specified dryout schedule at elevated temperatures, which is why you can still see the polypropylene fibers sticking out if you enlarge the image and look closely. Following is a photo of the exit holes on the other side. There was a bit of tear-out here and there around the edges, but not too bad. If you’re wondering about the rough appearance of this surface, when I dumped the leftover Kast-O-Lite mixture into the milk carton I didn’t bother to level the surface, so it was very uneven. Just before drilling these holes, I used some coarse sandpaper to flatten the surface because I wanted to have one flat surface to secure against a piece of plywood on the drill press table to prevent it from wobbling or shifting while drilling it. If it had been something that I wanted to keep, I would have compacted the mixture more and at least roughly leveled the surface, although I still would not have troweled it slick (the manufacturer's instructions say not to trowel it slick). Again, you may still want to cast the holes in place rather than drill them. I think that casting the holes probably involves less risk of a problem, unless you really have the drilling procedure totally under control. Cheers, Al (Steamboat)
-
Olfart, it does sound like at least the air-cure stage would have been complete when you drilled the casting. However, note that some refractories contain polypropylene fibers that I'm thinking could add some initial (air-cure stage) strength to the casting. During the manufacturer's specified dryout procedure (which involves considerably elevated temperatures), these polypropylene fibers would melt (or vaporize?) to add porosity to the casting. I'm guessing that you might have lost some of the early air-cure stage strength if the polypropylene fibers melted when you heated it (assuming that your refractory contained such fibers). I think that the melting point of polypropylene is somewhere in the 300s F. Using a new bit and a drill press should have helped, and securing it so that it doesn't wobble when being drilled also helps. What kind of castable refractory did you use? That could be a factor. I don't know what refractory you used, but I just found a chunk of leftover Kast-O-Lite 30 from another project that has fully air dried, but has not been through the manufacturer's dryout schedule, so it still has the polypropylene fibers in it. I'll drill it and post the results in a few minutes. Al (Steamboat)
-
Olfart, If I were using a castable refractory, I'd probably cast the holes in place, but that's largely because I enjoy casting things and not necessarily because I would categorically rule out drilling. There are a lot of different castable materials out there and a lot of different ways to drill those materials. Here are several variables that can affect the outcome of drilling: What kind of refractory material are you drilling? Some may hold up better than others. Was the refractory air cured per the manufacturer's instructions? The strength of some refractories after the air cure stage may differ from others. Of course, after the air cure, the manufacturer's specified dryout schedule should be followed before actually using the refractory. How hard were you pushing on the bit? Usually, only light to moderate pressure is required. Let the bit design and action do most of the work. Were you using a drill press (preferably with the casting secured)? This can help a great deal when drilling brittle materials, as it can prevent wedging of the bit in the hole and keep holes straighter and more uniform while directing the cut/pressure straight downward. What drilling speed were you using? Some experimentation may be necessary to find the optimum speed for a particular drill size and material combination. Was it a fresh masonry bit? They usually aren't very "sharp," even when new, but a "crisp" edge is still better than one that has been significantly rounded from use. The size of the aggregate and the relative strength/hardness of the aggregate compared to the binder could be another factor that could affect the success of drilling. I assume that you did not use a hammer drill, which could tend to break delicate materials. Since you're going to throw out the casting anyway, you might try drilling a few more holes in it and experimenting with a few of the abovementioned factors. Of course, you may still end up casting the holes, but at least you can salvage more information from the failed effort. I've sawed Kast-O-Lite, but I haven't tried drilling Kast-O-Lite, although I might try that to see what happens. However, I've drilled holes in Mizzou, Secar 71, and a couple of other refractory materials with no problem. I've also drilled through numerous kinds of firebricks over the years with no issue, mostly from kiln and fireplace-building experience. I hope that was of some help. Al (Steamboat)
-
Is the Vent-A-Fume hood related to Vent-A-Kiln hoods? I've seen those used over pottery kilns. They use a counterweight and pulley to help raise and lower the hood. I also ran across a slightly different approach to raising and lowering a hood in an old Buffalo Forge catalog. It also uses a pulley-and-counterweight system, but with a ring-shaped counterweight around the flue. https://archive.org/stream/BuffaloForgeCoCatalogNo801/Buffalo Forge Co Catalog No 801#page/n17 Al (Steamboat)