Steamboat
-
Posts
261 -
Joined
-
Last visited
Content Type
Profiles
Forums
Articles
Gallery
Downloads
Events
Everything posted by Steamboat
-
Thomas, I really appreciate your remarks. And as to foil, I've had a few items heat treated that were wrapped/crimped in stainless foil for the process, but I hadn't yet given any thought to the possibility of using any of the various high-temperature alloy foils in this environment. I'll have to look at some of the specs. Steamboat
-
Thanks, TFT and Thomas. If you'll pardon the analogy, I'm the sort of bloke who avoids the freeway and takes the scenic routes and back-country roads, even though it takes a lot longer to get from point A to point B, and that aspect of my personality probably crosses over into my approach to my projects. I don't get things done very quickly (ask my wife), but I try to have some fun and learn (sometimes by mistakes) along the way. I'll try to ignore the gnawing urge to extend the analogy any further. I always seem to have a long list of ongoing parallel projects. Fortunately, I occasionally finish one now and then, so there's at least some closure once in a while. I've noticed a tendency for the completed projects to be the ones that were assigned a high "spousal priority" level...lol...but I must say that my better half is surprisingly tolerant of my little idiosyncrasies, and as I mentioned in another post, is actually becoming quite interested in blacksmithing and will probably join the forum at some point. Steamboat
-
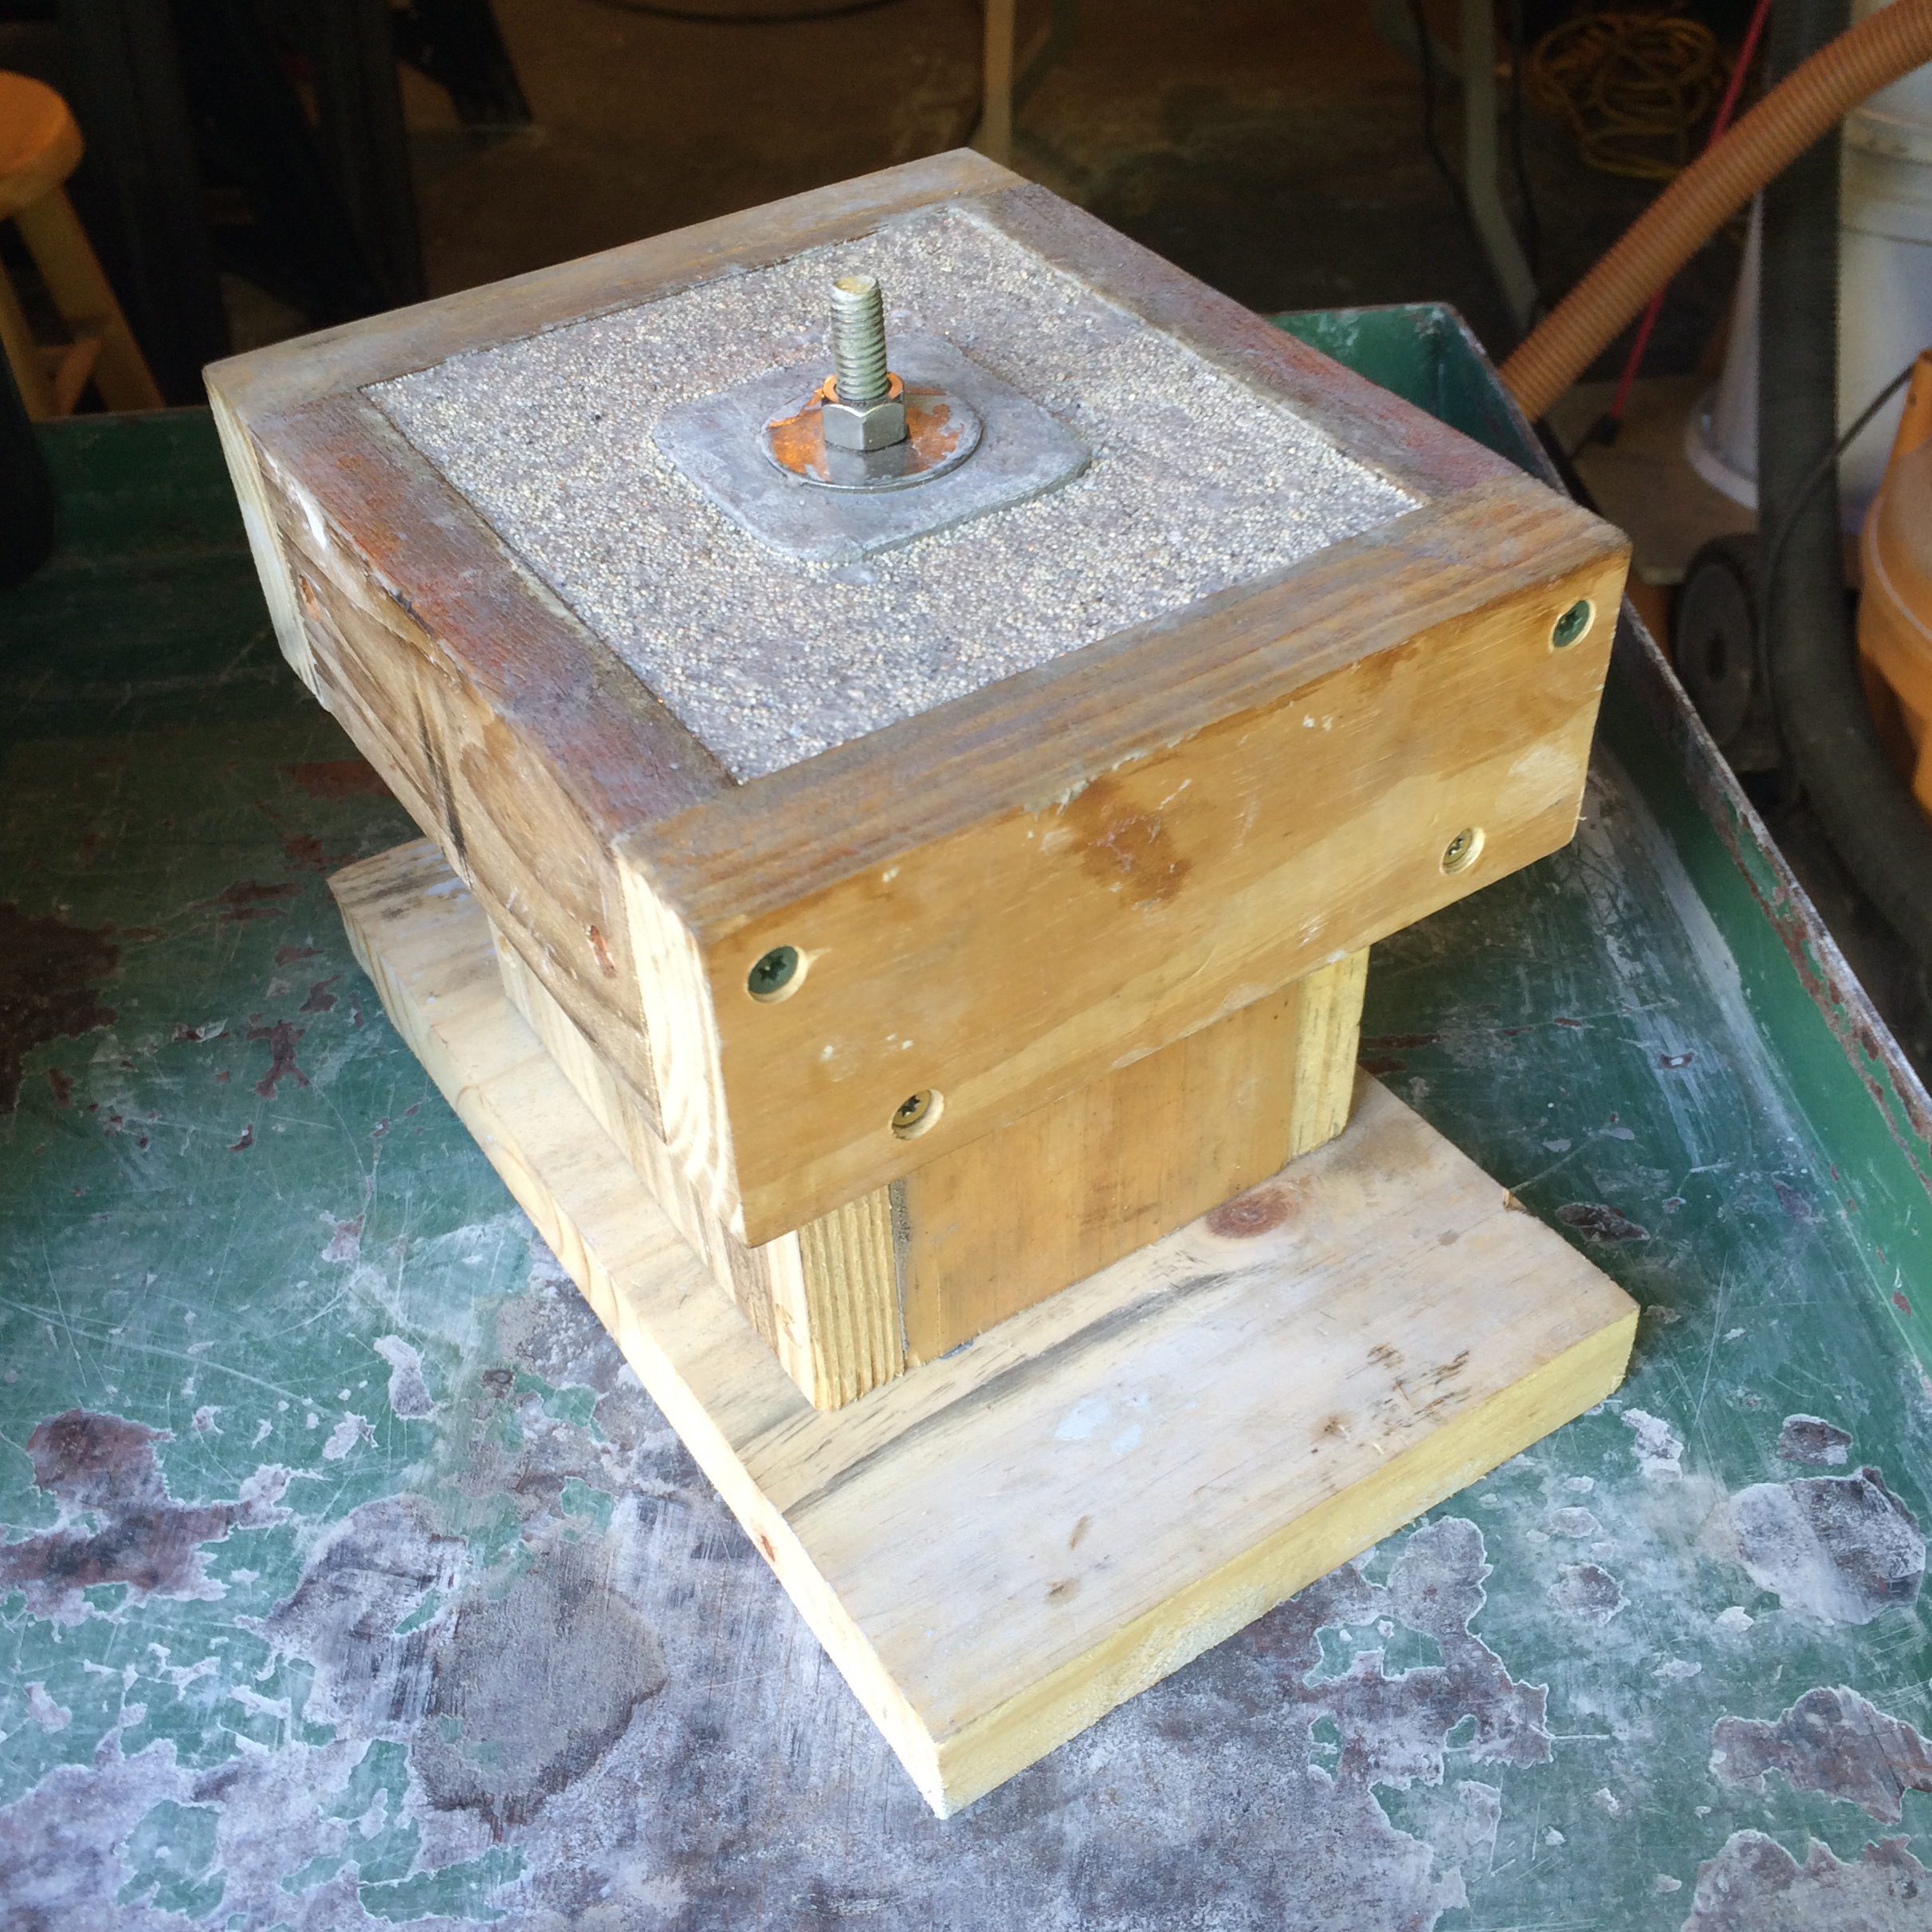
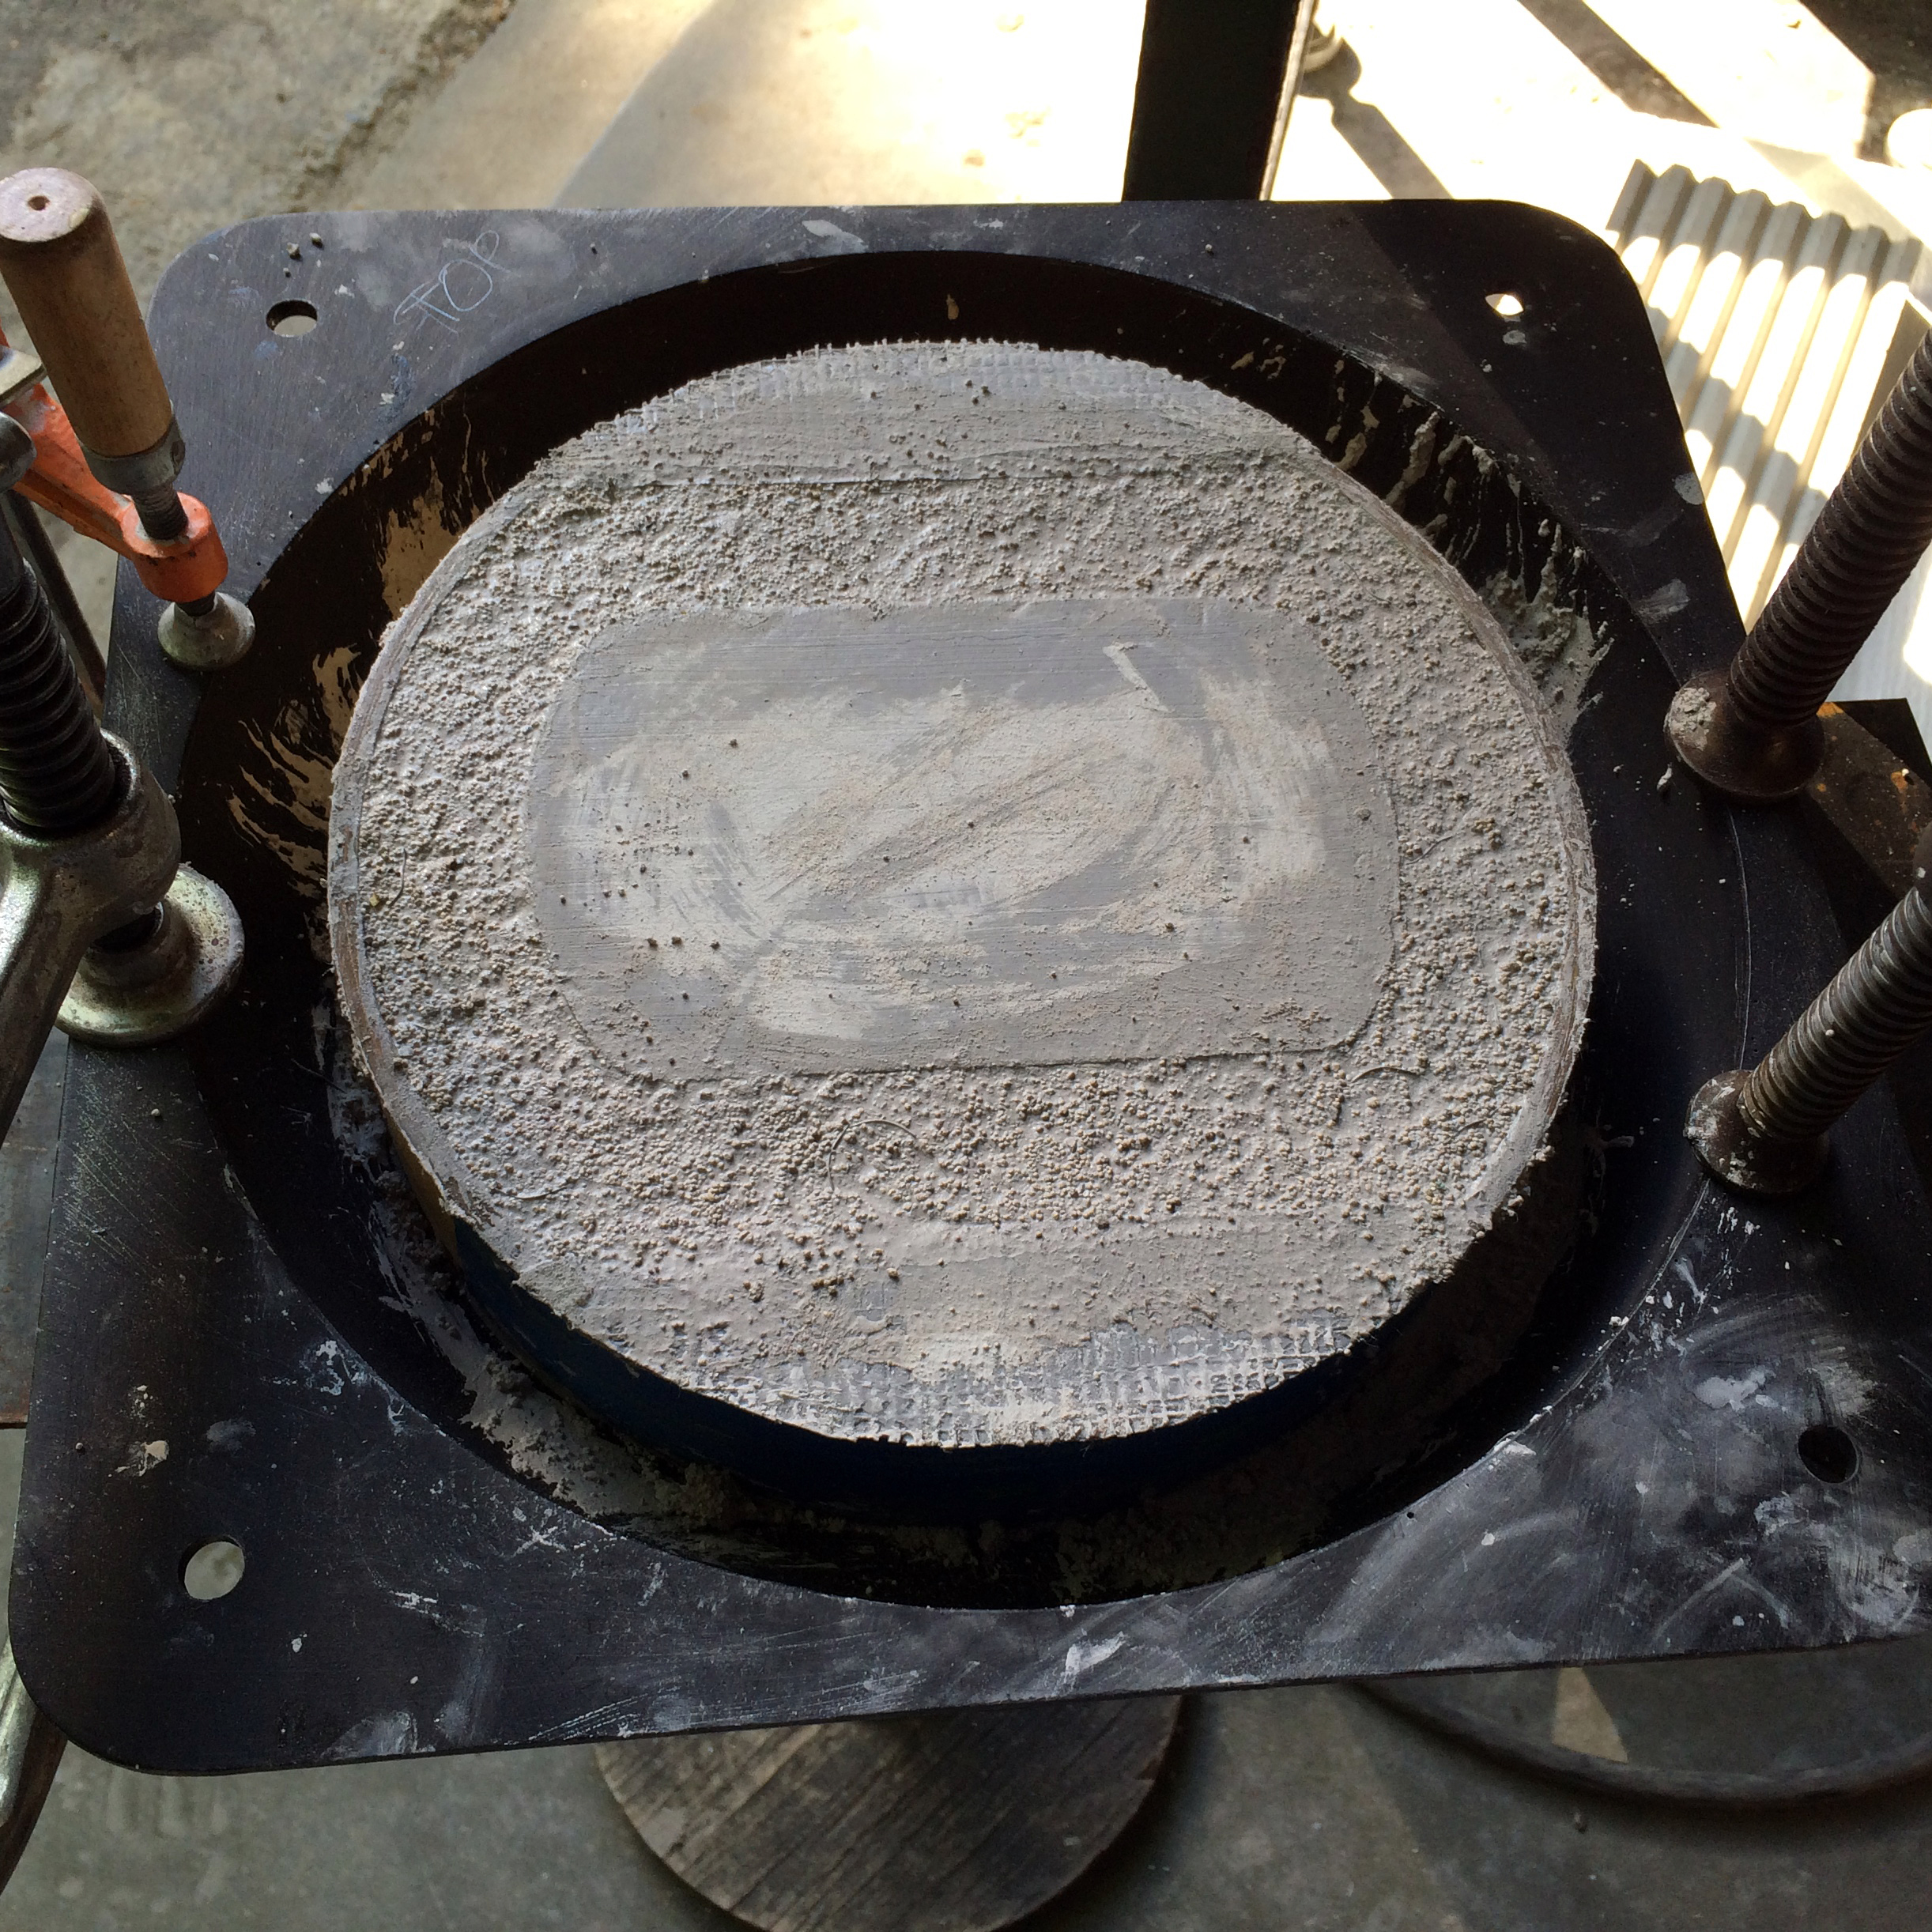
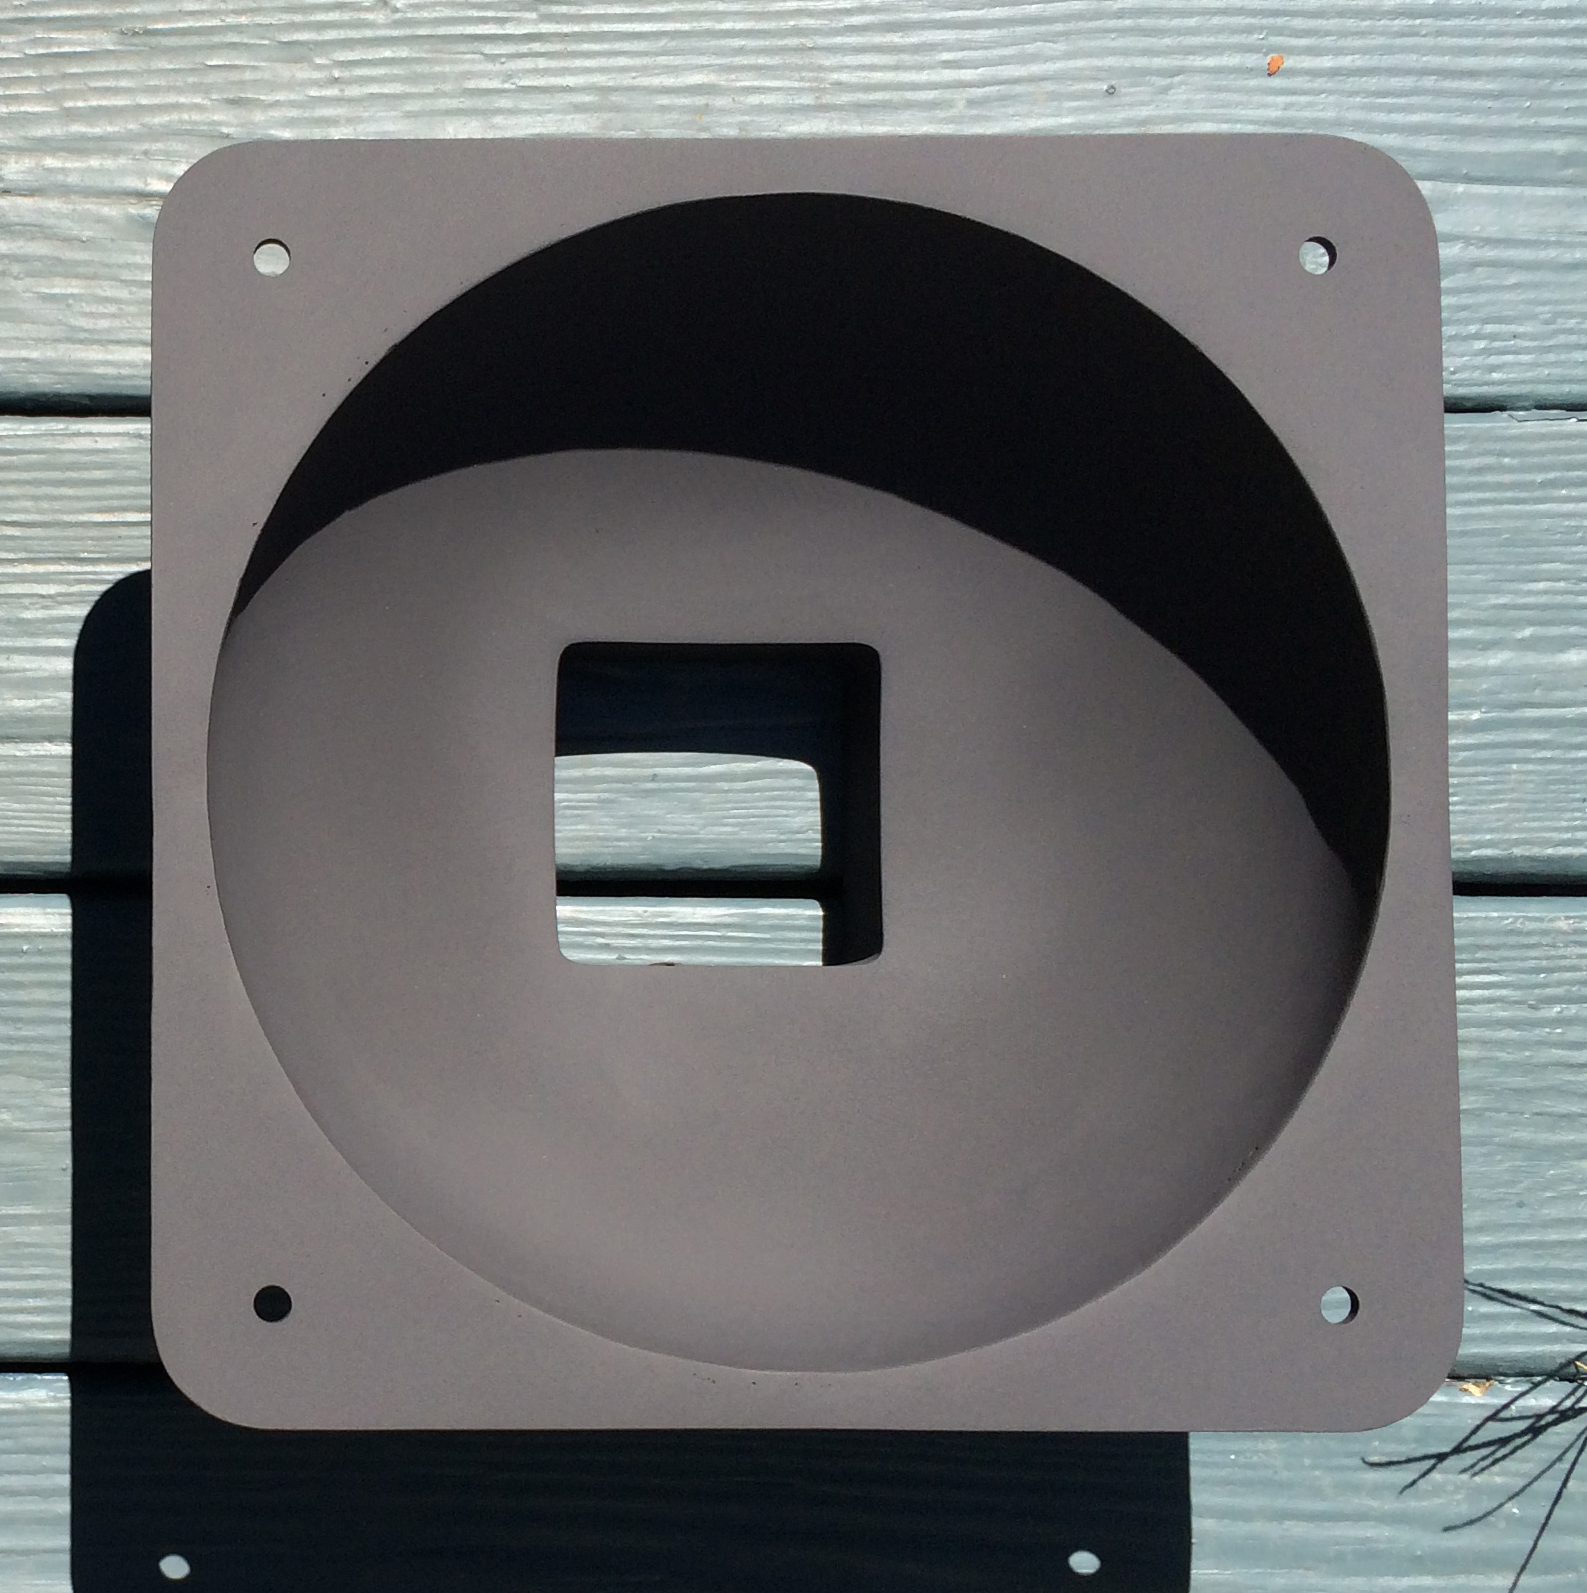
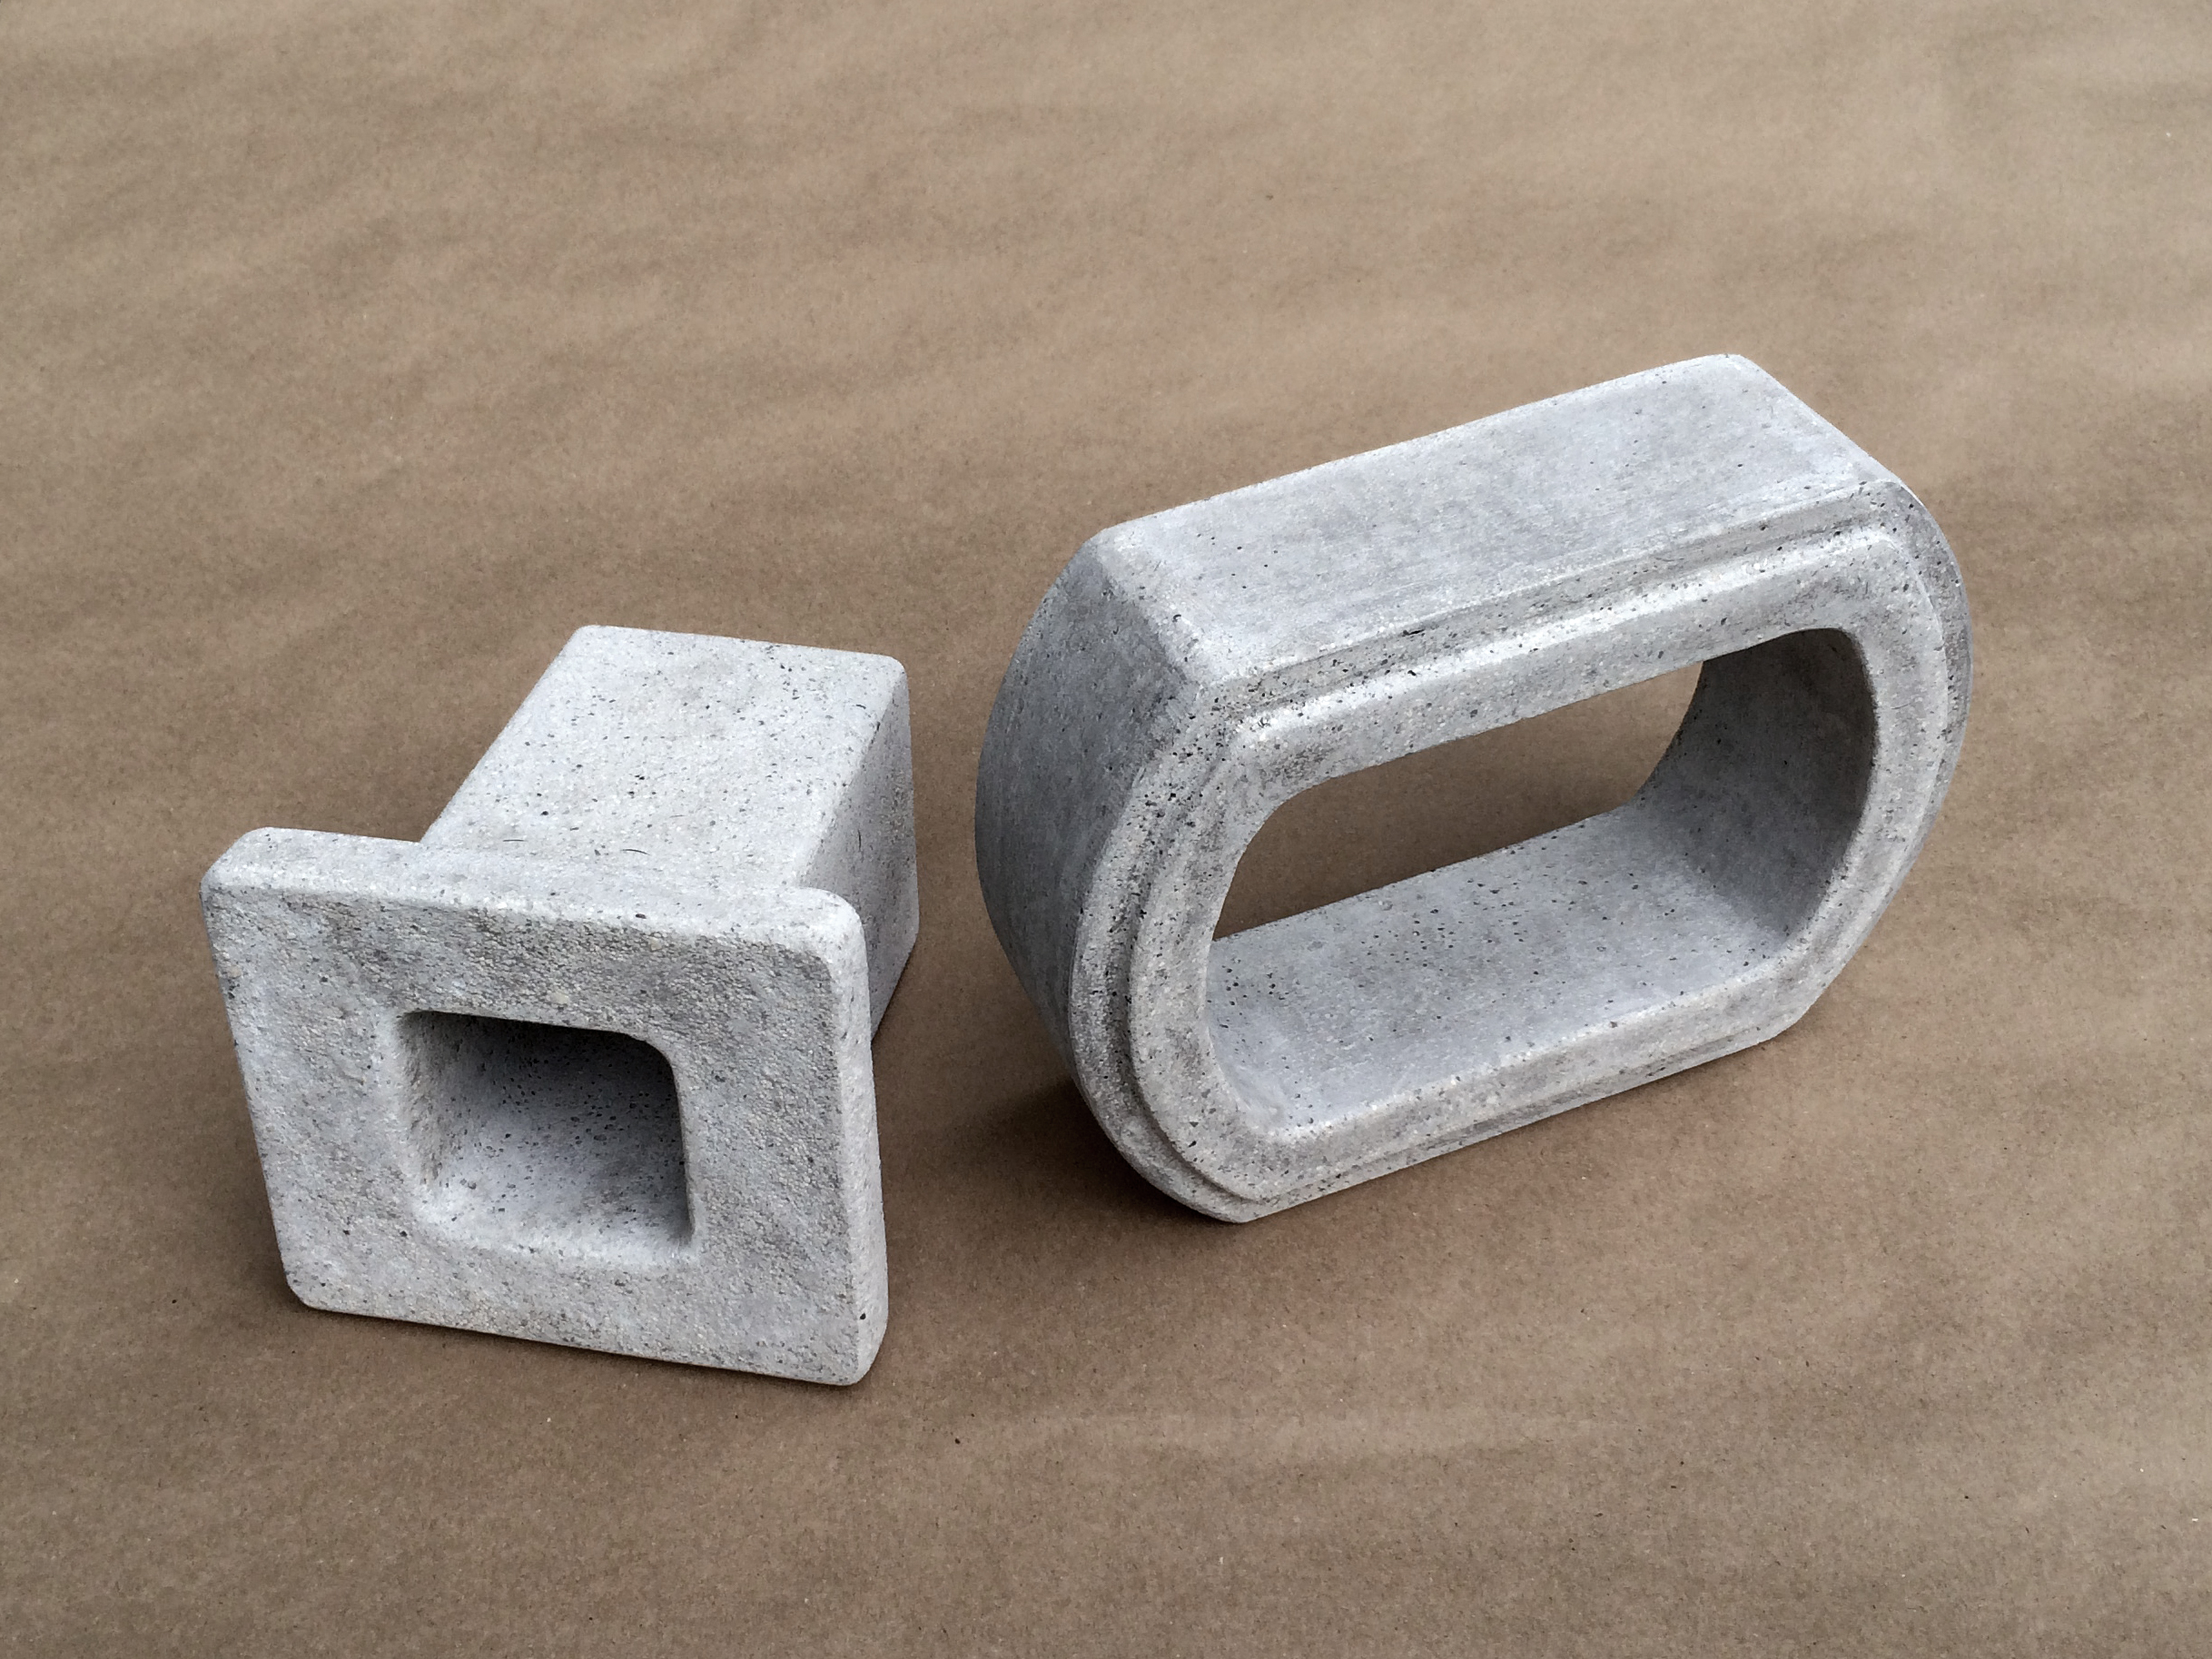
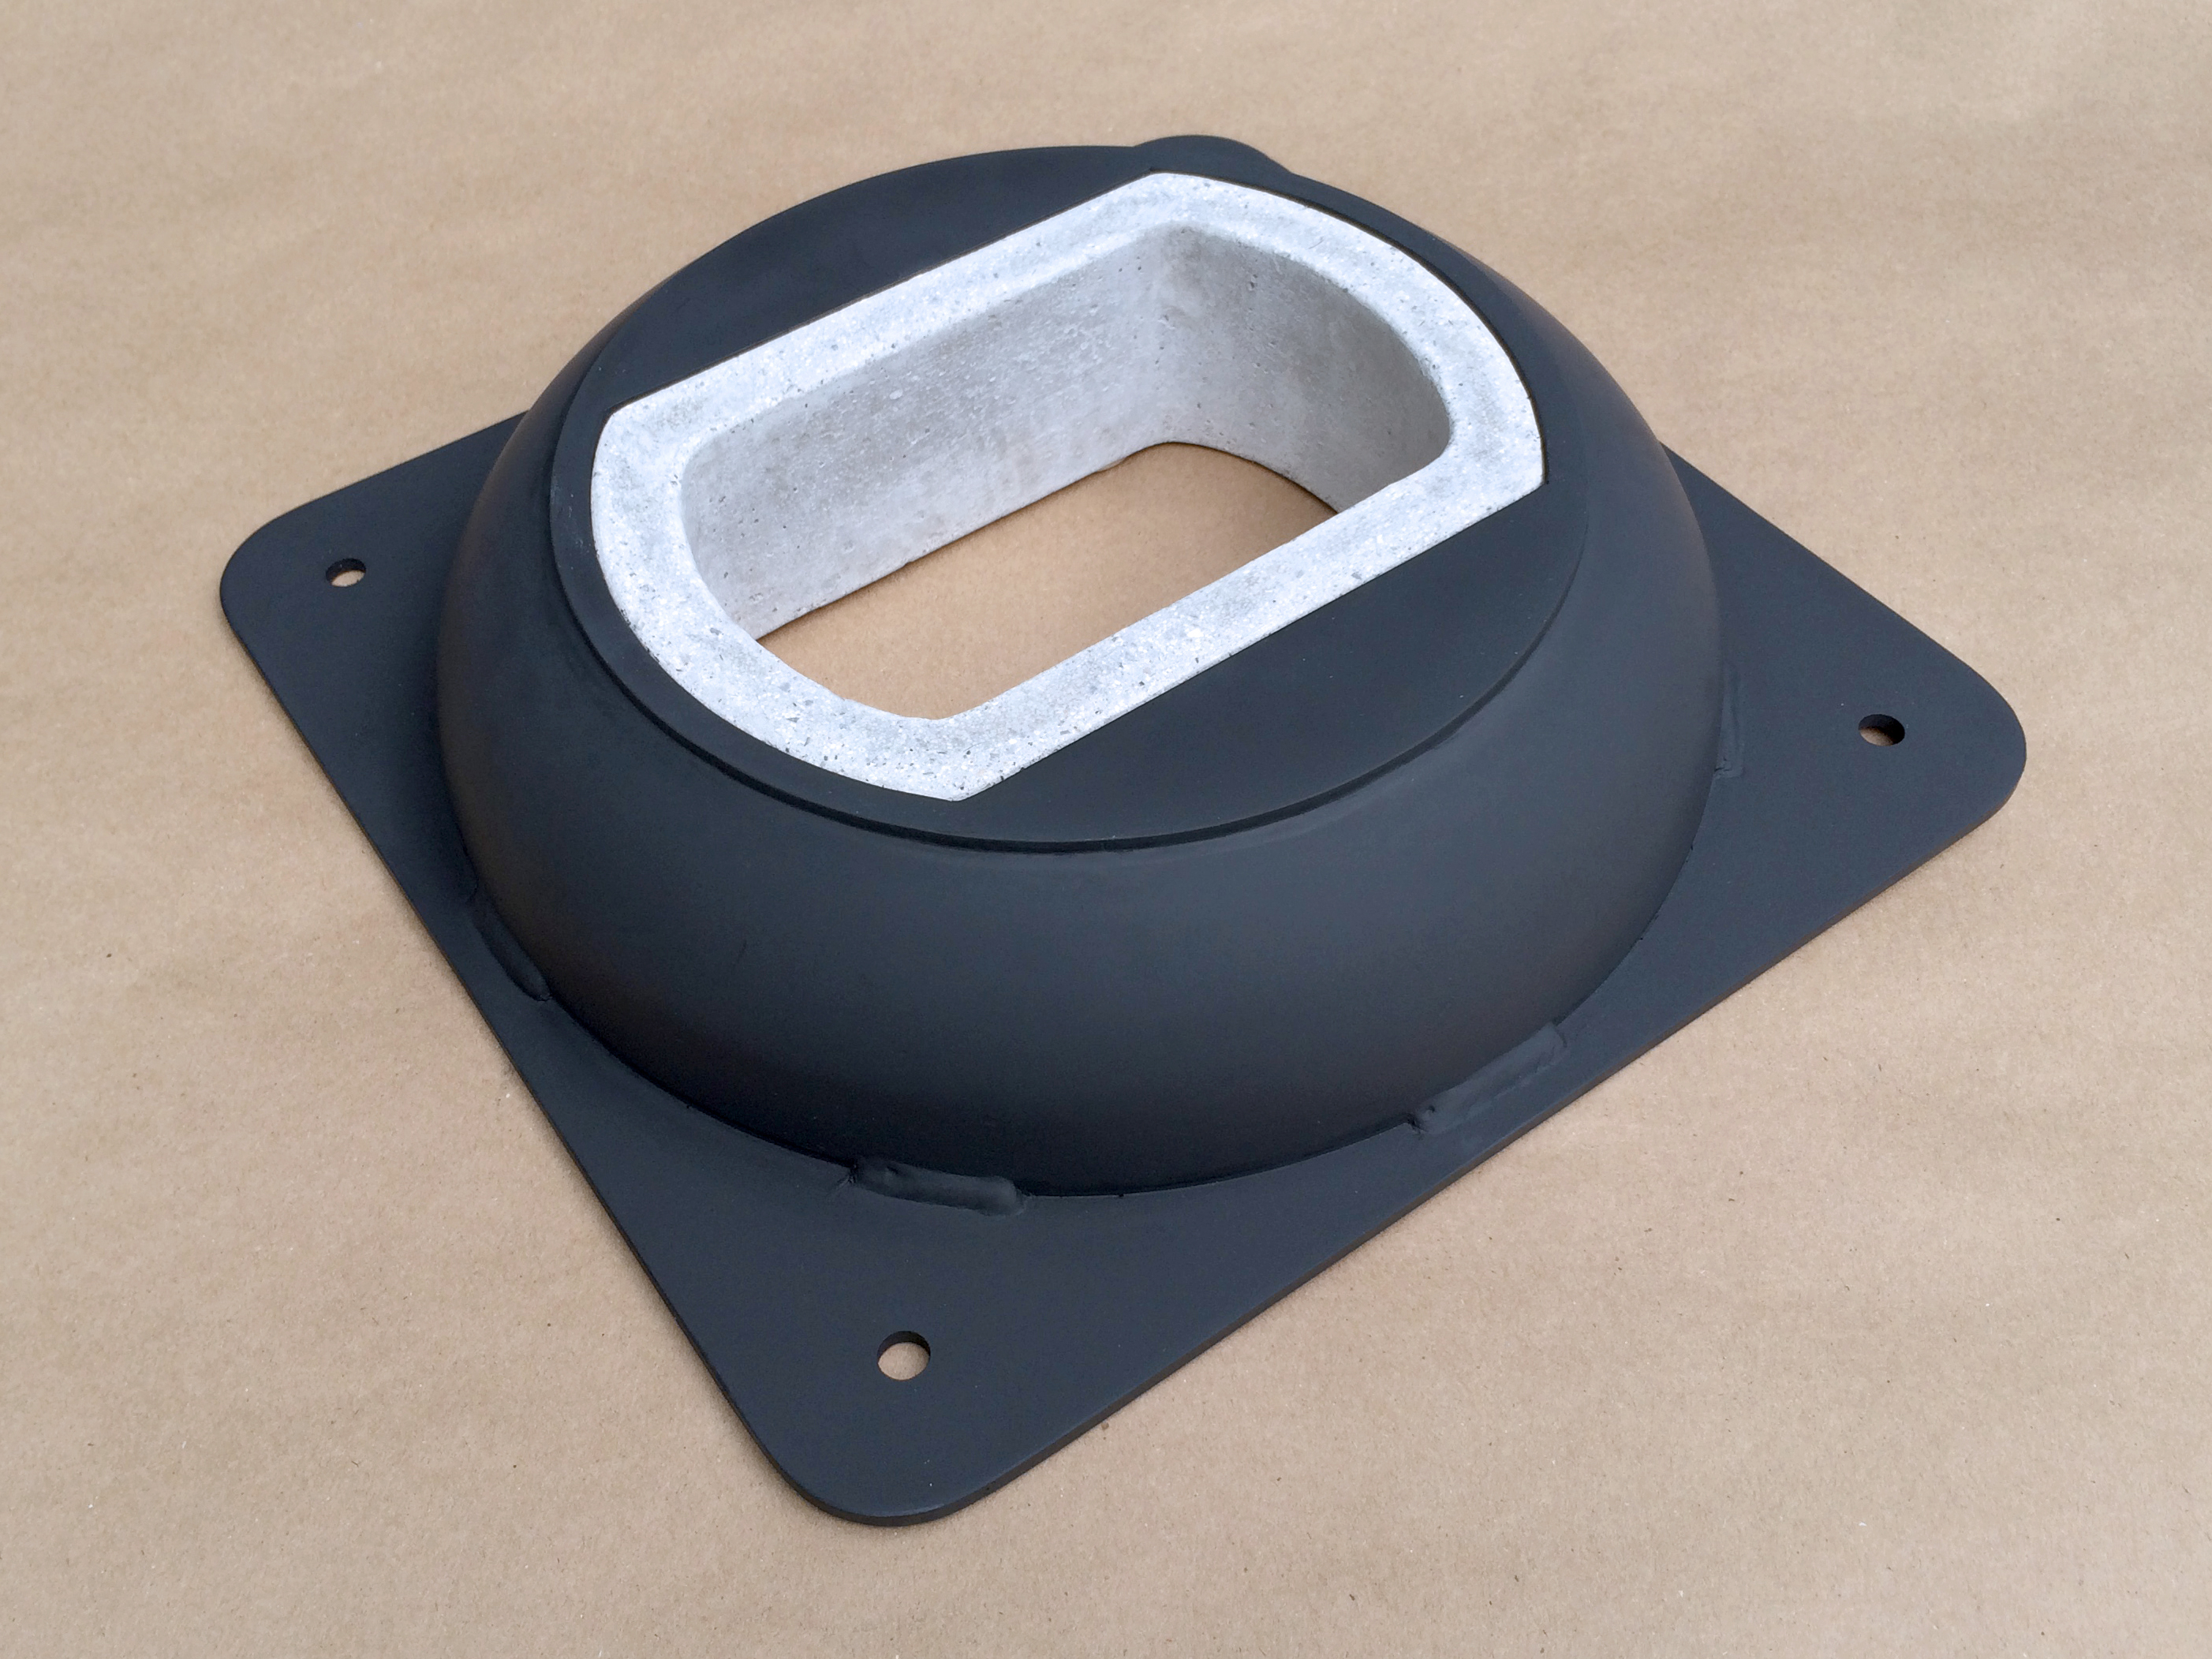
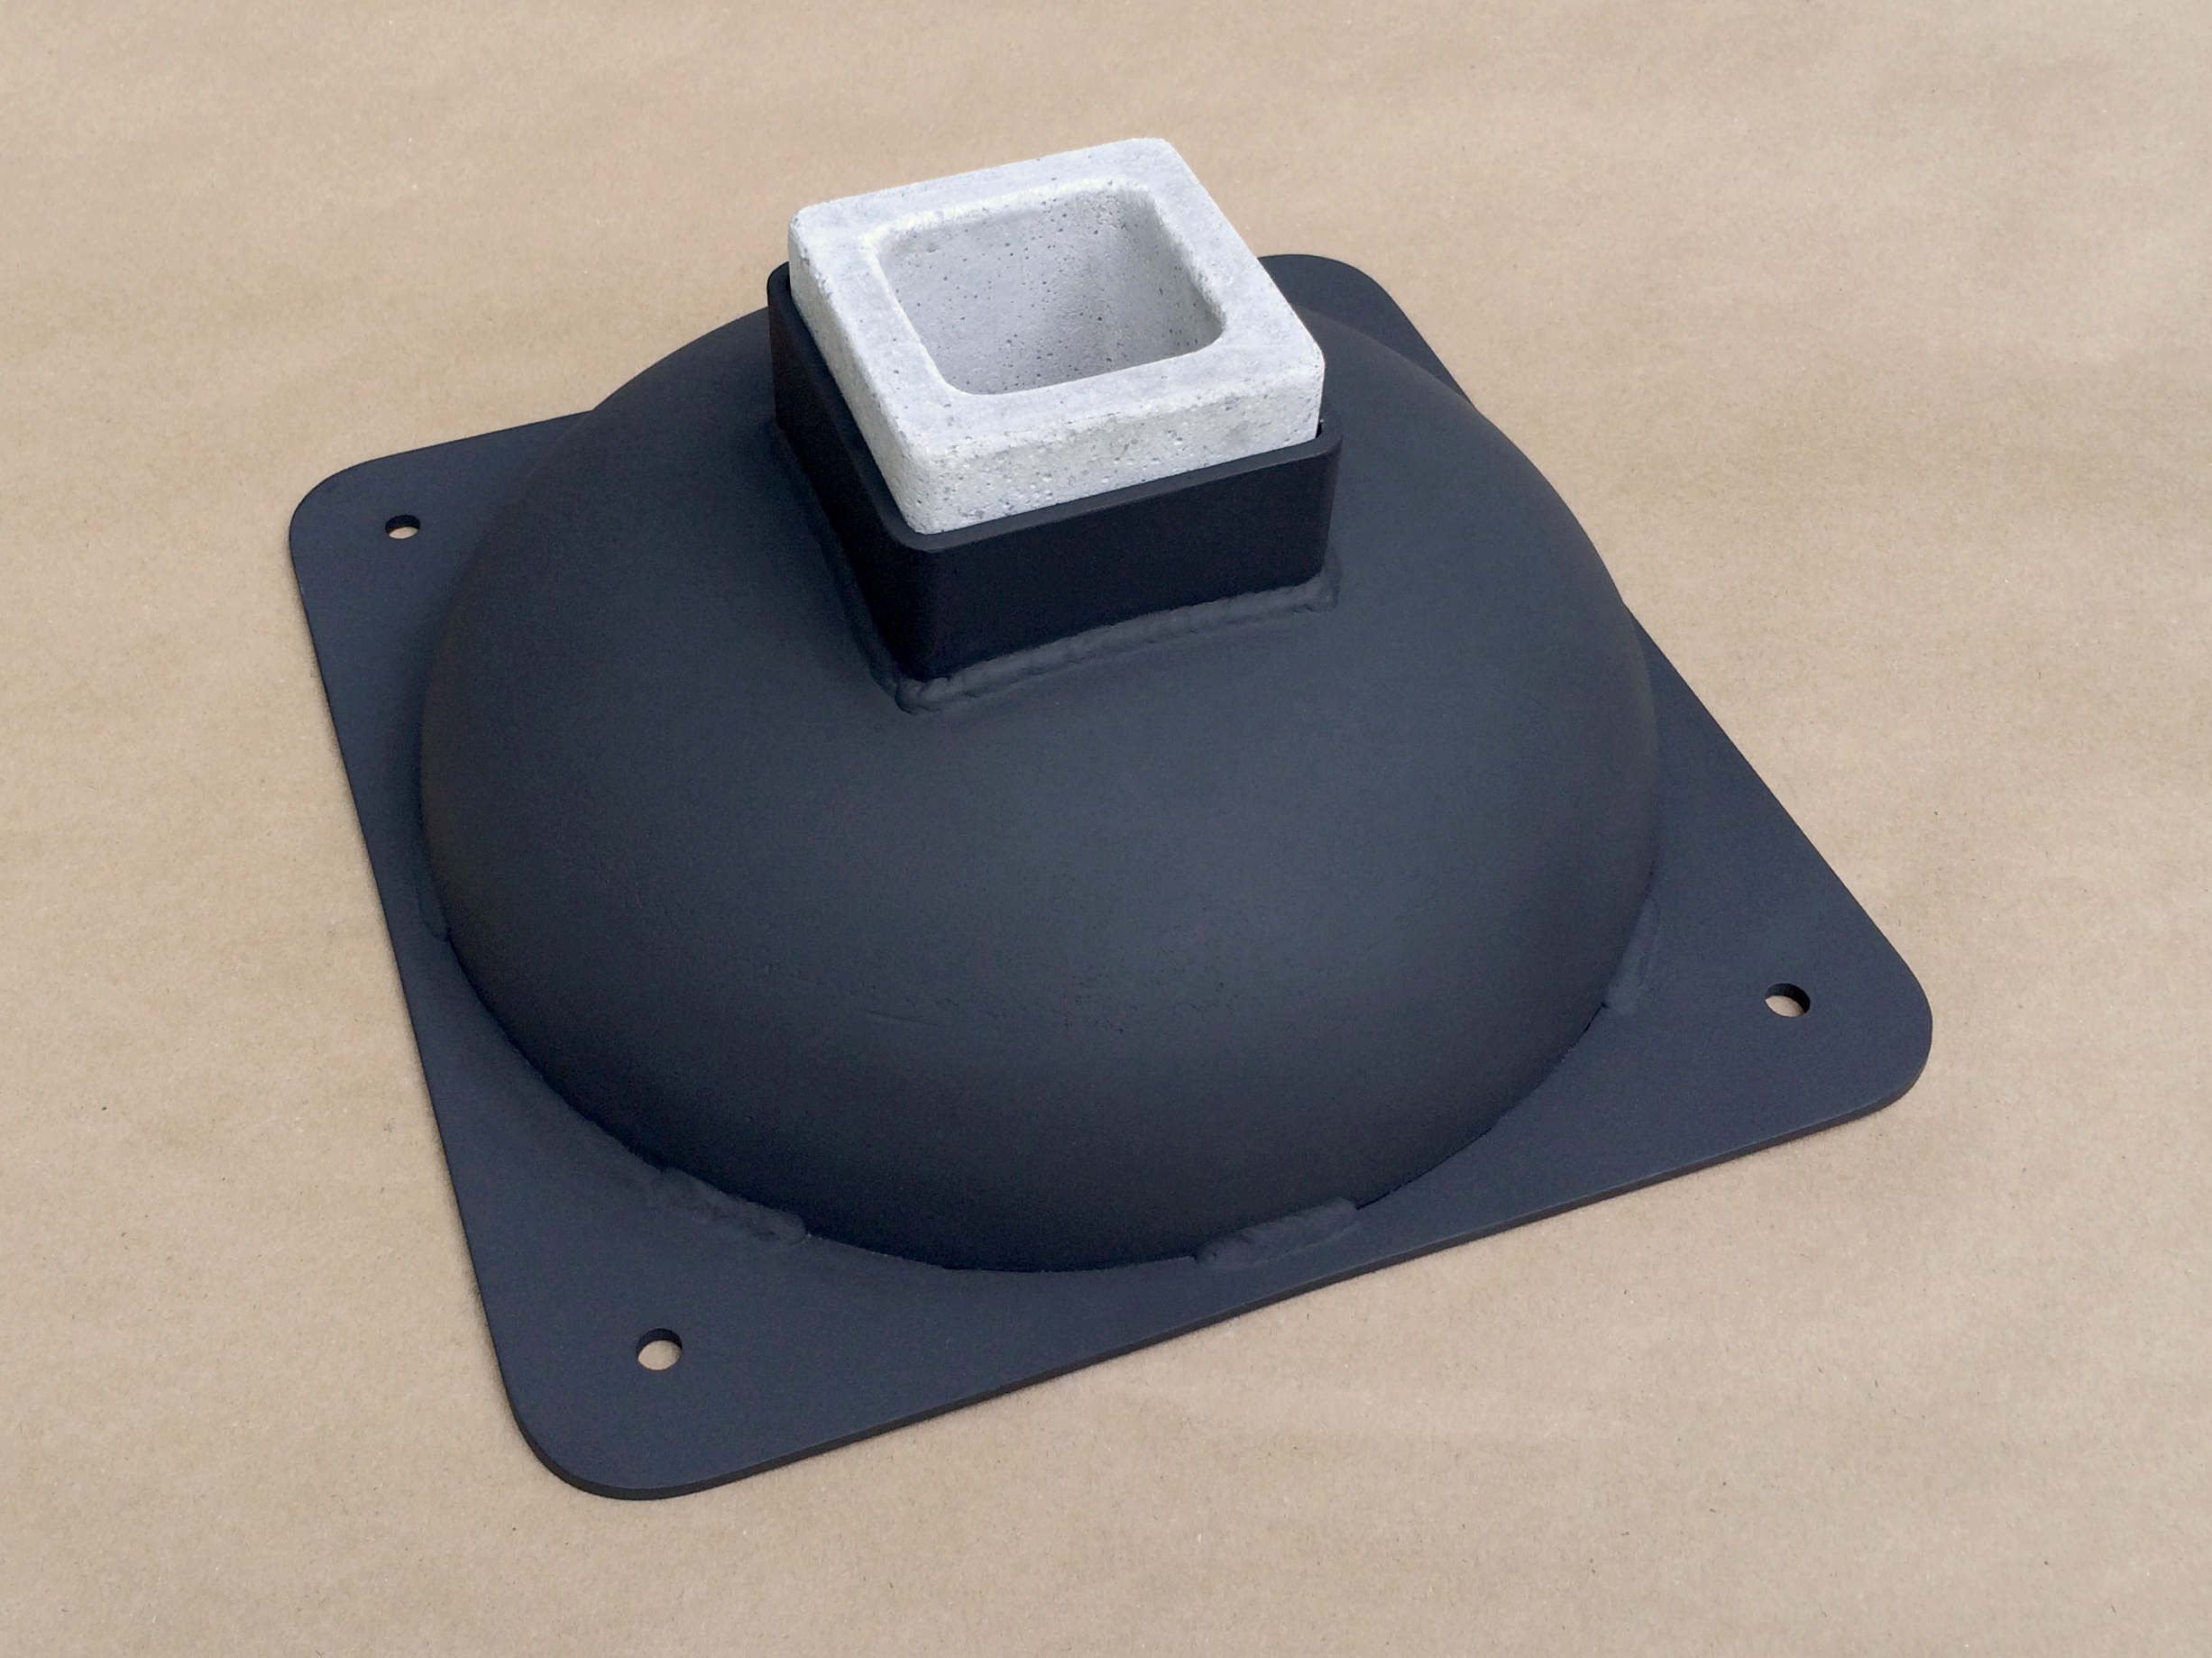
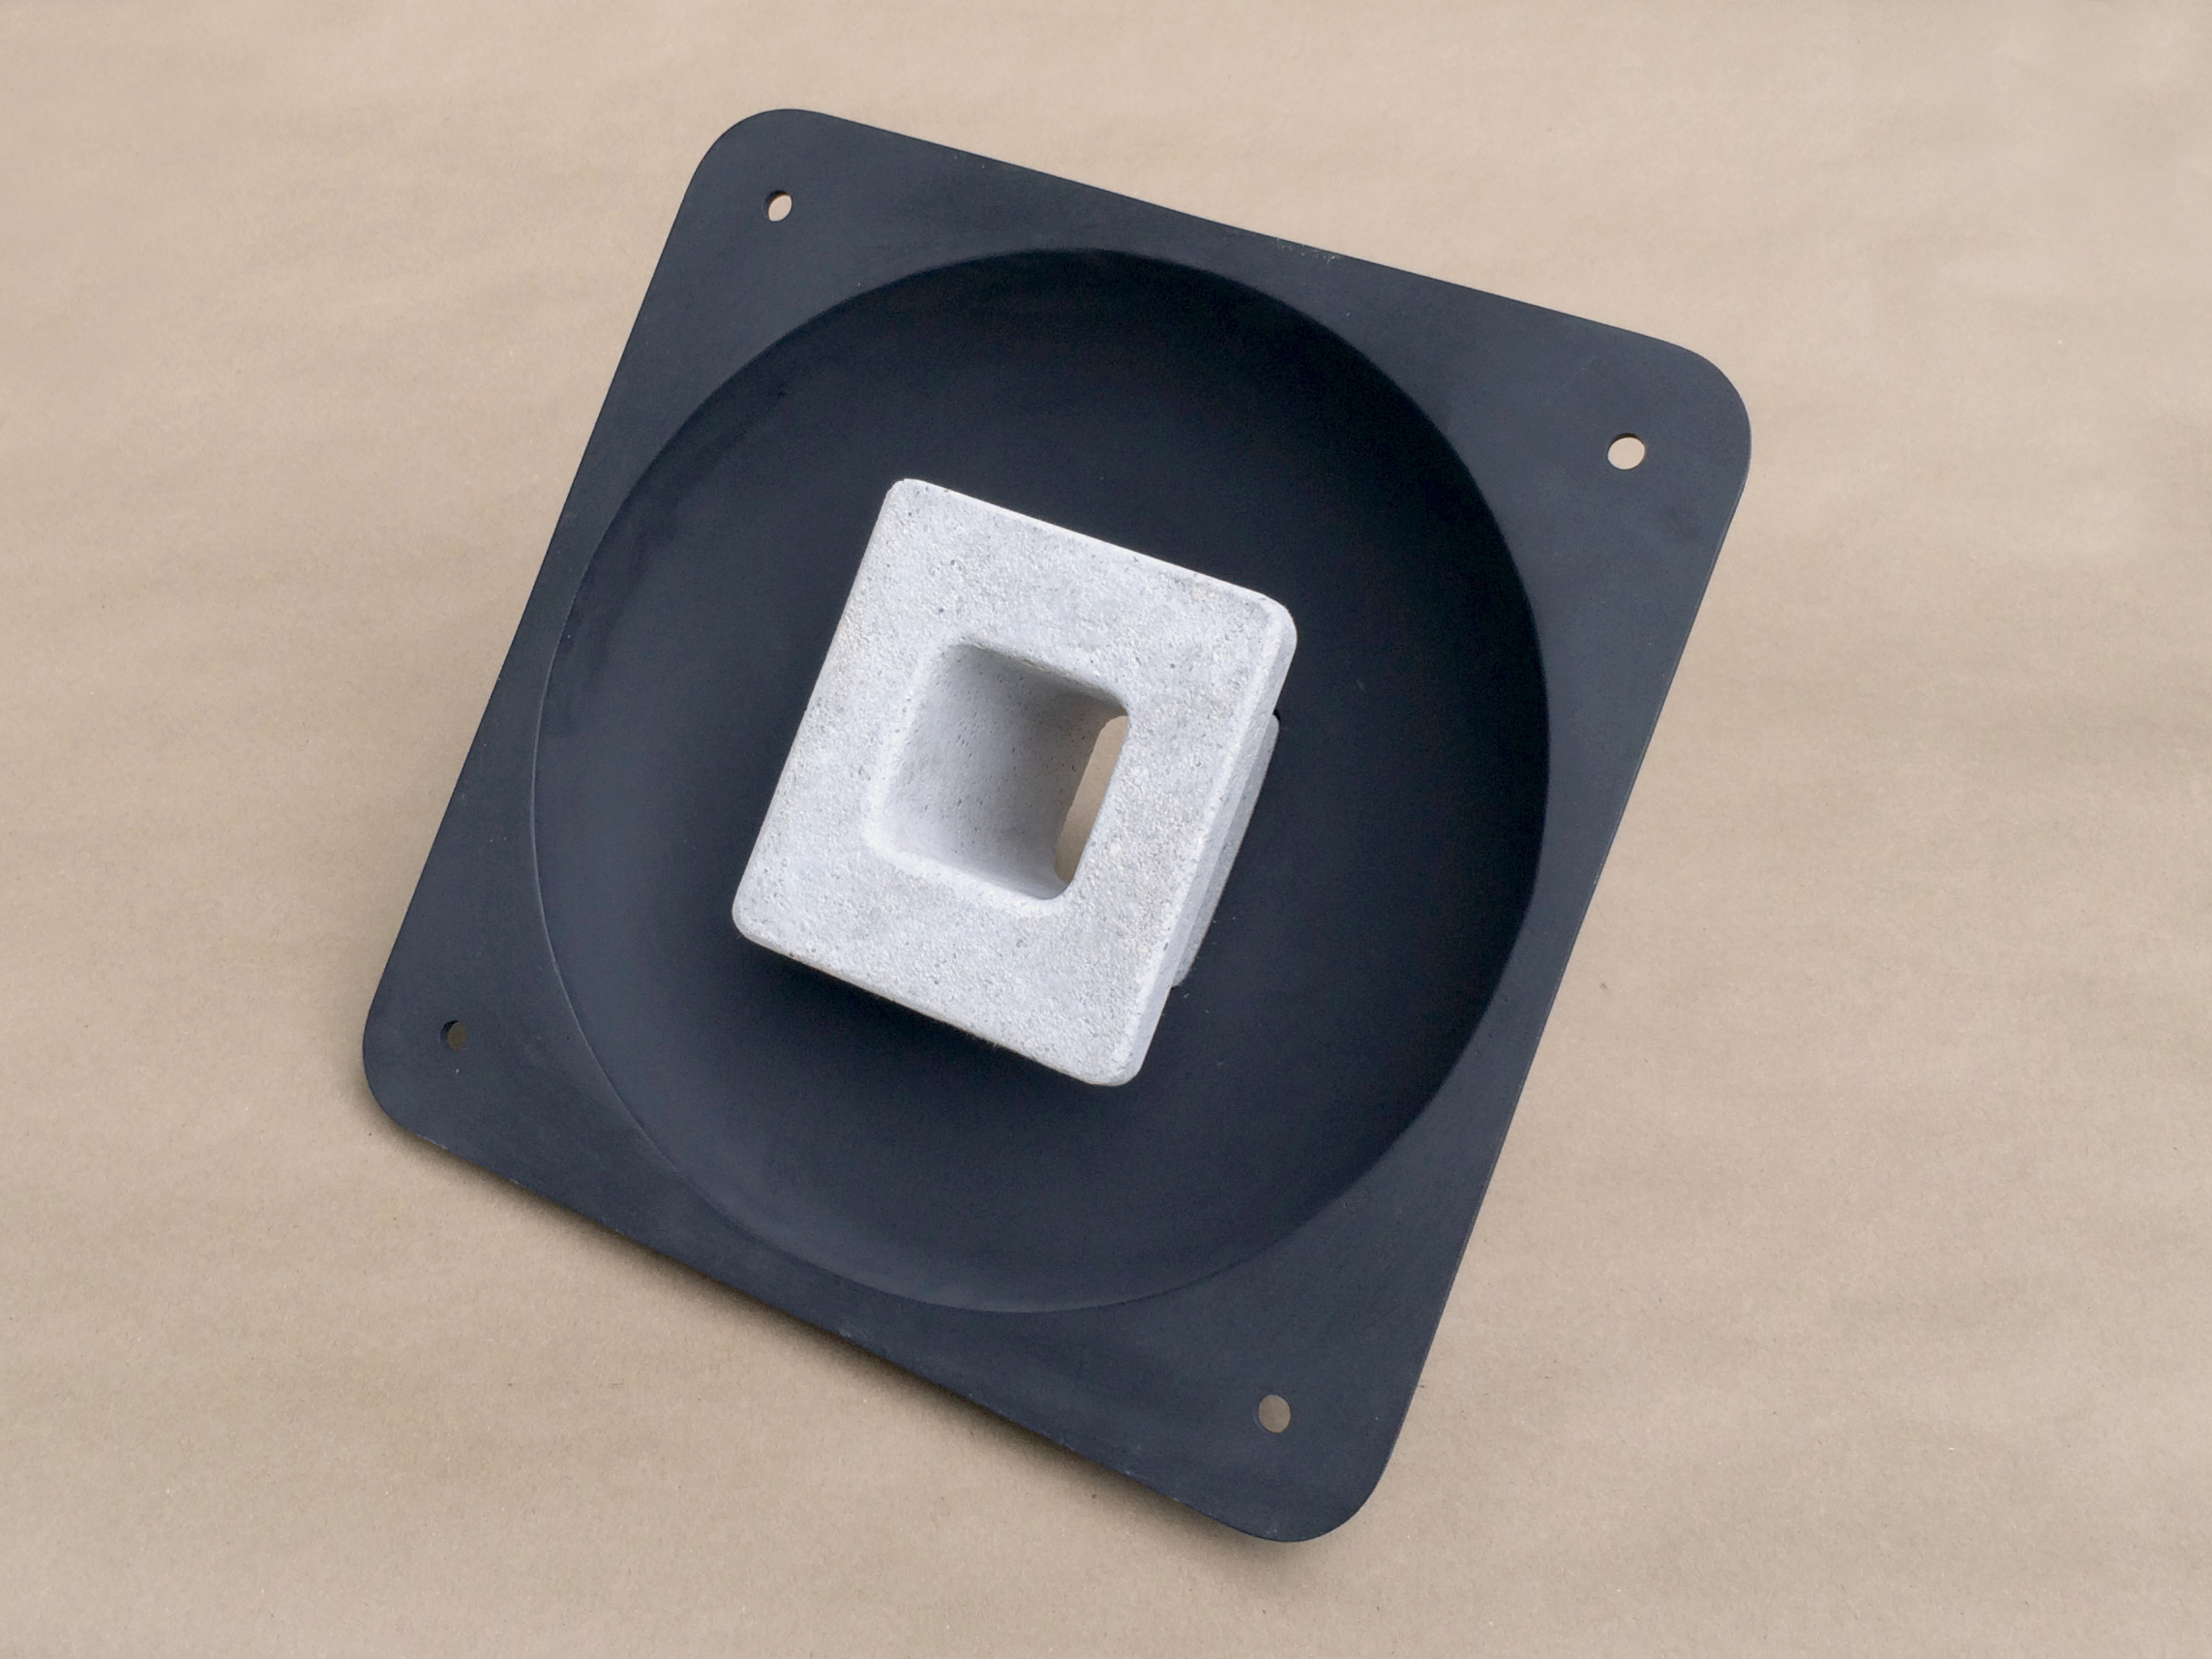
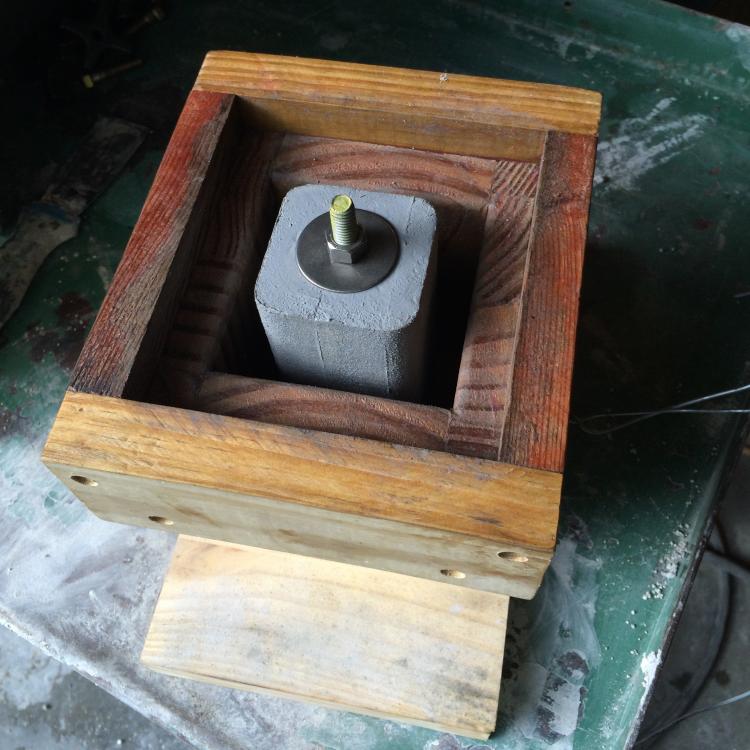
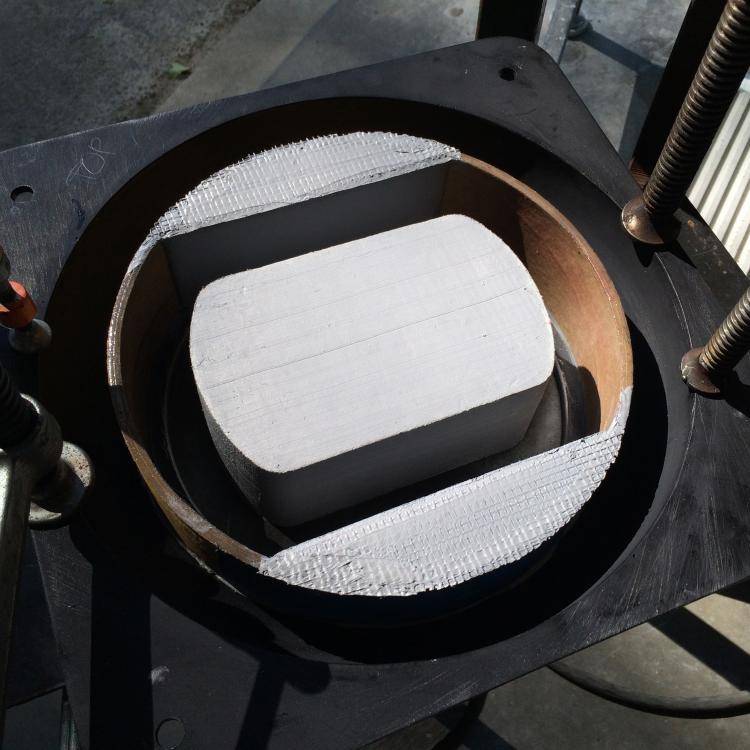
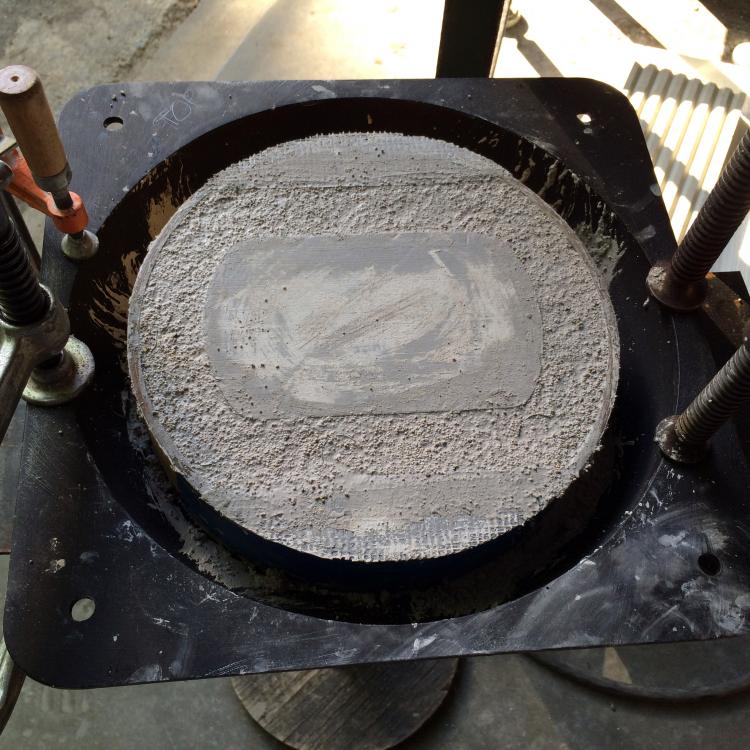
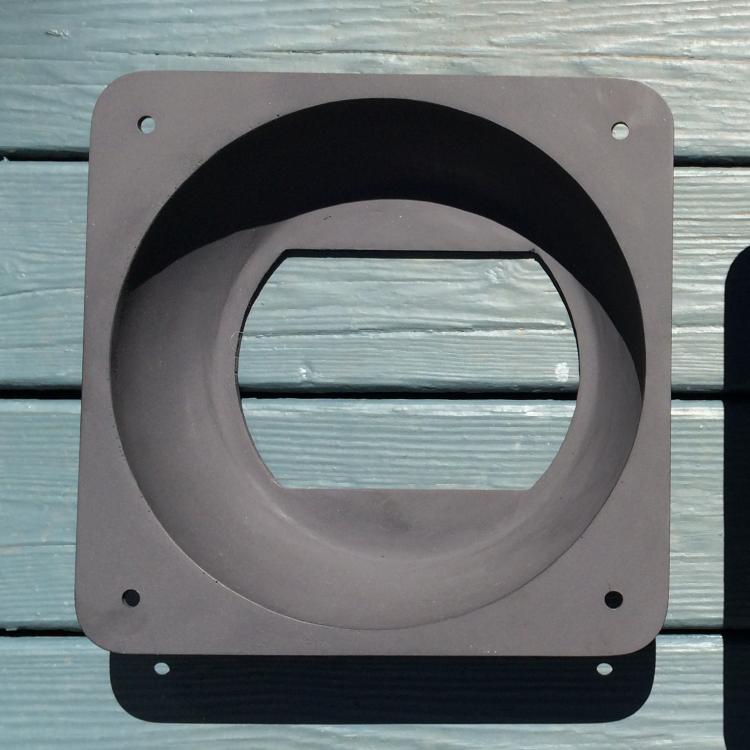
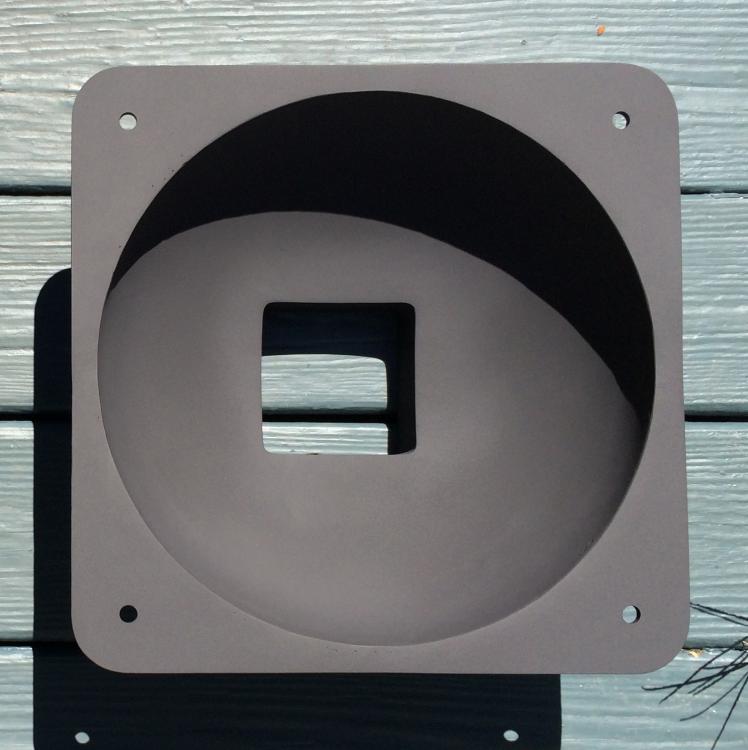
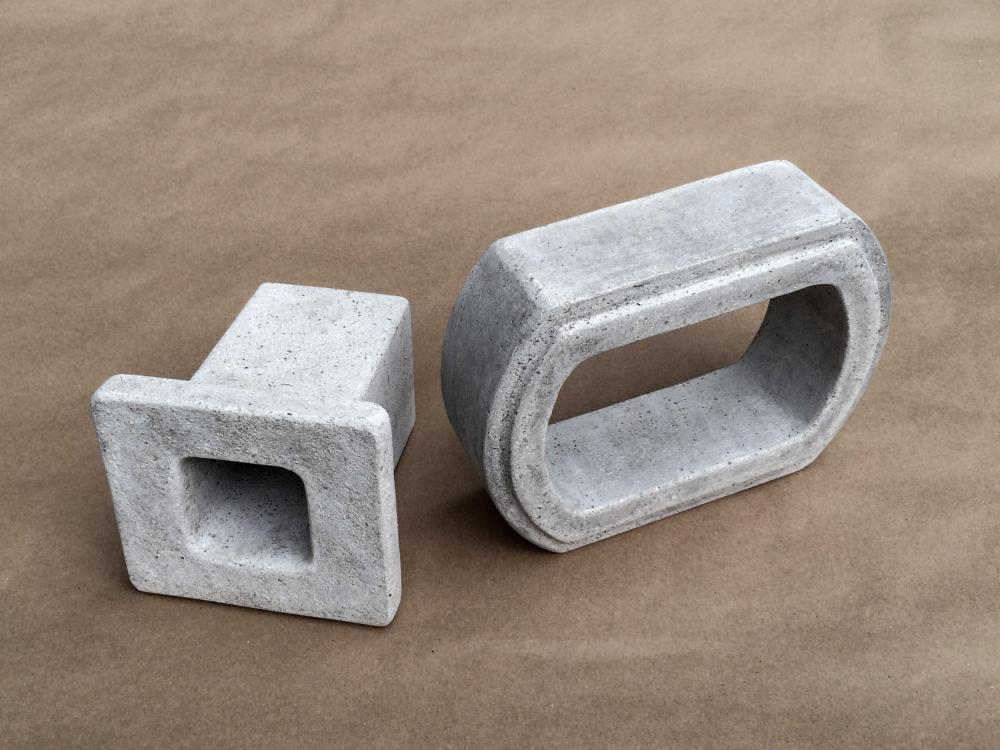
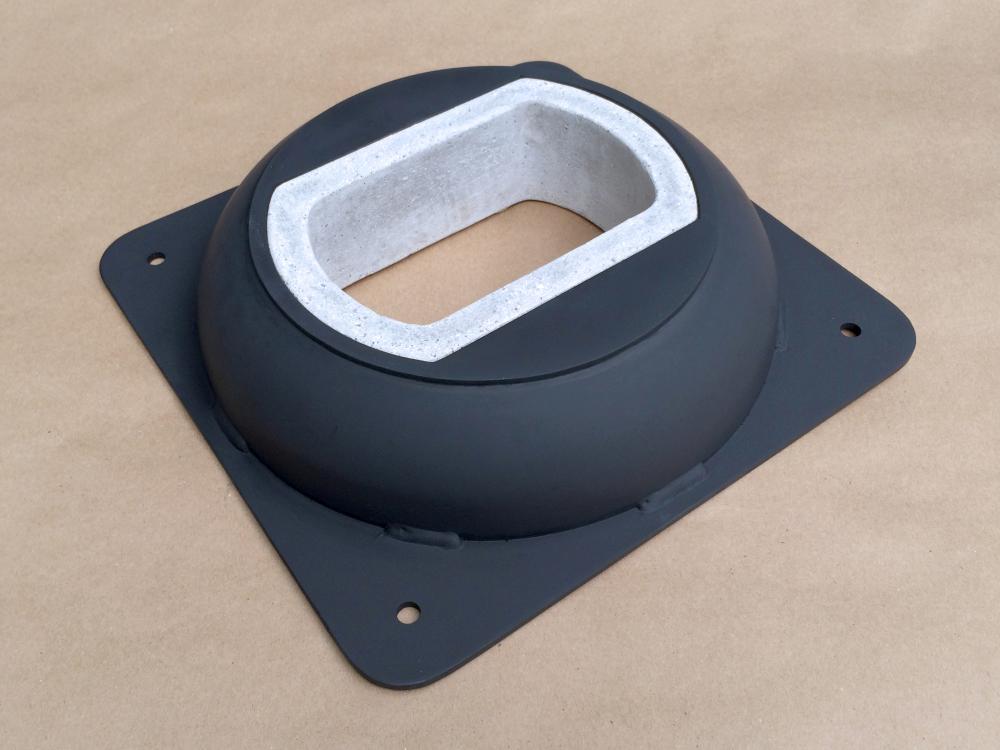
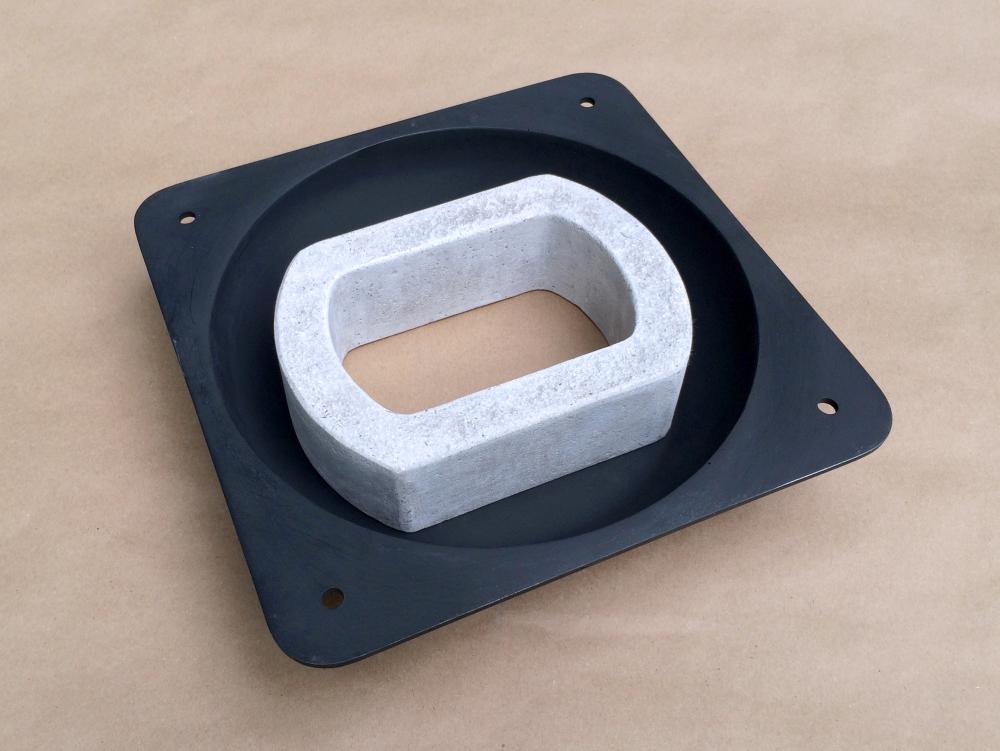
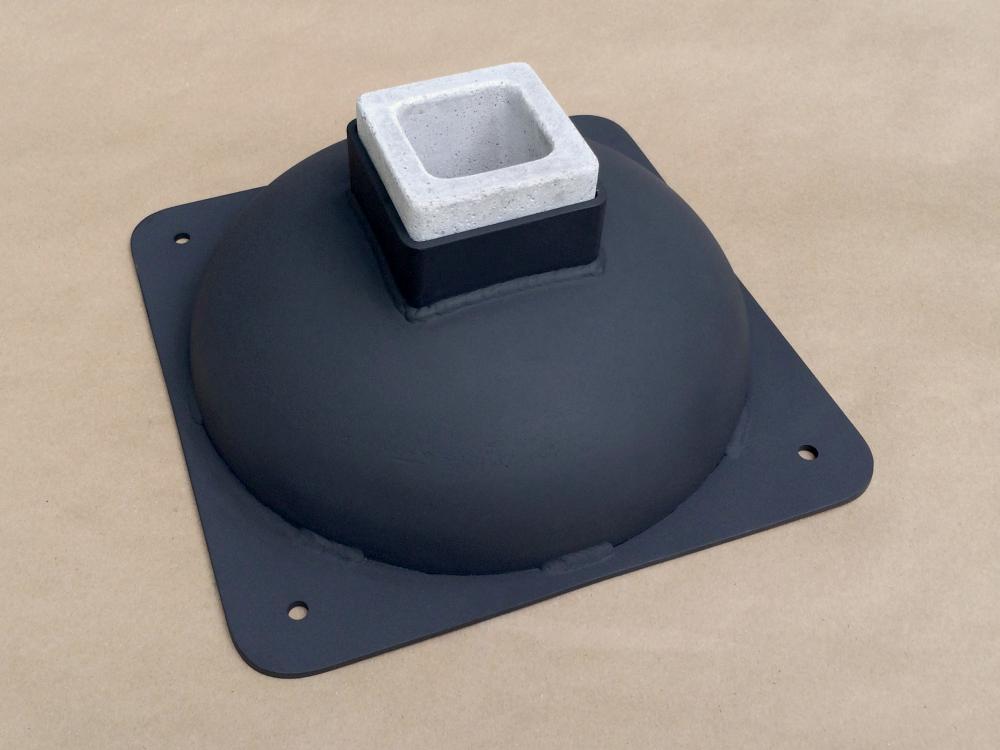
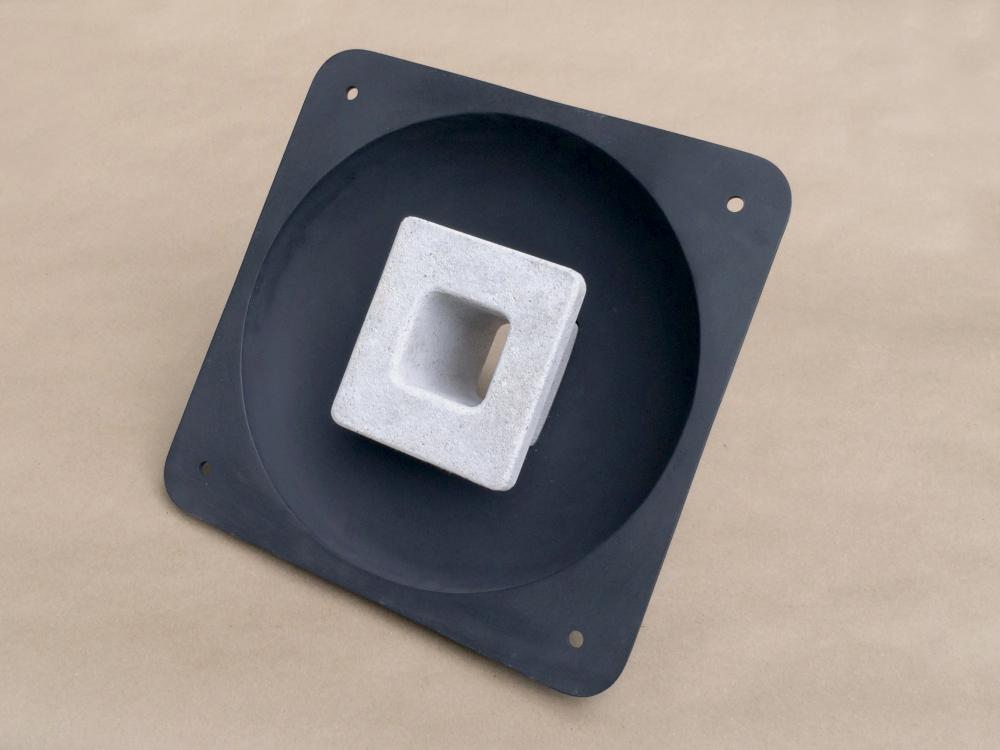
I have just finished casting a couple of sleeves (liners? collars?) to protect the front opening and the rear pass-through port of a gas forge that I’m building. I opted to use Kast-O-Lite 30 LI, which should provide durability and some insulating value. This is the first time I’ve used this product (and the first time I’ve built a gas forge), so this is basically just part of an experiment, and NOT a recommendation for anyone else, although I hope it is of some interest to the community. I'm open to suggestions, since none of these ideas are "cast in concrete," so to speak. I realize that there are easier and faster ways to protect the forge openings, but I’m not in a hurry, and I enjoy the design, fabrication, and experimentation aspects of my various projects. As long as I’m having fun and learning something, I don’t mind extra work. I'm building this forge as an "experimentation platform" to try out different insulating materials, burners, and other features, so I'm building it so that the front and back (the modified end-bells of an old tank) are both easily removeable. More about the forge itself later in another post. For now, this is just about the abovementioned sleeves. For the rear pass-through port sleeve mold, I cobbled together some scrap wood, coated the inside with several coats of carnauba wax mold release (buffed a bit after each application), and for a sacrificial core I shaped a piece of XPS (extruded polystyrene) insulation, which I coated with silicone rubber. I didn’t want any taper in the passage through the sleeve, and the XPS was easily dug out after the refractory had set. For the other mold, I used the front of the forge (the front end-bell of the old tank) for part of the mold, supplemented by three pieces of silicone-coated XPS and a doubled cardboard tube (Quik-Tube) temporarily adhered to the inside of the end-bell. I allowed for a little expansion room between the castings and the steel openings of the forge. I also put a radius on all inside corners of the castings to help reduce stress risers. After the castings were removed from the molds, I radiused the edges that would be directly exposed to hot exhaust gases and high radiated heat (I might increase the radius on some of those edges later on). All other sharp edges were eased a bit. A diamond file worked very nicely for the "fine-tuning" work. I’ve seen various types of “stainless-steel fibers” for castable reinforcement, such as needles, melt-extract fibers, hooked-end fibers, wavy fibers, etc., with needles being the type I’ve seen mentioned most often. However, instead of buying ready-made stainless fibers, I experimented with some DIY stainless fibers...about 2% in the mix. I don’t know if that’s an appropriate percentage for the fibers that I made, and don’t ask what the fibers look like...just yet, anyway. After I’ve used the forge for a while I’ll report on the success or failure of the castings and fess up about the DIY fibers I used. For now, suffice it to say that I used somewhat different fiber shapes for each of the castings. Frankly, in retrospect, I probably would have just purchased some off-the-shelf stainless fibers. I tried to come close to the manufacturer’s recommendations for mix-to-water proportions, and I tapped and vibrated the molds to the extent that I thought was appropriate, based only on intuition. If I had more experience with this castable product, I might have more specific recommendations. By the way, in anticipation of some questions, I’ve come up with a few workable approaches for supporting the sleeves in the end bells on all three axes while maintaining good insulation values and allowing for expansion/contraction, but I haven’t settled on one yet. I’ll post pictures when I do. It will probably involve the use of some ceramic insulating board, but that's about all I can say right now. Next, I’m going to try to match the recommended dry-out schedule for the castings as closely as I can. I've also thought about applying a coating of ITC-100 to the castings after they are fully cured and have been through a few firings of the forge, but I want to research that possibility before applying the coating. Has anyone here used ITC-100 or equivalent directly on a castable refractory, and what are your thoughts? Mold for the rear pass-through port sleeve: Pass-through port mold after screeding (I didn't trowel the surface): Mold for the front entry sleeve: Mold for the front entry sleeve after screeding: The castings: Inside view of the front end-bell (made by welding a perimeter flange and a flat front plate on the end-bell of an old tank...and wearing out a few sanding discs). The openings in both end-bells are actually centered; the camera angle just makes them look offset. Inside of rear end-bell (made by welding a perimeter flange and a square tube on the other end-bell of the tank): Front entry sleeve as it will appear in the end-bell: Inside view of front entry sleeve: Rear pass-through sleeve as it will appear in the end-bell (I may shorten the sleeve about 3/4 inch): Inside view of rear pass-through port sleeve: Comments, questions, and suggestions are welcome!

-
Good. Now you can get most of your money back when you return the extras. That should pay for more materials for your project. Steamboat
-
Goodness, what SPECIFIC stainless set screws did you order? What is the McMaster-Carr part number for them? Are you sure that's the price per piece, or did you actually order packages of them? Check your order. McMaster often sells items like that by the "package," with some minimum quantity of fasteners per package. Or, did you order some really exotic variety, like swivel set screws? Maybe I'm wrong, but I think it's possible that you might end up with a lot of extra set screws (they're good about returns, however). Steamboat
-
Welcome, Bigjobs. I joined the forum quite recently, but I'm not completely new to blacksmithing, and I've found that there is a lot of good information here (including "hints & tips" ). I'm sure that if you're interested in learning as much as you can, it should be a good resource for you. I had read many posts on this forum before joining, and I decided it would be helpful if I joined and started participating in some of the discussions, as well as bouncing my ideas off other people and contributing my own $.02 worth now and again. What are your areas of interest in blacksmithing? Steamboat
-
I understand the basic fluid mechanics and different purposes involved, although I'd propose a slight modification to what you said in your post. For my water well, the drillers were trying to clean out or widen existing breaks in the strata (the ones that already had a bit of water flow), rather than trying to break the strata (create new breaks). Perhaps that's what you meant; I just thought I'd clarify it a bit. It's one of those little obsessive things that stems from having labored as a tech writer way back in the Paleoproterozoic Era or thereabouts. I could be all wet when it comes to hydrofracturing water wells, but my non-expert take on it is that the pressure and volume required would probably depend on things like strata depth, strata type and tightness, number of existing fractures, and the area within existing fractures that would be exposed to high-pressure hydrofracturing water/fluid, etc. Lots of variables involved. I'll leave it to the drillers to figure it out. I'd love to see your naturally aspirated ribbon burner design. I've been reading up on them a bit, and I'm intrigued by some of the advantages they offer, as well as some of the design challenges they present. It's also a good opportunity to experiment with some different casting methods and materials. Steamboat Yikes! That was a scary enough experience to induce most people to take a desk job. Steamboat
-
I can't remember the specific pressure they used with the packer, but it does seem like it was a few thousand psi. I would guess that deeper wells in tight formations probably require higher pressures for hydrofracturing. I think I'm at the end of the "proppant" thing, too. And I should also clarify my previous post a bit: I am likely to go to the usual brand of cocktail parties, where dropping the term "proppant" would only generate an empty stare... Returning to the subject of castable refractories, I recently obtained some Kast-O-Lite 30 LI insulating castable refractory and began working up some protective liners or sleeves that I plan to install in the front entry and rear pass-through ports of the gas forge that I'm building, mainly to keep the steel around the ports from getting really hot, but also to provide a more durable insulating material around the ports. I'm planning to post that particular casting experience shortly in a new thread in the gas forges section. Steamboat
-
Actually, hydrofracturing water wells is done quite a bit in our neck of the woods. Many drillers here can perform that service. And yes, it's a water well, but it's drilled into bedrock and there's no casing at all except for a short length at the surface. The yield was pretty low right after it was drilled, and as I recall, they dropped a packer into the well and pressurized the appropriate portion of the well to around 3,000 to 4,000 psi, with the idea of widening and/or cleaning any existing fractures to increase the flow rate, which it did. I think it tripled the flow rate. As to "proppant," since I probably won't be attending any proppant conventions or cocktail parties, I might at least be able to put the term to use in a Scrabble game the next time I'm blessed with a couple of P's and maybe a blank tile. A new vocabulary word like this is 'prop'ably a good example of incidental learning. Steamboat
-
We had a 600-foot well drilled and hydrofractured some years back, and I suppose they must have used a proppant to keep the fractures open, since it continued to flow at the 'prop'er rate the next time it was tested. I would imagine that proppant granules must have to be pretty tough to avoid being crushed by the natural tendency of the fractured rock to close up again. Steamboat
-
"Proppant" is an important word to know if you're attending a proppant convention and want to blend in with the crowd.
-
I might allow a few stories...mostly true...to leak out from time to time. Steamboat
-
I may call a couple of refractory manufacturers next week and see what they can tell me about any fibers that they might be including in their mixes. If I hear anything interesting, I'll post it on IFI. Steamboat
-
Frosty, did you happen to test the "lint" (good term for the fibers) to see if it was actually ceramic fiber? The reason I'm asking is that a while back I separated out some lint/fibers from a castable refractory dry mix and found that I could melt the fibers with an ordinary electric soldering iron. I've since heard that sometimes a low-melt fiber such as polypropylene may be added to castable refractories, which may provide some benefits during the intitial dry-out/heating schedule through enhanced permeability. A quick online search brought up a fair number of references to the use of polypropylene in castable refractories, although I have not had time to have a close look at those sources. Steamboat
-
The ones I've seen use a nut on both ends, and I've seen them called out as "through bolts" in aircraft engine overhaul manuals.
-
"Thru-bolt" is probably an alternate way of spelling "through-bolt." The latter should produce more search results. Good luck determining the alloy.
-
That's absolutely true. I've run across a number of places with a scatter of bricks from an old fireplace. One problem is that they're often in bad condition, since they tended to be very soft and porous back then, so they absorb water, and and when they freeze, a lot of them tend to crack, spall, and sometimes just turn to powder. Bricks found below the frost line in excavations are often in better shape. However, I've also seen some good ones on the surface. The big issue, however, is that the kitchen fireplace is a really big fireplace, and it will require a LOT of bricks, and they all have to be the same type, color, and size, like the bricks in all of the other fireplaces in the house. They probaby would have come from the same brickyard originally. It's good to have all of the bricks match, not just for an authentic appearance, but for equal performance (expansion, contraction, adherence to mortar, etc.). Consistent size is also very important, especially with narrow mortar joints that will make even minor variations in size very apparent. I can't even remember when I last saw combo gas/electric fixtures...or where. In the 1800s it was very common to block off a fireplace opening and run a flue through the blocking wall and into the fireplace chimney to convert from fireplace heat to wood/coal stoves, and later, gas heaters. Actually, this saved the fireboxes in a lot of homes, since the fireplaces no longer had fires built in them. Of course, some later homes never had fireplaces...just flues for stoves or heaters. I had such a house in St. Paul, MN. I added a freestanding fireplace so I could enjoy watching some of Minnesota's hardwood go up in smoke while it was keeping me warm.
-
Yes, Thomas, I agree that the post hole banks/safes would probably have been within sight of their homes in most cases. Or perhaps under their homes in the soil in a basement or crawl space, or an empty void in a fireplace, etc. I figure that they probably would have wanted a location where there would be no obvious signs of recent activity. I would think that behind some selected stone in one of the ubiquitous stone walls might have been very unobtrusive, and they could have removed and replaced a stone without any obvious evidence of having been there. Most of the old farm fields in Maine were/are surrounded by stone walls made from the stones removed from the field to make it tillable, as I'm sure you know. I've learned a good deal about historic fireplaces from that era. I have a pile of fireplace books, and I was fortunate enough to spend a couple of days watching (and helping a bit) while one of the best-known experts in historic fireplace and brick restoration repaired some of our fireplace flues. I asked lots of questions, as you can imagine. I also spent some time with a local masonry restoration specialist, who was very forthcoming with information as well. I repaired several of the hearth springer arches off the main chimney arch, designed a very nice chimney cap (not an original design, but it isn't too obtrusive looking), and poured a new base for the planned kitchen fireplace replacement. So I'm gradually gearing up to build a very authentic-looking kitchen fireplace. The new fireplace would "look" authentic, but I would use a modern flue liner and maintain code clearances to wood, etc. It would also have a separate flue for the beehive oven, but you would not know that to look at it. One of the tricky things is to find authentic old brick, as well as firebrick that looks like old brick, since the original didn't have anything that would qualify as 'firebrick' today. Most of the bricks from the original kitchen fireplace had been hauled away and sold before we bought the house. You can get reproduction brick at a pretty hefty price, but I may have found a good source for some of the real stuff (but don't ask who or what the source is). It's narrower than the usual brick sizes we use today, the mortar joints are narrower, too, and the mortar used back then was a lime-putty mortar, although from what I've been told it can be slightly modified for a bit more immediate strength without changing its white appearance or making it harder than the relatively soft original bricks. The beehive oven located to the side of the fireplace can be a bit complex to construct, and as you mentioned, the fireplace and beehive oven could involve blacksmithing operations for things like the crane, door, hinges, door vent, handle, lintel, etc., not to mention cookware and cooking accessories, which could involve a LOT of time in front of the forge. I'm looking forward to getting to the point where I'm done laying brick and starting to make the iron parts. Heck, I'm still looking forward to when I can start laying brick. Oh yes, I forgot to mention that flue dampers have been installed in all of the currently-working fireplaces. I don't mind upgrades like that, which are not easily visible and don't detract from the historical appearance of the fireplaces. It would be interesting to see some of the cookware you've made.
-
Privy sites are usually good for artifacts, whether accidentally dropped, like coins and popped buttons, or broken items like crockery and other items discarded down the hole. Animal bones and other food remains in the privy are good for clues as to their diet, etc. If the house is old enough, there could be multiple privy sites, since the outhouse might get moved over a new pit when the old pit started to fill up. The ground immediately around our house has been re-contoured in recent decades, so old privy sites would be hard to locate from depressions, since there aren't any. An older neighbor can remember when our house had an outhouse, and earlier ones might have been in the same general area, but she only remembers its approximate location, so you might say it's kind of a 'crap shoot' to discover their locations. By the way, your mention of a specialized "blacksmith craftsmanship" image database is an interesting idea...worth some thought. Oh, yes, I know that the property has a lot of historical potential and many secrets yet to be discovered and interpreted...you're right about that...it's mainly a matter of time and resources. Since I retired, I'm so busy with various projects/pursuits that I seem to have less free time than when I was working full time. The propane forge that I'm constructing is just one of many activities, and I'm also trying to fit in some other historic research and archaeological excavation work, not to mention home restoration and half a dozen other projects. I'll say one thing though: it's far better to be busy than bored, so I'm not complaining.
-
I can't recall the specifics on the coins. My wife put them away somewhere. I'll see if I can find them. I think one of them was a large one-cent coin. The next time I'm up at the old house...probably this weekend...I'll dig out a box with some of the items we found and see what might be of interest to blacksmiths. There are a few hand-forged items. Other things that turn up around the property are old bits of rusted farm implements, most of which are relatively recent (early to mid 20th century). Maybe I'll post a few photos. Most farms had a dump site or two where discarded equipment and other things tended to end up. A lot of metal was collected and recycled back in WWII, but not all of it, as evidenced by several piles of "rusty treasure" here and there on our property.
-
Ausfire, it looks like a crankcase through-bolt from a small aircraft engine. I don't know what specific alloy it is, or if different alloys were used for through-bolts for different engines or by different manufacturers, but perhaps you could contact a manufacturer and narrow it down. Here's an example of something similar. http://www.aircraft-specialties.com/thru-bolt-1-2-20unf-x-10-75-long-sa641931-10-75/
-
Lou and Slag, just to clarify... When I find hand-wrought nails, they don't necessarily indicate any specific date range, since hand-wrought nails have continued to be used to varying degrees far into the era of machine-cut and wire nails, but my point was that it does tell me that the nails could have dated from a very early period, whereas if I find machine-cut nails, it tells me that the nails themselves are definitely later than my date range of interest (late 1600s to early 1700s), and a structure associated with those nails is "probably" not from my date range of interest, unless it was constructed over an earlier site, or if the structure was modified or repaired at a later date, using machine-cut nails. If I find a lot of hand-wrought nails and NO machine-cut nails, that is even more interesting to me, as it increases the likelihood of an early site in my date range of interest, even though the site "might" be later. It's getting late...I hope that makes sense.
-
Ah yes. That could enter into quite a discussion about dating structures from nails. I have quite a lot of material on nail history. Quite interesting, and there's some gray area here and there, in my opinion. But that's probably a subject for another topic.
-
Finding old nails...I know what you mean. They turn up everywhere around here, outnumbering pop tops by about 20 to 1. "Another nail! Arrrg!" On the other hand, if I find any totally hand-wrought nails (not made by the early crude nail machines), that is potentially good news, since I'm always looking for sites from the late 1600s and early 1700s. I'll see what I can find out about the blacksmith in Goshen.
-
Even today, the house is located in a very rural area. The nearest gas station is about six miles away, and the population of the whole township is about 700, scattered over a large area like many Maine rural communities. A trip to the bank would have been time consuming and not a day-to-day undertaking. Who knows? Maybe there's a little hidden cache somewhere on the 46 acres. They used to make bricks at the far end of the property, so that's another area to consider. And there were previous structures here and there which have been torn down over the years, including a few barns whose foundations are barely visible now. I haven't had time to explore the brick-making area yet, other than a quick surface reconnaissance. I wouldn't be looking specifically for a cache, of course, since the chances of hitting one are tiny, but rather to try to systematically find and record evidence for reconstructing the history of the property. That's the archaeologist in me.