Steamboat
-
Posts
261 -
Joined
-
Last visited
Content Type
Profiles
Forums
Articles
Gallery
Downloads
Events
Everything posted by Steamboat
-
Thanks, Templehound, I see how it was done now. What tooth profile does your checkering file have? In the photos, the grooves in the bolster appear to have parallel sides (or at least very steep sides), rather than a pronounced V profile, but maybe that's because of the way the grooves taper down at the ends so that the V profile isn't obvious at the ends of the grooves. In any case, I think it's a very attractive accent feature. Again, really excellent work on the knife! Al (Steamboat)
-

What did you do in the shop today?
Steamboat replied to Mark Ling's topic in Blacksmithing, General Discussion
Yes, I think the combination of canisters, cables, and powdered steel or iron present some interesting possibilities. Al (Steamboat) -
What did you do in the shop today?
Steamboat replied to Mark Ling's topic in Blacksmithing, General Discussion
Thanks for the detailed response, Jennifer. Good information! Actually, your point about a cable being homogeneous, and that good forge welds between the same kind of metal are virtually invisible, is exactly why I was inquiring about how carbonized residue or anything else (which would include scale, I guess) would affect the contrast in the cable weld patterns produced. I would be interested in hearing more about possible methods for achieving a highly distinctive pattern in cable damascus without relying on scale to achieve pattern contrast. I can think of a possible method that would involve disassembling two different cables, each made of a different type of wire (high-carbon steel wire, "iron" wire, etc.) and reassembling a mongrel cable made from both types of metal, as long as the cable format matches. This could be done at the individual wire level (more tedious), or simply swap strands, such as strands of 19 wires in a 7 x 19 cable. I've also had a few stray thoughts about some possible ways of using powdered steel/iron or metal-containing flux with cables, but I'll wait until the stray thoughts have solidified and I've done more research before posting any of them. Some initial experiments may be in order. Al (Steamboat) -
What did you do in the shop today?
Steamboat replied to Mark Ling's topic in Blacksmithing, General Discussion
Jennifer, that is an interesting pattern, and I may be trying some cable damascus soon. What is your personal approach for the initial cleaning of the cable to remove oil, grease, and dirt? Disassembly? Solvents? Burning out lubricants? I've read numerous opinions on the topic, but no solid consensus so far. And what are your thoughts about the effects of any residue that might remain from burning out the lubricants? If there is any carbonized (or other) residue from the burning, I'm thinking that it could affect the contrast of the pattern produced, as well as the characteristics of the steel. Cable lubricants can contain lots of things, like PTFE, molybdenum disulfide, etc. Having built and maintained a number of equipment items that use wire rope, I've found that different cable lubricants also have somewhat different characteristics when it comes to being able to remove the lubricant with solvents. Acetone works on some lubricants that I've run into, but not so well on others, Stoddard solvent works on some, etc. I usually have 7 or 8 different kinds of solvents available for various cleaning jobs, so finding a solvent that works is usually not a problem for me. However, getting all of the lubricant out of the interior of the cable could be challenging without taking the cable apart. And of course if you're working with fiber-core cable, the core would have to be removed. Al (Steamboat) -
What did you do in the shop today?
Steamboat replied to Mark Ling's topic in Blacksmithing, General Discussion
I can see where the spring would make it much easier on the muscles and joints, since the effort curve would have a much more gradual ramp-up, and the energy storage and release in the spring should be almost totally efficient. Have you already noticed a difference in terms of fatigue, soreness, etc.? Al (Steamboat) -
Great proportions, and I love the attention to detail. Nicely-composed photos, too. How did you make the narrow parallel grooves? Saw blade with no set on the teeth, perhaps? The consistency of the depth and spacing of the grooves suggests the use of some kind of jig/fixture for repeatability. Al (Steamboat)
-
I'd agree with Thomas that the nice thick T&G wood in the silo doors lends itself to being re-purposed as a workbench or table. Maybe a coffee table for the shabby chic couture crowd? My wife would latch onto that in a heartbeat. For a low coffee table, maybe you could utilize the existing brackets as legs, IF they aren't too far gone. Definitely worth the ten bucks. Al (Steamboat)
-
Jennifer, I am assuming that if Iron Dwarf is designing the blower from scratch, it seems to me that he would probably use a directional design, but I can't speak for him. He'd be the one to answer that. I have an old Champion blower in the basement with a symmetrical housing around the impeller that I might overhaul some day, and you are correct that it doesn't really care which way it turns, while the Buffalo blower on my forge is definitely directional with its spiral housing. I can see that it could be handy to have a non-directional blower that would allow the user to crank it in a preferred direction (if they have a preferred direction), although I'm guessing that the efficiency would probably be lower than with a directional-type blower. Your comment about being able to switch the clutch around to change direction is a good idea if it is being used on a non-directional blower. I agree that additional complexity can potentially lower reliability, although a good-quality sealed sprag clutch should be a highly reliable device, and one could be selected that could handle many times the maximum loading that it would encounter in a blower, so it should have a low likelihood of failure in long-term usage. Also as you said, it could be a selling point for its cool factor, even though it's a small detail, and the benefits are there but not necessarily overwhelming. For marketing purposes, it's the kind of thing that can reinforce the perception that the maker is very detail oriented, technically superior, etc. Al (Steamboat)
-
The foot drive idea in conjunction with a one-way clutch is intriguing. It could be a very simple, low-maintenance linkage. If the pedal/treadle travel is short enough to be operated by your toe while keeping your heel firmly on the floor, or if the pedal/treadle geometry provides a stable and comfortable place for your foot while standing at the forge in your normal working stance, then it should have little, if any, effect on your balance and stability while working at the forge, and it should be easy to adapt to. Al (Steamboat)
-
Both of your responses are well taken, and I guess "chase" was not the best choice of words for me to use. A clutch on the handle is not what I would call a "significant" advantage, but if the handle always stops in the same place, my take on it is that it might shave off a second or so every now and then, and it also seems to me that one could easily become adept at grabbing the handle in its fixed "parking place" without even taking a moment to look in its general direction. So I think it's only a "minor" advantage in the time sense, but I figure if you're going to design the dream hand-crank blower, why not add all the niceties? Another small plus for a clutch might be that a rotating handle could bonk into something or someone, although that should typically be a fairly rare event. Has that ever happened to you? And as mentioned, the clutch would assure that the blower is always cranked in the right direction, which might be helpful for novices, although just to play the advocate, one might argue that they should just learn to do it right in the first place. Al (Steamboat)
-
I like the idea of using a clutch with the handle. Avoids having to chase a rotating handle when you want to crank it. What type of clutch are you going to use for the handle? A sprag clutch, perhaps? Cylindrical or asymmetric sprags? I've seen some sprag clutches with a built-in row of roller bearings on each side of the sprag section so that the clutch "unit" can carry an axial load without having to install extra bearings, which might make for a compact design. An added advantage of an overrun clutch, although a minor one, would be to prevent someone from cranking the fan in the wrong direction. Al (Steamboat)
-
There's some elegant detailing on that spoon, and it has nice proportions. I'm not a professional conservator, but I thought I'd offer a few ideas that are based on some limited experience. In my archaeology projects I've worked with a couple of conservators who used several methods for conserving ferrous objects that we found. If it's stable and has no active corrosion, you could leave it as is and keep it in a low relative-humidity area. One approach might be to treat it with tannic acid, which would turn the corrosion layer black, which some people find more attractive looking than rust, but I don't think that tannic acid by itself would provide a vapor barrier, so it would still have to be kept in a low RH area. My understanding is that if there's no active corrosion, trapped moisture, chlorides, etc., a vapor barrier coating could be applied, but that might have its own potential issues for possible future conservation options. Electrolytic reduction cleaning might work well, but that might be getting carried away in terms of effort. I think I would steer away from using a typical commercial rust remover liquid or gel, as you could potentially lose some fine detail that may consist, at least in part, of hard, stable rust. I'm guessing that you know all this stuff already with your conservation background, but I thought I'd add a few thoughts anyway. Al (Steamboat)
-
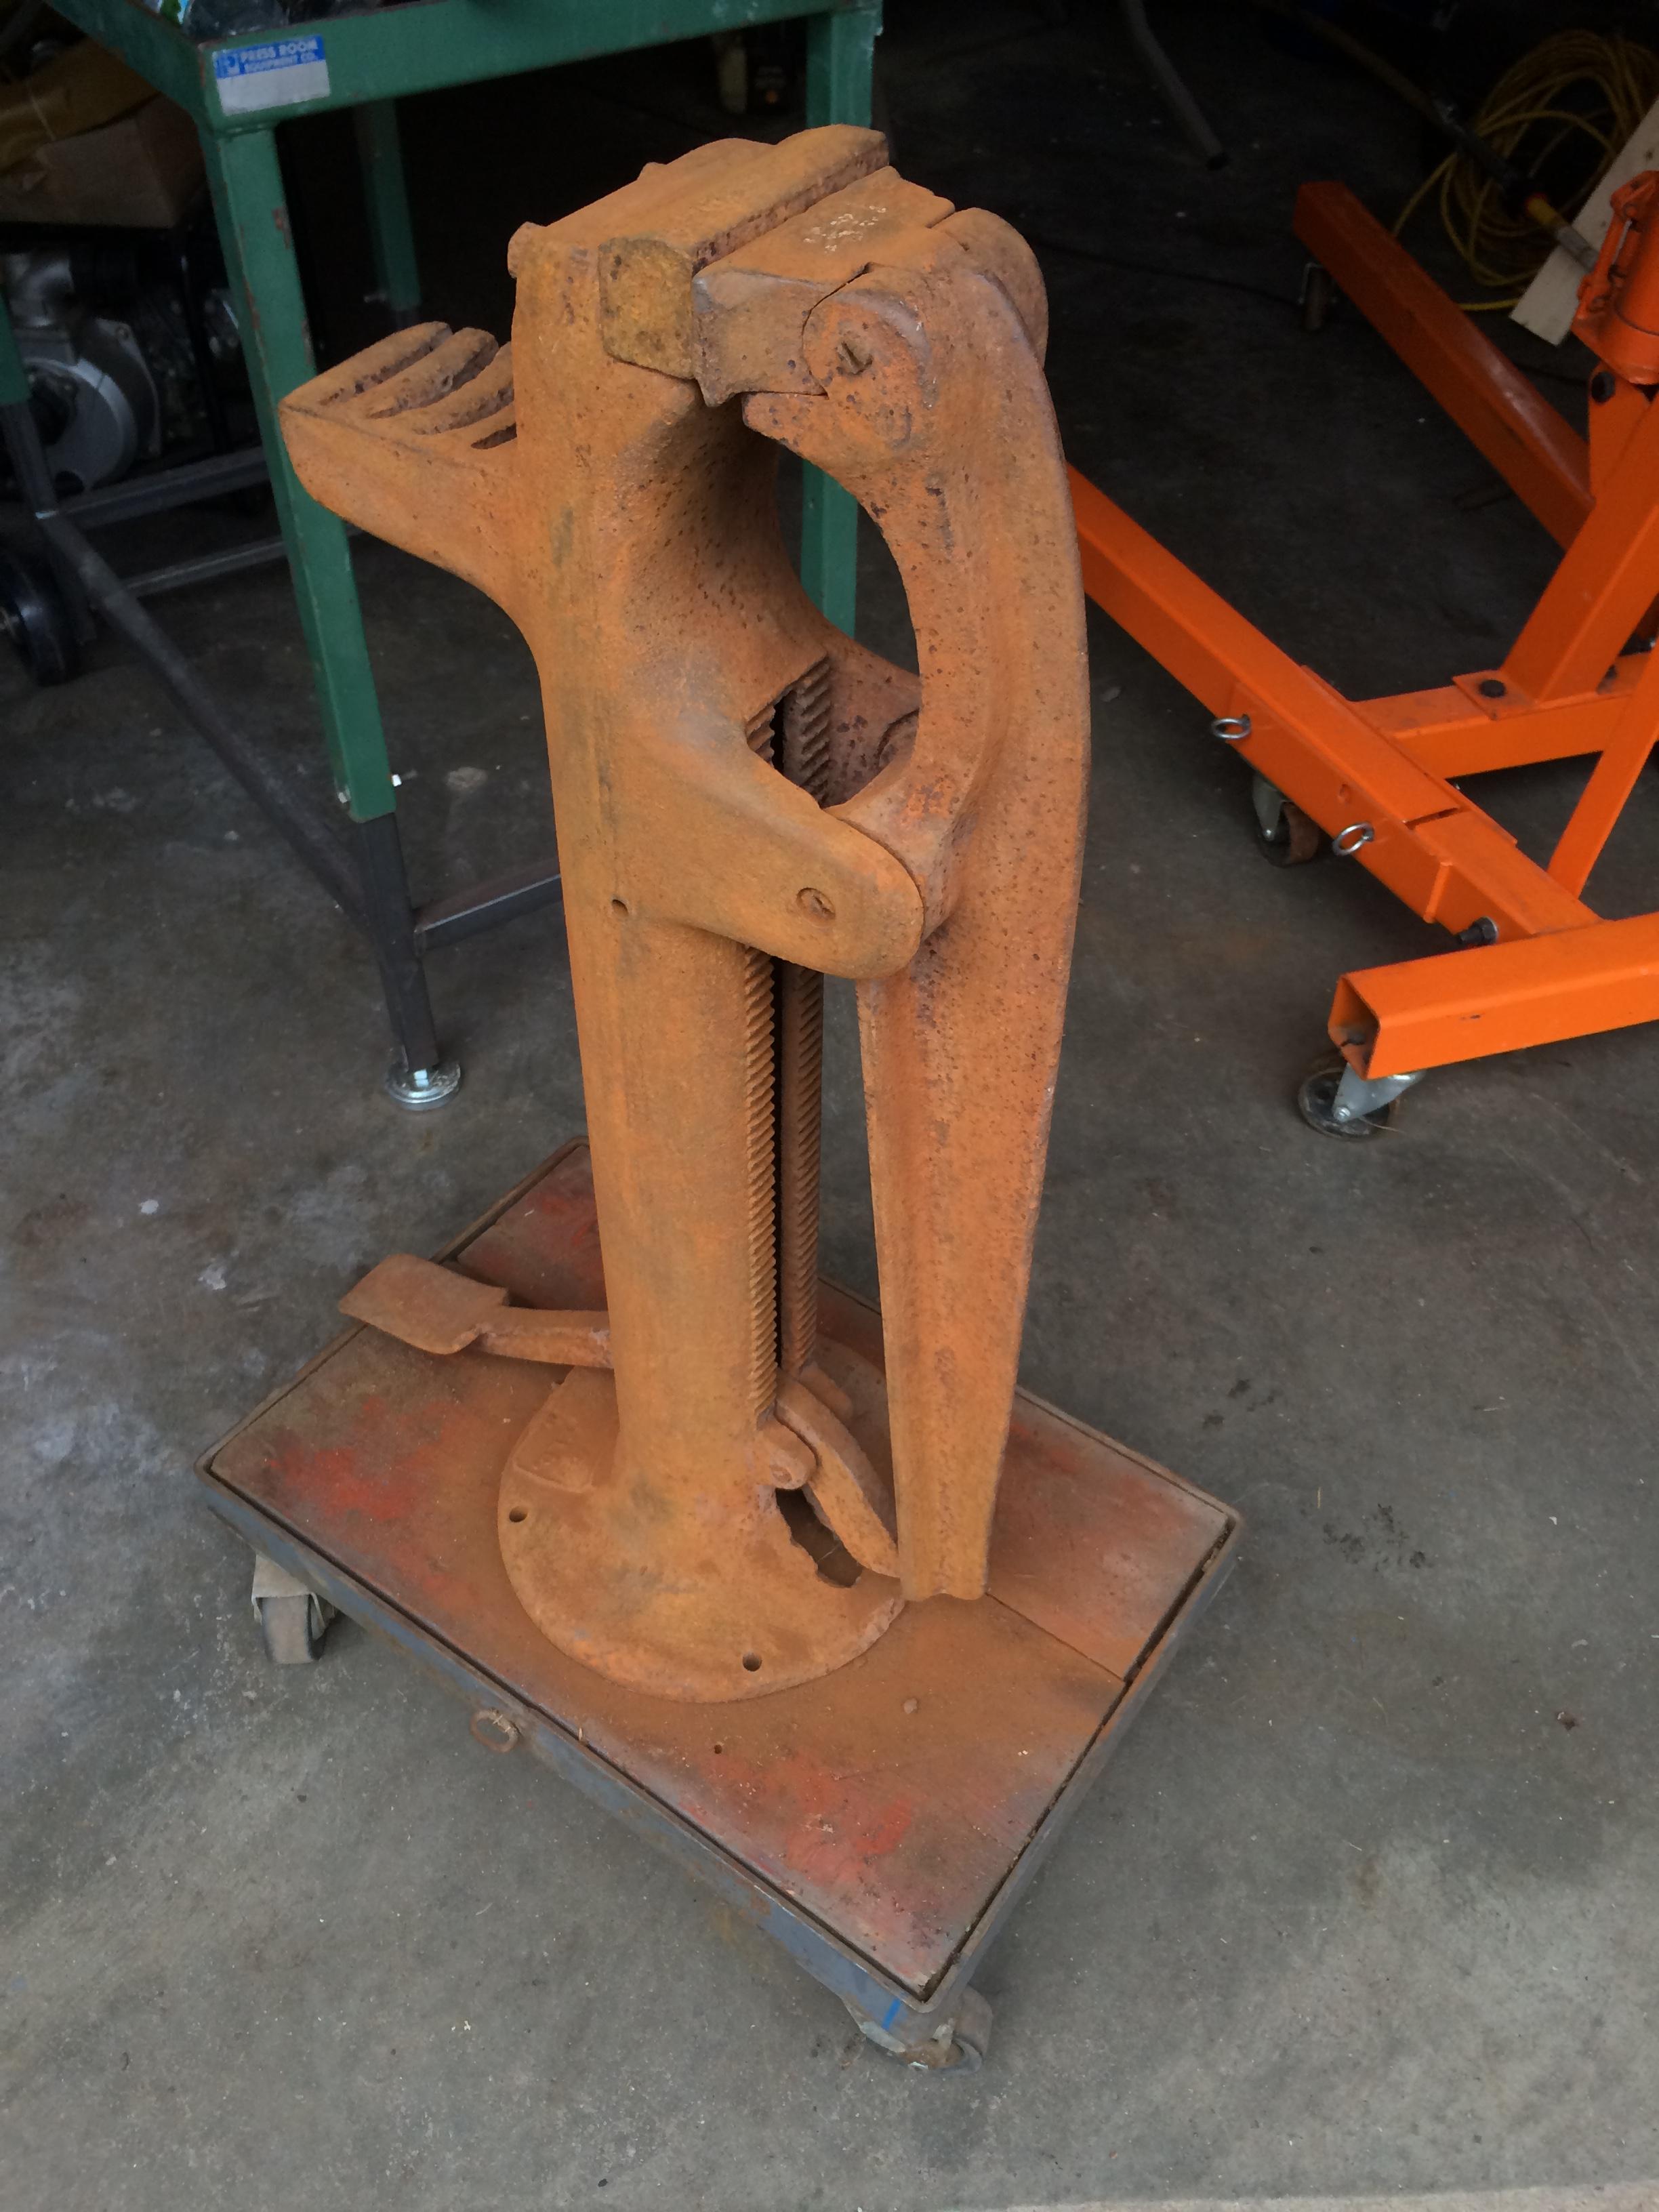
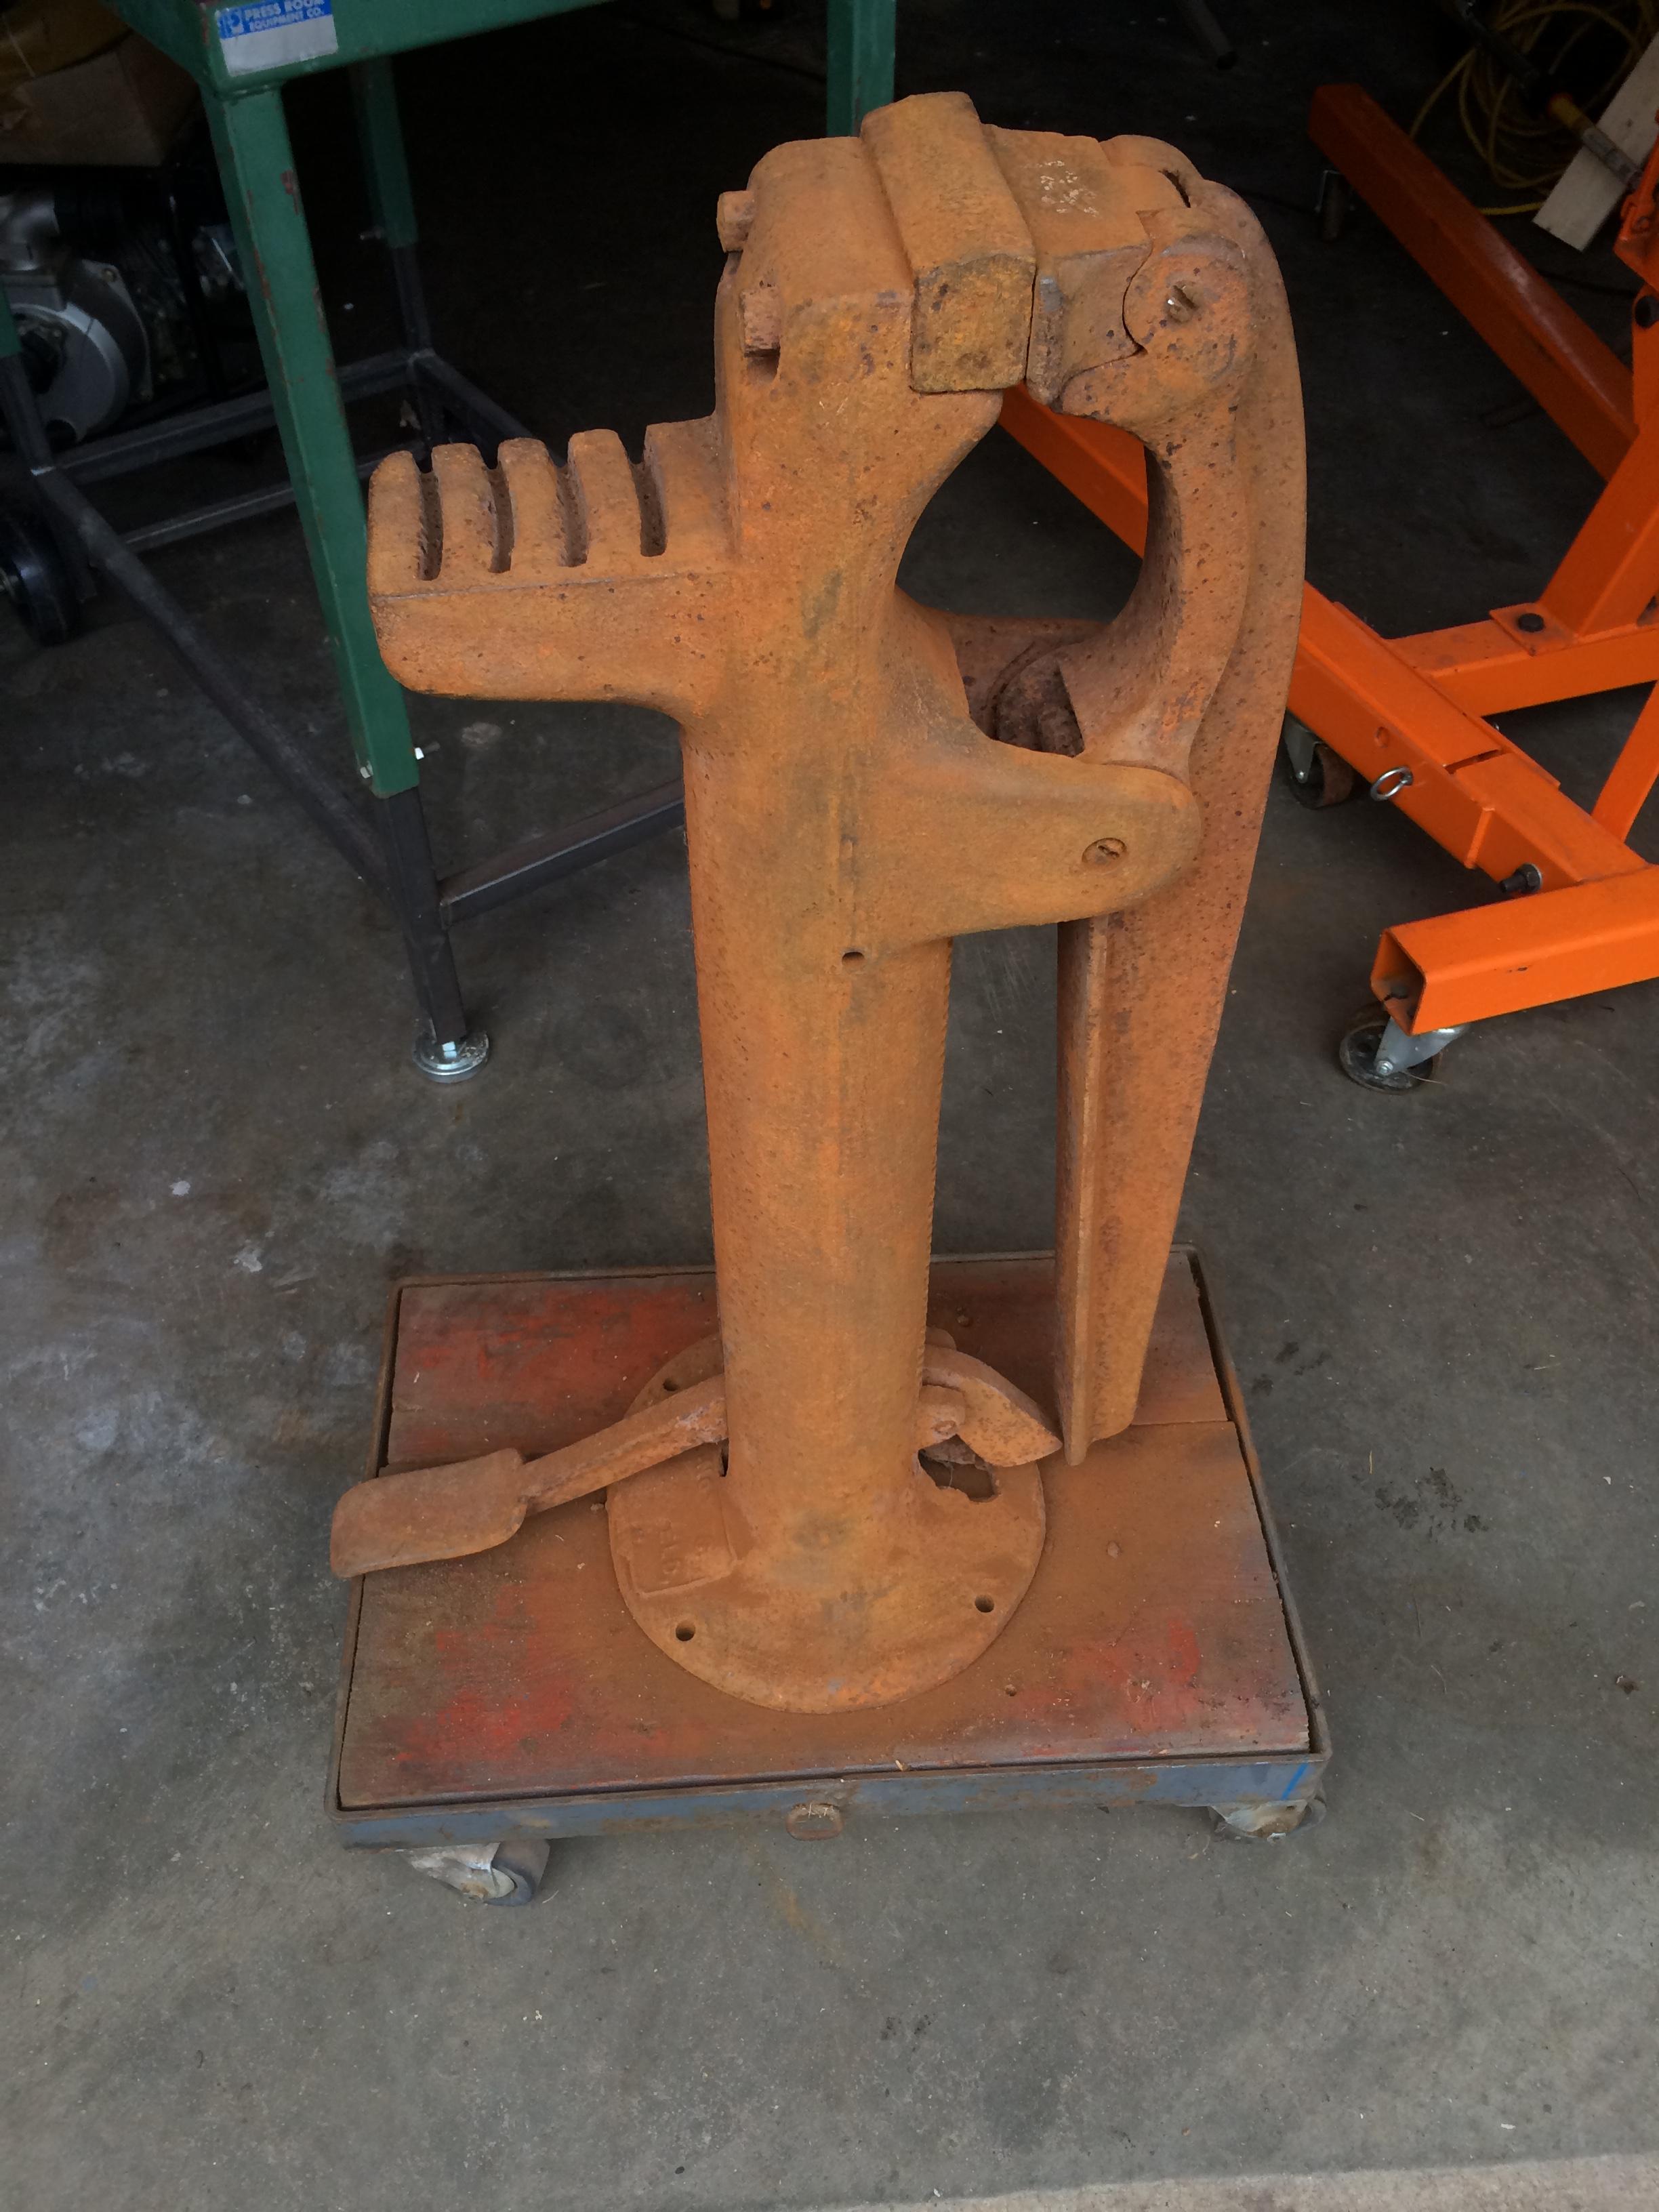
Here is another item that followed me home a while ago that has been gathering dust in the garage, and I decided it's time to do something useful with it. It's a B. B. Noyes foot vise (aka, farrier's vise or shoeing vise) that I picked up for $100 USD at an antique store. I thought it was a Wells Brothers vise until I saw that "B. B. Noyes" is still readable in the casting. It's actually in very good condition except for some wear in the middle of the calking block, but since I'm not a farrier, that's not of too much concern to me. There are no repairs, no deep rust, and the jaws are still nice and square. The fixed jaw is some kind of hard steel and the movable swivel jaw appears to be cast iron. I don't have any extra accessory jaws for it, and the adjustable-height upsetting block is missing (as they usually are), although I'm not too "upset" about that, since I should be able to machine a new one without too much difficulty on some cold winter evening. For my purposes, the "upsetting block" would be more useful as a "depth stop." For example, if I were making a set of table legs and I wanted to put a twist at exactly the same place on each leg, I would just set the depth stop, slap each leg in the vise, and twist, with no need to measure/mark each leg. I suppose that I could even improve on the upsetting block by making one with a socket to accept various heading tools. I'm now building a base for it, and I plan to replace the pivot bolts, add a removable steel jaw insert/cover for the cast-iron jaw, and install a spring to lift the foot pedal. After installing a new pivot bolt, the jaws will open by gravity and therefore will not require a separate spring. The location of the calking block is making me consider the possibility of installing a small, hefty steel plate over it, which would be of more use to me than the current surface of the calking block. I'll give some thought to possible non-invasive ways of installing the plate. Note: The dolly that the vise is sitting on in the photos is just for temporary transport...not part of the base I'm building. Al (Steamboat)


-
What did you do in the shop today?
Steamboat replied to Mark Ling's topic in Blacksmithing, General Discussion
Very nice job on the openers and hook, Ted! Das, you must have quite a load of stuff ready for Freaky Fair by now. I assume that this is the (bi-annual?) event in Pittsburgh. I would think that your snakes and the great scorpions that you made would be perfect for that venue. Good luck with the sales! Al (Steamboat) -
What did you do in the shop today?
Steamboat replied to Mark Ling's topic in Blacksmithing, General Discussion
GrumpyB, those are excellent first openers. Good shapes, very symmetrical, and nice even bands around the cap area. Al (Steamboat) -
The mat's mill-scale color and the rust deposit on the mat fooled me. And yes, I think there's enough combined mass in your anvil and anvil stand that a rubber mat shouldn't absorb any noticeable amount of your hammer energy. I have 1" stall mats in front of two workbenches, and they do make it easier on the feet. I don't do any welding or forge welding over them, though. I don't mind the way the clamps look now, but if you used a smaller washer that doesn't extend over the edge of the angle iron (or trimmed off the part of the washer that extends over the edge) and perhaps put a small radius on a couple of the corners of the angle, it might give the clamps a more finished look without much extra effort. And as Stevomiller mentioned, a bit of black paint might make them blend in nicely. Overall, it looks great. Al (Steamboat)
-
That's a really clean and solid-looking stand! The rubber under the anvil combined with the sand fill should do a good job in reducing harmonics and ringing. I like the curved pieces you welded on to secure the anvil. The clamps should be fine as-is, but if you want more clamping force, you could use a larger size of angle iron and drill the hole farther from the vertical side of the angle iron, which would give you more clamping leverage. I see that you have the stand sitting on a large steel plate. Will the stand be connected to that? Nice job! Al (Steamboat)
-
What did you do in the shop today?
Steamboat replied to Mark Ling's topic in Blacksmithing, General Discussion
I like the old presses. They often came with accessories for pressing a variety of things...fruit, cheese, stuffing sausages, etc. If you don't have the accessories, you could make them. Looks like your anvil got a thorough wire-brushing and is now all pretty and decked out it its Sunday best. Too bad you'll be getting it dirty. Looking forward to seeing the collection. Should make an attractive display. I like the asymmetrical one in the middle with what strikes me as an Arts & Crafts style look. Al (Steamboat) Das, how long does it take you to strip hot-dip galvanizing (which is generally a thicker zinc layer than plated zinc)? I've stripped the plated stuff before, but not the hot-dip. Al (Steamboat) -
What did you do in the shop today?
Steamboat replied to Mark Ling's topic in Blacksmithing, General Discussion
Really nice hawk! Have you been practicing your throwing? Al (Steamboat) -
What did you do in the shop today?
Steamboat replied to Mark Ling's topic in Blacksmithing, General Discussion
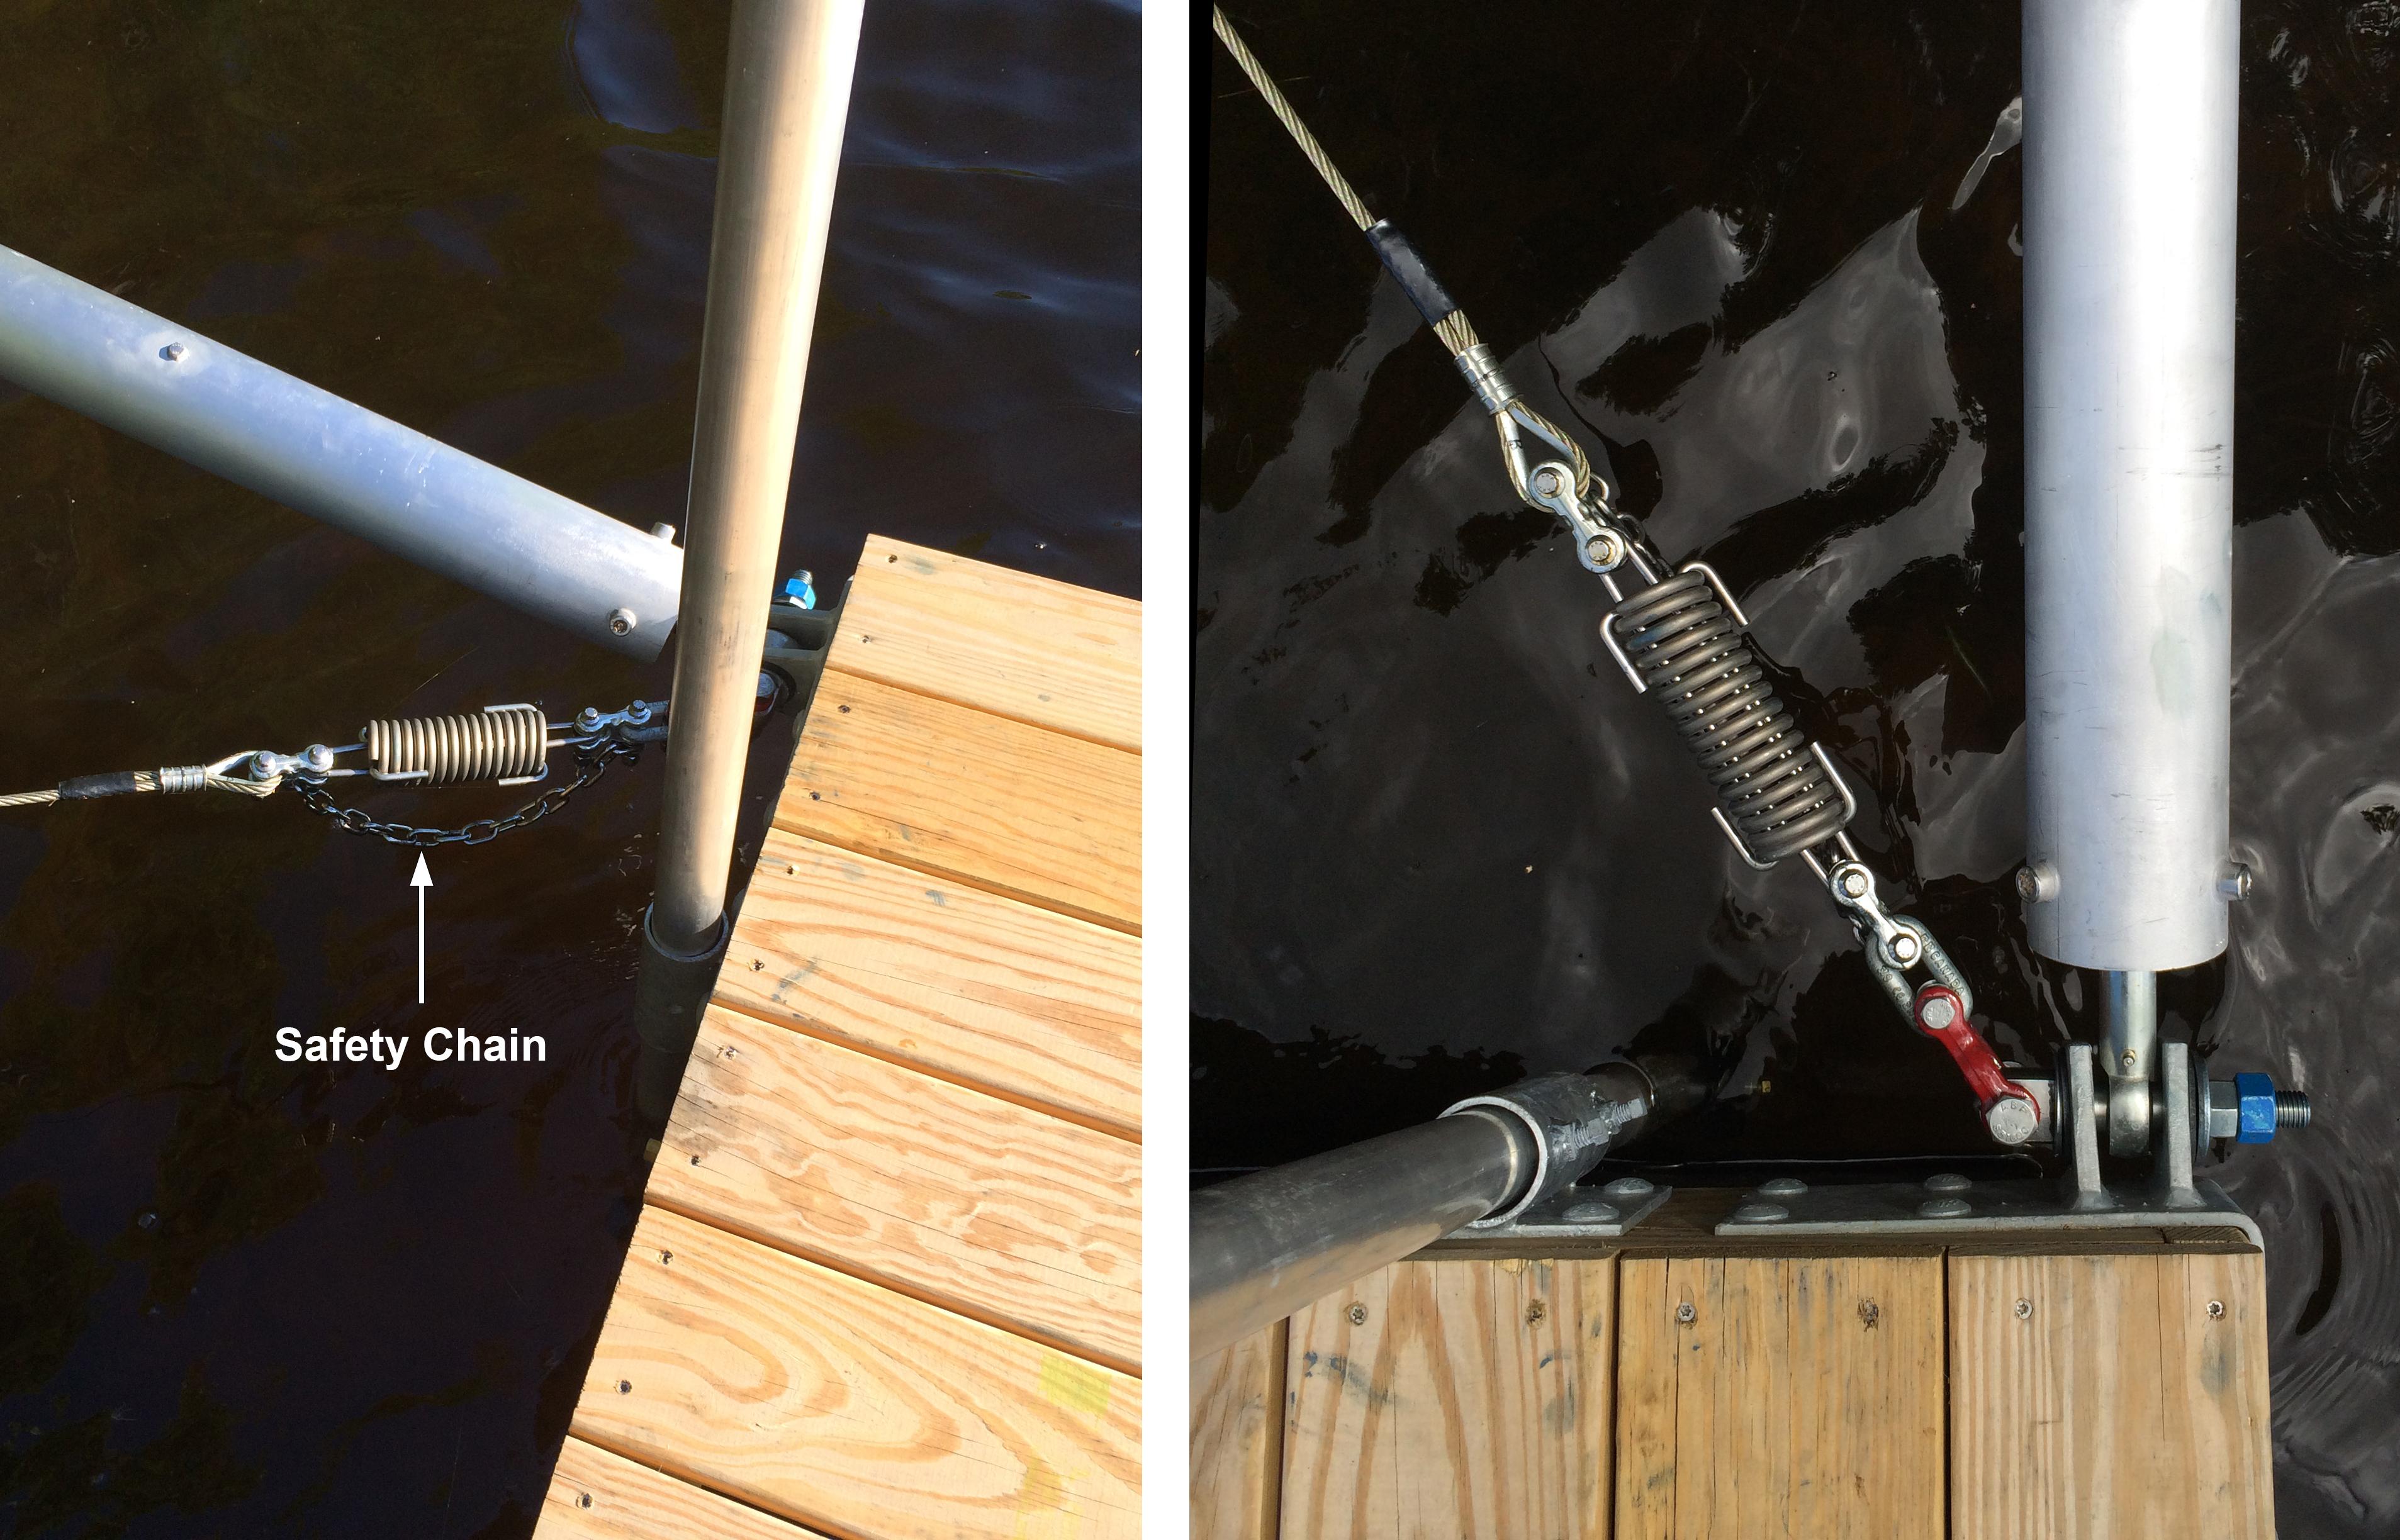
Just a thought... I see that you used what I prefer to call an "extension limit spring," commonly known as an "overload prevention spring." While this type of spring features the ability to limit its maximum extension, it can fail if its extension/load limit is exceeded, which could cause the folded-over wires to straighten out and slip through the spring. If you think that the spring might be the "weak link" in the treadle hammer linkage, you might consider adding a safety chain across it. Not seeing the entire linkage setup, I can't even guess at what kind of load it's designed to carry. I used the same type of spring when I built my strut-type (aka, stiff-arm) floating dock system (see photo below). I wanted to maintain tension on the cross-bracing cables, but limit the maximum extension, and therefore limit the distance that the dock could shift in the current, which changes from an upstream current to a downstream current with the tides. I installed a safety chain across the spring, just in case the spring failed by taking an an unexpectedly high load, such as the dock being struck by a floating tree trunk, which has happened a couple of times, although not hard enough to cause a spring failure yet. Al (Steamboat)
-
What did you do in the shop today?
Steamboat replied to Mark Ling's topic in Blacksmithing, General Discussion
Good looking openers! I think that the copper rivets in the eyes are nice accents. Al (Steamboat) -
What did you do in the shop today?
Steamboat replied to Mark Ling's topic in Blacksmithing, General Discussion
Hans, I hope the situation "quiets" down with your neighbor. We're very fortunate here, since we not only have some distance between us and the neighboring houses, but our neighbors are all very nice folks who are always interested in seeing the latest projects that I'm working on. Good luck with your neighbor! I also wanted to say that I'm very impressed with your many clever shop innovations, your energy, and your degree of organization. Someday I hope to be organized. Zrognak, all of your work that I've seen so far has been great. Keep sending the photos. I find that my tool/equipment clutter-cleanup cycle waxes and wanes. I tend to do a massive cleanup, then things gradually get more cluttered until I start spending more time trying to find tools than working with them, at which time my frustration level triggers another massive cleanup. If I ever finish my "compact" metal shop area, I hope to maintain the "organized" state more consistently. By the way, Jennifer, your portable shop trailer always seems to show what to me is an impressive level of organization. Al (Steamboat) -
Yes, a slight hint of eau de skunk creates a true rural ambience that is not altogether bad, but in higher concentrations it definitely graduates from 'odor' to 'stench.' When we go out in the yard at night, we check where we're walking with a flashlight to avoid surprising a skunk or raccoon, since we have the dubious distinction of having an abundance of both. There are so many skunk and raccoon divots in the lawn (looking for bugs and grubs) that it looks like a Golf 101 class used it for driving practice. It's a good thing that we're not "manicured lawn" fanatics. I'm happy enough if the lawn has a generally greenish tint to it and the weeds aren't too deep to wade through. Al (Steamboat)
-
Very nice swage block, Das! Should be extremely useful. We get a few possums (or opossums if you prefer) in our yard too. We don't leave any food outside, or we'd have a veritable invasion of critters, although the bird feeder area seems to attract possums as well as other animals. We're in a wooded area on a large river, which serves as a kind of corridor for all manner of animals. It makes keeping a vegetable garden a real challenge, which we have to approach with several different techniques. Excellent! Looks like you got a good machine at a good price. Al (Steamboat)
-
Gergely, that's a great table! Even though I don't have enough room for one like that in my shop, I'd find room somehow! JHCC, I would not mind having a nice compact belt grinder like that. I like the small footprint. It looks like there's a custom jig on the table, which I assume is held on by a couple of easily removable screws. If it's a 45-degree jig, it could come in quite handy...an added bonus. Have you attached a cord and fired it up yet? Al (Steamboat)