jlpservicesinc
-
Posts
5,776 -
Joined
-
Last visited
Content Type
Profiles
Forums
Articles
Gallery
Downloads
Events
Everything posted by jlpservicesinc
-
https://youtu.be/TZU_Sl8oTew (colonial style) https://youtu.be/ZsQ_2Kwe4uk (neck knife) This was a blade with no electric tools.. All hand done.. While I am using blacksmithing tools the basics of what I am doing are the same no matter what heat source used, or what anvil or anvil like object is used.. Each tool just speeds the process up, but years back using the most basic tools will help to learn and be a better forger as you learn to do more with less..
-

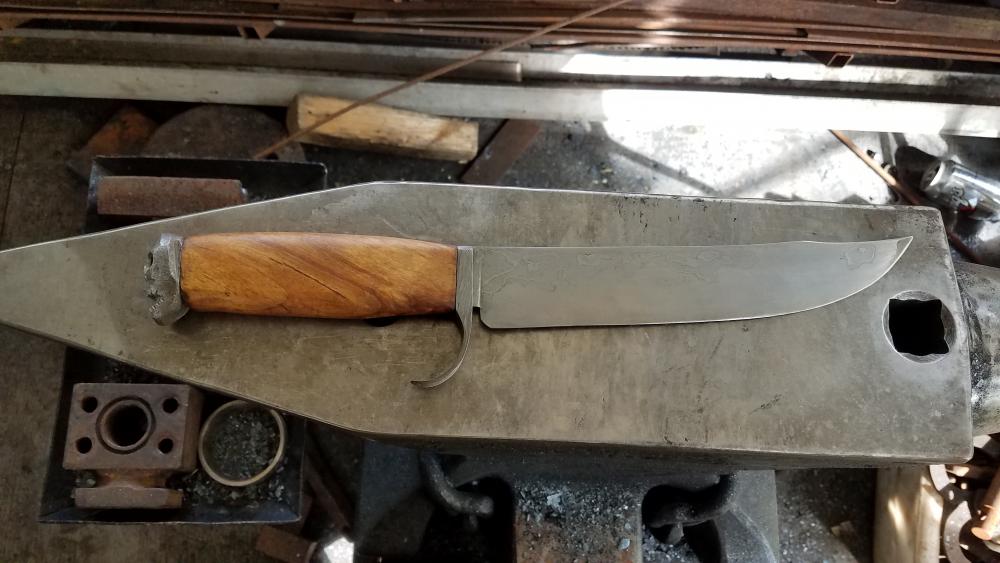
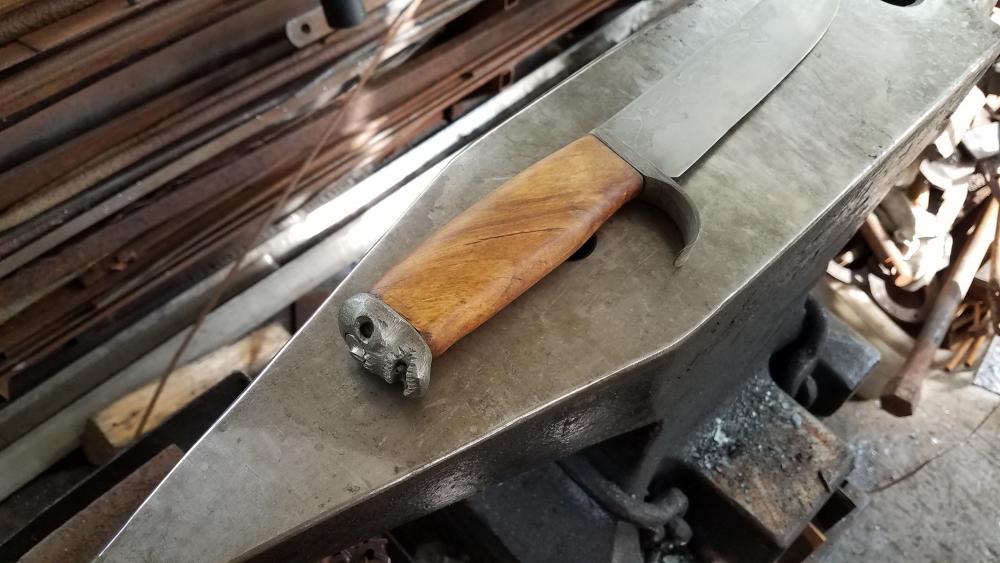
Sandwich HC wagon tire, 15n20, 5160, wrought iron Hunter
jlpservicesinc replied to jlpservicesinc's topic in Knife Making
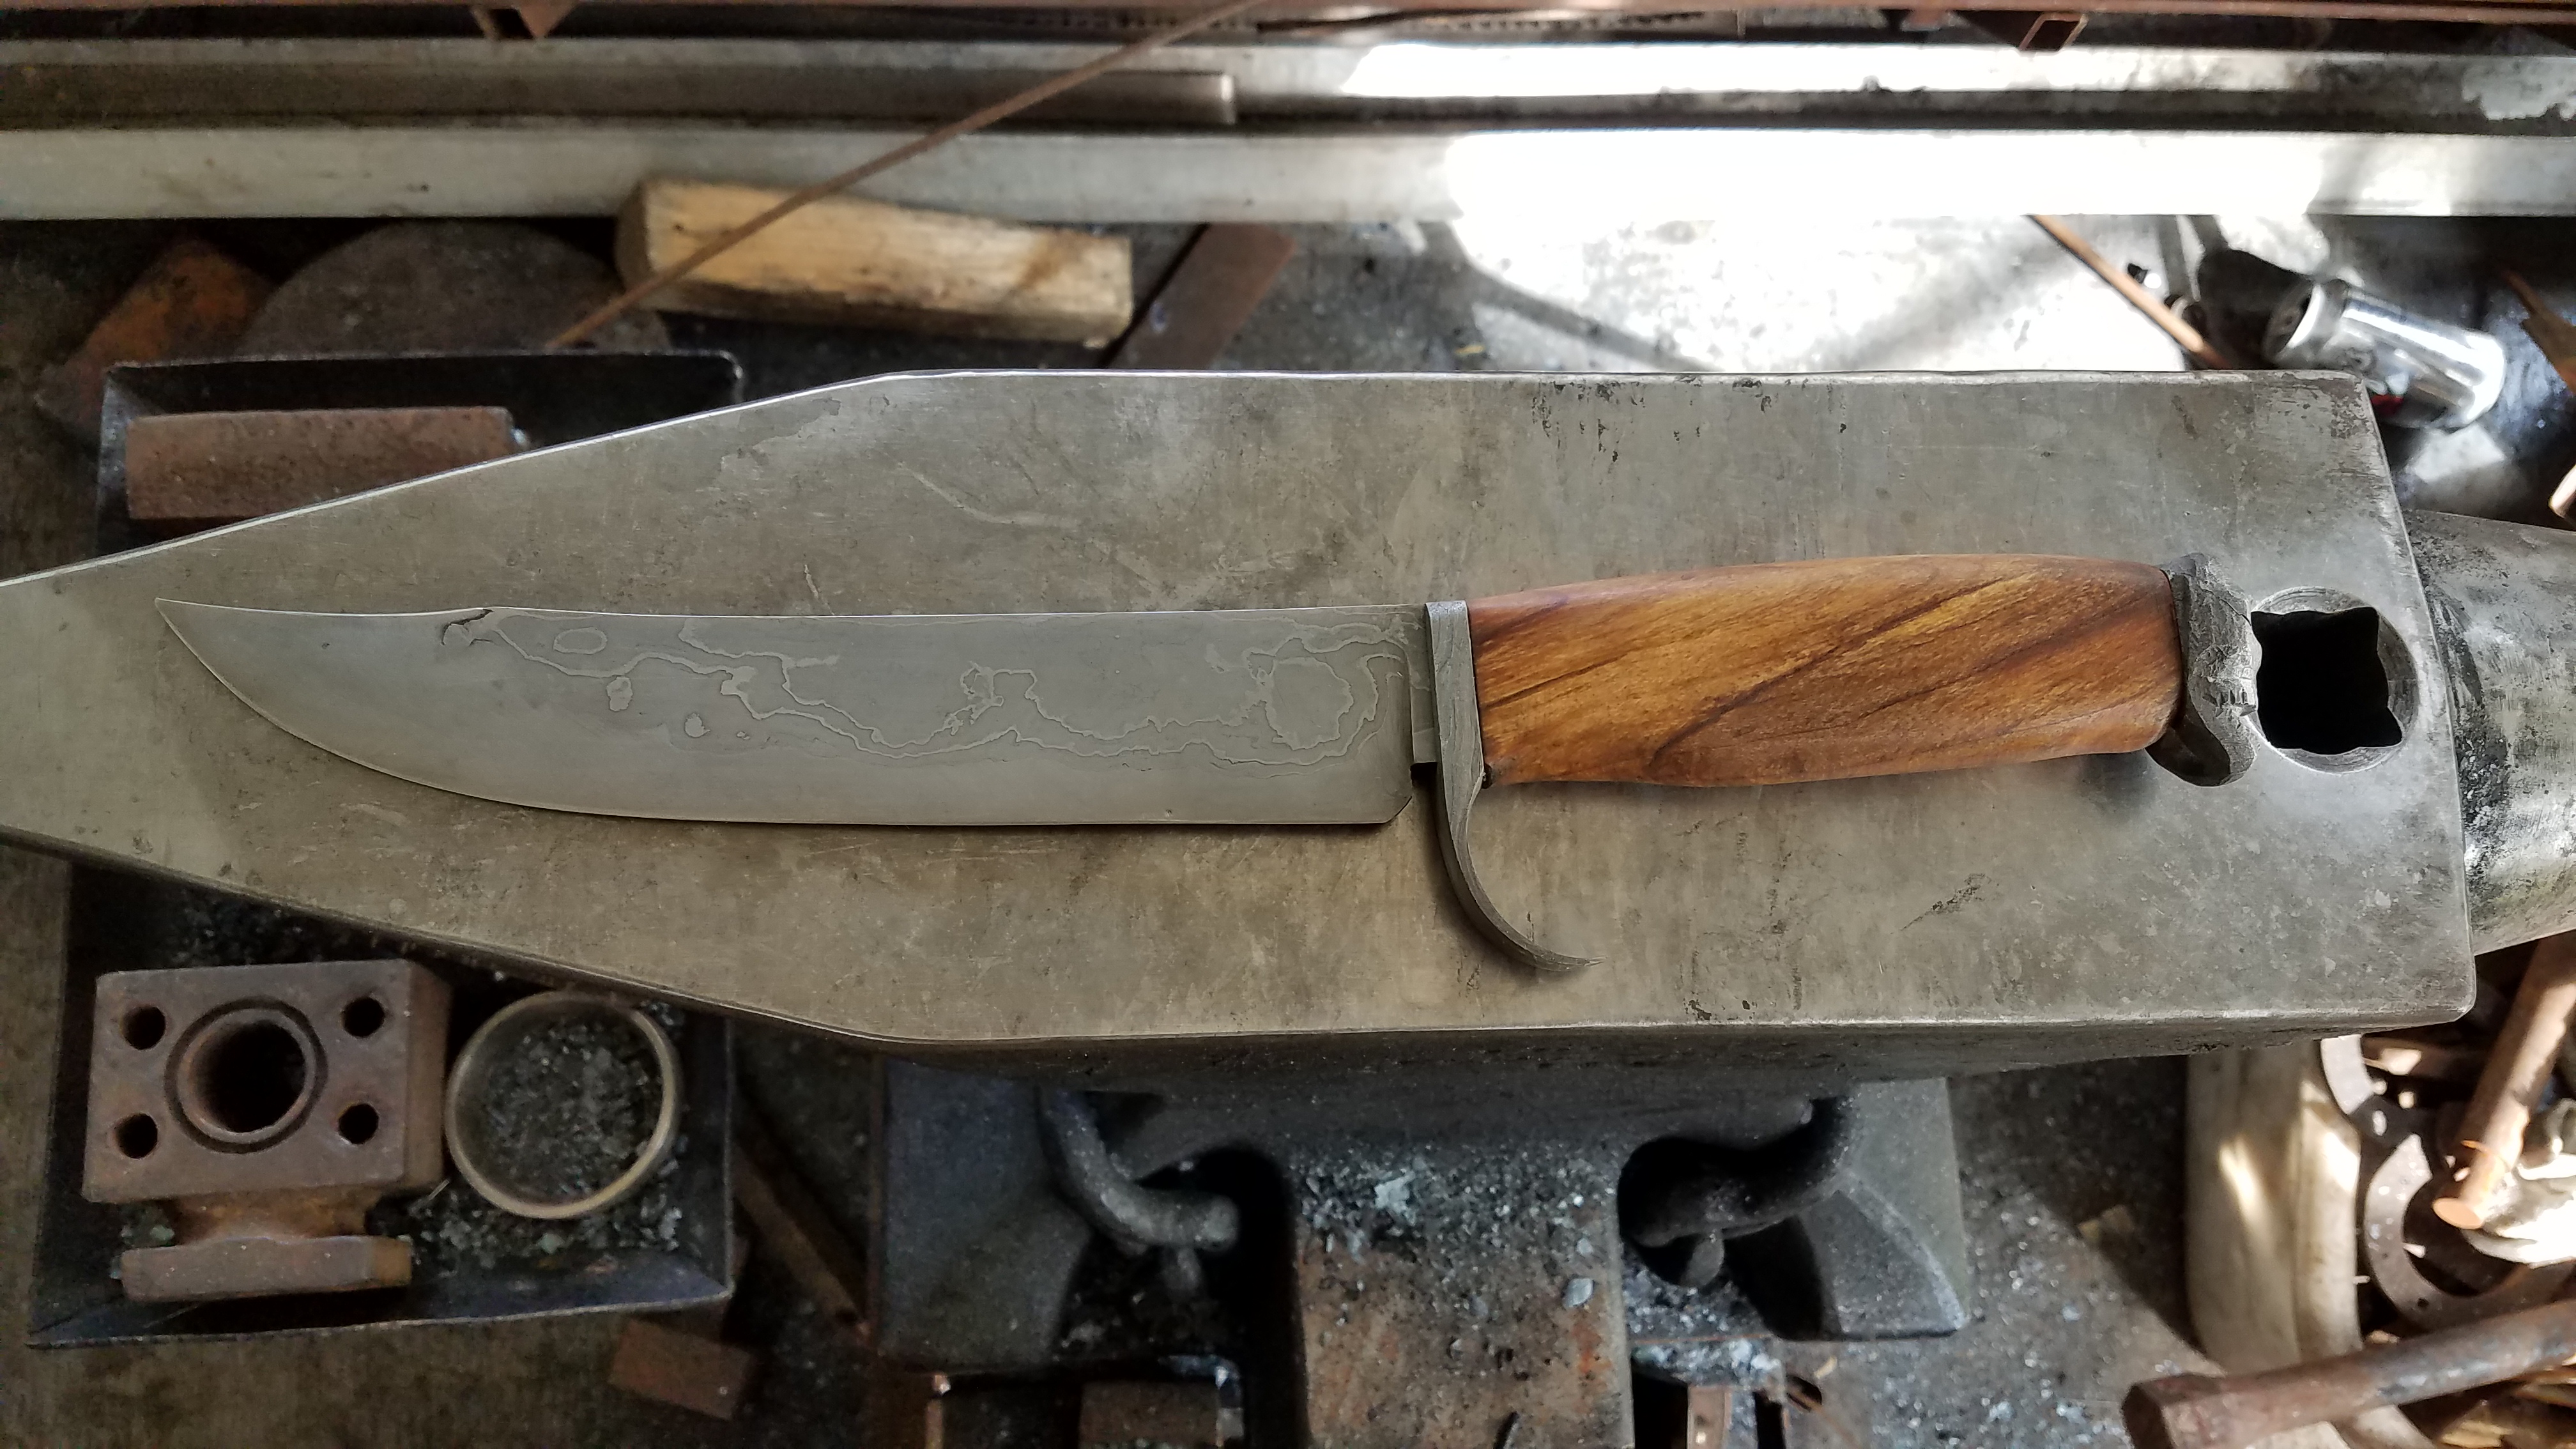
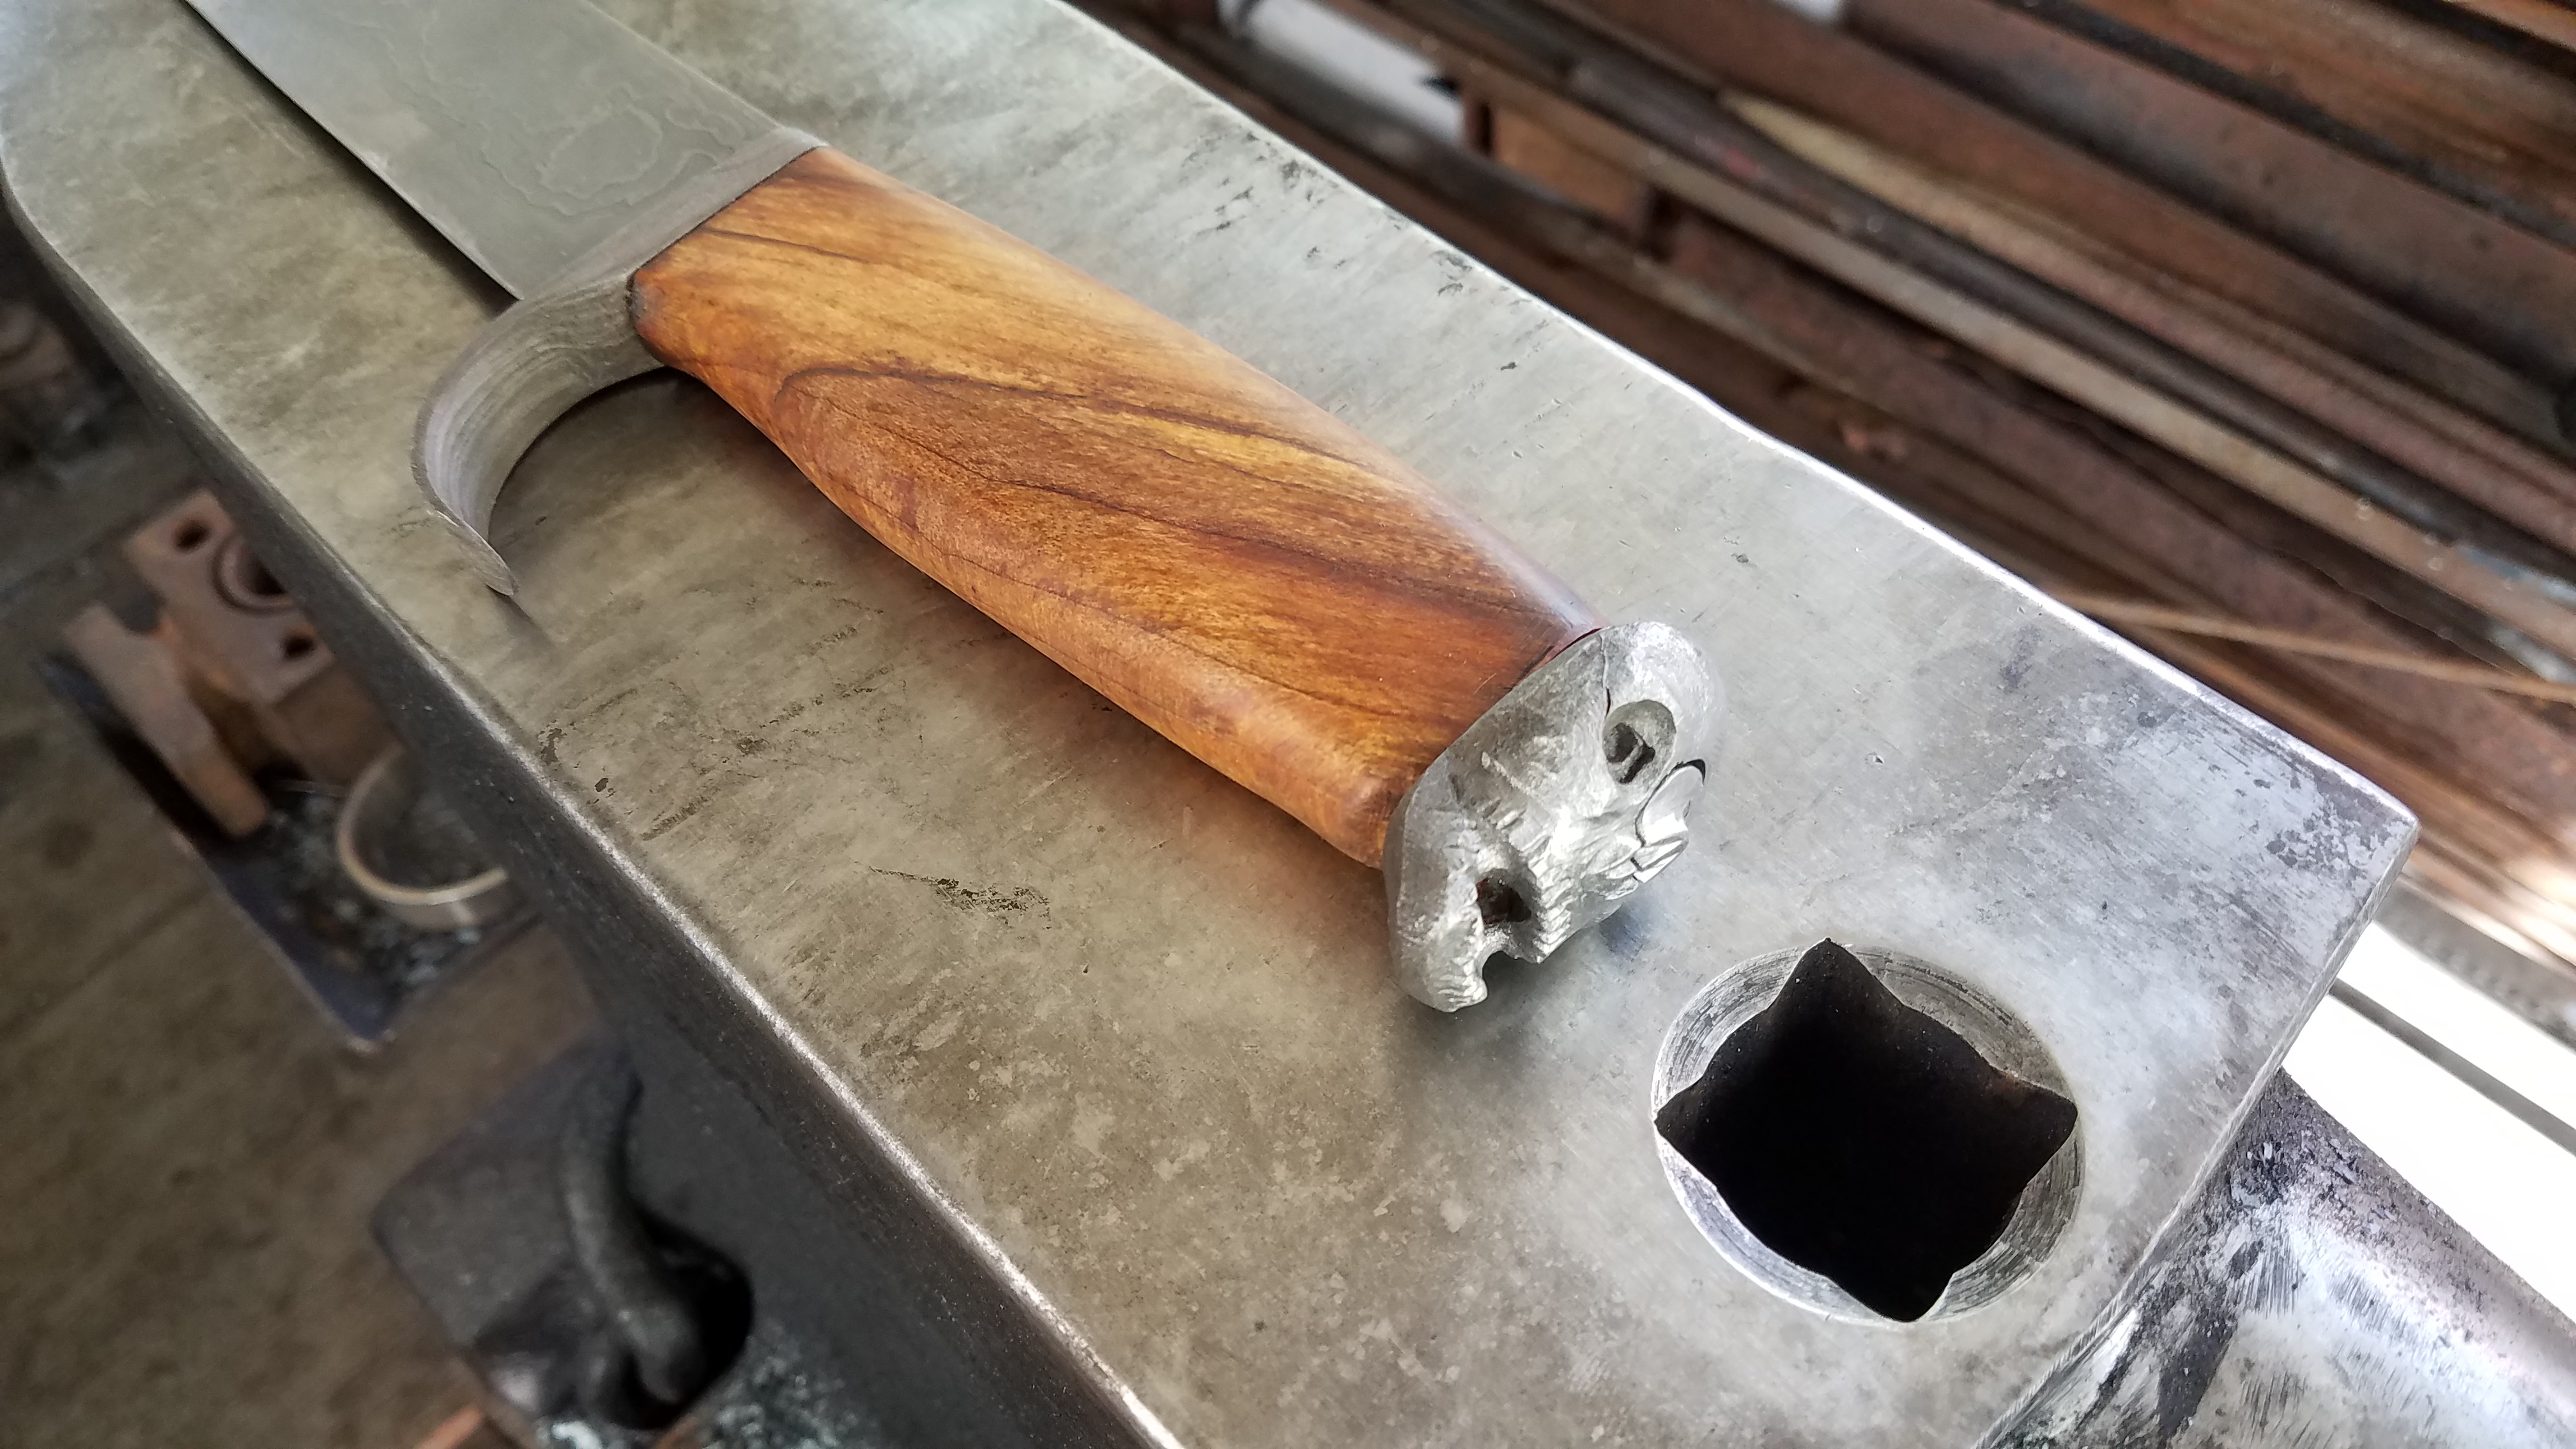
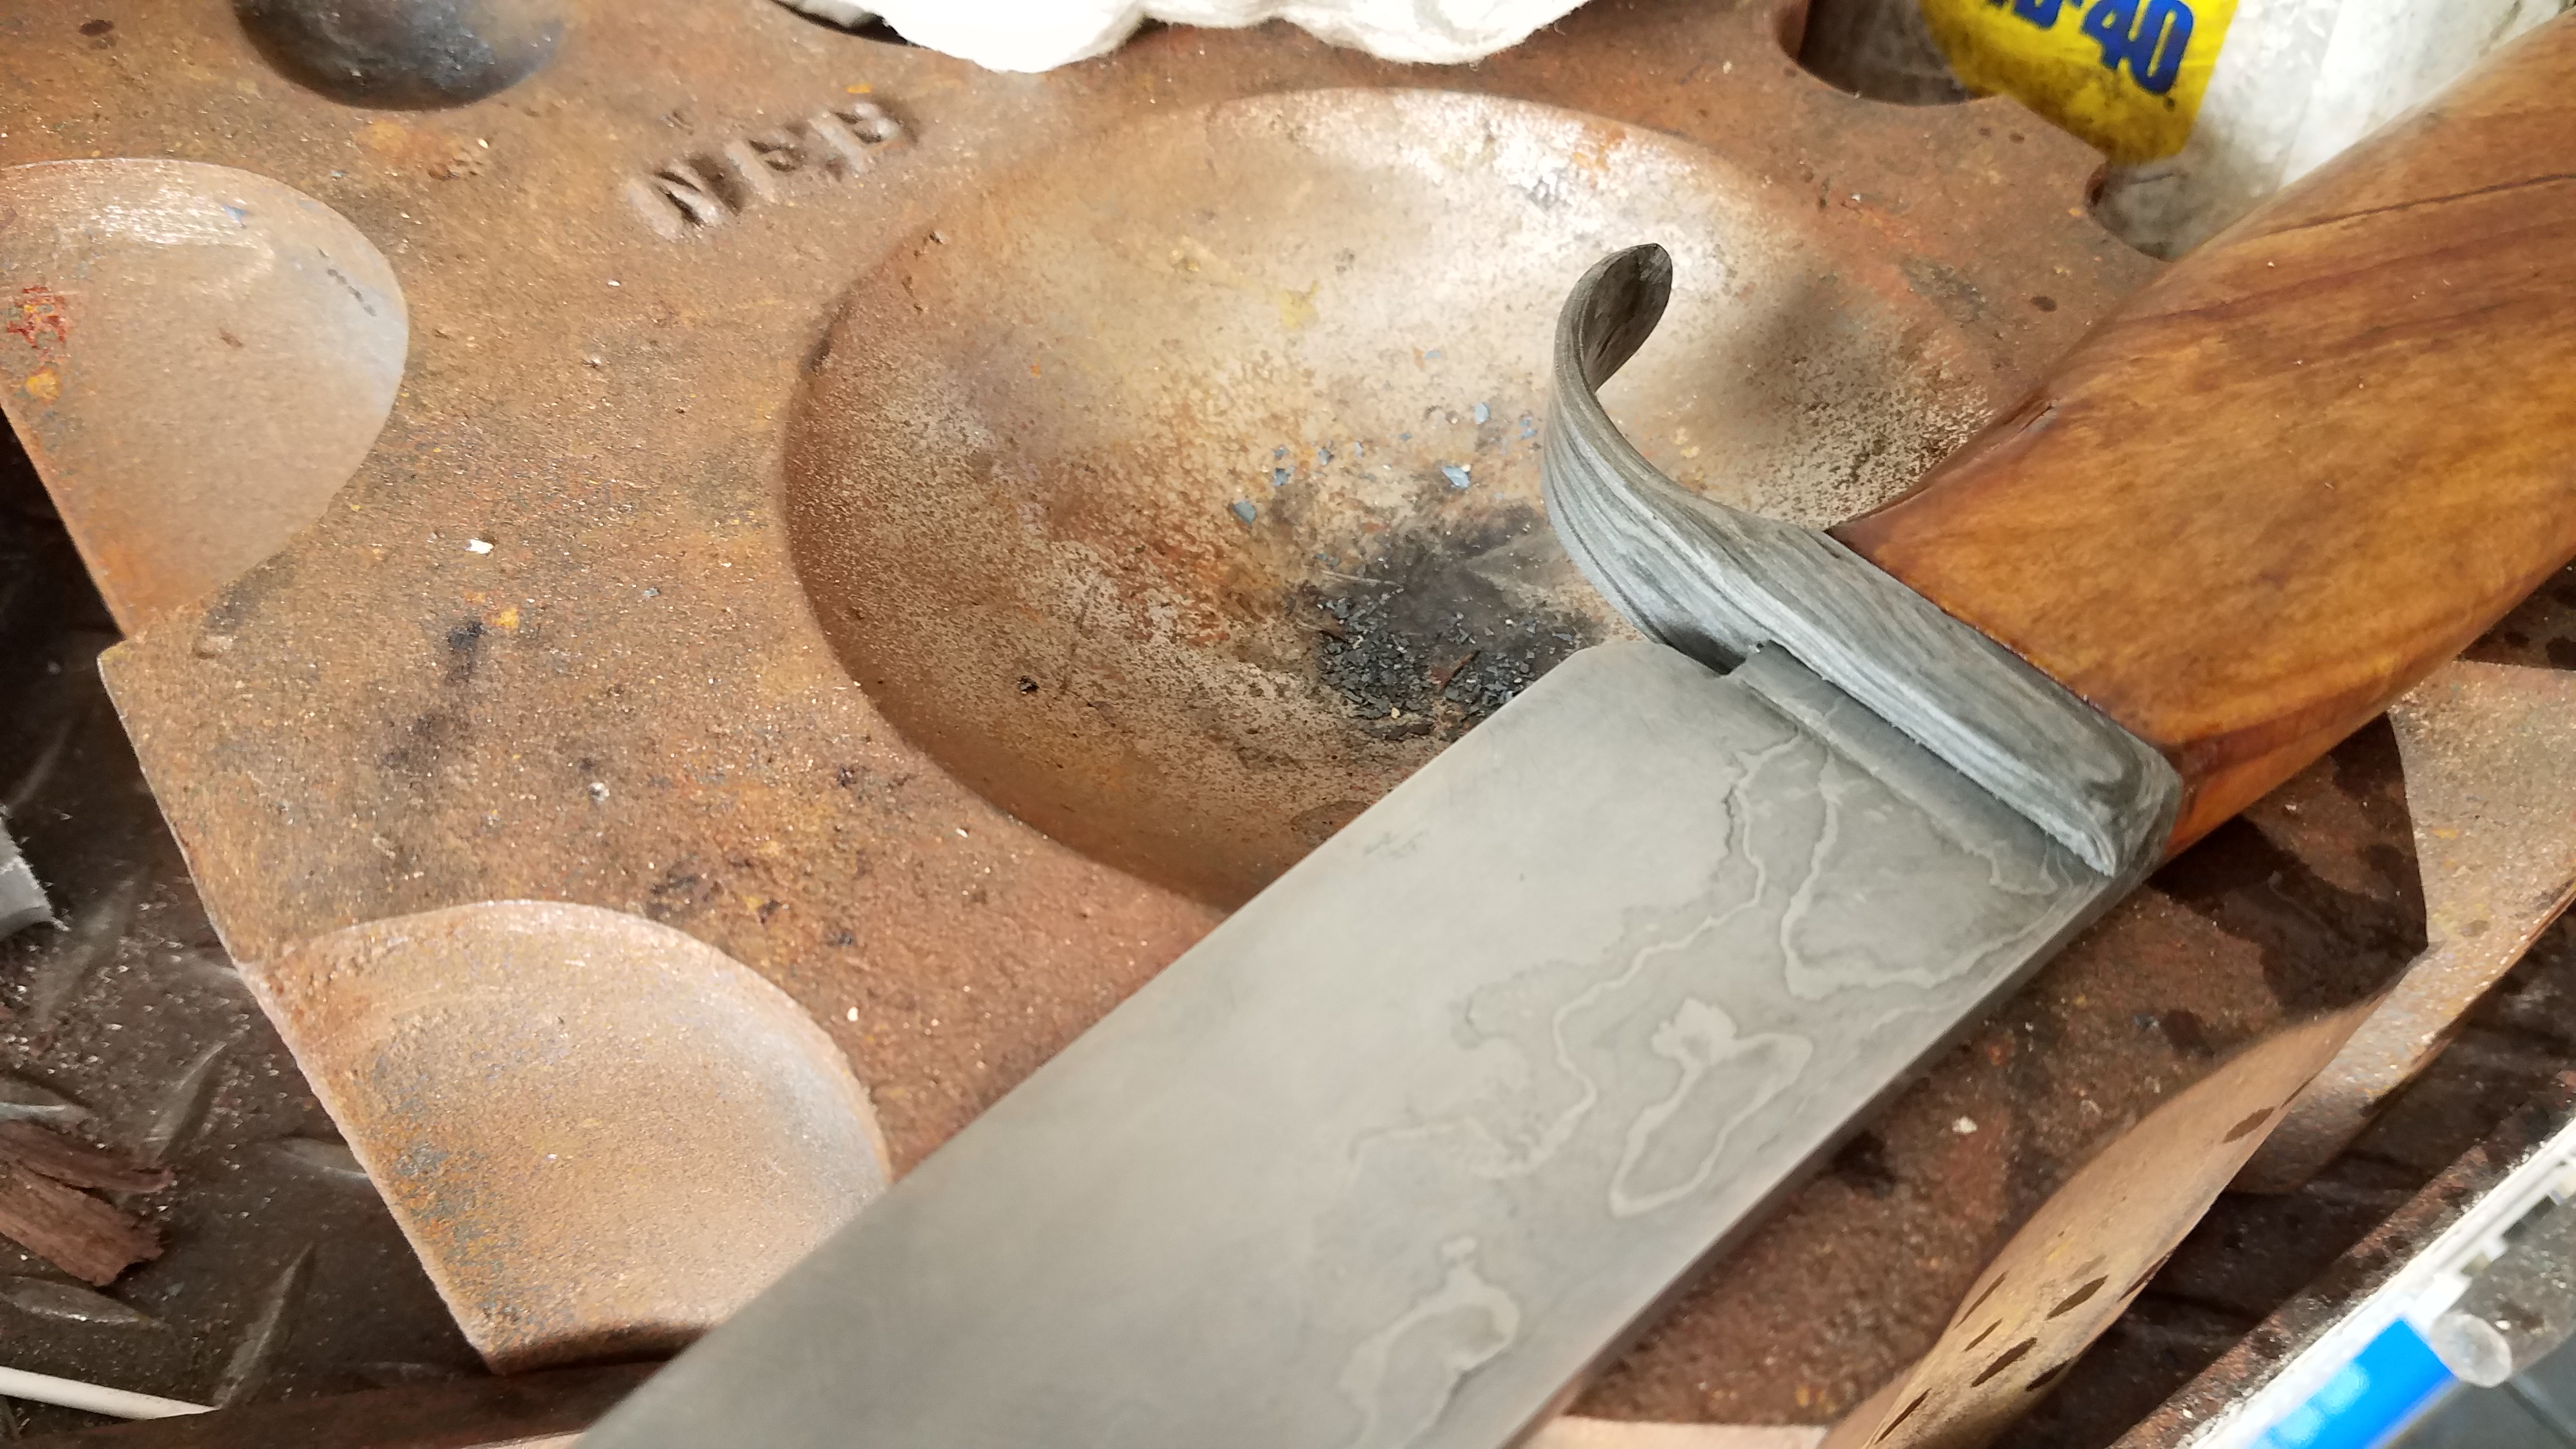
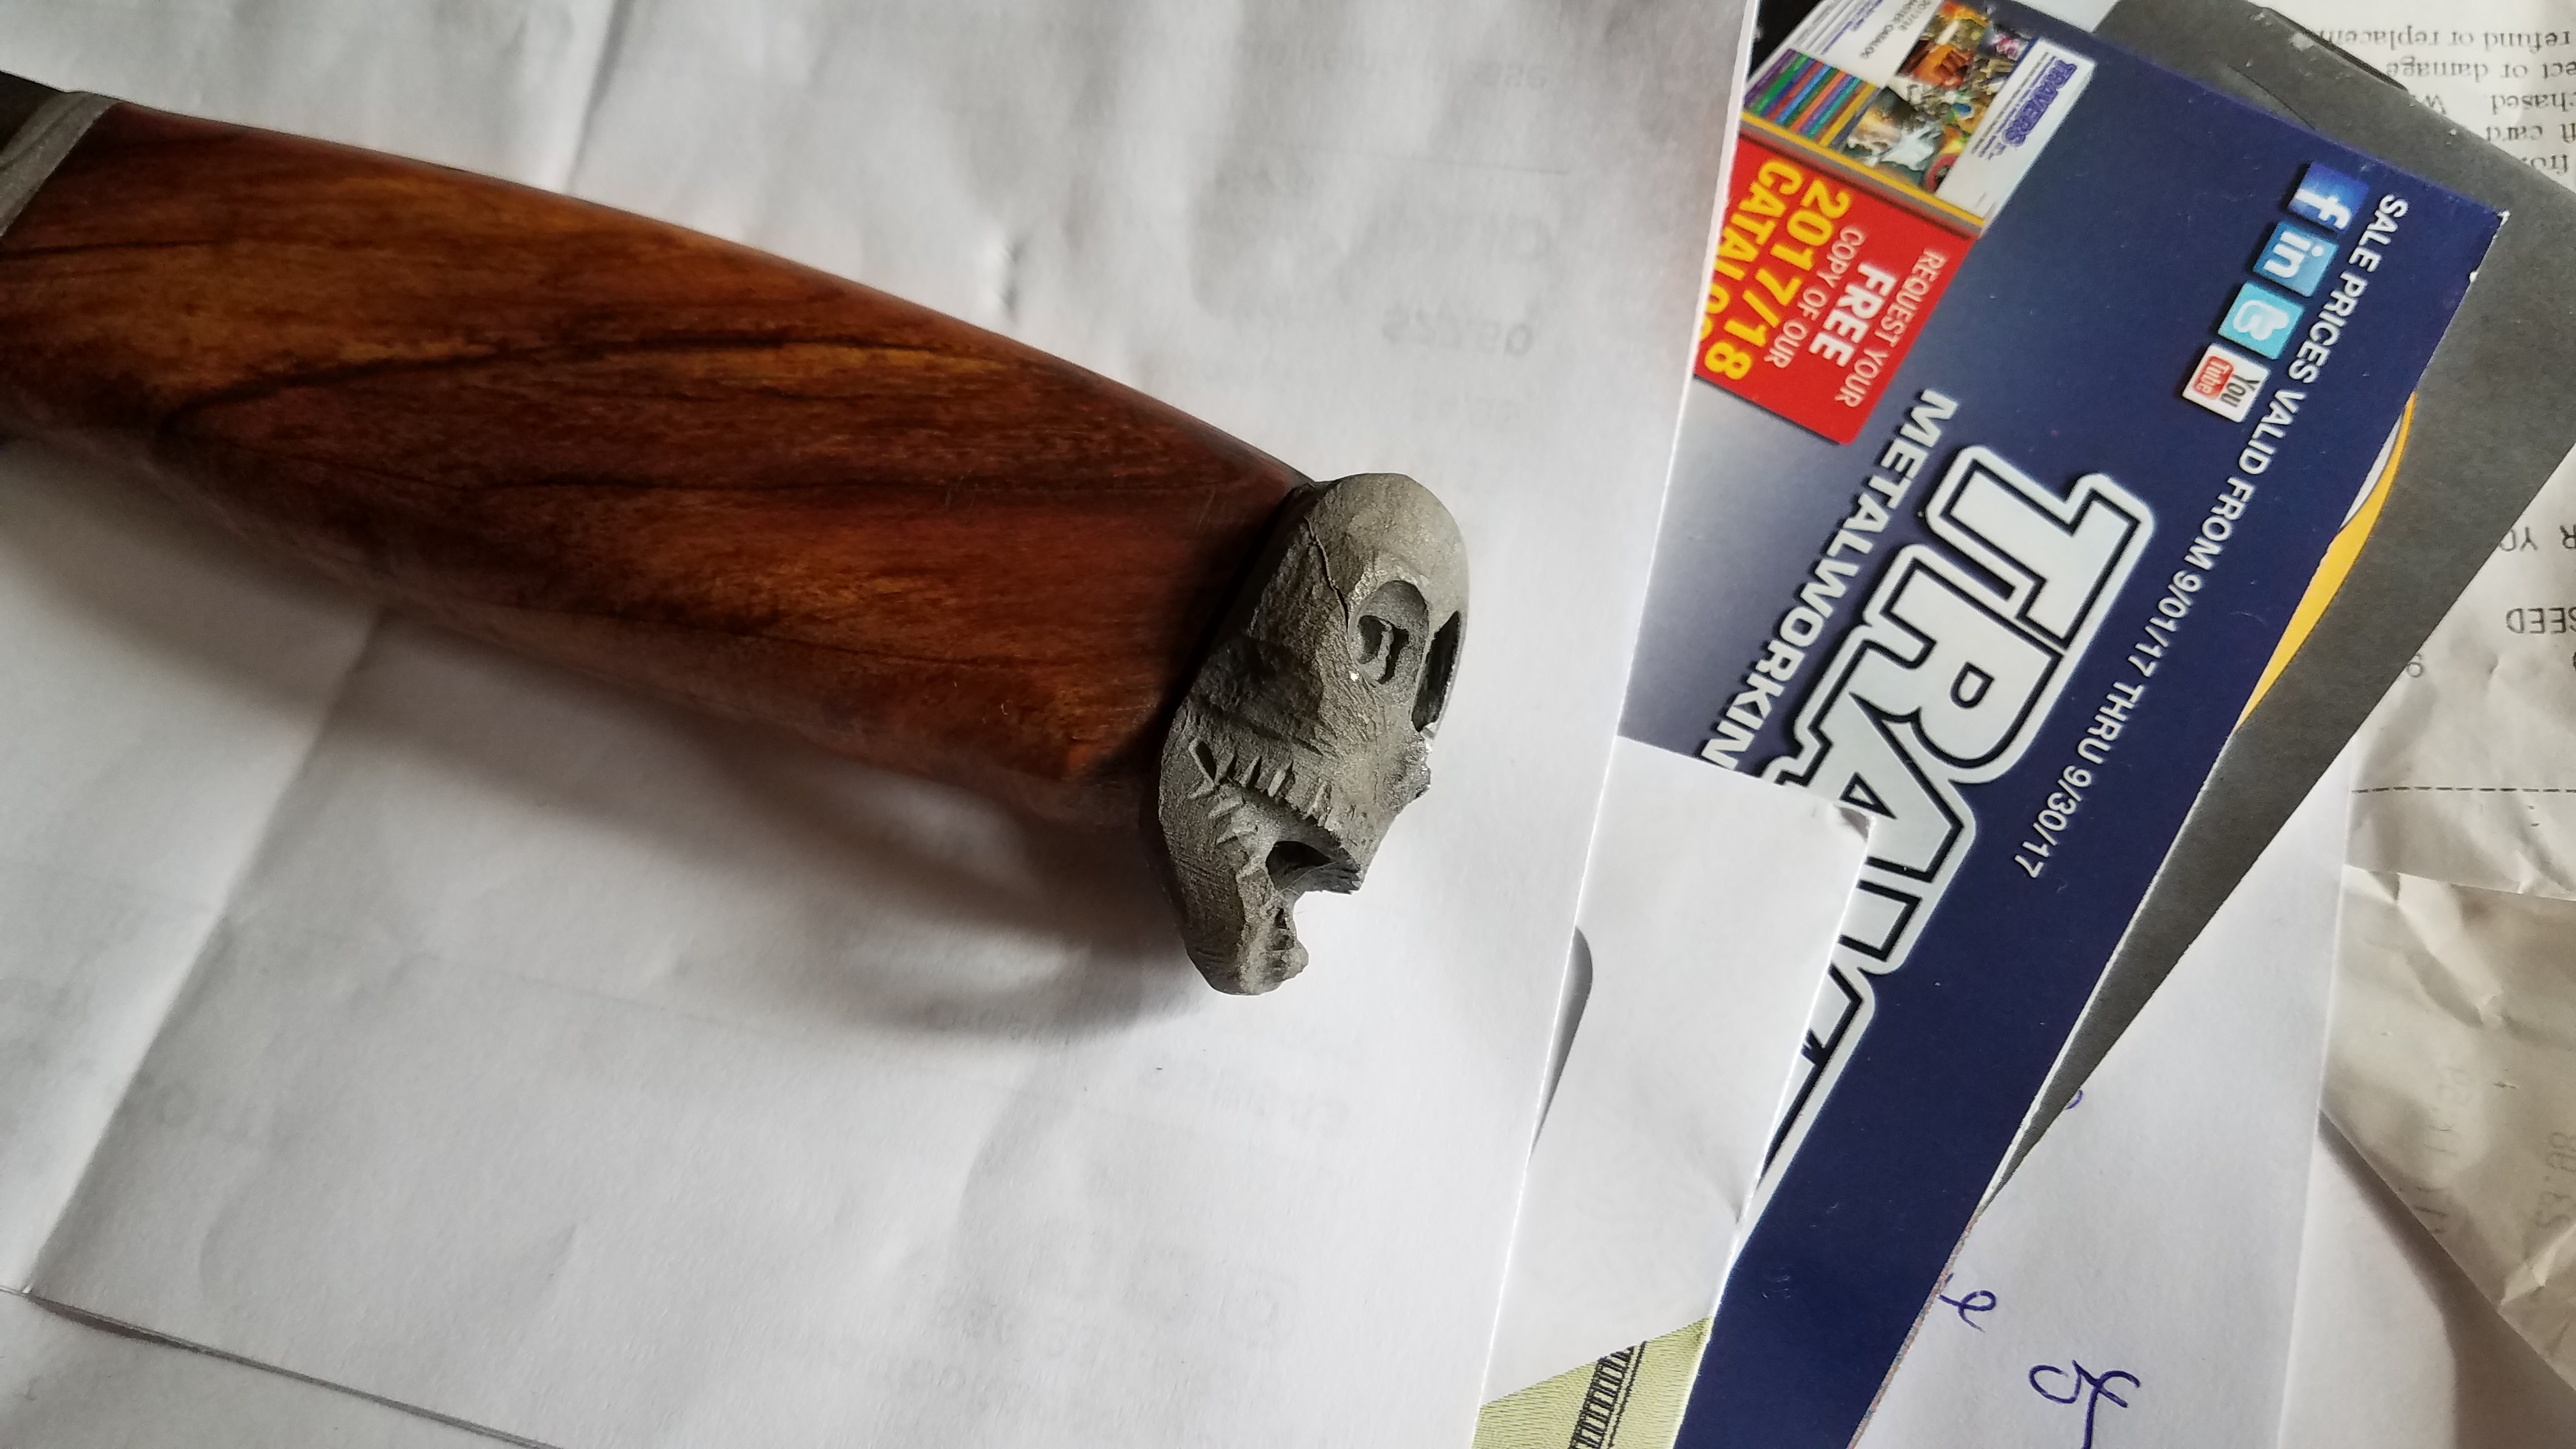
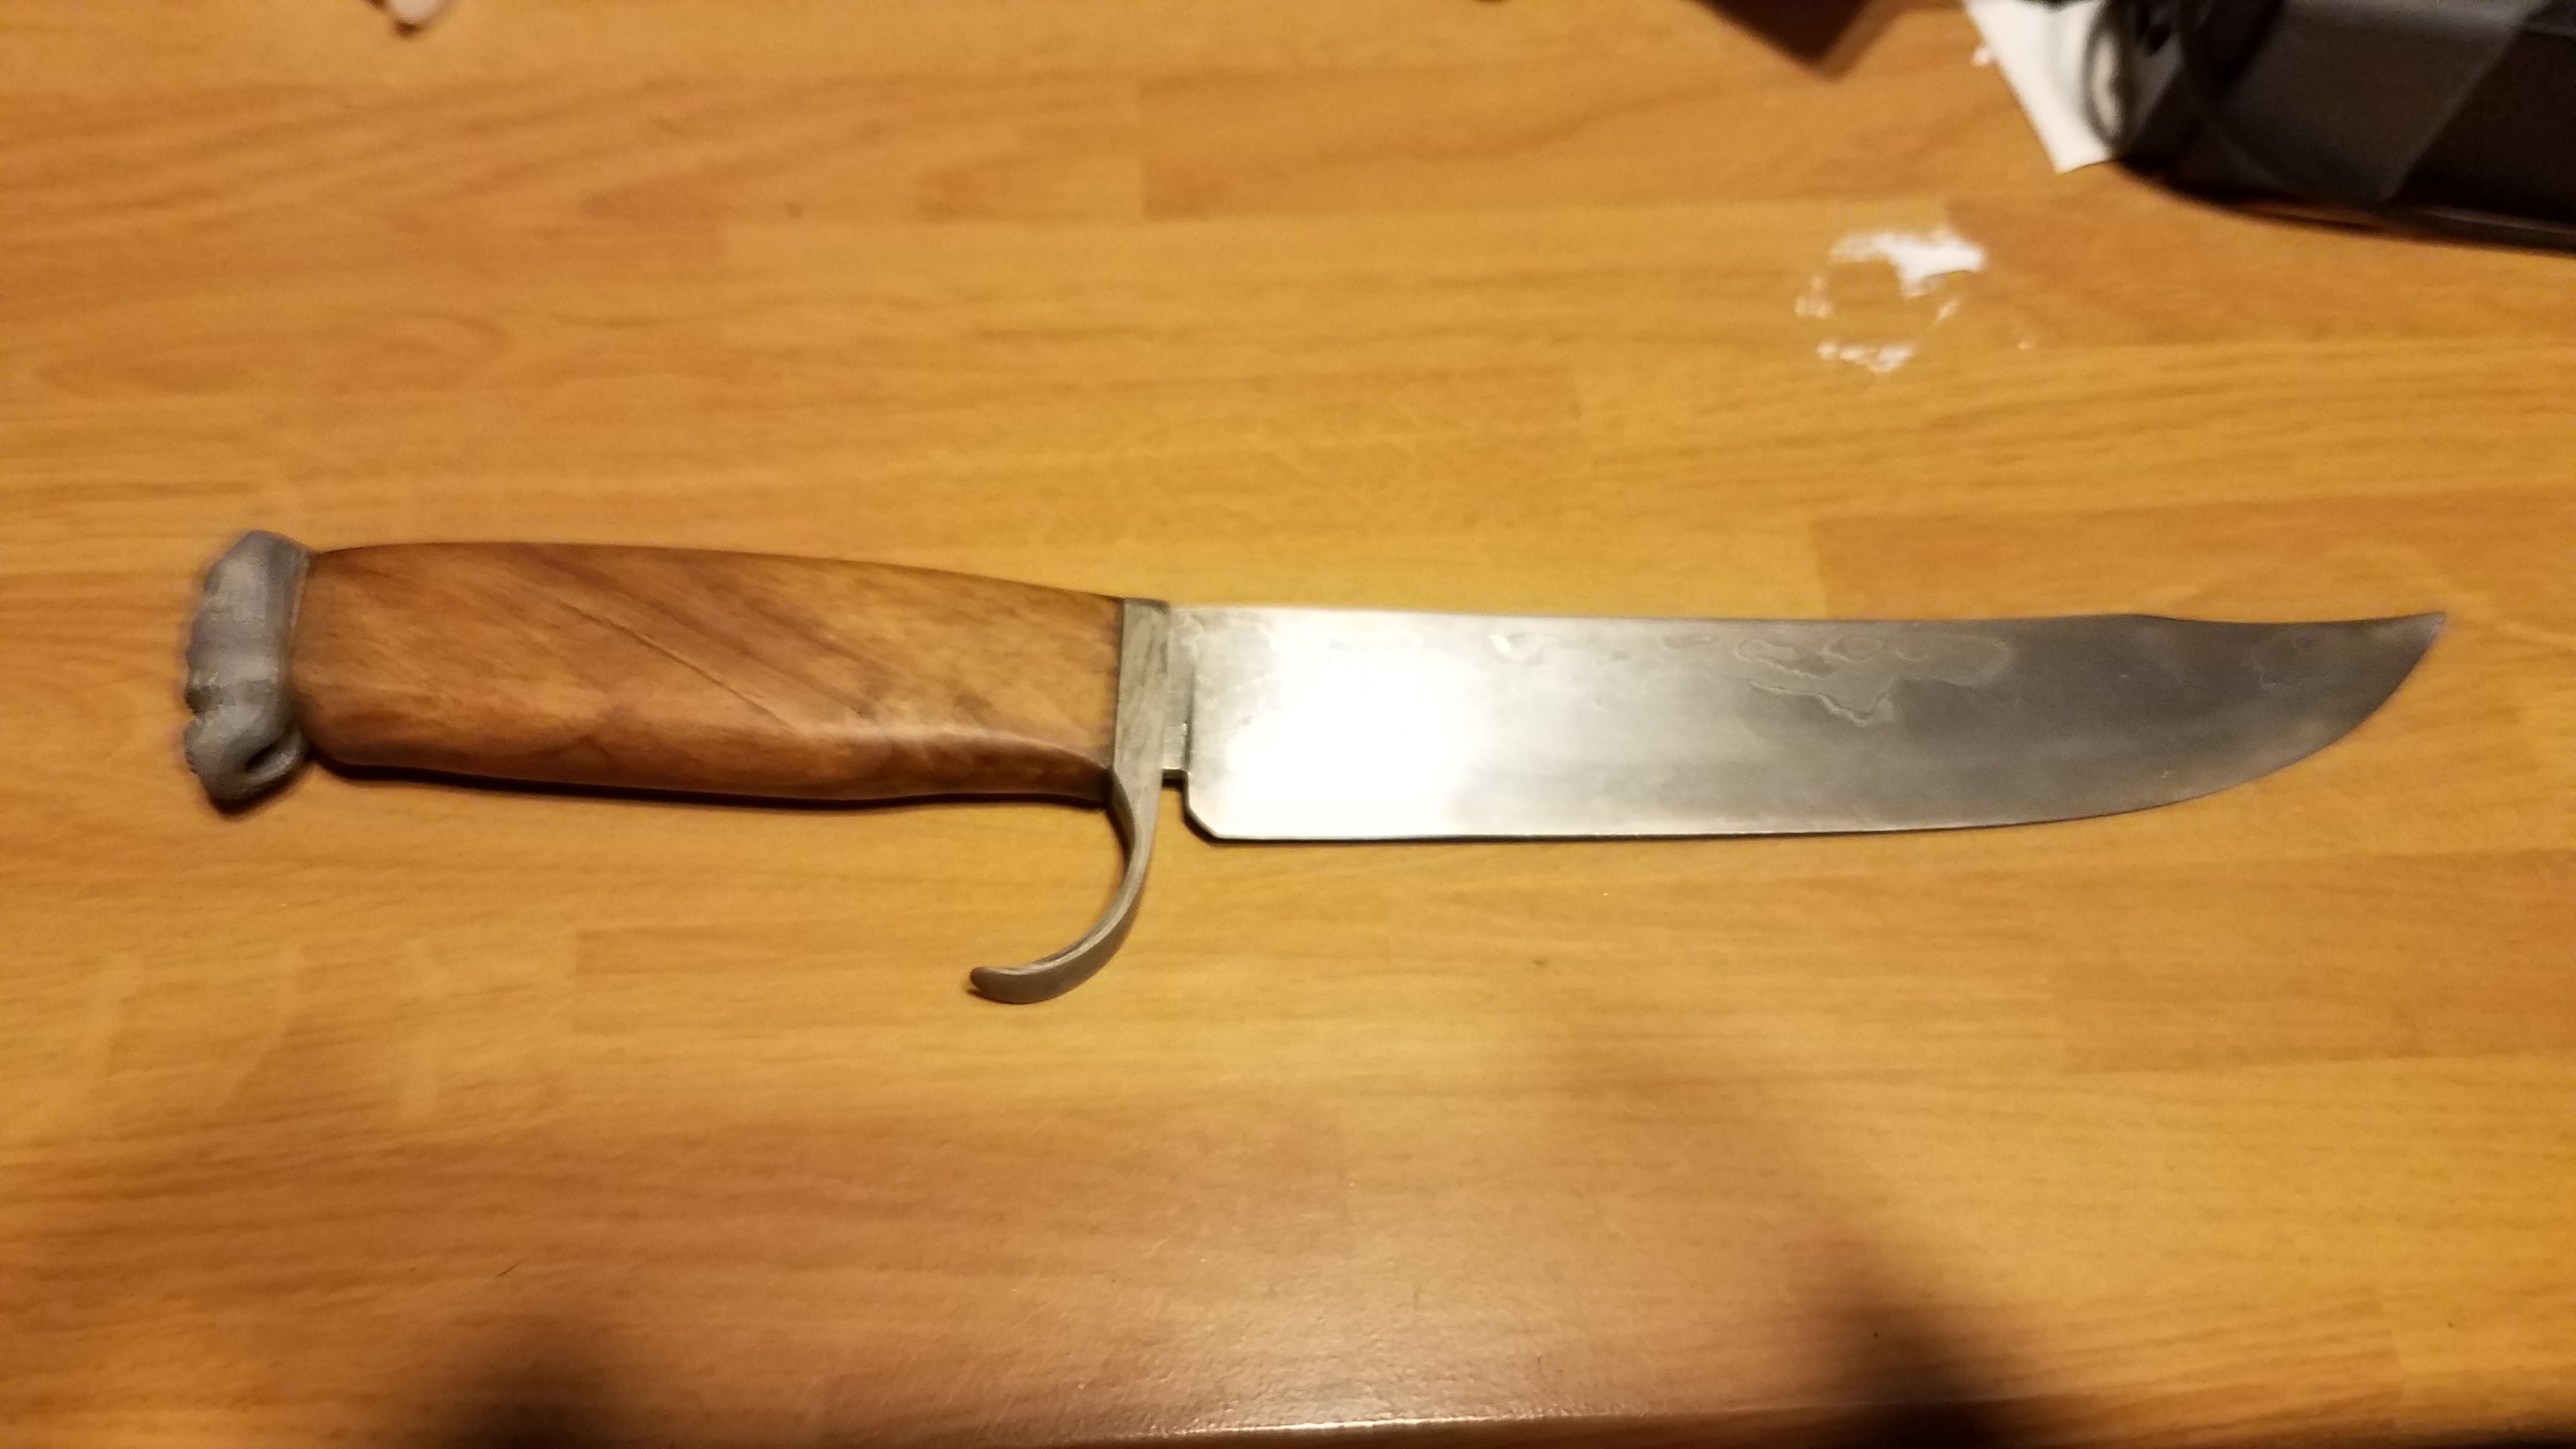
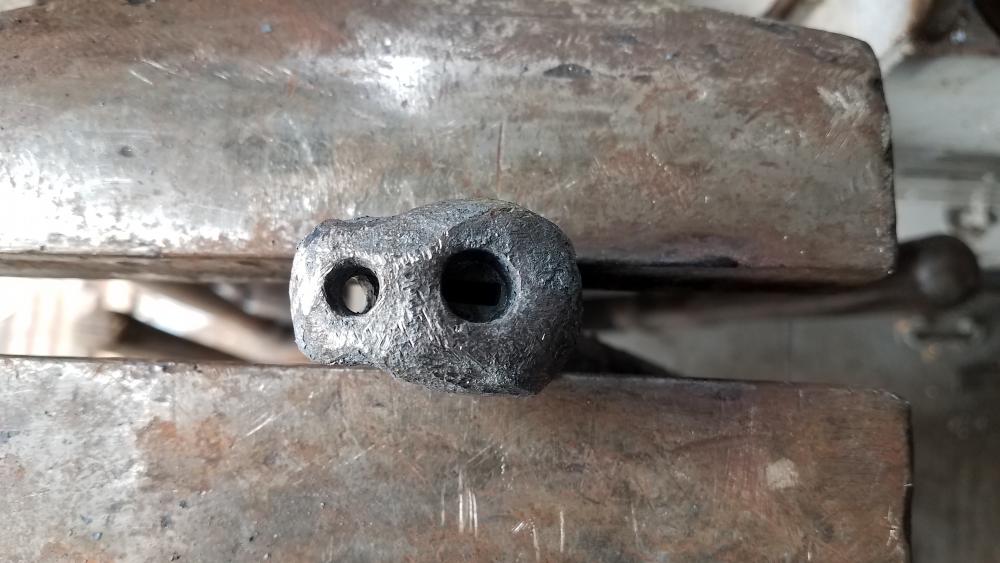
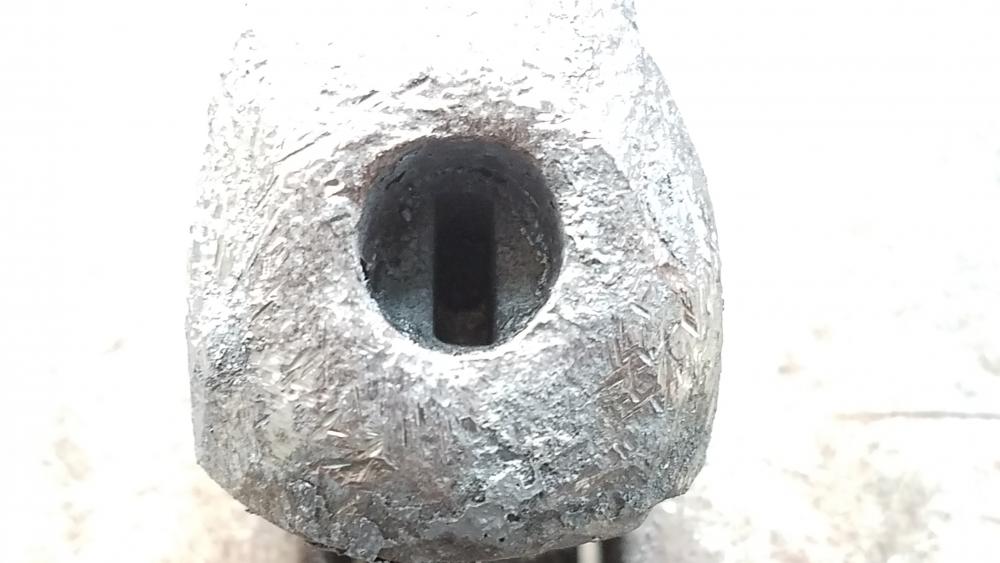
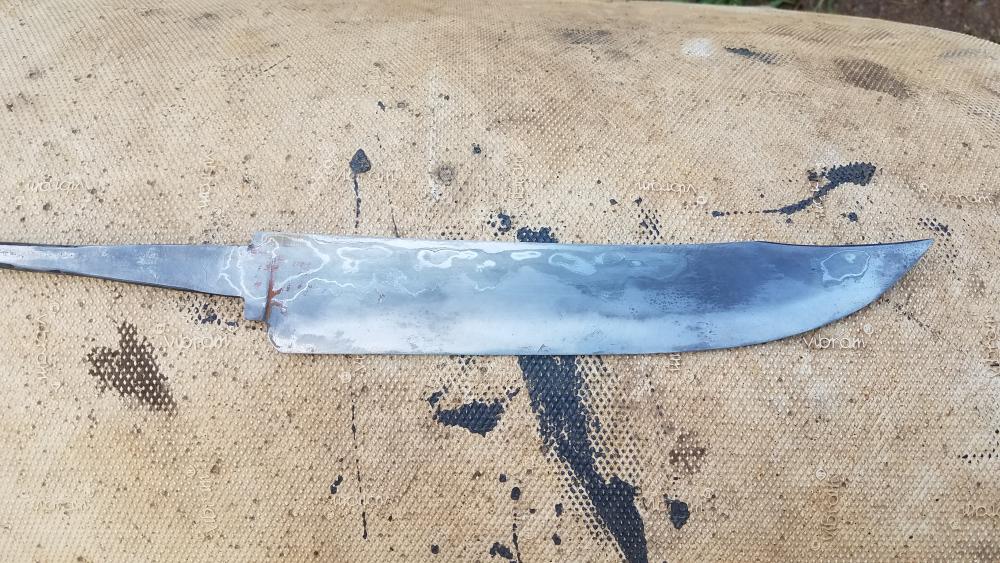
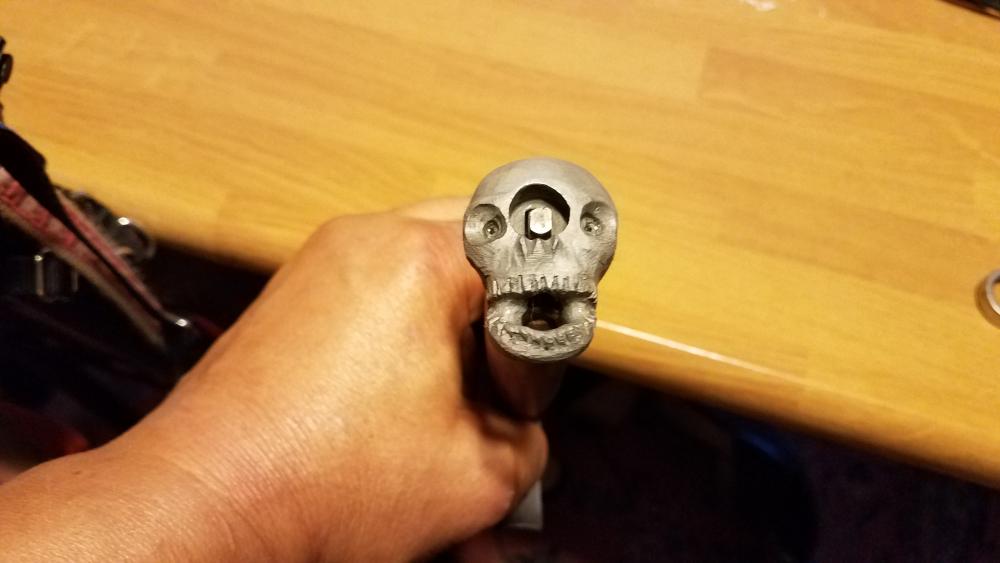
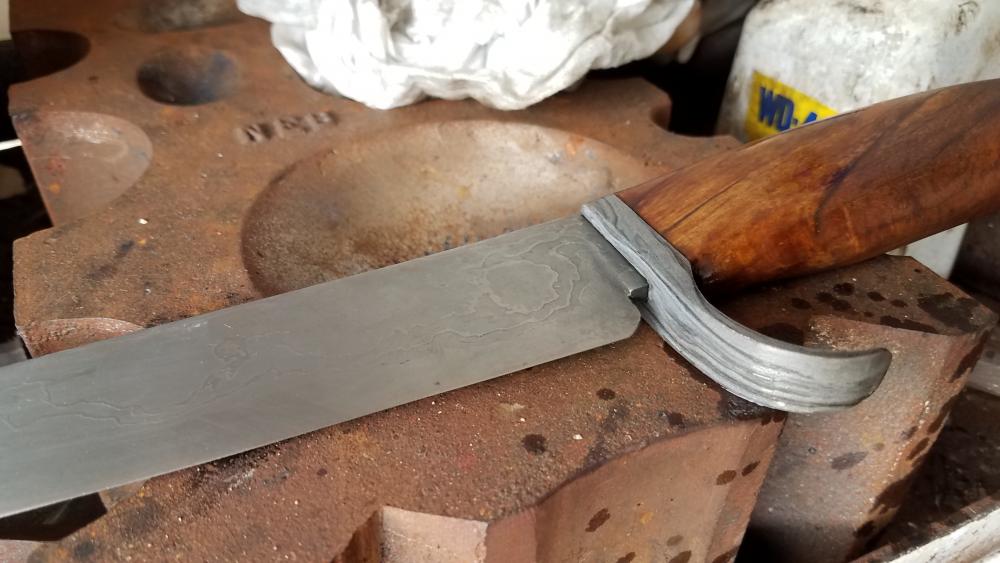
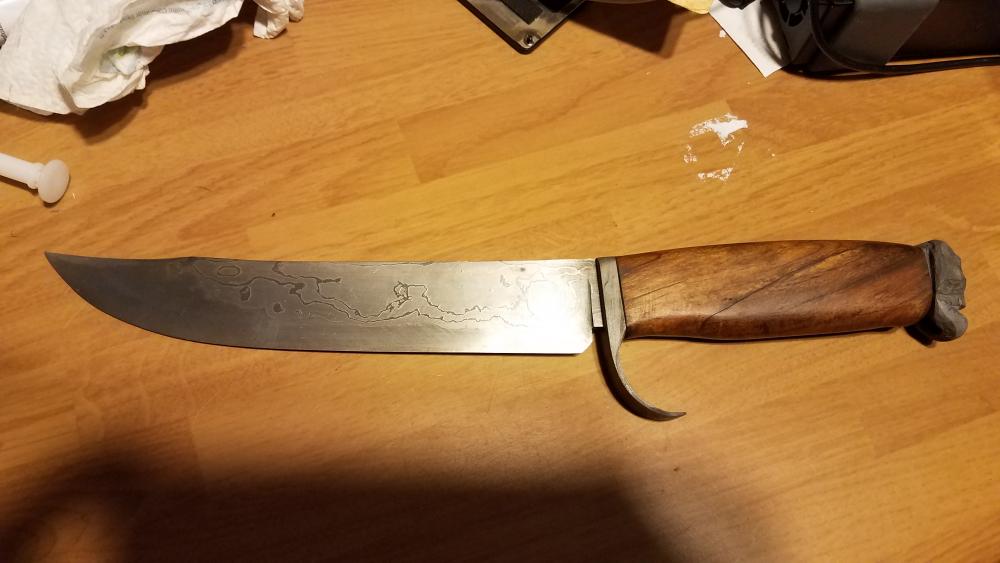
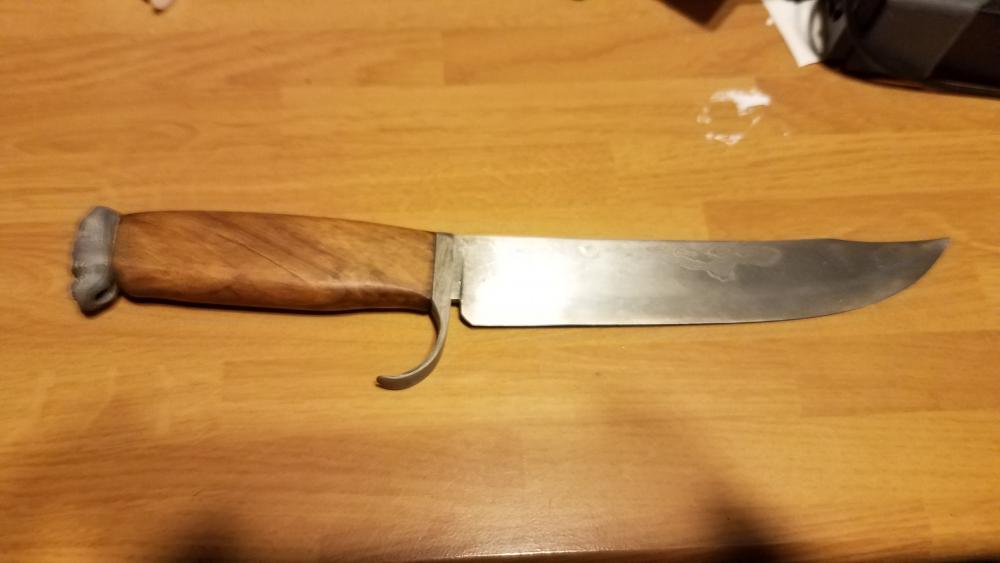
I'm pretty sure it was just high carbon steel.. It was very well refined and if it was/is carbonized wrought iron it was wasted on the knife.. It welded as typical of old steels I didn't test it though as it started life with me as a section of light buggy tire that was rusted to about 2ft long section.. To make it useful I faggotted it and started welding it together assuming it was wrought iron (it welded as such) and it was till I threw it into the slack tub and retreaved it that it had a nice pearlesque color and tested it was skating the file.. I have another section which came from the same place so I might test it to see further.. From a surface look with knocking the rust off there were no silica, iron boundary lines.. Thanks.. It took on a life of it's own. Got the nut done at the demo yesterday or just about done.. Still need to inset the nostrils more and make the wrench to remove it.. Thanks, I hear yah on the spalting.. It has a few artifacts as spalted but not a lot.. Sadly where the spalting shows the most is under the guard.. Would have loved to see the nut to skull portion a little cleaner but not bad overall for no drill press and the holes were punched while hot..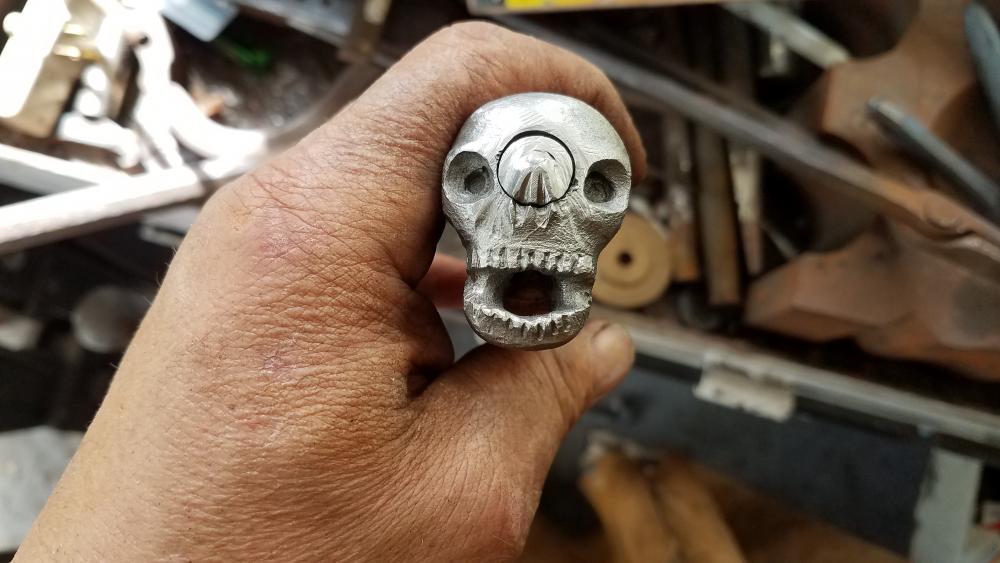


-
Proper hammering
jlpservicesinc replied to George Geist's topic in Blacksmithing, General Discussion
For me it has to do with natural body motion.. If you look at your work area as a turret with you in the middle.. Ideally it's one step to the anvil or vise from the forge usually with a turn. When you turn from the center of the anvil to the right the horn will naturally line up with the left hand on an arch without having to bend over like having the horn to the left.. I found that with older style anvils without truncated horns it was more on the money.. Now with a Truncated cone horn my left hand doesn't align as well but it still works well.. Other reason why is when using the horn for drawing out .. You are less likely to smash your hand into the face.. I'll draw a picture tomorrow if I remember.. -
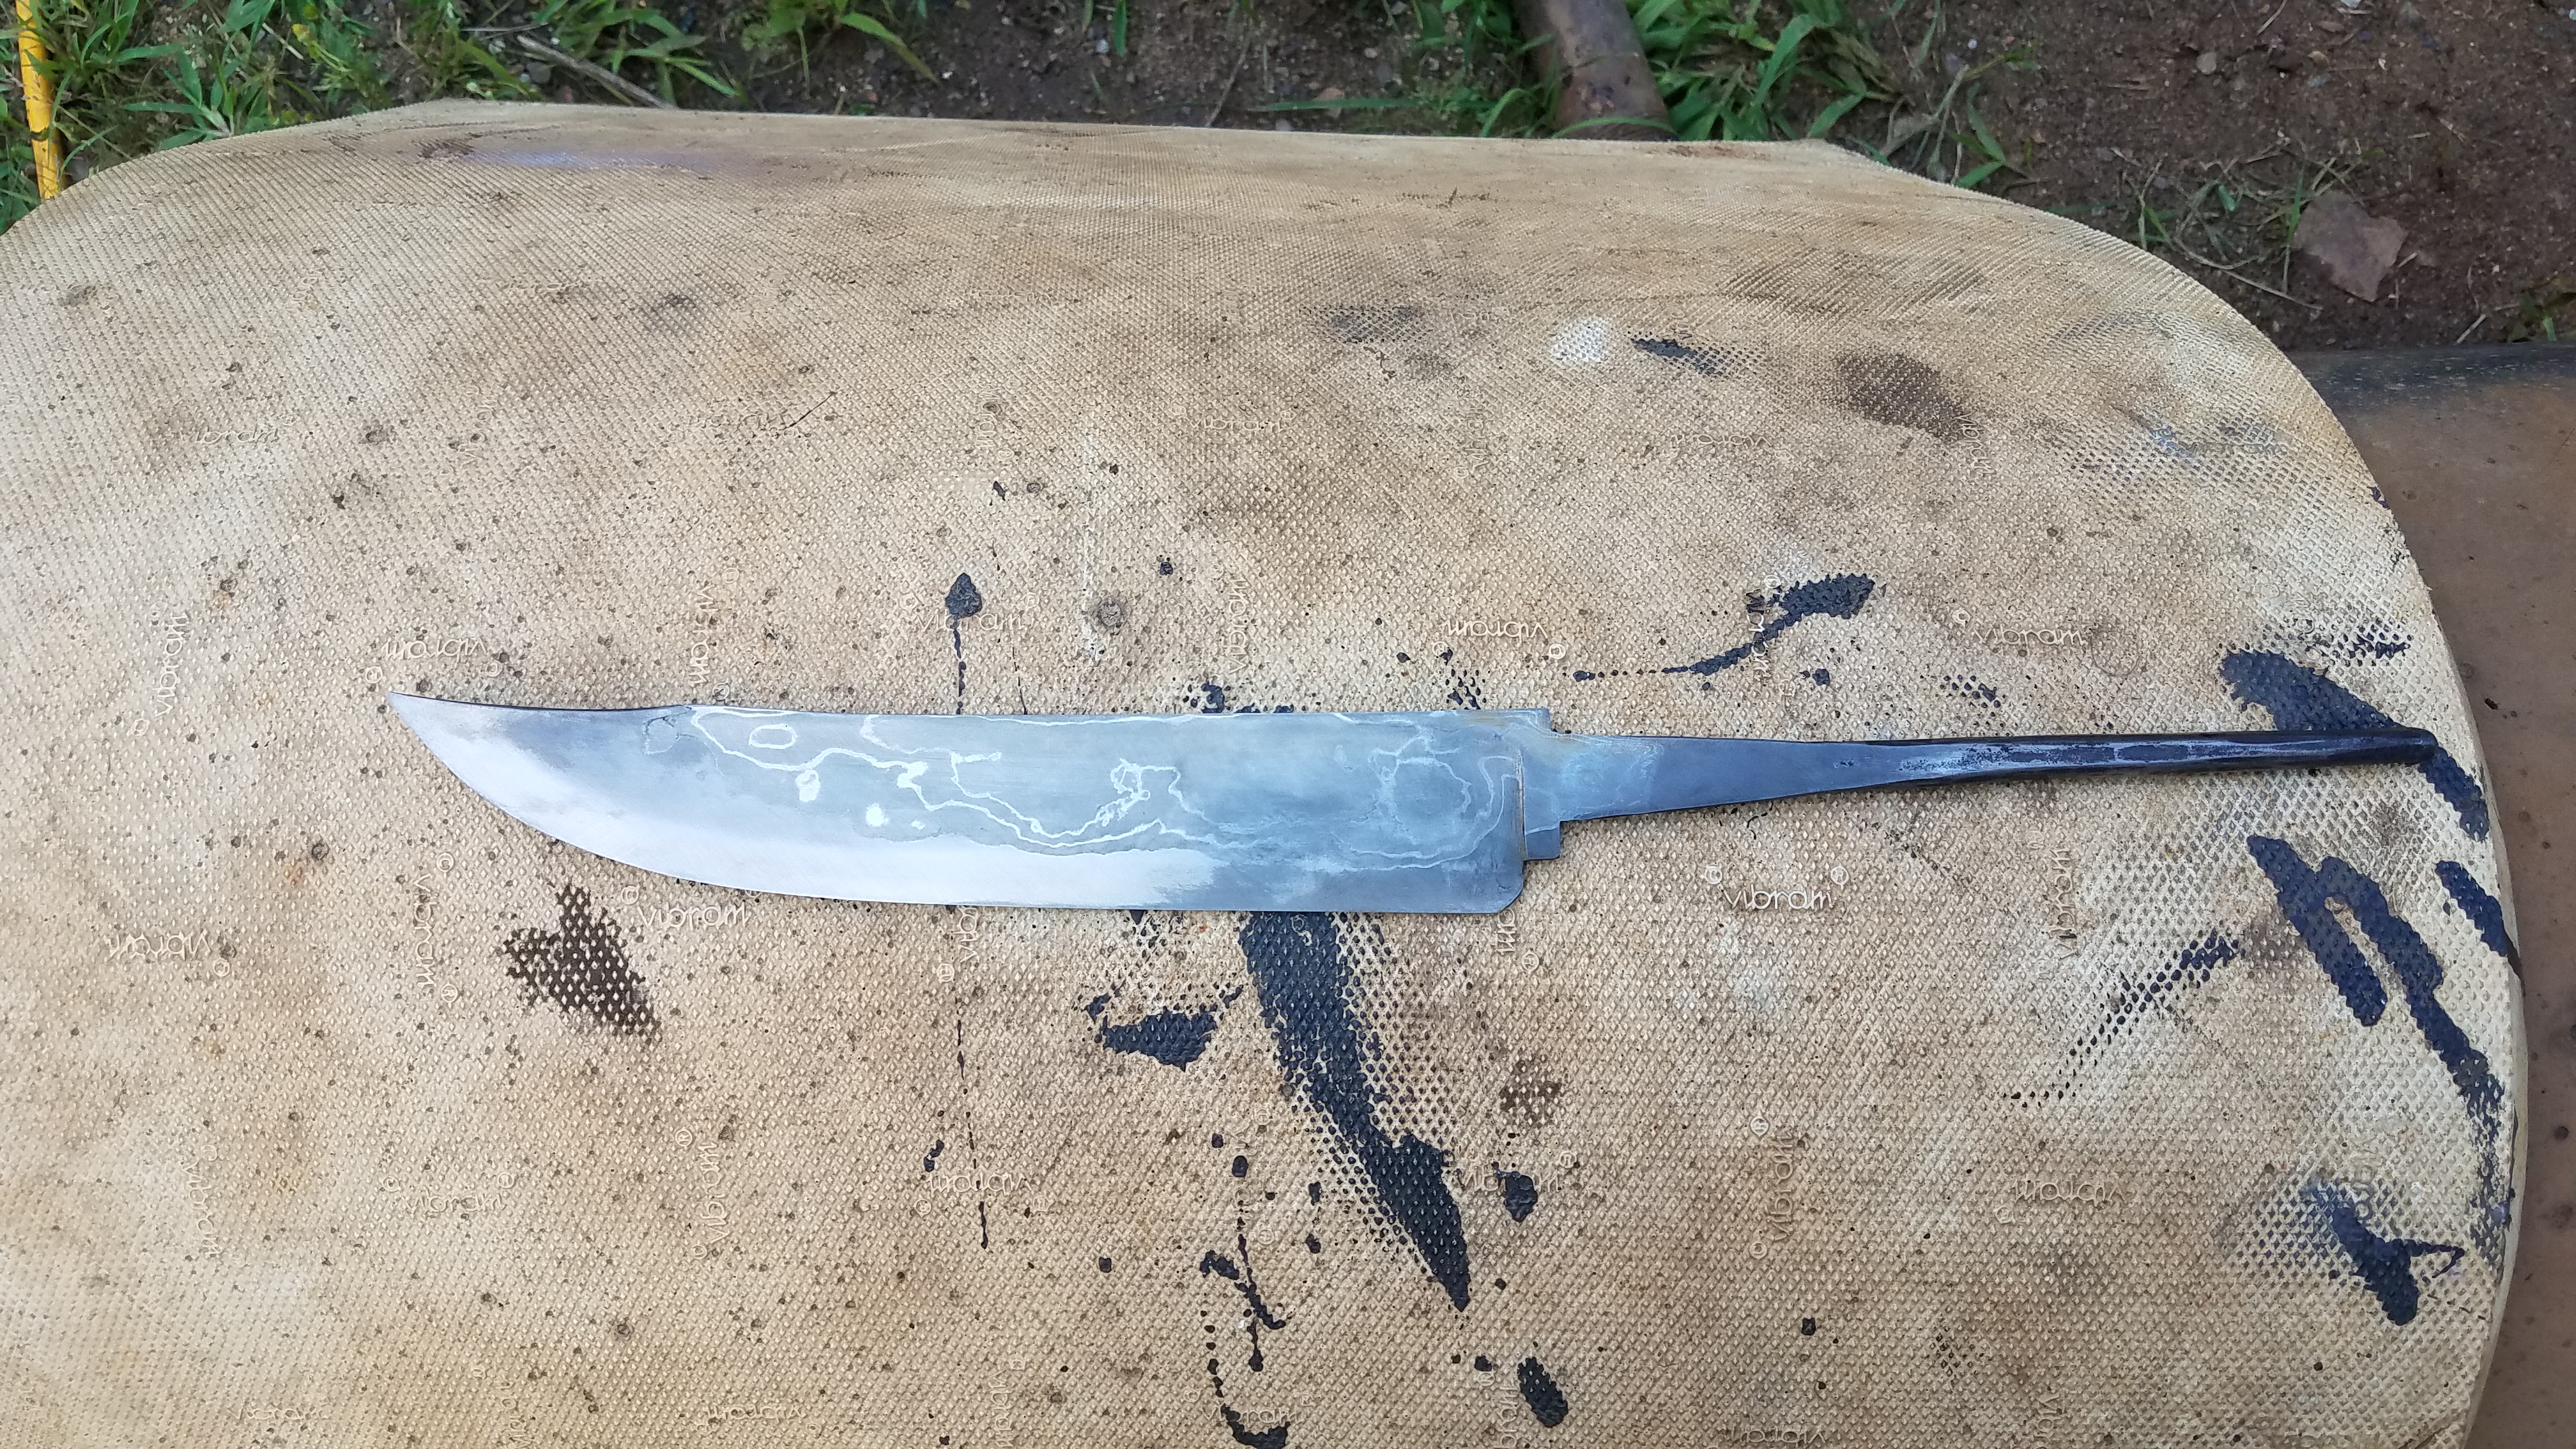
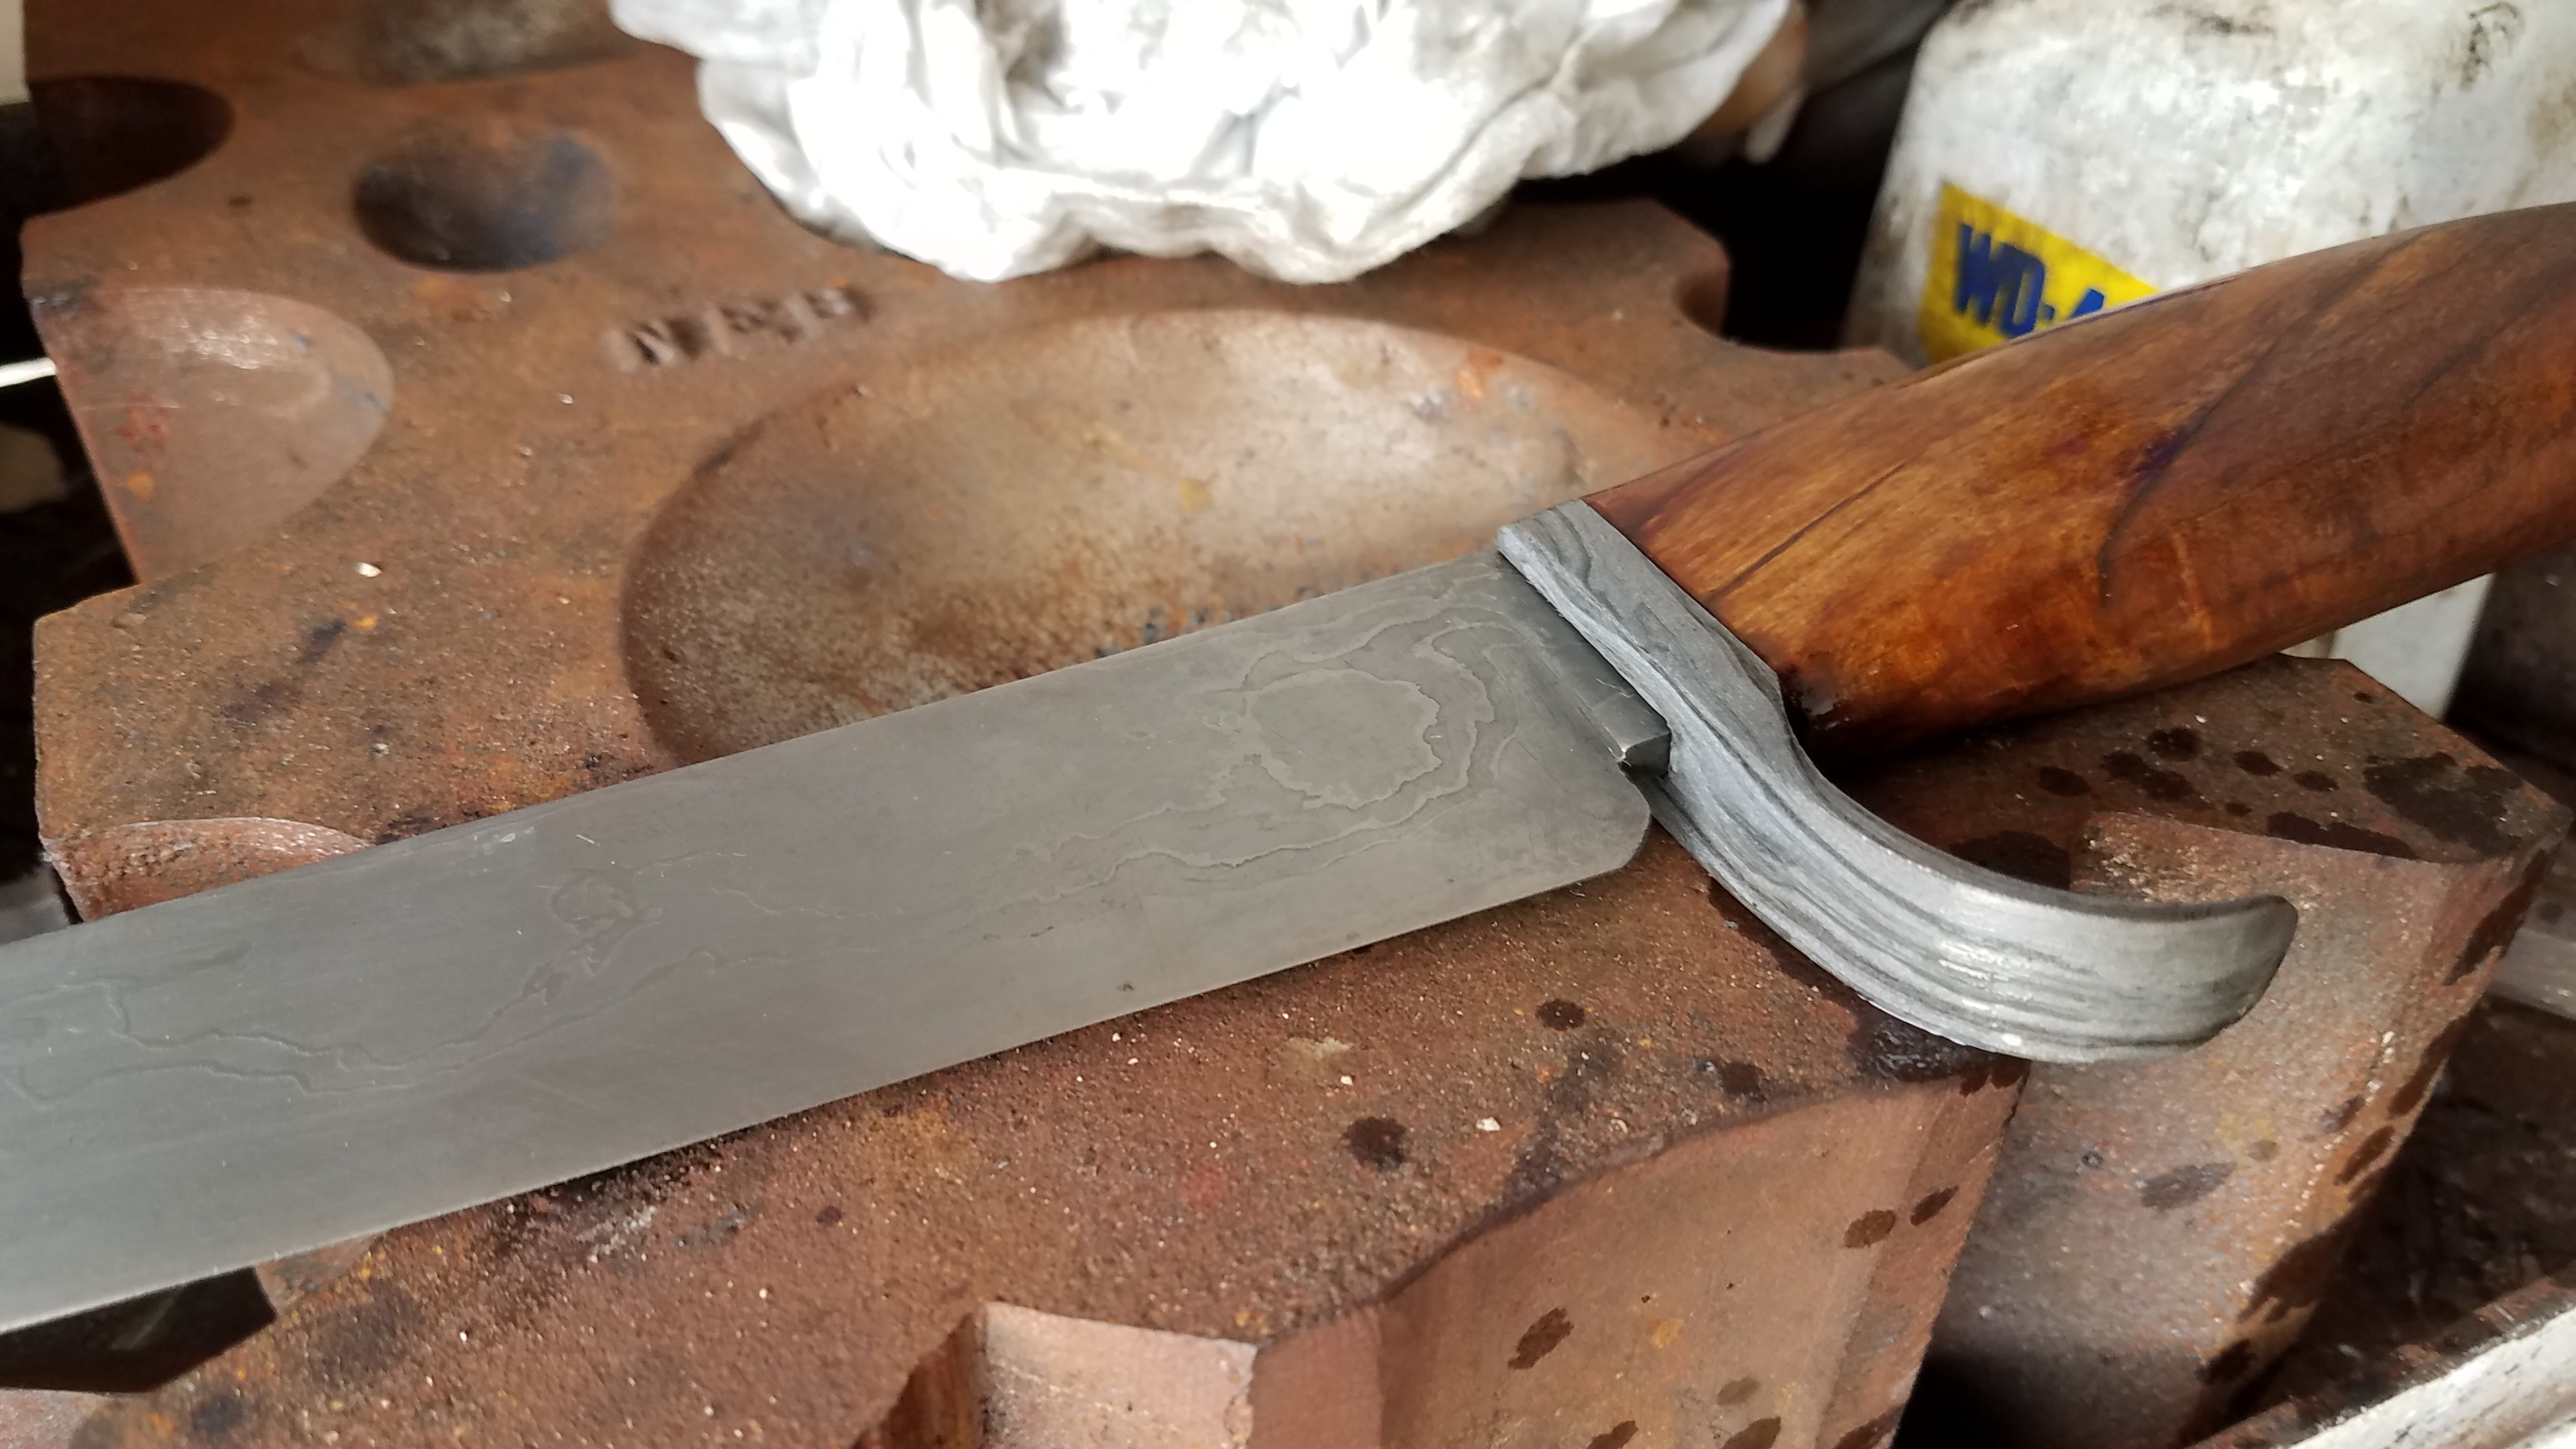
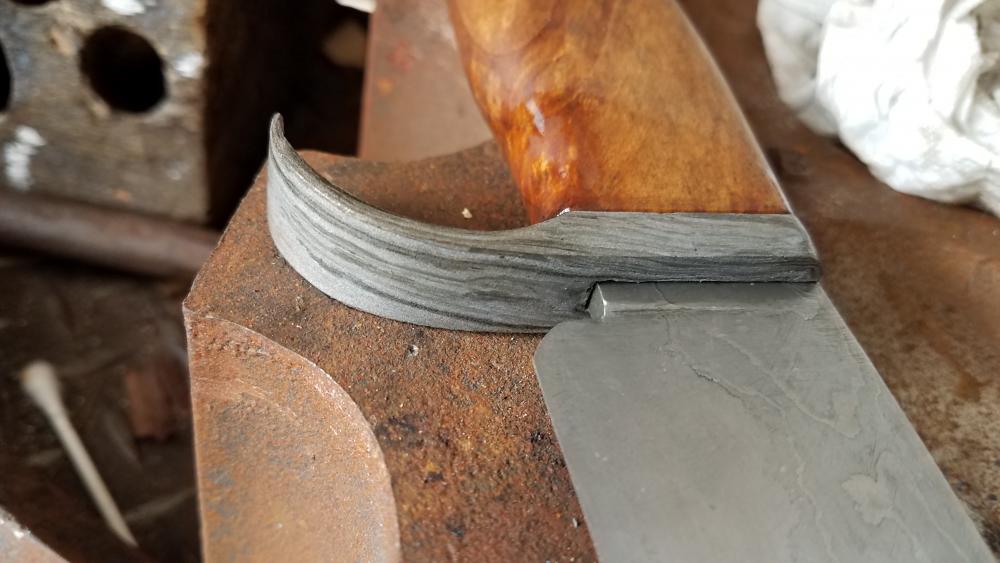
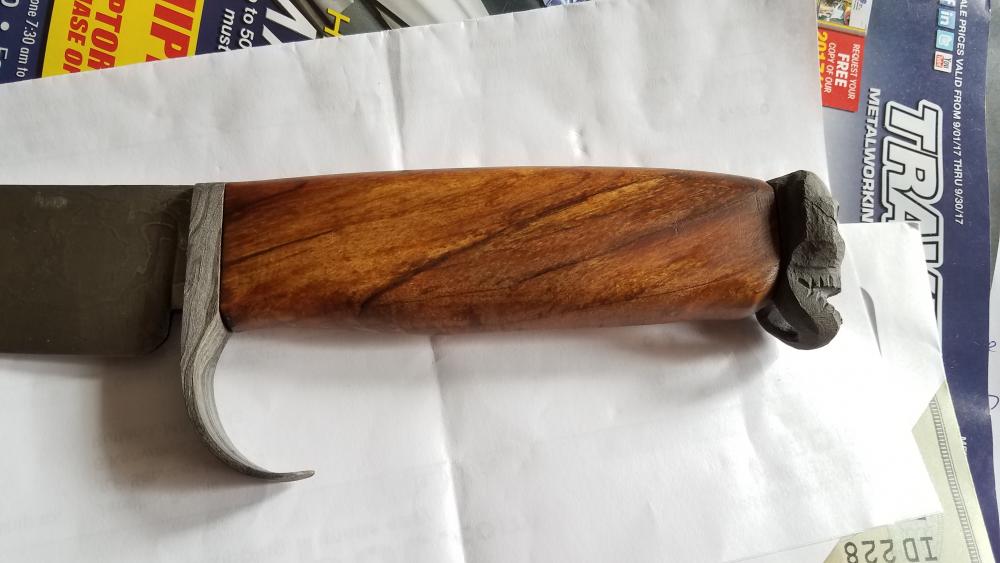
Knife started out as some wagon tire I had found. I just welded about a 2ft long section together and through it in the water tub.. It hardened and a file wouldn't touch it. Turns out it was high carbon so I just started welding things together.. I added 15n20 and wrought iron to the wagon tire and then welded this into a layered billet.. I then welded this to both sides of some 5160.. This was the first welded blade done in nearly 15 years.. It ended up having a few delams but it's ok.. Few rookie mistakes.. I started with a 25% vinegar etch and was looking for a little more contrast.. (I should have left it alone).. I then went to hydrocloric acid and it was to strong.. It eat the wagon tire like it was going out of style.. I then wanted to do something different so inset the blade into the wrought iron guard and forged up the skull with lanyard loop which is also wrought iron but it was over refined and has no pattern what so ever. (over refined by me as it started life as a tapered 3/4 to point and this was welded back on itself and then upset to over 2" and forged down to the skull.. Ideally it was the side profile which i wanted to be outstanding.. Still need to make the nut.. Spallted Maple handle I will be making a different pommel for it as well.. First few are after the vinegar etch..


-
I like it..
-
Nice anvil.. I own the modern equivalent is there is such a thing.. Looks like you are well on your way to forging stuff.. Treat her good and she'll give you a lifetime of wonderful use..
-
Congrats on the new swage block.. You are tooling up.. Out of curiosity what is it you plan on making?
-
Hi Welcome, Lots of people here come on in the mornings or after work.. You asked so here it is.. Lots of cold shuts.. Any cracking at any of the sections to bosses are going to fail.. Radius your anvil corners better or use the radius you have to your advantage.. Personally I like a shorter/rounder boss section for the pivot but if you punch it small and work up or use a slot punch you could get it to have more mass/material in the area.. as with any forging there needs to be a radius in any corner so you don't propagate stress cracks, or cold shears.. Overall not bad.. A few more pairs and you should be good to go..
-
in my early days of forge welding I had some steels which I couldn't weld.. Few years later I picked back up that same material and it welded just fine.. I have found as my skill set has increased there are a lot more opportunities to apply them in situations i would have been stumbled or stumped by in the past..
-
Thanks for answering my questions. Very nice indeed.. The stand is beautifully made as well.. Looking forwards to seeing more of your work..
-
Show me your anvil stands
jlpservicesinc replied to pkrankow's topic in Stands for Anvils, Swage Blocks, etc
Its gorgeous.. What do you figure it weighs? -
Show me your anvil stands
jlpservicesinc replied to pkrankow's topic in Stands for Anvils, Swage Blocks, etc
I like it.. Looks well made.. I don't see any through bolts? Glued? -
Charcoal flares up (starts to burn) or extinguishes/ashes faster (not enough fuel) for a given fuel volume than soft coal. lean fire manangement is what a lot of the asian and african smiths adhere to.. Reason being is they understand what they are forging and how to make the fire work for them (good fire managment skills) .. With charcoal because of how fast it can catch an produce heat vs soft or hard coal its nearly instant and so if you need a little more fuel to finish an operation you can just add it where using coal would be a big no, no.. With coals and coke the fire management goes up, Coke not nearly as much as soft coal..
-
+1 adding or banking on the side is not necessary unless you plan to do a larger section on the next heat.. IE after your current anvil and hammer forging time.. Charcoal will catch and be usable pretty much as soon as it's applied while you are taking your current heat.. The charcoal should be applied before the heat in preparation for the next forge operation.. " Fire management".. This will make the charcoal just about immediately available to heat the steel..
-
Its true.. The little dissertation I put together lacks a lot of the little details or big details depending on what you find to be important.. Thanks for pointing it out.. BTU's per pound is BTU's per pound and there are charts to look this information up.. 5lbs of charcoal is a lot more volume wise than 5lbs or bituminous coal.. Again this is part of the main reason in how much air you put into the fire to reach a neutral zone.. or a stoichiometric air/fuel mixture.. By covering the material you are in essence creating an oven or blanket to help hold heat in.. There is much information I left out as it would be a book.. Ideally working with someone in the know is the next stepping stone after videos and forums.. You don't always need to cover metal at the top of a fire is you are running a neutral fire higher up caused by running more air through a taller fire and this will move the heart of the fire upwards and outwards consuming more fuel.. interesting thread.
-
Nice all the way around.. How long did it take you to put the knife together including gathering all the materials? did you use a belt grinder on the blade?
-
plus 1 on Glenn's comment.. Having only 1 vise is a compromise and figuring out the ideal height for the work being done becomes a big factor.. Unless doing really heavy work in the vise (sledge hammer) I find a few inches above anvil face is pretty good for general work. File work even with elbows, Chipping work a little higher as then you are gauging the cut with eye site and have to be able to see the chisel face as you strike.. in the old shop I had made platforms to stand on for both vise work and sledge work as my strikers were shorter than myself..
-
The largest reason for not using charcoal is because of the expense vs bagged coal and the longevity of it.. Now not so much a price difference as coal used to be cheap at 3.00 a bag vs 10.00 for charcoal. In a perfect world it would be charcoal or coke and my preference is charcoal.. ok, so lets establish a base point.. A fire for forging using charcoal, soft coal, hard coal, coke, lignite, wood, or oil, or gas (propane, natural gas,etc etc) and all fire management for oxidizing, neutral or carbonizing is basically the same thing.. Fuel and air ratios.. Where this changes is as the air is introduced into the fuel the fire goes through each of these phases.. in a gas or oil fired forge once up to temperature you can use a choke or fuel pressure to get some adjustment and then keep it there until you run out of fuel.. In a solid fuel forge these areas of the forge fire are transient (Oxidizing, neutral, carbonizing) and simply based on how much air you put into the fire.. For charcoal a side blast forge is recommended for several important reasons.. 1 of which is how the fire behaves and how the charcoal (dust, cinder, ash) actually insulates the fire above it which can translate into a smaller fire to get the same heat for a given section of metal.. With a solid fuel forge you are always anticipating or forecasting how much fuel you will need 2-5minutes from now and this is called fire management.. A bottom blast on the other hand doesn't offer this same insulating effect even if all the cinder, ash is allowed to settle on the bottom.. instead it just plugs up the grate.. The other factor that comes into play is with having side walls with all the cinder, ash and dust it is very well insulated an the heat is concentrated into the work piece as it's reflected by the walls.. A bottom blast was designed for coal and coke use which the materials themselves become the insulating wall so to speak which is forced in from the sides.. Charcoal on the other hand can just be dumped on and banked out.. Enough about design.. But ideally if you are going to run charcoal,, move to a traditional designed side blast based on what you want to work on to get maximum BTU out of your fuel.. As to blast and what is going on in a solid full forge. It becomes understanding that you are in control of the blast.. The heart of the fire is where you do nearly all your heating as this is a Neutral zone and you won't have air attacking the steel as it's a Stoichiometric atmosphere.. (again changes with blast) With this being said... If you are understanding what is going on and you add enough air to reach this = neutral atmospere on top of the fire (like when using coke) the flame of the fire becomes a neutral atmospere and scaling is just about 0 and yes you can reach welding temperature but the heat is coming up from the bottom and it's only the flame and heated fuel directly under the metal that is neutral (the heart of the fire is oxidizing) With charcoal while you can weld or heat or control the top of the fire and minimize fuel consumption It's all blast related.. A bottom blast will always use more charcoal then a side blast because of how the fuel burns differently and how much less charcoal needs air.. As you increase air volume you need a large fire (more fuel) to reach stoich.. One other thing,, When doing the plates like that with stacking using an oxidizing fire and clay coating will offer the best results.. And ideally you want to do it at just below welding temperature as the clay will act as a welding flux in a neutral environment.. To keep the plates the same thickness the heat has to be the same throughout the bunch and ideally you need more than 2 plates because they will not move at the same rate.. You will also need to have the correct hammer weight wise to effectually move the metal at the center of the bunch just as much as on the outside.. Ideally you are looking to slip the plates.. This skill set to be performed takes a lot of practice to pull it off.. Save the wrought iron and practice on 1/8's sheet until you can get all the sheets in the bundle to be the same thickness when done as there is more to it then just the clay..
-
Forge welding to learn on your own is a task and is also hit or miss.. Being involved in a one on one situation with a skilled forge welder will have you welding all sorts of stuff together in just an hour or so.. There are a lot of miss conceptions as well as a lot of misleading information out there.. Not that the information is meant to be misleading but it comes down to knowing the colors, what the metal should look like before and during the weld.. What clean, properly prepared scarf looks like.. The scarf is how you get the ends to tie in and become invisible.. if you want more information geared at getting to a successful forge weld go watch the " How to" video on chain making on my jlpservicesinc youtube channel ( nearly all the videos have forge welding in them, well maybe 5 or 7 of them).. It's a great starter as you don't need to hold both pieces together which for someone starting out or even an experienced smith to get right each and every time.. Also making fireplace pokers are another great one as the rod is bent back on itself and again no reason to hold 2 pieces..
-
Portable Blacksmith shop
jlpservicesinc replied to jlpservicesinc's topic in Building, Designing a Shop
I like it.. LOL . It does look so sharp in the photos.. Since then I have done some pretty serious work it the trailer as well as a few multi day demos.. The floor now has that wonderful blacksmith shop dirt on it.. and from all the welding the metal rack and metal has a white powder on it from the weld flux jumping off and sticking.. Thanks and thanks.. It took a really long time.. at some point I'd like to make a rotary file holder and get a foot hammer made but there simply isn't enough room.. Id' have to get rid of the tool steel bucket and the extra nail keg I use for cutoffs and for holding nails.. But it is pretty amazing to work in.. -
Traditional blackmsithing.
jlpservicesinc replied to EJRailRoadTrack's topic in Blacksmithing, General Discussion
A lot of people feel the same way as you.. there is also nothing regulating the difference between Wrought iron worked into gates fences etc etc, and what cheap junk is sold in catalogs as "Wrought Iron".. No offense to anybody... I prefix this because there is a time difference between what is truly hand made to shape vs jigs and incorporating modern welding.. In other words. There are quality pieces made blending old and new technologies together to produce really nice items. But there are also people out there calling something forged or wrought iron when the only thing hand done is the handling of the bar before it gets stuck in the machine... As pointed out any moniker really means nothing... it just means that I end up explaining the difference to all the Walmart or acorn lovers.. -
I have just been to busy to deal with a stand and really the main problem is I have no room in the trailer.. the block sits on the work bench and when I designed the work bench I designed it for pounding on.. If you are hot to get a move on, let me know.. I'll draw it up..
-
Traditional blackmsithing.
jlpservicesinc replied to EJRailRoadTrack's topic in Blacksmithing, General Discussion
I think there is an ideal or a vision a person has both of costume and of building neither of which I adhere to nor was saying to be traditional.. because they dress the garb or work in a vintage shop means little.. My distinction is in forging skills and items made as well as tools used... progressive use of modern machinery, modern being limited to power hammers (drop, helve, steam, water, beam, human, tec)or hydraulic hammers since both have been used as far back as possible.. Again it becomes the skill set even more so than the finished product.. -
did you do a notch and break test? or just a file test? Some of the steels just don't get as hard as a true 5160 or 52100 so the file feels sticky.. But it is still hard.. If you do a notch and break test it will for sure show you the error of the ways.. Also some of the springs are decarbed on the outside so there is less likely hood of a spring failure from fracturing.. Flatten out 5", notch every half inch, take a full yellow heat at the end and have your last notch just before transition temperature (1500F or less) then harden the whole 5".. give it a file test, and then snap off each segment and look to see if there is a nice clean, small grain in the broken off part.. You'll notice that at the high heat sections 2400 down to about 1800 the grain gets smaller with the lower temps.. Post back results.
-
Ghoul steak turner
jlpservicesinc replied to jlpservicesinc's topic in Blacksmithing, General Discussion
Please don't take this the wrong way but I avoid jigs like the plague.. Or what I should say is While jigs can speed up production and make a consistent product, they also can mask a skill set or lack of a skill set and can hinder further skill development. I found that the only time I use jigs is when doing many scrolls or table legs or the like where to sit and bend and wrench every bend just becomes to time consuming to make any money.. One of the largest compliments I can get is making a piece or10 by hand and having someone say it looks factory made because of the precision between or against each other.. And of course I am a big promoter of taking ones time when it comes to forging.. Speed comes with practice and as a smith gets better so does the work and speed..