

Kozzy
-
Posts
1,203 -
Joined
-
Last visited
Content Type
Profiles
Forums
Articles
Gallery
Downloads
Events
Everything posted by Kozzy
-
Obviously test on a scrap piece before you dive into something harder to replace. I'd pick up an etch resist pen rather than rely on a sharpie. If there is such a thing as a radio shack these days you might find one there but they are also sold on Amazon. Personally, I would go the proper route of making an etch mask which is a bit more complicated than can be put in a post. Look into it if the quick and dirty method isn't satisfactory. The modeling world makes some amazing stuff with chemically machined parts (etch away the stuff you don't want) so there is a big community there to learn from as well as supplies to do a superior job--you'd just need to dig them out of the woodwork. Here is one thing that might help if you have time---This is a photo-resist material that you print on with a laser printer (NOT ink jet) and then can just peel off the template to use on your parts to be etched (actually ironed on and then peeled). http://www.techniks.com
-
I just tripped over some material that's been sitting around the shop for 15 years and thought I'd toss out some "water cooler talk" just to see if someone had opinions and ideas. Nothing pressing or important--just got me thinking. A machinist friend made a mistake and ended up with 4 blocks of 4140, parallel blanchard ground faces, 8" x 8.5" x 3.5" which he traded to me for some magic beans. He wanted them gone because the expensive mistake angered him every time he saw the darned things sitting in the corner of his shop. They're roughly 60 lbs each. Since my screaming toe decided to start the conversation, I got to thinking about what I should do with them...possibly swage blocks of some sort? Anything on your wish list that you'd make from blocks like that? Some sort of swage block you never get around to making but would if the material landed on your toe? Other suggestions? Something on your wish list? Just fishing for ideas.
-
I found them at uvex...now just have to find a version that includes magnifiers for old-man eyes. I climb equipment stairs and ladders all the time for work and this darned bifocal thing really sucks in the real world. I use prescription safety glasses now but I'm not really happy with them so want to try something new anyway.
-
The sweat drip thing drives me crazy in summer around here---any chance you can point me to the brand/style you are speaking of so that I can chase similar down? A simple search isn't really giving me what I think would work well.
-
I won't speak to hand forging because I haven't done that on stainless with a hammer---but in an industrial process we do you have to get it quite hot or it tends to crack (type 304) Put a magnet on it. If the magnet either doesn't stick or barely sticks, it's 300 series and won't harden. It will work-harden with repeated cold blows and bending but that is not the kind of hardening you need for tooling--it just makes further working a b***tch. As 300 series stainless work hardens it becomes slightly magnetic. If you see a tiny bit of magnetism, it's probably the result of some work hardening when the round bar was drawn. If a magnet sticks, it's probably 400 series stainless. That can be hardened. It's not the greatest when hard but it's enough for a basic knife edge..not really good enough for punching tools. (added for general knowledge just in case the stainless is unknown in the future) It won't really be stainless any more after you forge it unless you exclude all oxygen from the process. It'll be "mostly stainless" but more prone to rusting and some other metal problems. Oh...and with any stainless steel, remember that it's called stainLESS, not stainproof for a reason: It can get some basic surface "rusting" in certain cases. But the real answer...heat it, whack it, learn. You might like it or you might hate it but either way it'll improve your experience level.
-
Remember, old school was to use a foot treadle large grinding wheel like the kind you see in old movies sharpening axes. A good wheel can be pretty efficient but is, like all things old including me, slower. You can do pretty much any grinding on one that you'd be able to do on a knife belt grinder today. A good shop would have several wheels from coarse to fine. Apprentice work. I just picked one up that is in restorable but questionable shape. One of these days if I can get the 5 lifetimes of projects caught up on, I'll give it a try on a scratch-made knife. A good quarry of quality stone for grinding wheels could make you rich in the old days.
-

Wooden Anvil Stands: To Finish or Not
Kozzy replied to jac's topic in Anvils, Swage Blocks, and Mandrels
Old school wood preservation was to oil it with anything from kerosene to used motor oil to diesel. You have to let it air for a long time afterword though. Platforms on windmills used to last many decades in the blazing sun/weather because the boards were oil soaked. If it'll get damp, I'd use something like boiled linseed oil to really soak into the end grain. Do it warm. If it'll stay good and dry, it'll probably be ok but that depends on the wood. For example, Elm is hard and heavy as my brother in law's skull but rots very easily when exposed to weather. -
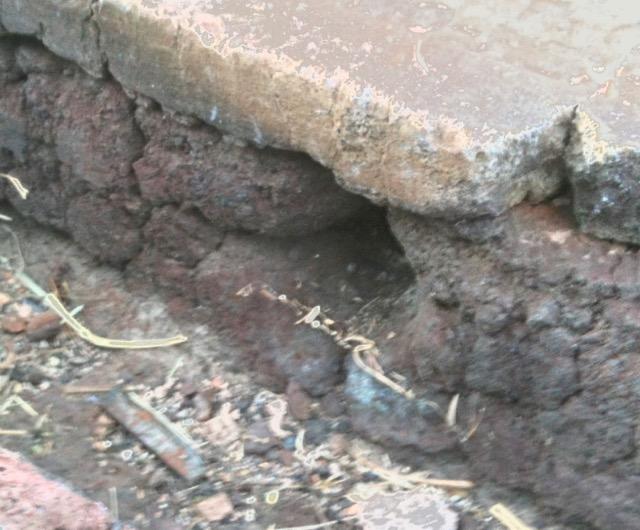
Attached is a photo of one of the 4 tuyeres on the old school forge I am bringing back to life. It's a little tough to see but the openings are roughly cone shaped as the refractory has degraded and about 2" in from the face, the refractory is cast around the steel gas lines--looks to be 3/4" pipe. This is an air fed forge--propane is fed into the blower impellor and then to a distribution header with 4 pipes leading to the tuyeres. 3 have shut-offs so that you can choose 1, 2,3 or 4 burners being lit. The problem is, I am not sure what the actual shape of the refractory portion of the tuyeres was to begin with--or if it really matters. Should they be slightly conical to allow some spread? cylindrical? If cylindrical, then same diameter as fuel feed pipe or slightly larger? Cast in some sort of modified mini ribbon burner? Since you only get one shot at re-casting the refractory (or start again from scratch) I thought it better to ask for opinions rather than just guess. Oh...those degraded top bricks are 1-1/4 thick for a size reference.
-
Japanese style belt hammer
Kozzy replied to j.w.s.'s topic in Power Hammers, Treadle Hammers, Olivers
There are several youtube videos of the belt hammers as well as some photos but I can't seem to find any reference to building that covers the details of the spring. The rest seems pretty darned simple to deal with. One of the youtube videos shows a much simpler spring in use in Japan that isn't even leaf spring style--just a single flat bar spring. Seems doable And dang, working in a Japanese-style forging pit all day would kinda suck. Might be efficient but it's a little like the tools being the master of you rather than you being the master of the tools. -
I've got a few pieces of Grizzly equipment and a clone of a slightly smaller version of the saw. Grizzly stuff is ok as far as it goes but it is chinese (or taiwanese) made so you can expect to do some repairs (improvements) right out of the crate. If they supply assembly bolts, chuck them immediately and get some decent quality nuts and bolts instead. The bases tend to be a bit wonky so you may need to do a bit of beefing up (sheet metal bases). Nothing huge, just basic improvements that are easy when new but a pain if you wait. Basically, even when new treat them like a piece of used equipment that needs a going over to make sure things aren't awry. The time will pay off later. Overall, a decent value.
-
Interesting....I had forgotten about Bartell. I once did a job related to water jet cutting refractory blanket material with them. Unfortunately, I rarely get to Spokane but I'll keep them in mind and try and stop by the next time I do. Thanks
-
Now comes the REAL chore---you need to stare at it for a while to decide what cut direction will get you the most of the best. .....and come up with a good story for the grandkids about how you lifted the crotch and carried it there it all by yourself :-)
-
I know it's likely been covered before but a search doesn't bring up anything specific. I need to do some repairs on an old propane forge as well as some other stuff that uses fire bricks both hard and soft as well as various other refractory supplies. I was wondering if someone could recommend a good online source. That that stuff is definitely not handled in my backwoods area. Since the price and quality seems to vary wildly at the various online sources I've looked into, I'd rather take a recommendation than just take a shot in the dark. Thanks for any advice or recommendations. While I'm rambling...someone about an hour away seems to have ended up with a lot of old fire brick--possibly disassembled an old kiln of some sort. I can't seem to reference the markings with temperature rating but was wondering what people's thoughts were about price and whether it was worth grabbing a few for future projects. Unfortunately they're all curved or tapered so that might make using them more work than they're worth to buy new Craigslist link removed They've been listed for ages so just seeking other opinions on whether you'd throw a bunch on a pallet for later....$ 4 bucks ea adds up fast.
-
Thanks, Frosty. Clears it up nicely
-
Sleeve anchors work by compression. Either the material is solid enough to take that compression or it isn't. Epoxy won't really affect that. There are anchors designed to be epoxied in for those cases where you can't rely on standard compression. They often have threaded inserts. You haven't mentioned how big the fasteners you intend to use are so it's hard to be more specific. #9 screws, probably not a big deal either way. 1/2" lag bolts, probably a BIG deal either way. Here's an example of an epoxy in threaded anchor that goes down to 1/4" http://anchorco.com/media/mconnect_uploadfiles/p/o/powersert.pdf just for reference. There are other styles also.
-
Would someone be kind enough to clarify what type propane regulator is being used? Anything out of the ordinary? Some information regarding an appropriate gauge to monitor pressure would help also. I don't want to make assumptions and end up doing something stupid because of it. I'd rather ask and look stupid than not ask and be stupid :-)
-
Probably sleeve anchors but...... Not all brick is the same. If this is an internal wall on an old place you might be opening a can of worms. Very often in the old days bricks were made locally out of inferior clays and under-fired. They can be quite soft. The softer bricks were usually used on internal walls whereas the harder ones from the center of the brick kiln tended to be used on the more structural and weather resistance needing outer walls. Putting a fastener into a soft brick may cause it to crack or pop a divot out. The local bricks in my tiny town were so soft that they are barely usable as bricks. They fail really easily and sleeve anchors would probably pop about 25% of the time. Modern bricks are far harder and should take a sleeve anchor just fine. So, I'd have plan A and B--standard sleeve (compression) anchors if the bricks seem hard enough and epoxied-in anchors if there is any question of brick hardness. Go easy on the drilling, also.
-
Carnauba is not the problem...it's the solvents used to make it spreadable. You could make your own food safe paste wax pretty easily using carnauba and the proper oil as a softener. Most likely choice for the solvent oil would be mineral oil as it does "dry" when the volatiles evaporate. Carnauba is a common ingredient in cosmetics and even some foods (it's just a palm wax) Typical process would be to melt some wax in a heat proof container...then you trickle (TRICKLE!) in your oil while stirring. Depending on the results you want, you can either do a best guess on oil amount and keep stirring (off heat) until it thickens or you can go further and make lotion: That would have a lot of oil and when cool enough, you use a stick blender to whip in air. The "lotion" will take a little longer to harden but will go on really nice and the coating will be barely perceptable. While you're at it, make some hand lotion for your wife using bees wax and olive oil..plus a little fragrance. She'll think you are a genius. For temporary rust protection on things that will never see paint, the standard food-grade coating is a mix of silicone and mineral oil. This wipes on thin and dries almost immediately--giving about a year's worth of average protection on something like a ground cast-iron machine table. You can drink it too if you need a good internal cleaning (that's a joke, son) Amazon has a couple of sources for pure carnauba wax.
-
"littlegianthammer.com"
-
.JPG.8e33bc43dd9c50d517305d31963fa5b5.JPG) Add to that a spoke shave. The stanley version is about 15 bucks and works extremely well for finishing the handle shape.
Add to that a spoke shave. The stanley version is about 15 bucks and works extremely well for finishing the handle shape. -
Ok, any ideas what this is/from
Kozzy replied to ianinsa's topic in Tools, ID, and pictorial reference
Breaker for detachable chain...barely used these days. Used to be that every farm had one of those or several. Often you can find them branded with things like John Deere because they came as part of the tool kit on the farm equipment. Many also had several slots for different sizes of chain. Detachable chain is this style: -
You need to use a sanding sealer. This would not only be true for end grain but also for some woods like Cherry and Alder which take stain unevenly. The sealer plugs the pores so that things like end grain or uneven side grain don't act as a vacuum for the stain. They also tend to have a secondary benefit: The act as a grain raiser. The grain of the wood surface gets compressed in the process of cutting, planing, and saning. If you just sand and put a finish on, the compressed areas will expand when moistened and all that sanding which you thought was perfect will suddenly be rough again. Normal procedure is to sand, wipe the surface down with alcohol or a similar quick drying agent which will cause the compressed areas to expand, THEN do a final sanding. That's one of the steps that is required for a perfect surface. Test this by taking a perfectly-sanded piece of wood and writing your name on it in water: When you see (feel) what happens, you'll never skip the grain raising step again. With a sanding sealer, the grain is raised and the wood fibers basically encapsulated. You apply, let dry, do a finish sanding job. In the stone age, the sanding sealer was just thinned shellac (which is alcohol based BTW). One other step that can be important to a perfect finish is grain filler. Some woods have very large pores. You can NEVER get that glass finish without filling these up. Grain filler is basically like the sanding sealer mentioned with but with some solids (often talc) that fill these pores. It's like filling in a million tiny potholes. You fill and then do your final sanding procedure. Sounds like a lot of work but on woods like ash and oak, it's the difference between rough and glass-smooth. Oh...and then you get into the advanced class of scraping instead of sanding on large flat surfaces. That's too much to go into here but is what's needed to take the wood to the next level of perfection for the customers with really deep wallets.
-
Grossly ignorant on induction heaters but....
Kozzy replied to Kozzy's topic in Induction Heating, Oil forges, etc
Thanks, all. Answering a few questions--- The rods are actually coiled wire that's straightened and cut in a rotary straightener. Even if the ends were made perfectly square, the electrode itself becomes a bit uneven under the arcing and introduces it's own inconsistencies. It should be electronically switched but isn't..100% on time for the high current. I tried to get the maker to do it differently but wasn't in a position to have enough input. The short "stick out" is a problem but I can change the rod clamping on a revised machine to compensate for that. There are some other shortcomings also...should have had better shielding gas flow for instance. Just because people were kind enough to give opinions and the day is boring, here's a photo of the existing "problem" machine that I want to bring from the stone age to at least this century. This was during the original testing so things are still in "unfinished" mode.
-
Long ago I looked into an induction heater for one of our commercial processes and at that time (the stone age) the cost was as much as a new Lexus. The maker at that time said it had to be high-freq and in those days electronic switching was $$$$. I see now that there are affordable Chinese versions out and even some home-mades so that got me thinking about the possibility again. Currently we resistance heat the part--it's hard to control and every little glitch can cause inconsistency. What we have is a 3/16" dia. round bar in T304 that sticks about 3/8" out of an assembly (could be more if needed). The machines uses an air cylinder to move a ram/electrode against the end of the bar, resistance heats (calculates at about 3000 amps at 2 volts) the bar in about 5 seconds, the pressure is turned up and the of the T304 flattened like a rivet head. unfortunately, the old controls are all time based, not heat based so if the contact isn't perfect due to the sheared end of the 3/16 bar or scale on the electrode, it might just crack the part due to underheat. Just wondering if anyone who has more knowledge about induction has any ideas or comments. Ideally, I'd like to induction heat, detect the forging temp electronically (can that be done through an optical fiber based on light/color?) and then just press when ready. We're talking numbers in the thousands. Happy to sacrifice speed for consistency because re-working the bad ones costs way too much time and material. I'm completely ignorant on the subject so just fishing for knowledge and ideas...Didn't even know that Induction had some into the realm of affordable to try until I stumbled across the forum examples. Thanks for anything you can offer.
-
Try a KISS solution just to see if it resolves---make a quickie tin-foil deflector cover to direct residual smoke to the chimney...maybe with a small air-channel so what little draw there is has some make-up air. If it works, you can fab us a decent cover to throw on when the hammerin's done.

