
JHCC
-
Posts
19,356 -
Joined
-
Last visited
Content Type
Profiles
Forums
Articles
Gallery
Downloads
Events
Everything posted by JHCC
-
That's an amazing project. I'm looking forward to seeing how it comes out. Nice touch, using the I-shaped section that comes from hammering bar stock on edge. Very creative.
-
My older brother used to hog my stuff all the time, too.
-
THEY SHOULD GET A WELDER!!!
-
Welding's more fun!
-
You could probably use the cut-off section to make the stand, like this: If you're making a side-blast, you just have to cut a hole in the wall of the forge for the tuyere. If you're doing bottom-blast, you'll need to cut some access holes so that you can get to the tuyere and the ash dump.
-
No, just one end.
-
Looks good. Might want to put a slot in the back as well, so that you can heat up the middle of a long bar.
-
No, there are a thousand ways and one. Cobble something together from what you have on hand, and show us the photos when you're done.
-
Definitely looks more like a Mousehole (AKA The Undisputed King of Anvils) than a Peter Wright. However, keep in mind that both those companies were in business for years, and many, many other English anvil makers not only got their start working for them, but continued to make similar anvils after striking out on their own. I use a 148 lb. Mousehole, and it has served me very well for decades. I would disagree with Will W. about the crack. Mousehole anvils often have the hard steel faceplate welded on in sections, and this looks to my eye like a cracked joint between two of those segments. While it's conceivable that this could be the nucleation site for a catastrophic failure like the one in the other photo, I personally wouldn't worry too much (unless you're planning on doing a LOT of work with heavy sledgehammers).
-
Makes sense.
-
Is a "Biltong" what a smith uses to hold the stock while forging a billhook?
-
 So, a Vermont farmer is walking along the road when a Texan pulls up in a big, shiny pickup truck and asks, "Hey, old timer! How much land you got here?" The farmer rubs his chin and embarks on a lengthy description of the boundary markers on his property, some dating back to colonial times, finishing up with, "So, I guess about two hundred, forty-seven acres." The Texan laughs and says, "Well, down in Texas, I got me a spread, and I can get in my truck and drive all day without coming to one of my borders." The Vermonter nods knowingly and says, "Oh, yeah. I had a truck like that once."
 -
Standard butchers saws do indeed cut on the push, but that’s not what I’m suggesting. Such saws depend on the rigidity of their frames to keep their blades straight. However, if you dispense with the frame and turn the blade around, the tension of the pull stroke will keep it straight in the cut.
-
What did you do in the shop today?
JHCC replied to Mark Ling's topic in Blacksmithing, General Discussion
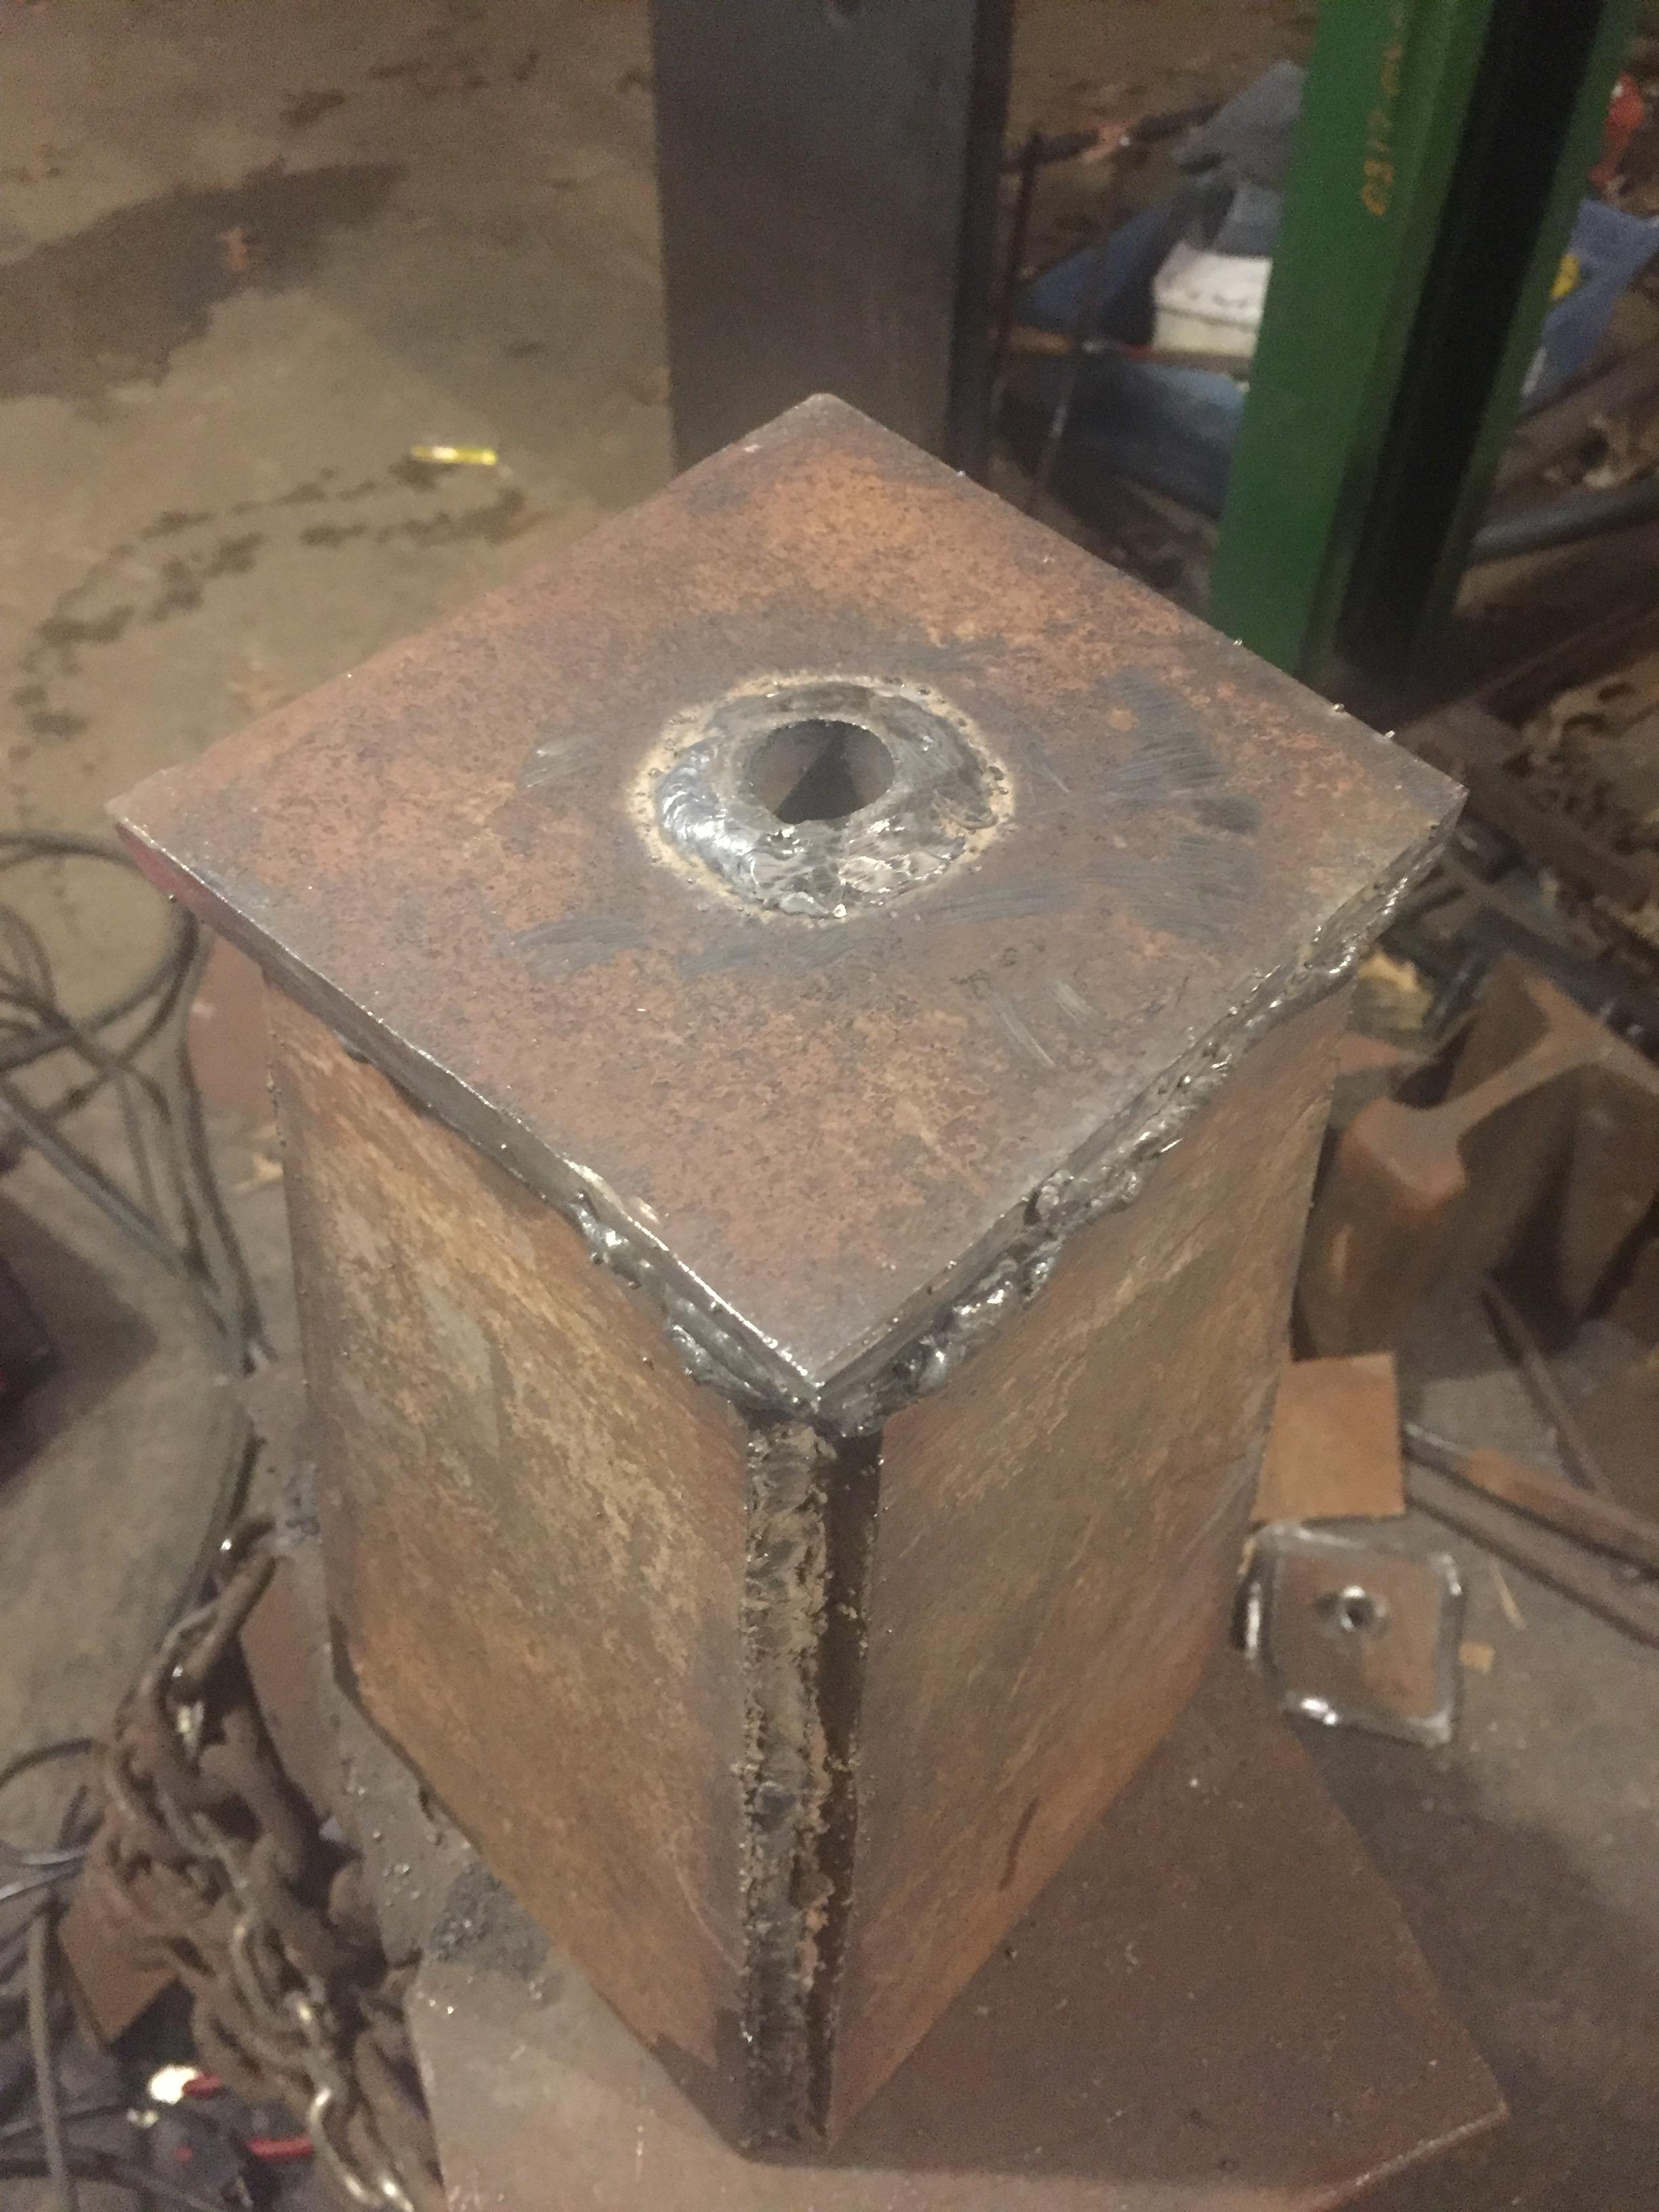
Welded up the new faceplate for the tuyere. Tight as a drum! (Oh, and remember that yarn bowl I made for Lisa? She took it to a knitting group, and now the owner of the yarn shop wants to carry them.)
-
Amen to that. May his memory be eternal.
-
JAV, that one gets you an oak leaf cluster for your curmudgeon medal. Blake, welcome to IFI. If you haven't yet, please READ THIS FIRST!!! As for your question, search the forum for "TPAAAT".
-
That's why I don't put my face and name on my bad content.
-
You want the steel to be soft enough that it can still be filed by hand. Probably best to do some tests with different tempering colors/temperatures to see how they behave both for sharpenability and flexibility. Probably not. A distal taper would mean the tip would produce a thinner kerf; the base of the blade, a thicker. That's a recipe for the saw binding in the cut. Some high end saws do taper edge-to-spine, but if the teeth are properly set, that's not necessary. One thing you might consider would be a hollow handle that the blade from a standard butcher's saw could fit into, to cut on the pull stroke. The blade would be under tension while it cuts (like a traditional Japanese woodworker's saw), eliminating the need for a bulky saw frame. The whole thing would be fairly light and easy to pack, as well as easy to disassemble to clean.
-
What did you do in the shop today?
JHCC replied to Mark Ling's topic in Blacksmithing, General Discussion
Got the end of the tuyere cut off, cut a new faceplate, and started drilling out the hole for the air pipe. After several frustrating hours of coaching my ASD son through his homework, it was a relief to get into the shop.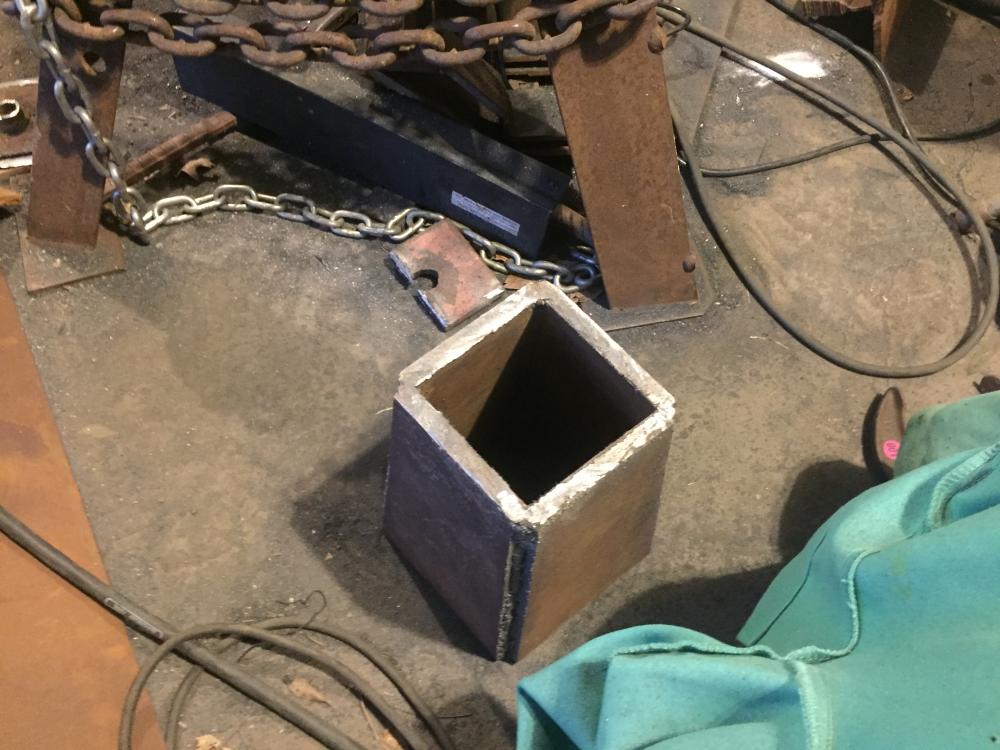
-
Eighty years old -- I think this skirts the TOS rule on no commercial links!
-
What did you do in the shop today?
JHCC replied to Mark Ling's topic in Blacksmithing, General Discussion
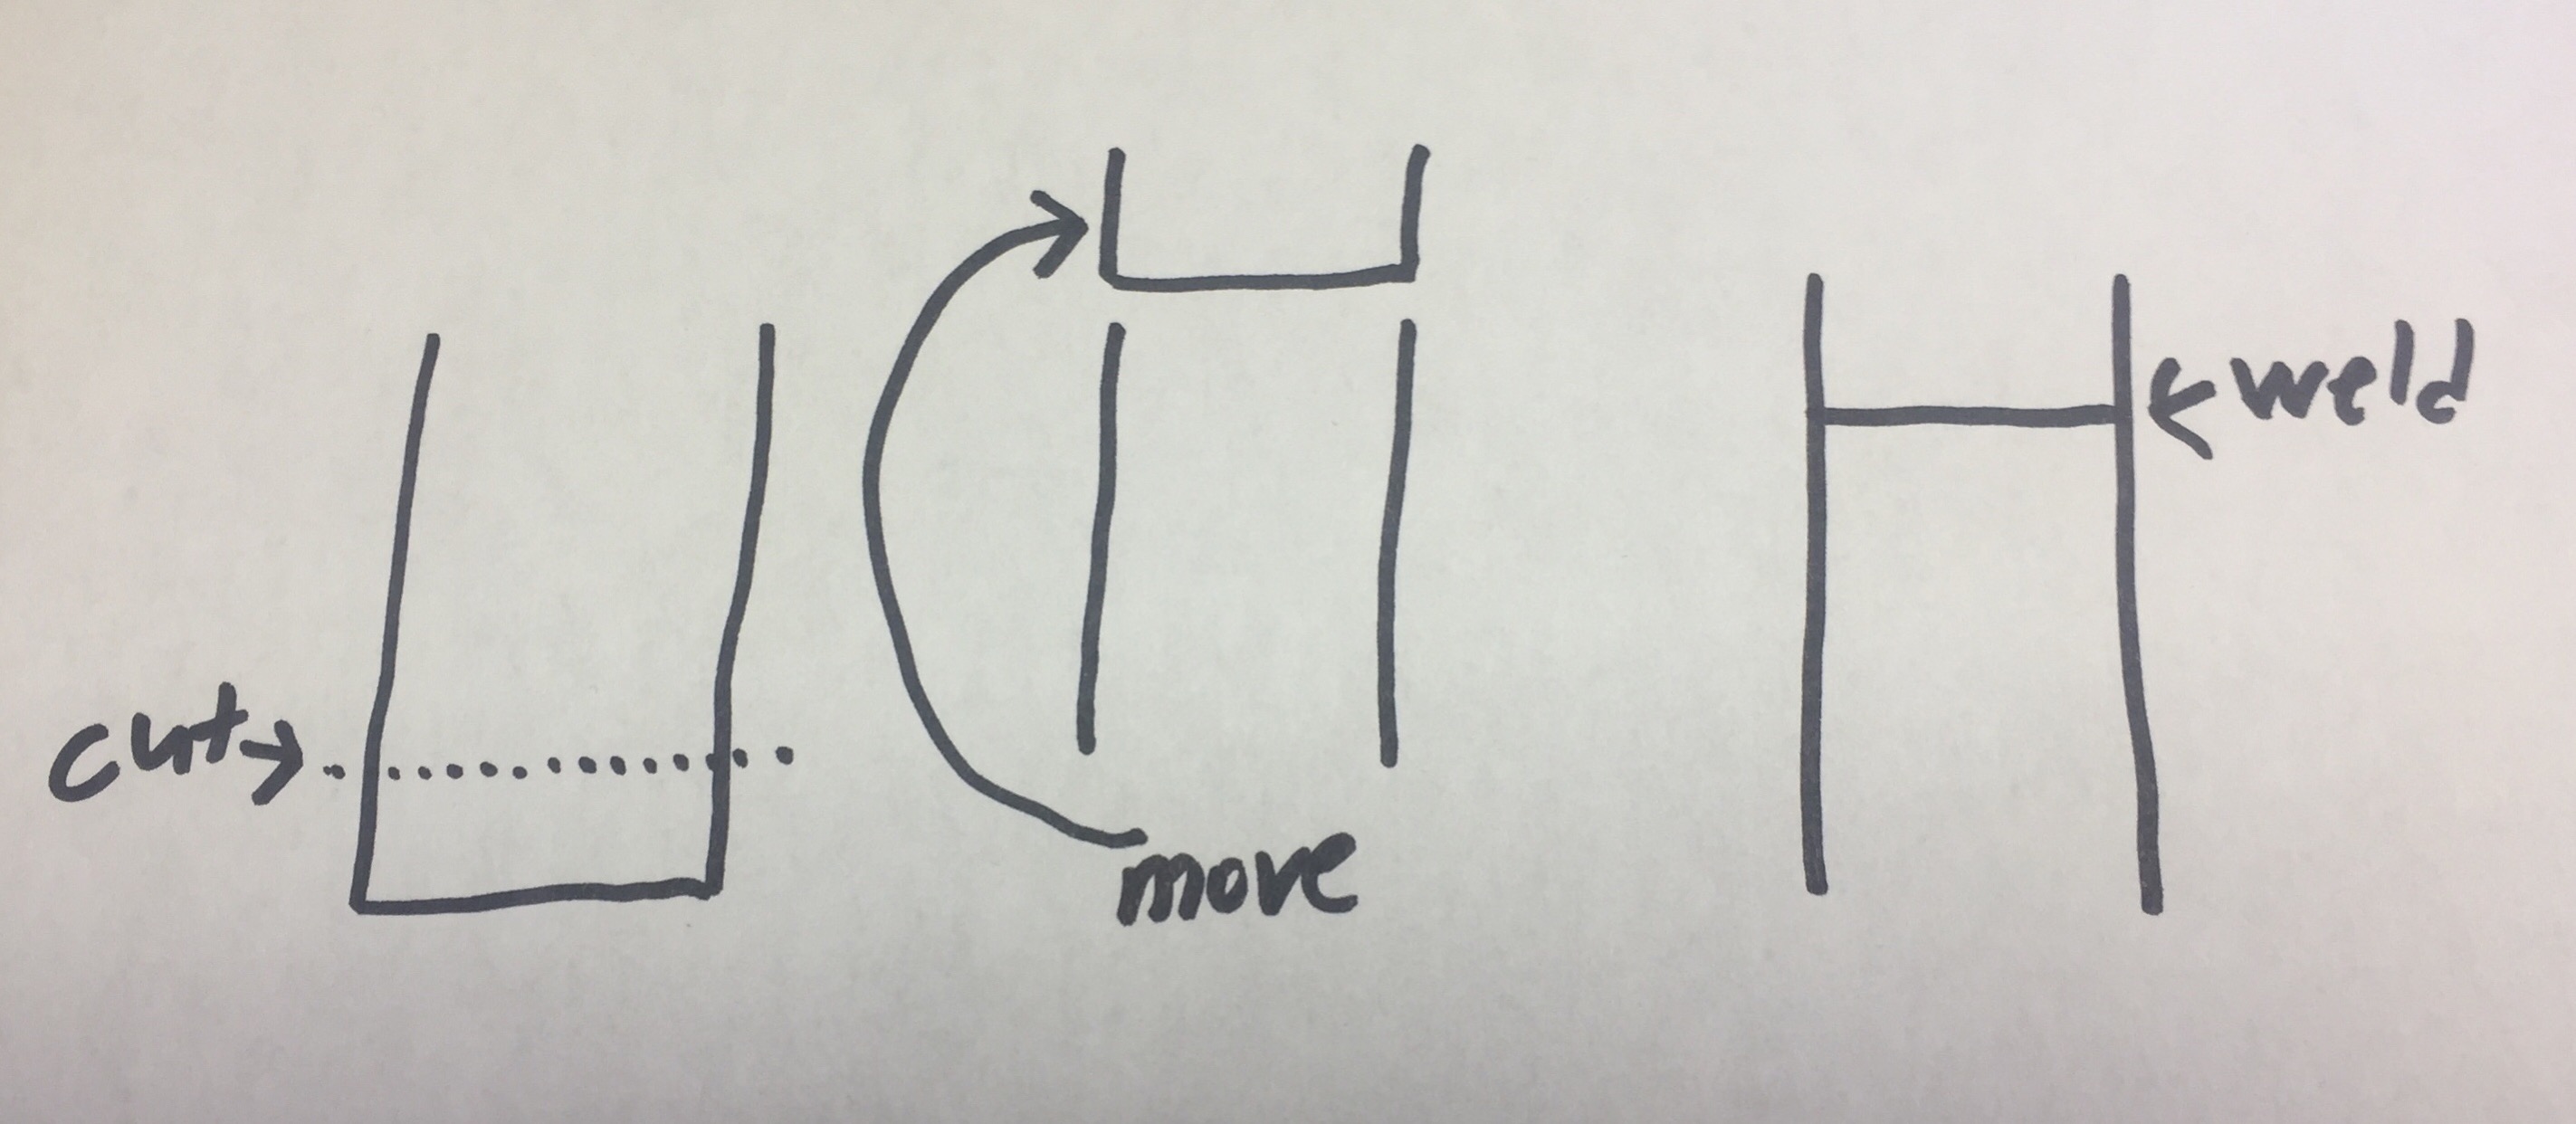
Here’s what I should have done the first time. This is the connection between the arm of the treadle hammer and its head, nice and watertight to prevent leaks from the melted lead pour. The pipe pierces the wall of the tube and is fillet welded on both sides. And that’s how I get better at all three!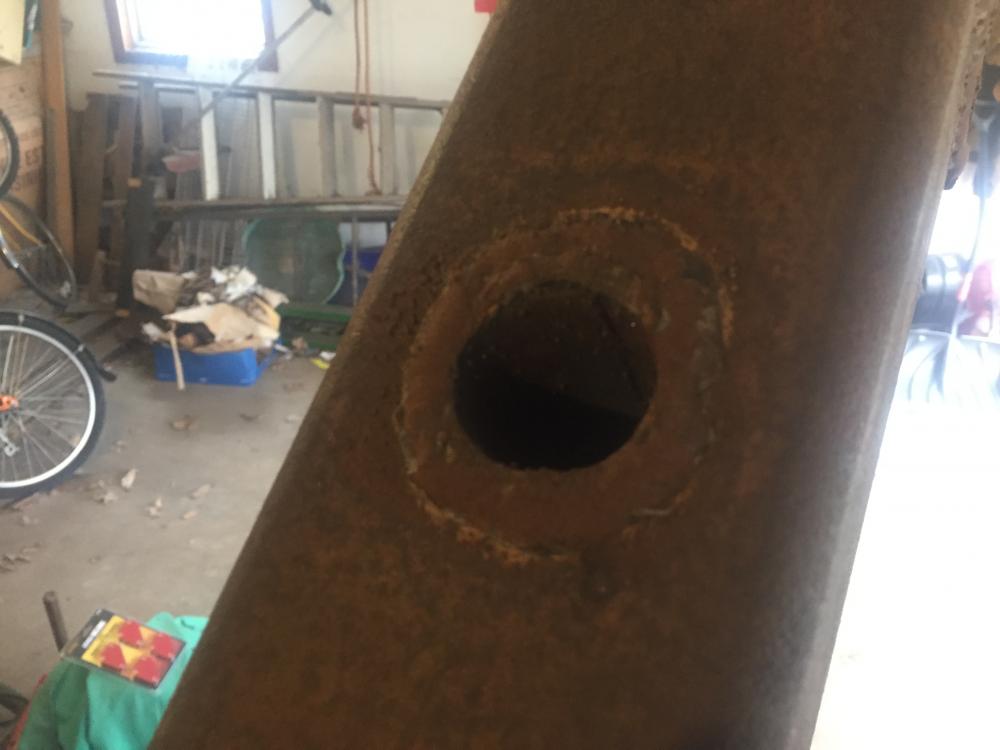
-
So few?
-
What did you do in the shop today?
JHCC replied to Mark Ling's topic in Blacksmithing, General Discussion
Three reasons: I really want it to be right, not just "good enough". I already tried welding over the leak from the outside, and the only result was to reduce the size of the air outlet. I don't think brazing will be any better. I don't have a torch. Frankly, cutting it off and fitting and welding a new faceplate is the right way to go. If I do it right, I'll get something that not only doesn't leak, but also has the proper air pipe diameter. I knew the way to do it right the first time, I cut corners, and now I'm paying the price. Ideo firmiter propono de cetero me non peccaturum peccandique occasiones proximas fugiturum. -
Now I'm getting ideas for casting an anvil out of silicone. "Sure, it's on the light side, but it's got great rebound!"
-
What did you do in the shop today?
JHCC replied to Mark Ling's topic in Blacksmithing, General Discussion
Thanks, Das. Unfortunately, it's got a slow leak where the air pipe meets the face plate, right in the only spot that I can't reach with the welder. I've made the hard decision to cut off the face plate, make a new one with a better connection, and weld that on. More work, but probably worth it.