J
Members
-
Joined
-
Last visited
Everything posted by J
-
Yeah, obviously 1/2 ton on a ladder lift isnt going to work. The one i have is based on the ladders rating, 300lb. Could you give more detail on what youre lifting and 25ish feet height is the next challenge. To handle that load it needs to be single stage. Sounds more like a stationary crane, or boom truck project.
-
-
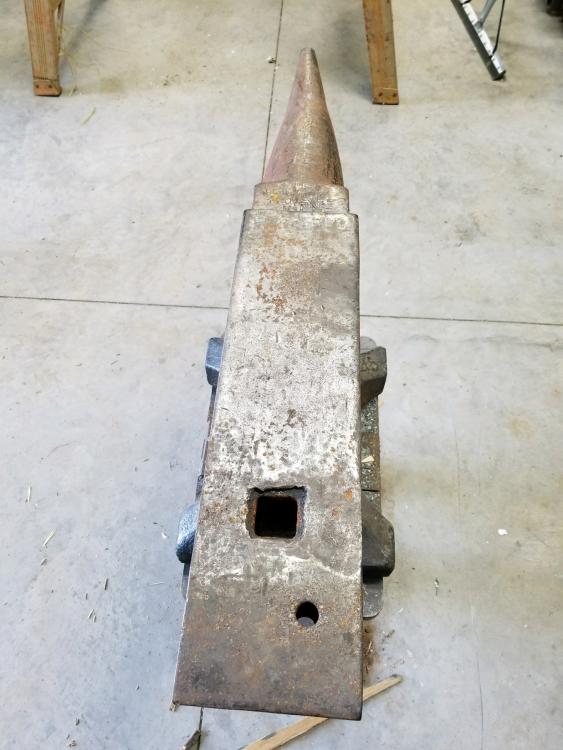
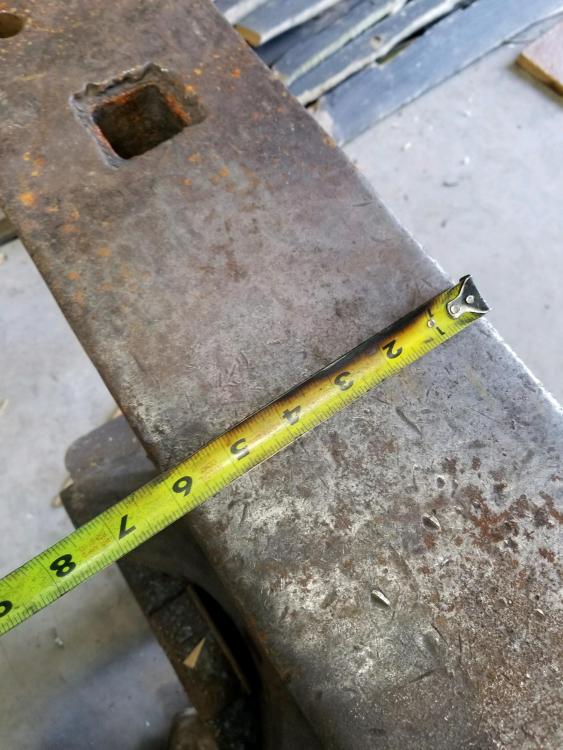
I pondered this earlier, and even mocked up a piece of 1-1/2 “ tubing flaring out the end. Too big for the hole but a good exercise in upsetting square tube. It measures to be like a 1 3/8”+ hardy and according to aia should be 1-3/8”. So best sized tubing i can get from my supplier is 1-1/4” with 11ga which leaves me a with 1” hardy. My next thought was how to fasten/secure the 1-1/4” tube in a 1-3/8” hole. I guess i could shim the sides and flare the bottom to lock it in. Or just leave it loose. Anyway just throwing out ideas. Thanks for the thought thanks i may just square up those hardy edges and round them slightly for looks and make a removable sleeve, because ive came to realize, i think i am just trying to fix it for looks.
-
-
-
That urge is powerful! I agree that the damage looks like a failed weld more than edge chipping, in how its uniform in appearance. But i know nothing of its past use, which it saw a lot of, other thant it came from the amarican bridge co. The shaft of the hardy is perfectly fine I tend to make my hardy tooling by tapering and upsetting for the tool base. That wont work here as is, I can make them on the swage block for use on this anvil.
-
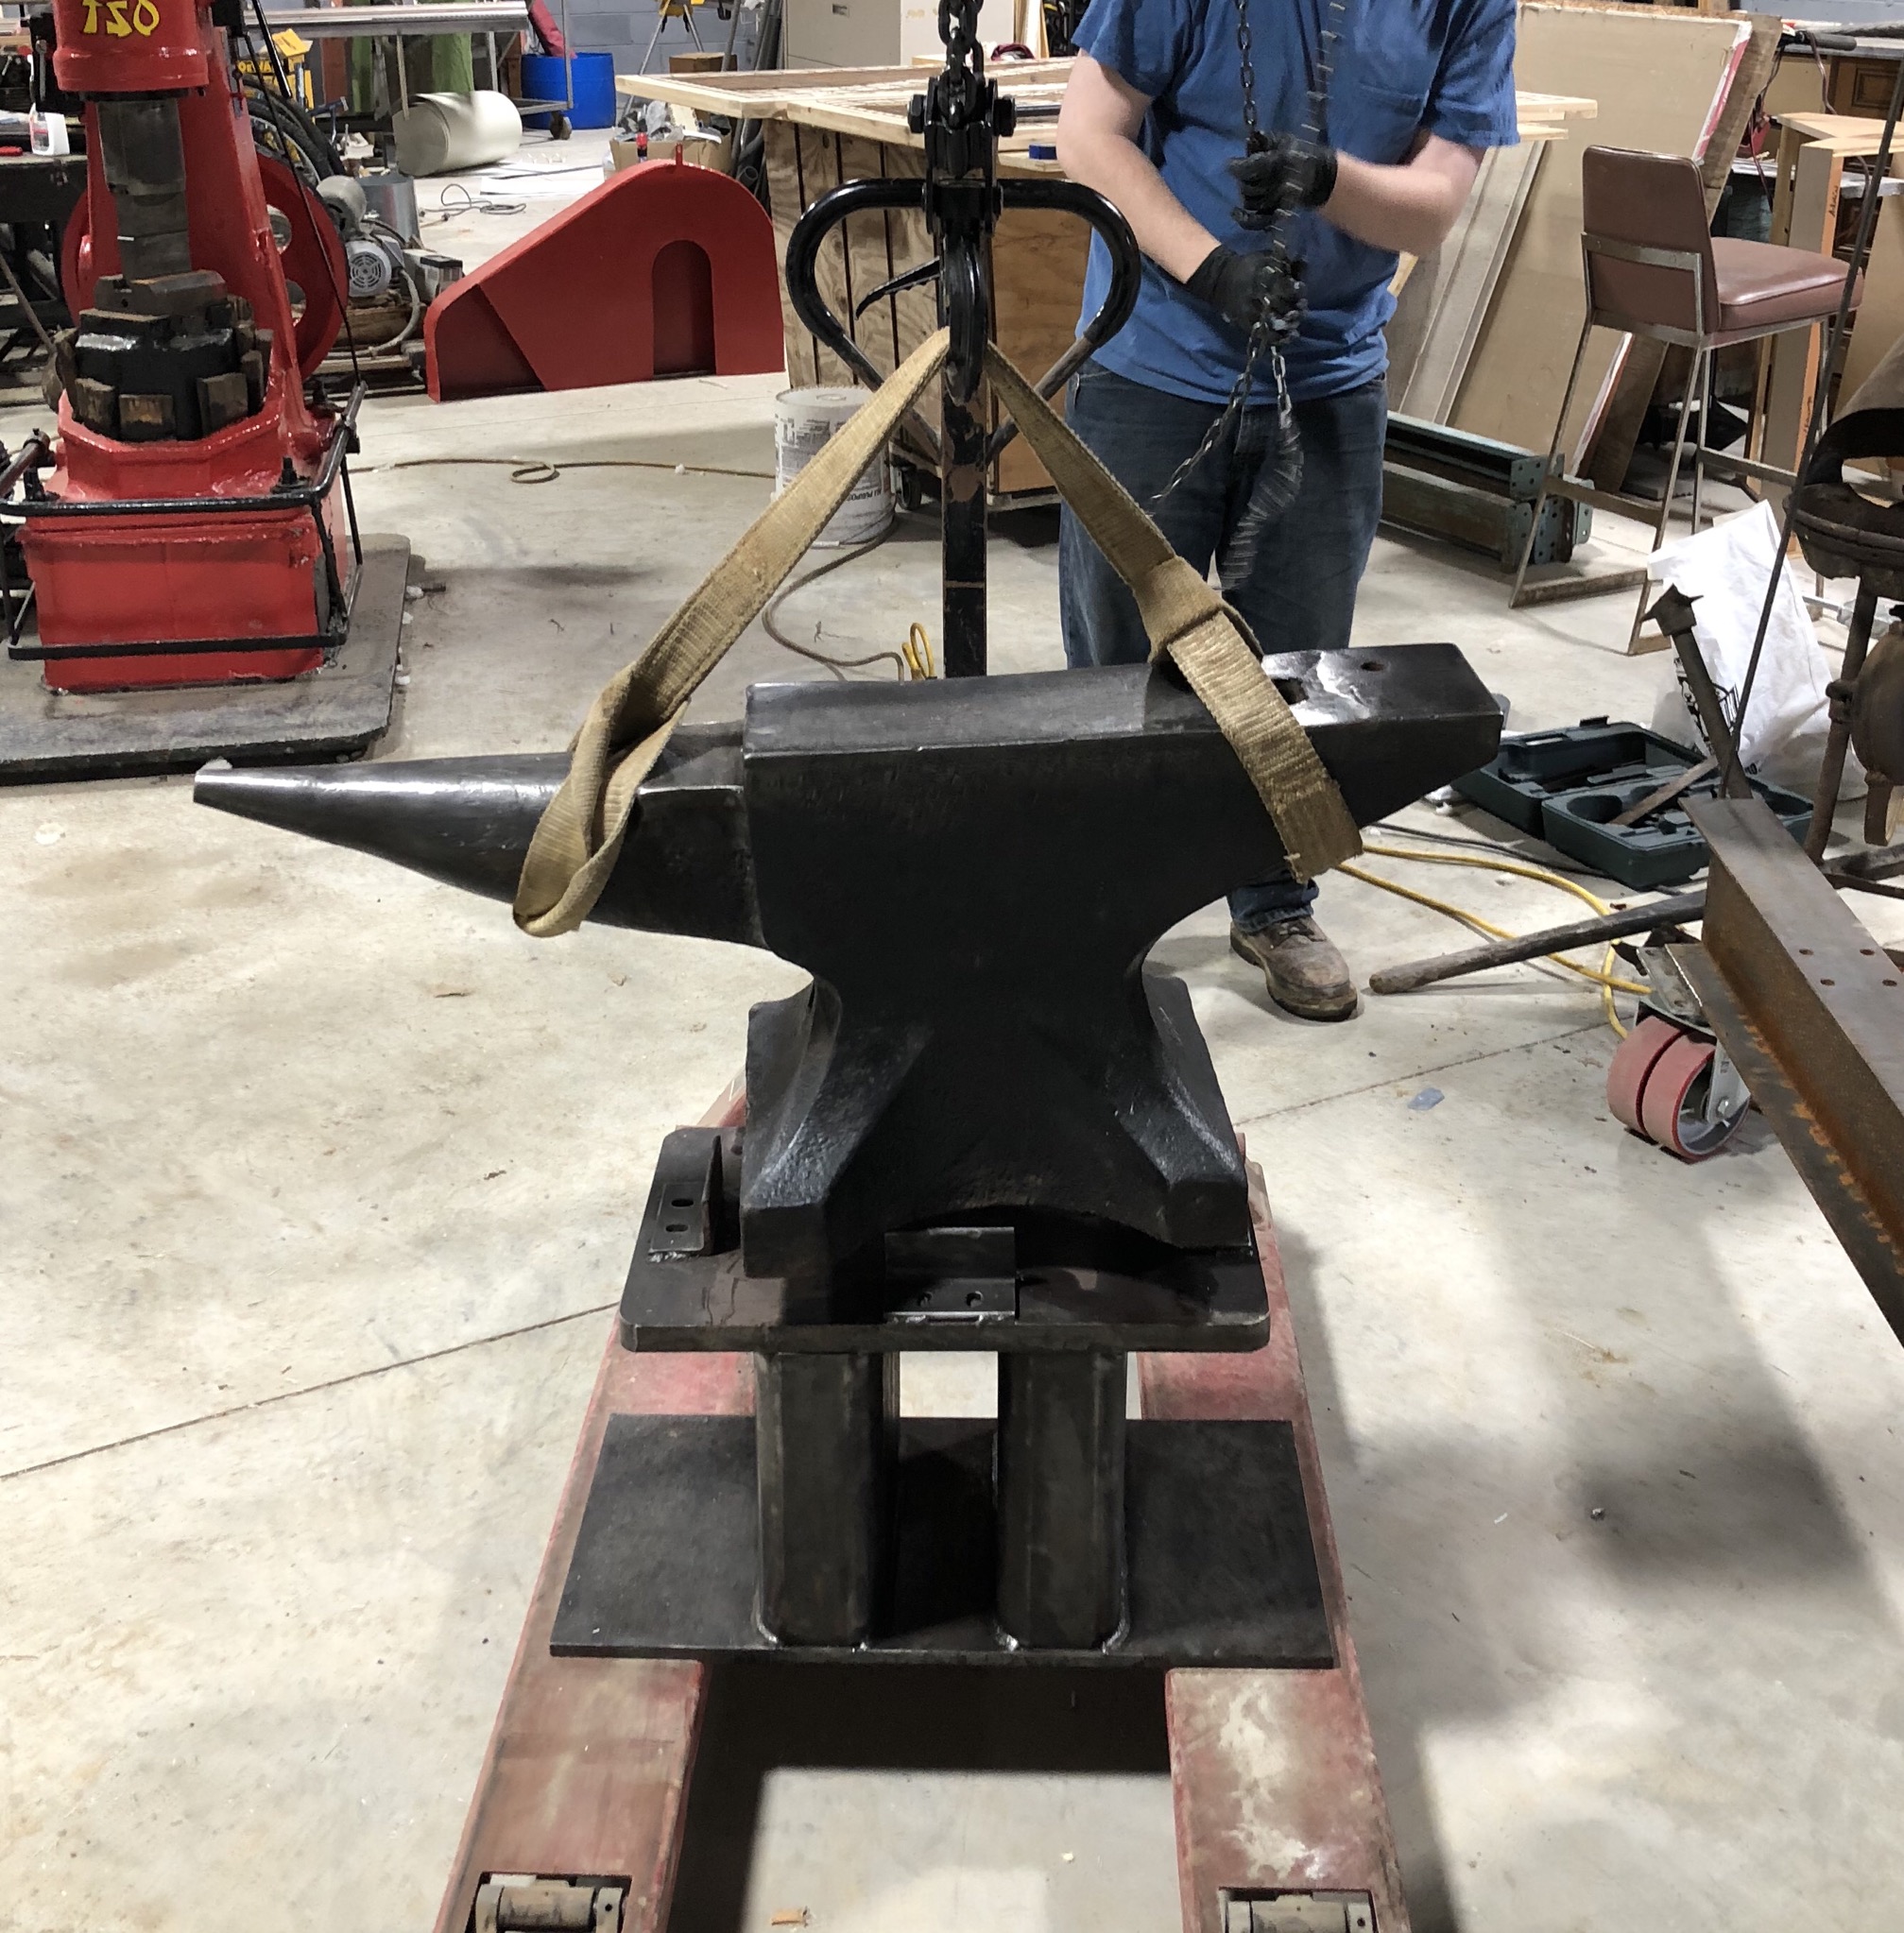
I just wrestled this beast to the shop. Its a 1914 fisher 450 lb. there is a good amount of damage to the hardy edges at the top. My first instinct is to repair the edges. But ive also considered just making wider hardy tooling im my swage so it will rest on the top ie “span” over the missing edges. My repair procedure is to clean the area. Preheat with a big propane burner to 400F. Then nickle weld a base layer on the cast. Then clean and hard facing rod to build up the edge. Finally clean/dress the edges Ive repaired several wroght iron anvil edges and feel very confident in that area and Ive successfully repaired lots of simple cast iron gears and blocks etc. but the combination of that coupled with the size cause “It wont fit in my preheat oven” then hardfacing the top layer. Then once its done burry it in vermiculite. Then finally three days later when its cool i have to clean up the welded edges inside of the hardy. Lots of steps theres also two or three 1/4” x 1/4” wounds in the middle of the face id hardface weld while its hot. the anvil is very usable as is, with 90% rebound all over the base and about 50-70% rebound when moving on the heel.
-
nicely done!
-
harbor freight has an adjustable roller you can buy, its about $150 last time I bought one. I'm not generally a HF fan, but it was for a single job rolling some tube, I needed to roll 5 12" rings out of 1" copper. I figured it would be a consumable tool and not last, but its been hanging around the shop and used quite a bit. I took the time to mill a few specific dies, but theres a number of sites that sell various milled dies for it online, but for 1/2 square just use the flat dies that come with it. youll loose about 6" of material on each end that wont bend into a radius so for a 4' dia ring youll need about 13' getting you 1 ring per 20' stick of material unless you weld the drops together.
-
-
-
nice!
-
here here on the amateur comment. My real job is vp of engineering for a gc. yes there are bad clients, the may not be not dishonest or bad people, just unreasonable bad clients. its a matter of how bad, and can you predict how bad. in our case if we sense this, we add a modifier to the total management cost to deal with them. if we get the job, we at least have enough in the budget to have a project mgr babysit the project. and document document document. make sure you document and have provisions for the sure to come change orders. were in a slightly better market now and can cherry pick our clients vs fighting in the open bid market. at any rate how can you supply a fixture they havent even speced?? major red flag stuff. or when you as one of the bidding contractors are put to the task of value engineering ..run!!! with 30 contractors bidding the winner is usually the one who left out or overlooked the most in their bid. good luck
-
So recently I was involved in a debate about steel, more precisely, modern carbon steels used in knife making. This may seem like a bladesmithing topic but I think it applies better to general forging of modern carbon steel. at any rate its a good study of material science. It started as I overheard some general conversation about forging a complicated knife shape vs stock removal to achieve the same shape. the argument was that in a "modern carbon steel" it dosnt matter whether you forge the shape or mill or grind it away, it would achieve the same strength once it was properly heat treated. this went against my general understanding of forging of parts, blades, or whatever. my addition to the conversation was that, all things being equal, a forged shape would be stronger. if two parts were made, one in a machine shop via stock removal, and one in a blacksmith shop via forging with minor finishing as required to achieve similar tolerances. then both parts sent through the same heat treating process, the forged one inherently retains a more cohesive grain strength, making it stronger. the reason for machining is keeping tighter tolerances and speed of manufacturing. the argument back was that, when properly heat treated, original grain patterns do not affect finished strength, they are mostly reset. and that the talk of grain strength was just a carryover in blacksmithing from the wrought iron days of very large grains where it mattered greatly how the grain was oriented. now I don't discount that the difference may be minor, but I find it impossible to believe a forged shape isn't stronger.
-
I have a similar forge for travel /demo work and it originally had a refractory type lining about 1 1/2 inch thick. I took it out to lighten the load, and since that forge just heats up 1-2 times a month ill deal with the slow decay of metal. originally the mortar was just placed in it level except for a small bowl depression in the middle with the bottom being the air inlet. With a rivet forge that's all that was expected, just to heat rivet sized metal to forging temp. to get a hotter fire for big pieces or forge welding you'll need to bank the sides up with more coal, but with that there's the extra consumption of coal. probably getting off topic.... don't reinvent the wheel, just line it with a refractor mortar, or kitty litter homemade mix, there's liner recipes of all types just do a search on "homemade refractory mortar"
-
-
Thanks for the input, and differences of the two. I've not spent a lot of time on power hammers. I worked on an lg50 last year and successfully made trapezoidal stock from perfectly new round... Learning curve was short tho. I used a big blu last year for a brief time and again for about an hour this Saturday and really liked it, Im sure I'd be happy with it. I don't know anyone around here (central NC) that has an IK. So a direct comparison on my part may be hard to do. I enjoy making tooling and have made several sets of spring swages for my treadle hammer and would have no problem making more as needed for use under the IK hammer. I also don't see myself getting and changing out dies a lot unless they're at a bargain or I have a job I can charge them to. I'm leaning towards an IK, my comparisons were along the lines of air consumption, value, and longevity. And what's so wrong with combo dies???
-
Have any of you compared iron kiss hammers to big blu hammers? Specifically the octagon 100 vs the big blu 110. From what I've read, air consumption on the octagon may be less. I only have a 5hp/80 gal compressor and trying not to buy a new one. For the price difference I can get a blu 110 and 10hp compressor for about the same money, I've heard big blu is an air hog. The other factor is big blu is only 1.5 hrs away should problems arise, I can get replacement parts easily, and travel to pick up is less. I've used a big blu for an evening, and liked it a lot compared to only other hammers I've used a lg 50 and trip air 40lb. I guess it's all in how to use your equipment also, but iron kiss seems to be the dream hammer on some sites.. thanks
-
Yes, needlers/scalers work good for peening. Also used one for work hardening a brass base.
-
Mathematically speaking an Area, in our case "square foot", has zero thickness therefore zero weight. That's true if we're talking about steel, brass, or bananas. Its not until you give it a thickness like 1" , 1/4" etc... Then it becomes Volume, which given the density, becomes weight.... And I think steel is closer to 490 lb/CF 12"x12"X1/4" = 10.2 lb ish now...what were we talking about... .
-
it would be a bit unwieldy to use with a burning log in it , just think how much movement the reins have to have to capture and release. it appears to be mad to grip something of a specific size and hold. a lid or hot handle.
-
that's a very realistic leaf you made in the pictures...
-
try bending cold .. if it looks unsatisfactory or wont work, bend it hot with a torch exactly where you want the bend. if it breaks at some point in the future, bend another loop install a longer eye bolt, rinse and repeat as needed. To keep the rest of the spring cool, submerge it in a bucket of water with just what you want to heat and bend above the waterline, heating will be harder but can be done with a hot enough torch. and remember soon as you start monkeying around with heating, hardening, and tempering an unknown piece of steel you're asking for more unknowns to happen.
-
sq foot has no weight ... you beat me to it!
-