Malice9610
-
Posts
167 -
Joined
-
Last visited
Content Type
Profiles
Forums
Articles
Gallery
Downloads
Events
Everything posted by Malice9610
-
breaking down stock with limited gear
Malice9610 replied to Shamus Blargostadt's topic in Blacksmithing, General Discussion
hmmmm..... That is about half as expensive as the 9 inch bench model HF sells. I may have to look into doing a table / mount for that instead, might be cheaper in the long run. Thanks for the pictures and explanations, makes a lot more sense now as to how I might use one of those. Now to go scrounge around dads scraps to see if there is anything fitting to make a table / mount for it. -
breaking down stock with limited gear
Malice9610 replied to Shamus Blargostadt's topic in Blacksmithing, General Discussion
@SpankySmith... I just looked that Portable one up ( ive had my eye on the 9 inch bench one for a while ) HOW exactly do you use that thing? To me that looks entirely too bulky to work with small materials, did you rig up a table or something, or just use the included handles? -
breaking down stock with limited gear
Malice9610 replied to Shamus Blargostadt's topic in Blacksmithing, General Discussion
When using the Angle grinder on leaf springs, I had the same issue with making " straightish " lines, but I found a " fix " to my process. Draw the cut line, Like say your going to cut the piece directly in half longways. Then take your angle grinder, and lightly follow the line ( cutting perhaps 1/10th of the way through ) so when you go back over it to fully cut it, you have a nice groove to help keep your cut straight. However like you noticed, It does not work so hot for anything other then semi straight cuts. I would think a Sawzall with a good blade would work great for the finer sides of shaping the cuts, or perhaps a heavy duty jig saw, Not sure how long it will last, but Harbor Freight sells a 9 inch Bandsaw for around 176.00, its small enough to fit on a small work bench, I plan to pick one up either at the end of the month, or after a few knives sell this month, whichever comes first. Ill take some leaf spring to it and let you know how well that little jobby job does on it. -
Here is what I have been slaving away over the grinder and anvil recently.. Old Spring Steel that I heated up and flattened so I could get 2 knives from the length one would make, however it has forced me to determine that I MUST make a flatter tool for that process and that I need to start using water on the anvil during that time to help with scale. I did the flat grind completely by hand, given the amount of scale and hammer marks I had to grind out, I had to take the grind all the way to the spine of the blade. This is by far the best freehand grind I have done to date. the plan is to gut the core from some black paracord, and do a flat wrap all the way around the handle, then take some olive drab and do a twist type wrap with a Black kydex sheath. I have 4 more of these to finish, I am contemplating taking the other one that has really bad hammer marks in it, and doing the same thing by taking the grind all the way to the spine, but on the others I am contemplating doing a grind line and then texturizing them to hide the hammer marks.

-
My son and I have knife throwing contests, But he is too young to drink beer still..... He is 6, and is getting rather good, seen him hit and sink the target 3 times in a row from about 8 feet.
-
camping hawk or hatchet
Malice9610 replied to homeshow's topic in Axes, Hatchets, Hawks, Choppers, etc
Ahhhh Thomas..... A geek similar to my own true self..... That is one one my reasons for preferring Linux as well, app not running well, tail the log file while trying again and seeing it crash, although it sounds like you are significantly more experienced then I am, I missed the heyday unix days at the admin level due to age. Now my only chance to take a bash at unix systems are the Siemens/Epic systems the Hospitals I support use. I grew up around the machines as well, both my uncles are systems admins, one for a genetics lab, and one is now a contractor but was a robotics and systems engineer for a Semiconductor company. They are both nix purists, neither of them own a Windows machine at all, and both are Redhat conscripts. I for the most part am, all my personal servers run CentOS, However my laptop runs Kali for " Testing " uses. If you run a laptop, give Kali linux a try, its quite nice, I have never been a fan of buntu/debian based distros having cut my teeth on Fedora and Redhat, but a lot of the " user friendly " fluff of buntu has been removed and a LOT of awesome tools put in their place. -
camping hawk or hatchet
Malice9610 replied to homeshow's topic in Axes, Hatchets, Hawks, Choppers, etc
Kubuntu is a debian based Ubuntu clone. If you are interested in Linux, I would suggest taking a Fedora live CD for a spin, you can download it in MANY different desktop environments ( Gnome, KDE etc. ) If you want something wild, try the Enlightenment E-17 desktop manager, it is completely customizable. Virtual desktops, full mode transparency, its awesome. My recent try, is a Ubuntu distro called Kali Linux, its a " Penetration testing " ( Aka for Hackers ) distro for security minded geeks. -
camping hawk or hatchet
Malice9610 replied to homeshow's topic in Axes, Hatchets, Hawks, Choppers, etc
Click the link, Save the file to your computer, right click the file > Open With , and choose Internet Explorer. I'm an IT geek / Software analyst in real life, if anyone has computer questions feel free to ask and I can help out, its the least I could do to share my experience with computers to all those that share their experience with me on blacksmithing and bladesmithing. -
LOL.... That is just too funny Frosty and SmoothBore...
-
Thanks Frosty.... I am actually going to be doing handles this weekend on my prototype EDC's, between you and John, I think you both just saved me from screwing stuff up bigtime.
-
Also, Thank you John for setting me straight, I actually plan to do the handles on the first 5 knives ive ever made this weekend, so this information came at a perfect time for my weekend plans.
-
understandable, I think my wording was a bit off ( it was early and pre coffee posted ) so my brain was only partially engaged. In my case, i have 1/8th round brass stock for pins, so drill the hole out to 1/8th, and then take a needle file to it to enlarge the hole only by like a hairs breadth, but by the sounds of it, even that might be too much of a gap from what you are saying.
-
I was just reading up on this after reading your post, as I am new to this whole blade making process and have yet to come across the term Galvanic Corrosion. before reading Johns post ( refreshed the tab before posting to see if anyone more experienced would have a magic answer ) , my thoughts were to make the holes for the pins slightly larger then the actual pin so that epoxy could flow between the pin and the handle, now after reading Johns post I see I was on the right track. http://en.wikipedia.org/wiki/Galvanic_corrosion There is a helpful table at the bottom showing the differences of the different types of metals.
-
so I've heat treated my first knife
Malice9610 replied to Shamus Blargostadt's topic in Heat Treating Knives, Blades etc
I have been working with 1/4 inch thick leaf springs recently. A good angle grinder with a cut off wheel and a vice makes short work of cutting the nearly 3-4 foot long sections into usable pieces. I made my prototypes out of the stock at its full width and realized they were MUCH to thick, but I am going to finish them off at that width and use them as my personal EDC pieces. So my solution was to cut them into 6 inch lengths, then cut those pieces equally in half longways, then take them to the forge to flatten out, so far the process has proved to be a success, however I have yet to cut the blades out of the templates at this thickness, I plan to use the leftover metal from each cutout for bolsters and such. -
Let me know what you think
Malice9610 replied to MAD MAX's topic in Axes, Hatchets, Hawks, Choppers, etc
Ahhh, Cant say I have ever seen a mobile home leaf spring, but now that i read it again, 3/4 thick stock would work great for slitting and drifting I would think as thats about as thick as a rail spike. However in looking at them and contemplating the upset process, I am going to give upsetting the end of a normal 1/4 inch thick leaf spring a try, and see if I cant make a half decent hatchet out of it that way. Might work, might not, but the only way ill ever know is if I try... -
Let me know what you think
Malice9610 replied to MAD MAX's topic in Axes, Hatchets, Hawks, Choppers, etc
Was part of the pre slit/drift process to upset the piece to provide more stock for the slit process? I have a large quantity of Leaf springs and was wanting to give a tomahawk a try, but other then using a rail spike and forge welding a bit in I hadnt thought of using leaf springs to make them, but that to me looks what you did to make them. I like them, specifically the first one. -
Wow. That guys attitude will get him chewed up and spit out on other forums I've been on. Sucks for him, This site is a gold mine for all things hot metal, Not just knives, That is one thing I noticed about most of the other sites I have seen, is that they are very specific to blades and knife making, where as this site has a MASSIVE expanse of info and knowledge about all things blacksmithing. Anyone " New " to the concept should be willing to get any information that might ever be needed, not just specialty info. We call those types " McEntitled " where I am from. Deal with them ALOT in my particular industry.
-
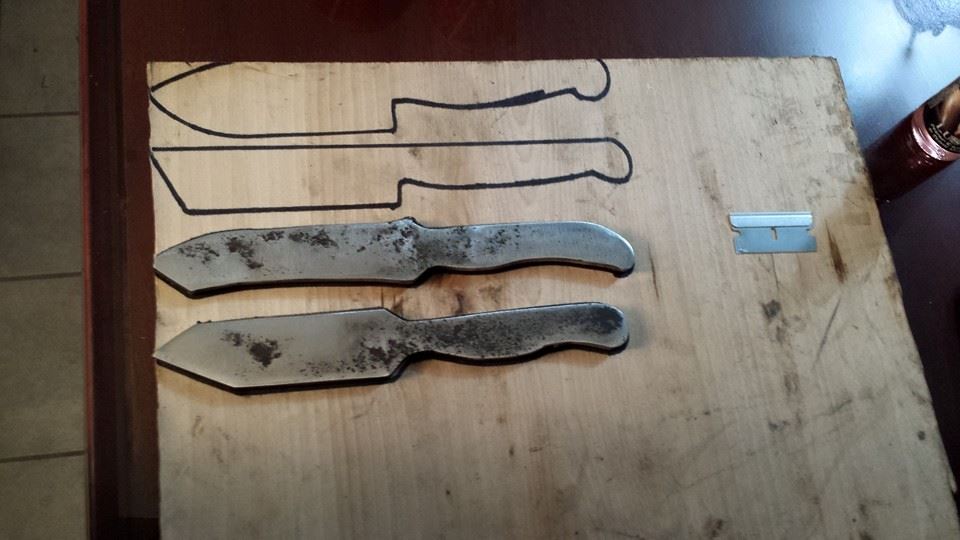
Here are 2 more I cut out of the second section of leaf spring. Basically my goal to start, is with EDC type knives for something to sell, here in Utah the laws pertaining to knives you can carry are pretty lax as we are an open carry firearm state, but unless you want people looking at you funny and avoiding you, its best to keep the object attached to your belt on the smaller side of the scale. Also the board behind them, Is what I will be using as my templates moving forward. Here is the Tanto style one from above after some grinding, I did most of the grinding freehand, then cleaned it up and fixed it best I could with a file. Essentially my plan is to make one of each style, freehand grind it and file it to clean it up, and keep the first of each design for prototype use and abuse, should they pass my tests, they will get made for sale, however my freehand grinding will need to improve before I can actually freehand them all, so I will be using a jig on any I plan to sell, I have a lot of ideas in my head for different designs, so there will be plenty of prototyping done to improve my freehand grinding skills. Unfortunately during the week my ability to work is very limited as I have a couple young kids at home who spend weekends with their mother, so forging and heat treating anything at the moment is a pure weekend project, Once my 6 year old gets over his defiant streak, I plan to have him help dad but for the moment its more risk then worth it. That is actually part of why I have moved more over to the stock removal process for knives for the moment, The girlfriend will only tolerate the noise and smell and filthy dirty boyfriend for so long before she reaches back and gives me an old school Italian smack down unless this project starts bringing money into the house. And with the number of Drag racers and mechanics my family hangs out with doing stock removal on old leaf springs is the most economical all the way around. I have one more template to rough out from a paper drawing to add to the board, technically that one is a special request, my friend who is more brother then friend wants a double edged boot knife similar to the one from Big Trouble Little China, So tonight's work is to get that drawn up and rough cut on a blank, but first I have to make a plate for my grinder, not sure why but the tool/stock rest on my cheap harbor freight jobby has these deep grooves on it which prevent smooth movements with anything remotely Jig shaped.


-
The trick I read about that helped me, is the wire coat hanger trick. Straighten a wire coat hanger, and once you think the piece has gotten hot enough, touch the wire to the piece, if when you pull the wire away ( you have to leave it there for about 8-10 seconds ) you can feel it sticking to the main piece, its at the right temp, I have noticed also that if your placement in the fire is wrong, it does not seem to stick , however that is just a noobish observation, I could just be imagining things.
-
So last weekend I decided to get over my aversion of using my good steel to work on, cut up some O1, and started banging away. Made myself a nice little narrow single edged blade with a decent sized tang, set it off to the side and worked on another piece. Short while later, after it had cooled, I picked up my first piece, and noticed that the tang was not straight... Not thinking, I grabbed my 16oz hammer, and lightly tapped it a couple of times, and the tang snapped off Then I remembered what I had read, that O1 in thin sections can / will air harden... Since this was later in the evening Sunday, I packed everything up for the night and swore to myself I wouldnt make the same mistake next weekend. So yesterday, I started another one, with the same basic design in mind. Since I had not finished the second piece from the week before, I started with that piece. And this is how it turned out so far. Underneath, is 4 sections of leaf spring, which I had also worked on, took the two shortest pieces from a pair of leaf springs I got from my dad ( off my kid sisters 76 Camaro Dragster pre build, so no hardcore racing done on them ) and cut them in half, then heated and flattened them in sections. Today was a " lite work " day as I had some plans to spend some time with family, so rather then light the forge and get all filthy dirty, I just traced some templates out on one of the springs after cleaning the rust off them with my belt sander and took my angle grinder to them, then cleaned them up on my belt sander. Originally I was going to use them as templates a bit more durable then paper, but after holding them I realize they need a slightly longer handle, as my hands are not very big and anyone with even slightly larger hands will find the handles too small, So I plan to finish them off entirely and keep them as " Prototypes " to hang on my wall. Going to do bolsters on them along with Hickory wood scales, with probably brass pins, I was going to do Micarta, but currently I lack a respirator so I am going to put making any micarta off till the end of the month when the monthly money fairy deposits my paycheck in my bank. They dont look it from the picture, but these things are MASSIVE, the springs were 1/4 thick, So its going to take me a bit to grind them down, but luckily I found some thin board type material in my garage ( previous owners left all sorts of useful stuff ) that I can trace these out on, draw the handle out a bit longer, and then cut out and have durable templates for the knives I make. They still need a bit of work, the chisel tip needs to be narrowed more and there is a thick spot on the other one right before the beginning of upward curve to the tip. but my main focus today was to get the handles ground out to spec to see how they felt in hand. The first one still also needs work as the tang is again not straight, but the moment I noticed it I just set it right back down and remembered what had happened the weekend before.


-
harbor freight anvil design changes
Malice9610 replied to Danz409's topic in Anvils, Swage Blocks, and Mandrels
That is actually the exact Anvil I have at the moment, Purchased due to its relative cheap price. Cannot use the edges for shaping as the crap metal will split when you attempt to do so, Using the " horn " for any kind of shaping results in the blue coating producing NASTY fumes ( buying and taking a wire wheel to it this weekend to solve that, but I expect it to split or snap off this weekend also from use ) . and the Hardy hole on first appearance appears straight, but its VERY poorly done and in order to use anything I had to take a file to it and square it up the entire length of the hole. But, for 20 bucks, and being easily 3 times the size of the Anvil I started with back in January, It was well worth the money, being the newb that I am, I would much prefer to make my mistakes that damage one of the most important tools of the trade on a piece of 20 dollar HF junk, then on some nice expensive 100+ lb anvil worth owning. As my skills improve and I start to make some money off this project, I fully intend to buy or make a good anvil, but for the moment, Im gunna just pound away at this thing till it breaks. As for marking the face, Yes, even light taps mark the face of it, I have decided in the interim, I will cut a piece of 1/2 inch steel plate to slightly overlap the existing face, as then I can toss the plate in the fire to preheat to lessen the heat loss when doing things such as forge welding. -
I feel your pain Max, I just started doing this stuff back in January of this year, with Forge Welding being at the top of the list of " Things I must learn how to do " and have had very limited success making it work, Infact currently, I have successfully made exactly 1 forge weld, I attempted to forge weld a stack of 6 inch long 1/2 inch flat stock, and was able to get the first inch to forge weld completely, The rest refused to weld. My last attempt failed spectacularly, burned off a good half inch of a 2 inch length of O1 and ruined my first half decent spilt using a hot cut off the section of Rail spike I was trying to forge the O1 to. But I still try every time I fire up the forge, I just try to always use Scraps with the intent of getting the process down. Good luck man, and keep trying, even though I consider my one successful attempt a " failure " as I couldnt forge weld the entire piece it was still very much a confidence builder to grind down the end afterwards and see that i actually did it for once.
-
There is a video on Youtube showing how to do that twist that explains each step. Search " Rubix Cube twist blacksmith " will pull up a few. Also check out " Pineapple Twist Blacksmith" also, that one is pretty cool as well and the guy shows how to do it very clearly. I have yet to try either one, but that is due to my complete lack of being able to hot cut anything even remotely straight, Need to work on that skill first...
-
That clock is AWESOME...
-
O1 Tool steel for a blade. Questions
Malice9610 replied to Malice9610's topic in Heat Treating Knives, Blades etc
funny you mention that DSW, as I was walking to the Gas station at lunch today, I saw a guy wheeling an old broken stove/range to the curb for pickup and thought to myself " Thats not a bad idea for Tempering... unfortunately it was gone before I left work, as Space is not something I lack of yet, I moved from a dinky 2 bedroom duplex into a large house with a 2 car garage, and only have 1 subcompact car to park in it, however I do expect that space to be taken up quite quickly between my newfound blacksmithing habit and my other " shop " projects fairly soon ( family has a history of drag racing and engine building, and robotics, My tax refund is being split between blade stock/equipment and controller boards/parts for the drone ive been designing ) And Steve, I didnt see that post initially when I looked, although I will admit I did not actually search for anything before I asked, however I have since read that post all the way through, and it did answer a lot of my " not quite answered " questions I did have..