Malice9610
-
Posts
167 -
Joined
-
Last visited
Content Type
Profiles
Forums
Articles
Gallery
Downloads
Events
Everything posted by Malice9610
-
So at the advice of a few other more experienced makers, I used a Pipe to normalize in my forge. and I cant complain one bit about the results, allows me to work during the day without overheating my knives, and allows for a more consistent heat along the entire blade. Here is what the first attempt using the pipe looks like after 3 temper cycles. next, I plan to try some 1084/15n20 in the pipe to see if it will help with forge welding.
-
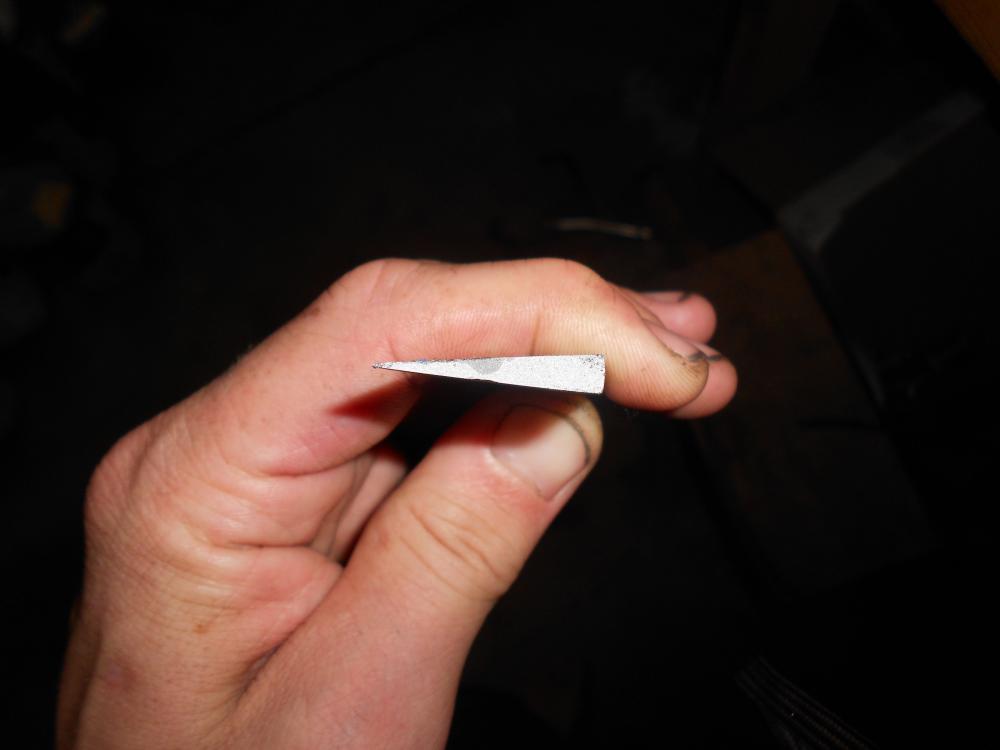
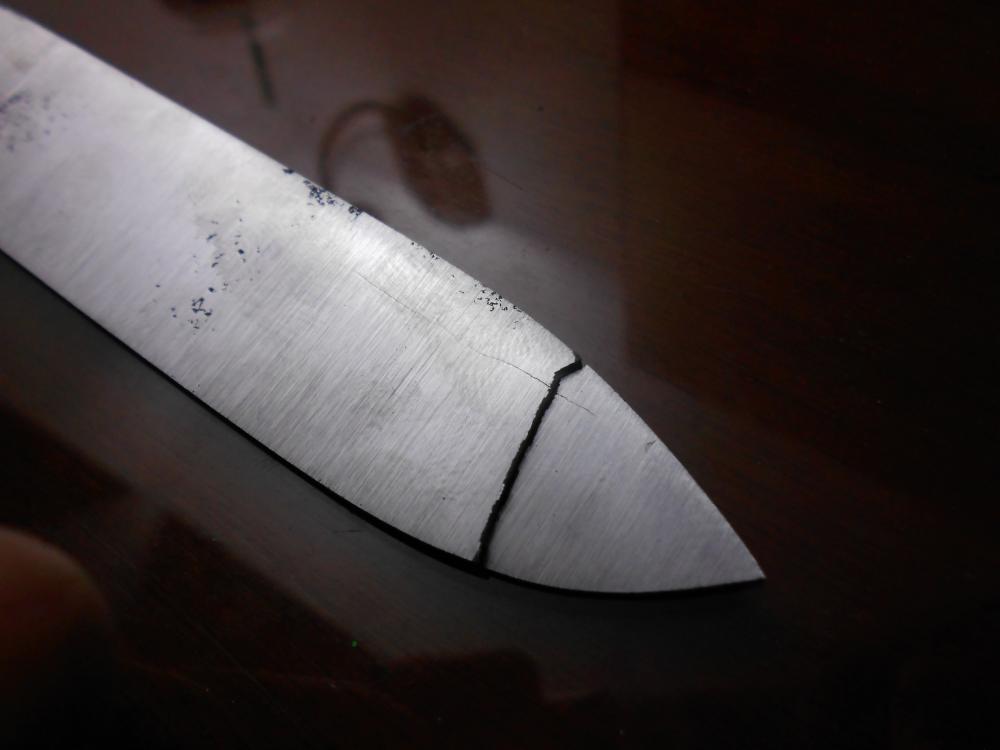
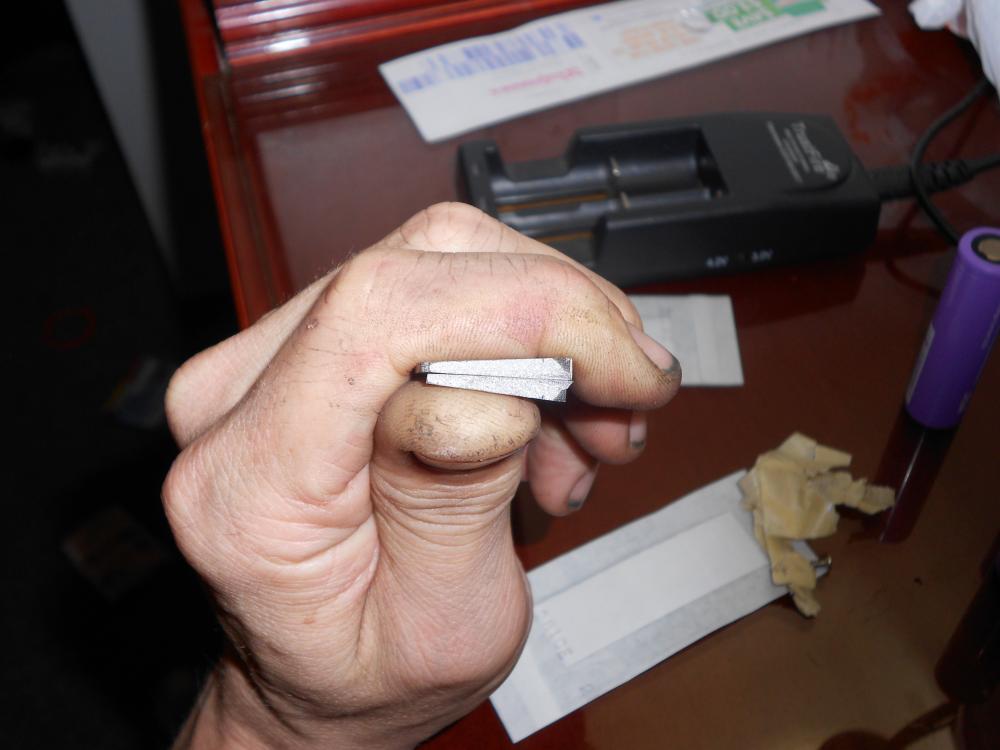
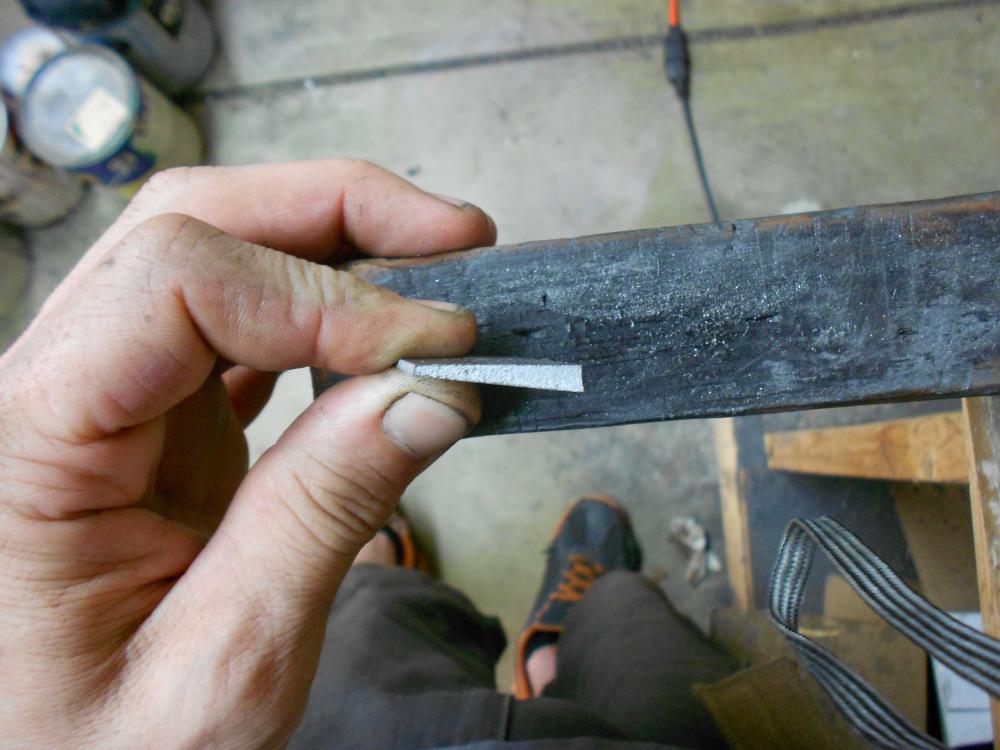
First off, Steve, you were right, using " used and abused " steel does create moments of frustration when you spend a goodly number of hours working on something, only to have it not turn out. Once I have worked my way through the stock I have on hand, Its going to be all new Aldo steel for me moving forward. But, This gave me a chance to do some destructive testing on a fully heat treated knife, to both see how well my normalization went. and also to see how close to the bend test I am. This is the first time I have done any destructive testing. Here you can see the line that drew my attention, at first I thought this was just a gouge in the steel, So I hit it a few times with the belt sander but it wasnt going away. then I noticed where at the spine, there was an angle crack about 1/16th an inch down the blade, that went across the entire spine. I was cleaning the buildup off from tempering this blade when I noticed this, So I was probably about 4-6 hours into this particular piece when the cracks started to show. Tossed it into the vice, and put some muscle to it, but it wouldnt snap. So I braced my feet on the bench, and put ALL my weight on it ( 146 lbs give or take ) and it snapped right at the end of the crack in the spine. You can see a hint of the horizontal crack on the outer sides here, and the dark spots is obviously the much more serious crack in the spine. Grain size is a bit larger then I expected, but not the worst I have ever seen on my work, I did triple normalize these, however I suspect they still cooled too quickly, as my normalization process involved heating them to non magnetic, then walking them about 10-15 feet to my garage and layed them down on the concrete, I suspect that was part of why a couple of the others also warped significantly, but this one, and a matching blade ( making a matched set for a friend of mine and his wife ) were the only ones to be hardened and tempered. I checked the other blade over and there are no signs of any cracks at all on the surface points of the steel. I even ground it down a bit more just to make sure I wasnt missing something just another pass deeper in. Here is a shot after I broke the knife again about half way though the blade, The grain structure to me still seems a bit big for a triple normalization, but this section is / was thicker, and the grains appear smaller then nearer the tip. its no where near a factory heat treat, I would say it falls somewhere between the " 1 normalization / 2 normalization " range from the Picture of the file where they did multiple tests to show grain patterns. Breaking the knife at that point, required a breaker bar, its not overly thick, But I once I threw a cheater bar on it, it snapped with relative ease, which also leads me to think that I may also want to consider my Tempering temps as well, I started at 400 for an hour, cool to room temps, then 375 for an hour, cool to room temp, and then 350 for an hour, I think I should probably ramp that temp up with the same increments to a max temp of around 475-450 deg. The steel is 1976 Camaro Z-28 leaf spring, While not certain, I looked and from what I can tell it " SHOULD " be 5160, so that was the route I took with it, however considering my results I expect many will agree there is something off with my thinking. Sorry about the no so great photos. My " good " Digital camera is not the greatest by any means. but I did want to try and get some decent shots of the grain patterns to see what everyone else though on if I am close to my guesses on where I could improve my work.
-
Here is what I got done today, which is admittedly not that much, but I have ALL day tomorrow to work on them so its not a big deal. Top shiny one is the prototype, the one below it I did completely on the jig. Ill never file a bevel on that cheap piece of horrible fright garbage again. both sides took less then 1 hour total to bevel, granted the other side isnt as good as I did the other side first. but I have plenty of room to clean the bevels up still. Two things I noticed about the jig that are not mentioned in the video about its construction that I realize are common sense and I should have known better. 1. When placing the knife on the jig, you need to line up the file to the stop bolt before cranking it down, luckily for me, I gave myself extra room on the ricasso area and can clean the slight difference up without issue. 2. A36 is tough stuff compared to what they make eye bolts out of, In the short time it took for me to file this out, I wore a groove in the eye of the bolt. So I will be buying another eye bolt tomorrow and will be sanding my rod up to 1000 grit to hopefully negate this.

-
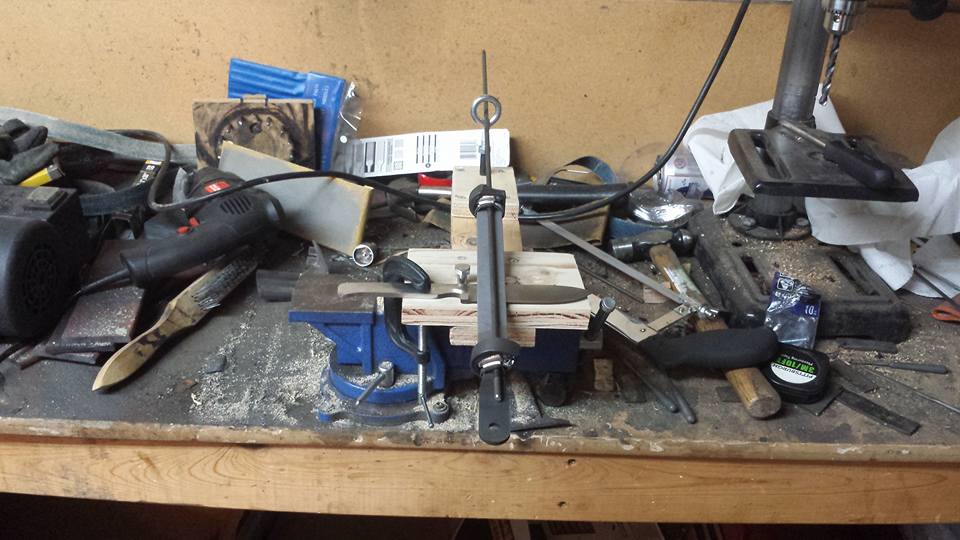
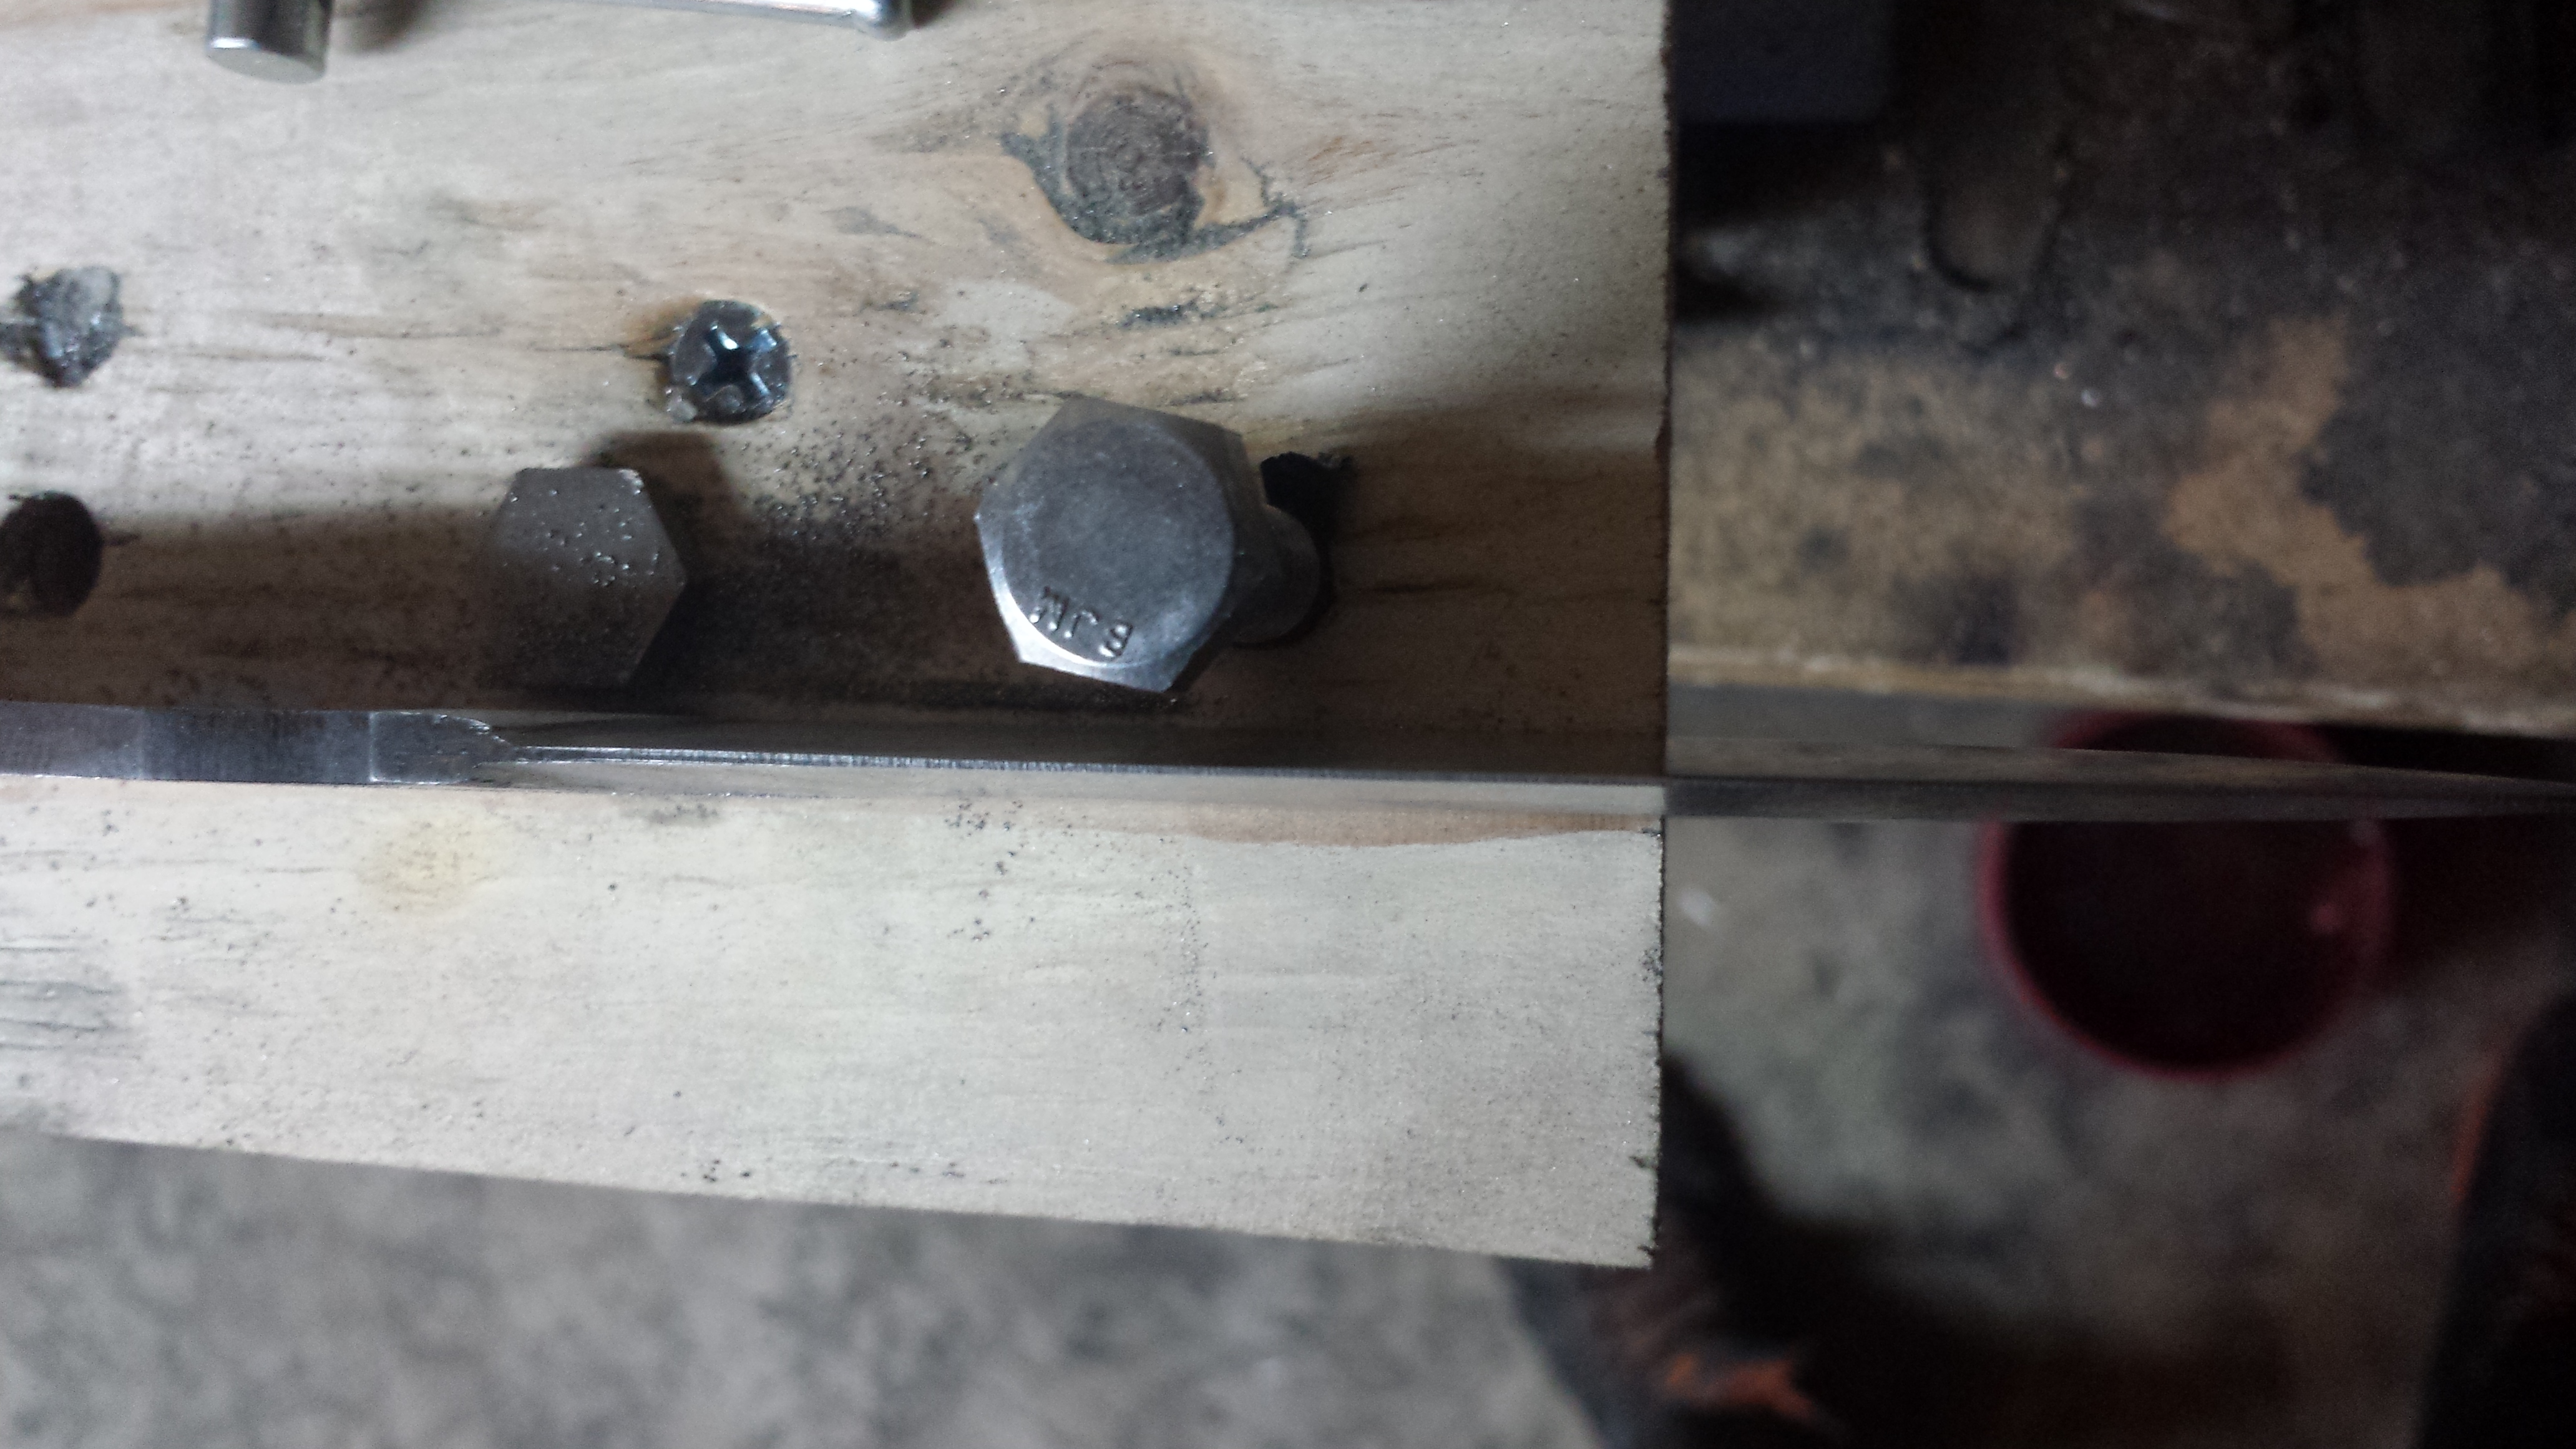
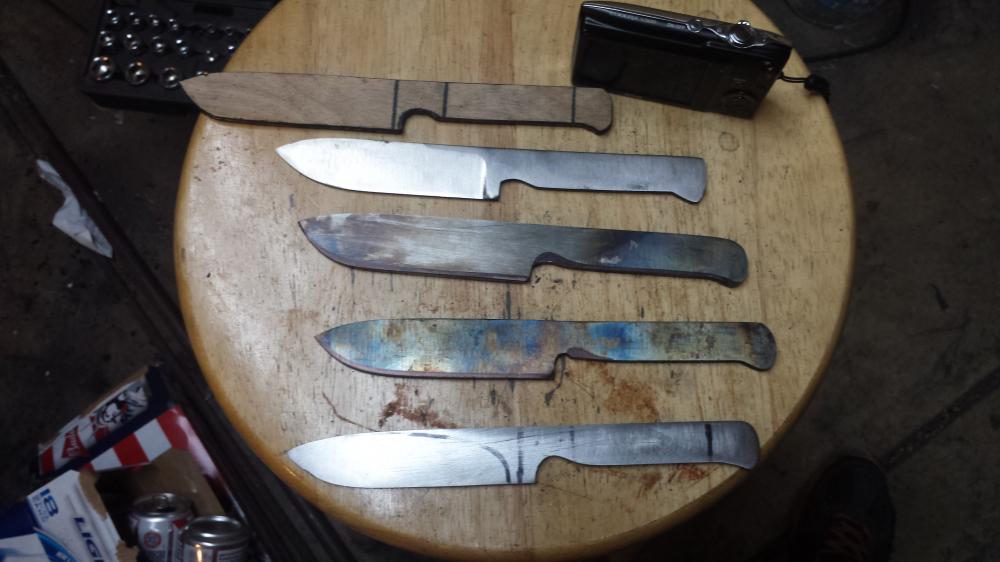
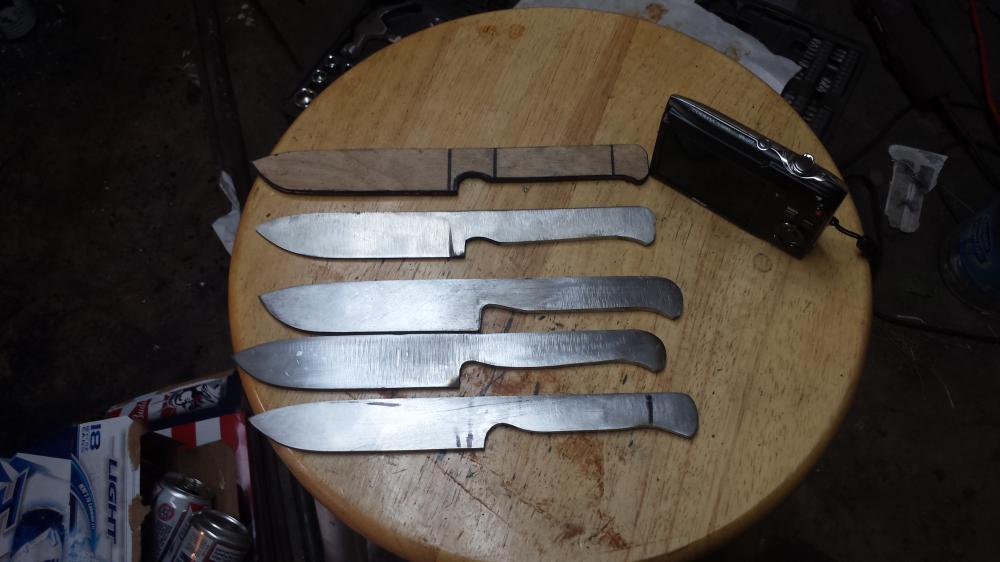
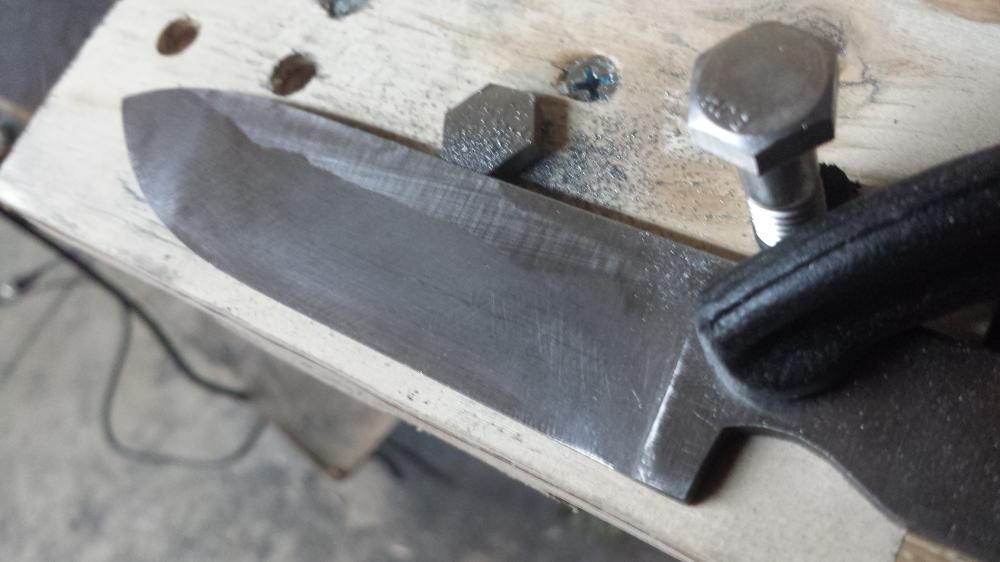
So I am making some knives for Fathers day for my Uncle, Brother in Law, and Father. They are the first run of the new design of Drop Point hunters I am going to make, what with my first design being a bit of pain in the neck for various reasons. The newer design is much easier to cut out 2x knives from a single 2.5 inch wide slab of stock then the previous design, which helps with preventing unrepairable damage to certain areas of the knife without destroying them. I am using an angle grinder with a cut off wheel, the first design the blade was much wider, which created a nearly impossible zigzag cut where the ricassos of both knives came within like 1/4 inch of each other. and every single ricasso had a slight nick in it from the cut off wheel that in some cases went half way through the ricasso on one side. Top is the template for cutting out, Below that, is the prototype I made to determine how thick I wanted to make the knives as I have to thin them out quite a bit as the stock is 1/4 inch thick. As you can see from the template to the prototype, I did deviate on the blade shape slightly by tapering the edge portion a bit more then the template shows. I plan to normalized the prototype in a 3x normalize > 3x harden > 3x temper process and then break the blade to see the grain pattern before doing the other three, I really like the prototype feel in the hand even without handles, so I expect the finished knives will end up being quite nice in hand, but I want to be certain they will stand up to the rigors my brother in law ( avid hunter ) and my outdoorsmen type uncle and father will throw their way. At this point all three have been thinned out just slightly oversized of the prototype, to allow some room for error on the beveling and heat treating process. In this after refining the handles and tapering the blades a bit more, the template has a very straight design to it, Which I wanted as a " standard " of the design, so that I could change it on a per knife basis, Each of these is getting Brass and Bocote handles. you can see in the first photo the lines I am thinking of going with for the pin holes for the blade end bolster. I would like to have all the pins line up along the handle so I suspect I will have to make the blade end bolster longer then I wanted to so I am not drilling a pin hole so close to the finger groove as to introduce a weak point in the blade. The plan is to do each bolster slightly different. and try my hand at some decorative filework on each one. I also made this bevel jig, after watching a video on youtube ( Gough Custom channel ). I have found that I spend WAY too much time fiddling with bevels on my cheap 1x30 Harbor Freight grinder. Earlier this week while I was at Home Depot, I found a nice Nicholson cross cut file for 7 bucks, so I decided to buy it, my previous files are all Harbor freight pieces, and to call them garbage is putting it mildly. I brought this file home, and did a quick draw file on the handle of the prototype to see how well it cut, and I was sold on it and Nicholson files after the first pass. very clean cutting. smooth finish. I finished putting the jig together last night, and decided to give it a whirl on the prototype. considering the bevel was already there on the prototype I just attempted to clean it up a bit as I could feel some high spots and see a few along the edge. Between a maintainable angle, and a great file, I had the prototype bevel cleaned up in a lot less time then I could have done using the belt grinder. I am also much happier with how my plunge cut and ricasso end up with this method. The only downfall was having to bevel the corners on my brand new Nicholson file, But I went back the next day and bought another one just like it specifically for the jig. As you can see here, there are for sure high / low spots in my freehand grind that the file is slowly cleaning up, I am sure part of it is also getting used to using the jig, but thats why I used the Prototype first, So I could figure out the best way for me to use the jig effectively, I would like to have these all have some " flat " left in them with a clean straight grind line instead of a full flat grind all the way to the spine. I have to clean up a bit still on the Ricasso area, my goal is to finish cleaning the bevel on the prototype to match all the way around, but that is easily the straightest edge I have ever created, I am not sure ill be able to clean up the ricasso all the way, as most of the damage was done when setting the plunge cut on the belt grinder before building the jig. That is where these all stand as of right now, Tonight when I come home from the day job, Ill be finalizing the placement of the bolsters and drilling holes, and then its off to the jig for the bevels, But before I can do that I need to swap out the 3/16ths rod on my jig for a thicker one, the rod slightly bends when applying pressure and I would prefer it to be more rigid so that I dont have to worry so much about the angle of the file during the cut. I suspect that is part of the reason I have a slightly uneven grind line after using it, is Im bending the jig in the cut and its not cutting evenly.


-
ones ill keep in mind for sure when the time comes to start those projects. Thank you Frosty, This is why I love this site so much, there is so much to learn and so many people to learn new things from.
-
Yeah, I want to take on more " blacksmithing " type projects as well, there are things some people make that just blows my mind on how they were able to shape metal the way they did. And plan to do more decor type stuff in the future, I want to make some leaves, been thinking a twisted S hook with a couple leaves sprouting out of it would look great on my deck. I do plan to start more projects like that once I have more stock geared to that type of use, as right now my current stock consists of leaf springs, some O1 rod stock, and a TON of A36 1/4 inch rod.
-
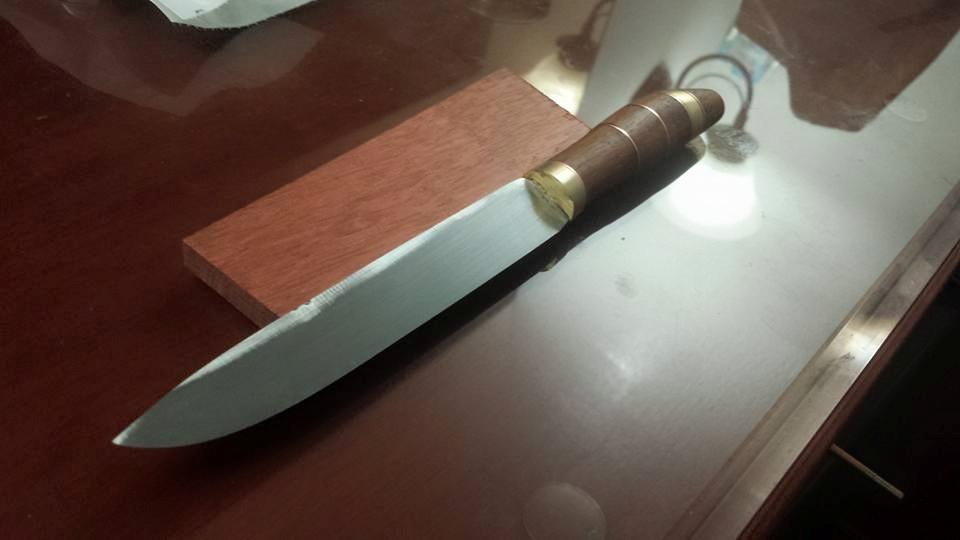
I think either all of my friends are alcoholics, or there is a much larger demand for " lime slicers " then anyone anticipated. My friend stopped by last night, and saw this right after I finished coating the handle in linseed, and loved it. and then earlier today, he texted me and told me he must have it for general kitchen use such as eating steak and slicing limes. His dad is who got the very first knife I ever finished, and he has reported that the knife excels at lime slicing and general bar usage. It would seem I have found a niche I am good at, I make good bar knives it seems.
-
Part of being a newb to this, is figuring out the best way to assemble all this stuff. With that being the case, ill tape the handle up before i attempt to buff out the brass, Thanks Jeddly for the heads up on that.
-
You both may not realize it, but even though you both say " I dont make knives " you both heat metal up and shape it. and there is where your experience far outshines mine. Dont sell yourselves short, You both may not " Dabble in the dark arts " but I am sure if you two decided to do so, your work would likely far outshine mine.
-
Thank you Charles, Complements such as that from one so much more experienced in this then myself tell me I am on the right track. And thank you Frosty as well, Between you and Charles and Thomas, you guys have proven time and time again that all the reading in the world cant measure up to real world experience, which you gents all have in spades over me.
-
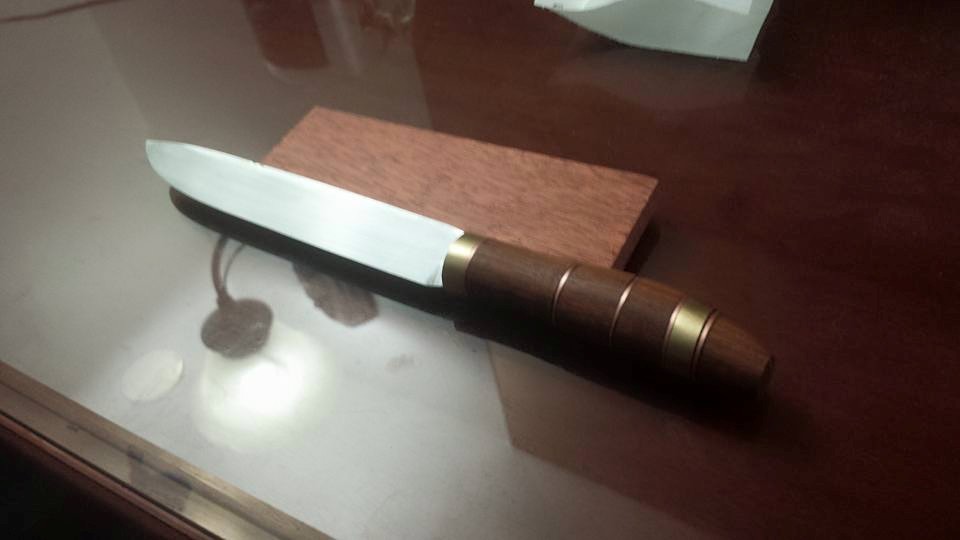
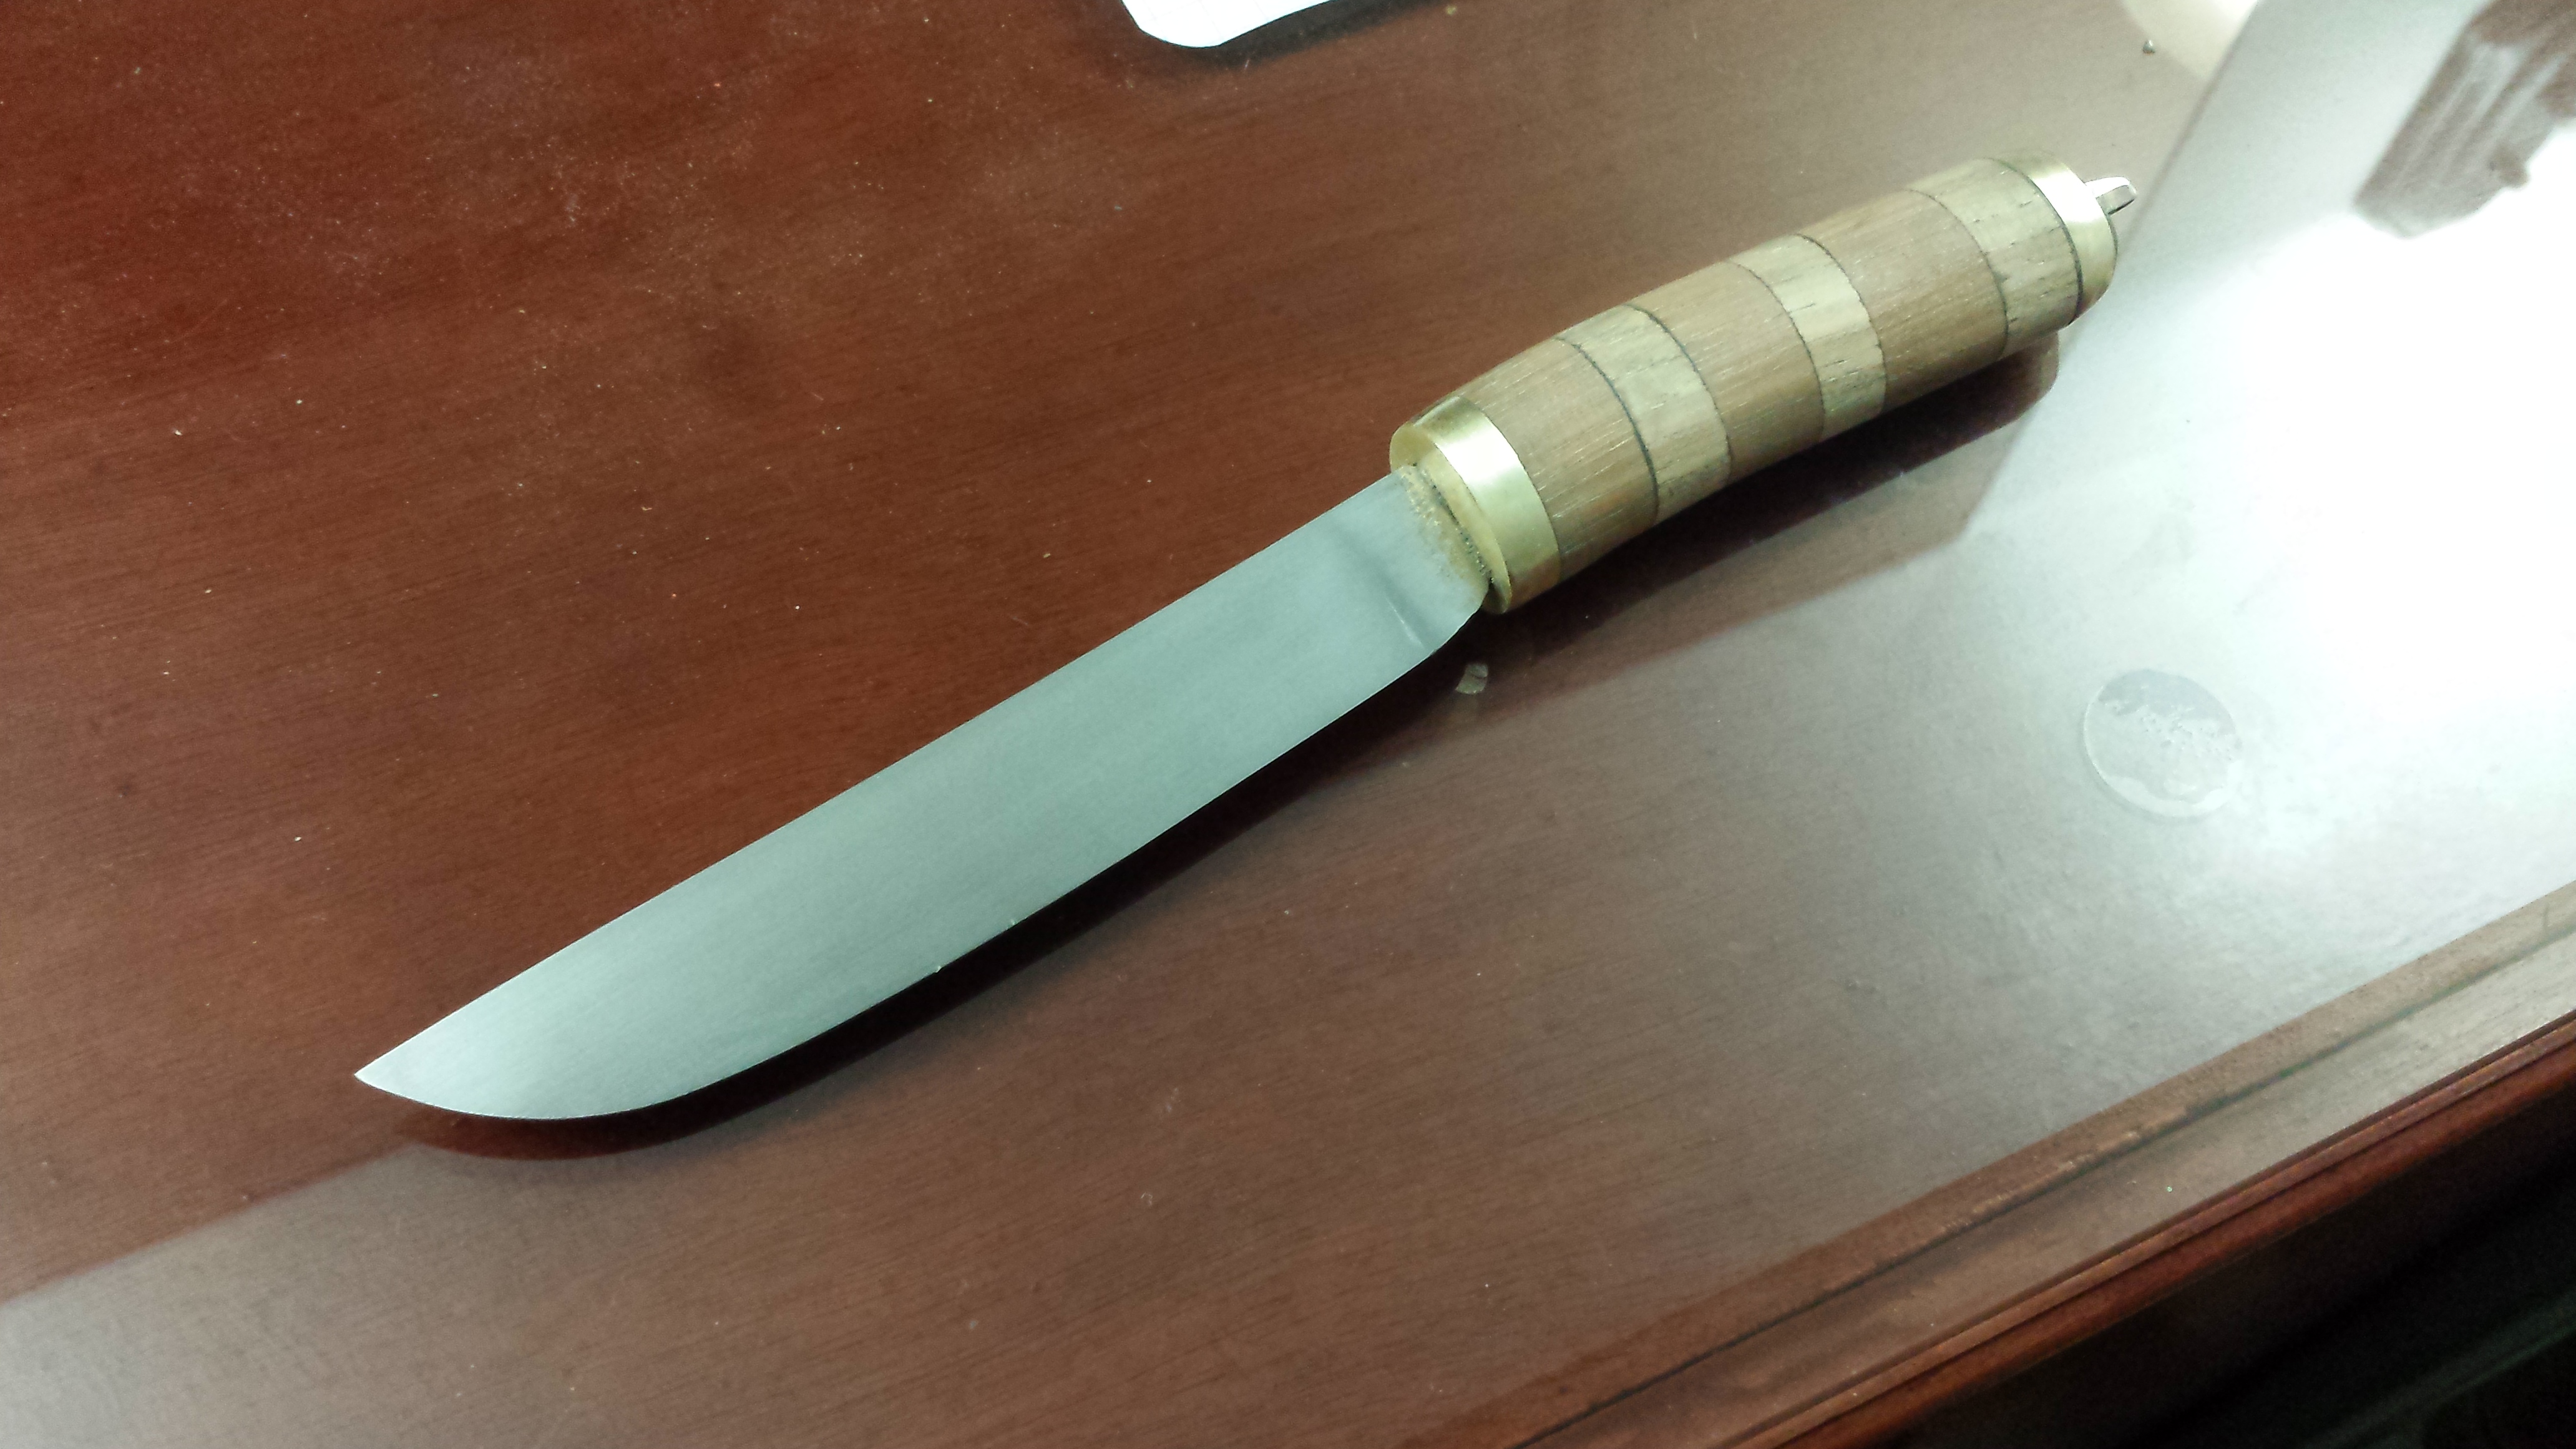
Yeah, the blade is quite a bit longer then the traditional Puukko, I figured I would use it as a handle practice as my wood handle skills are sub par at best. I didnt want to ruin the heat treat on it to shorten it down, however I have a couple more blades from the O1 stock I have that are much closer to the traditional puukko length, those ones are going to be done as close to traditional puukko as I can get them as they are still scale covered and have yet to even be ground, those ones will get the traditional diamond cross section and no ricasso. I just measured it, the blade is exactly 5 1/4 inch long, so technically it is a bit long for a Puukko, but a bit short for a Leuku which is the identical big brother of the puukko.
-
As I said, the difference is very slight. but there is a slight taper right after the brass.

-
Well the design is based on a Puukko, which is even scarier as it lacks a ricasso and the edge goes right up to the handle material and they have similarly done handles. The photos dont show it well, but the bottom end of the handle actually has a slight taper to it where the first piece of brass is slightly wider then the copper which is slightly wider then the wood, its a very slight difference in size, as I was limited to how much I could taper it due to the width of the tang, but that is also why I left the hump on the back end of it and it tapers the way it does, I am also considering doing some jimping or filework on the spine of the knife right at before the handle to increase the grip on the knife as you do have a very valid concern with the risk of injury.
-
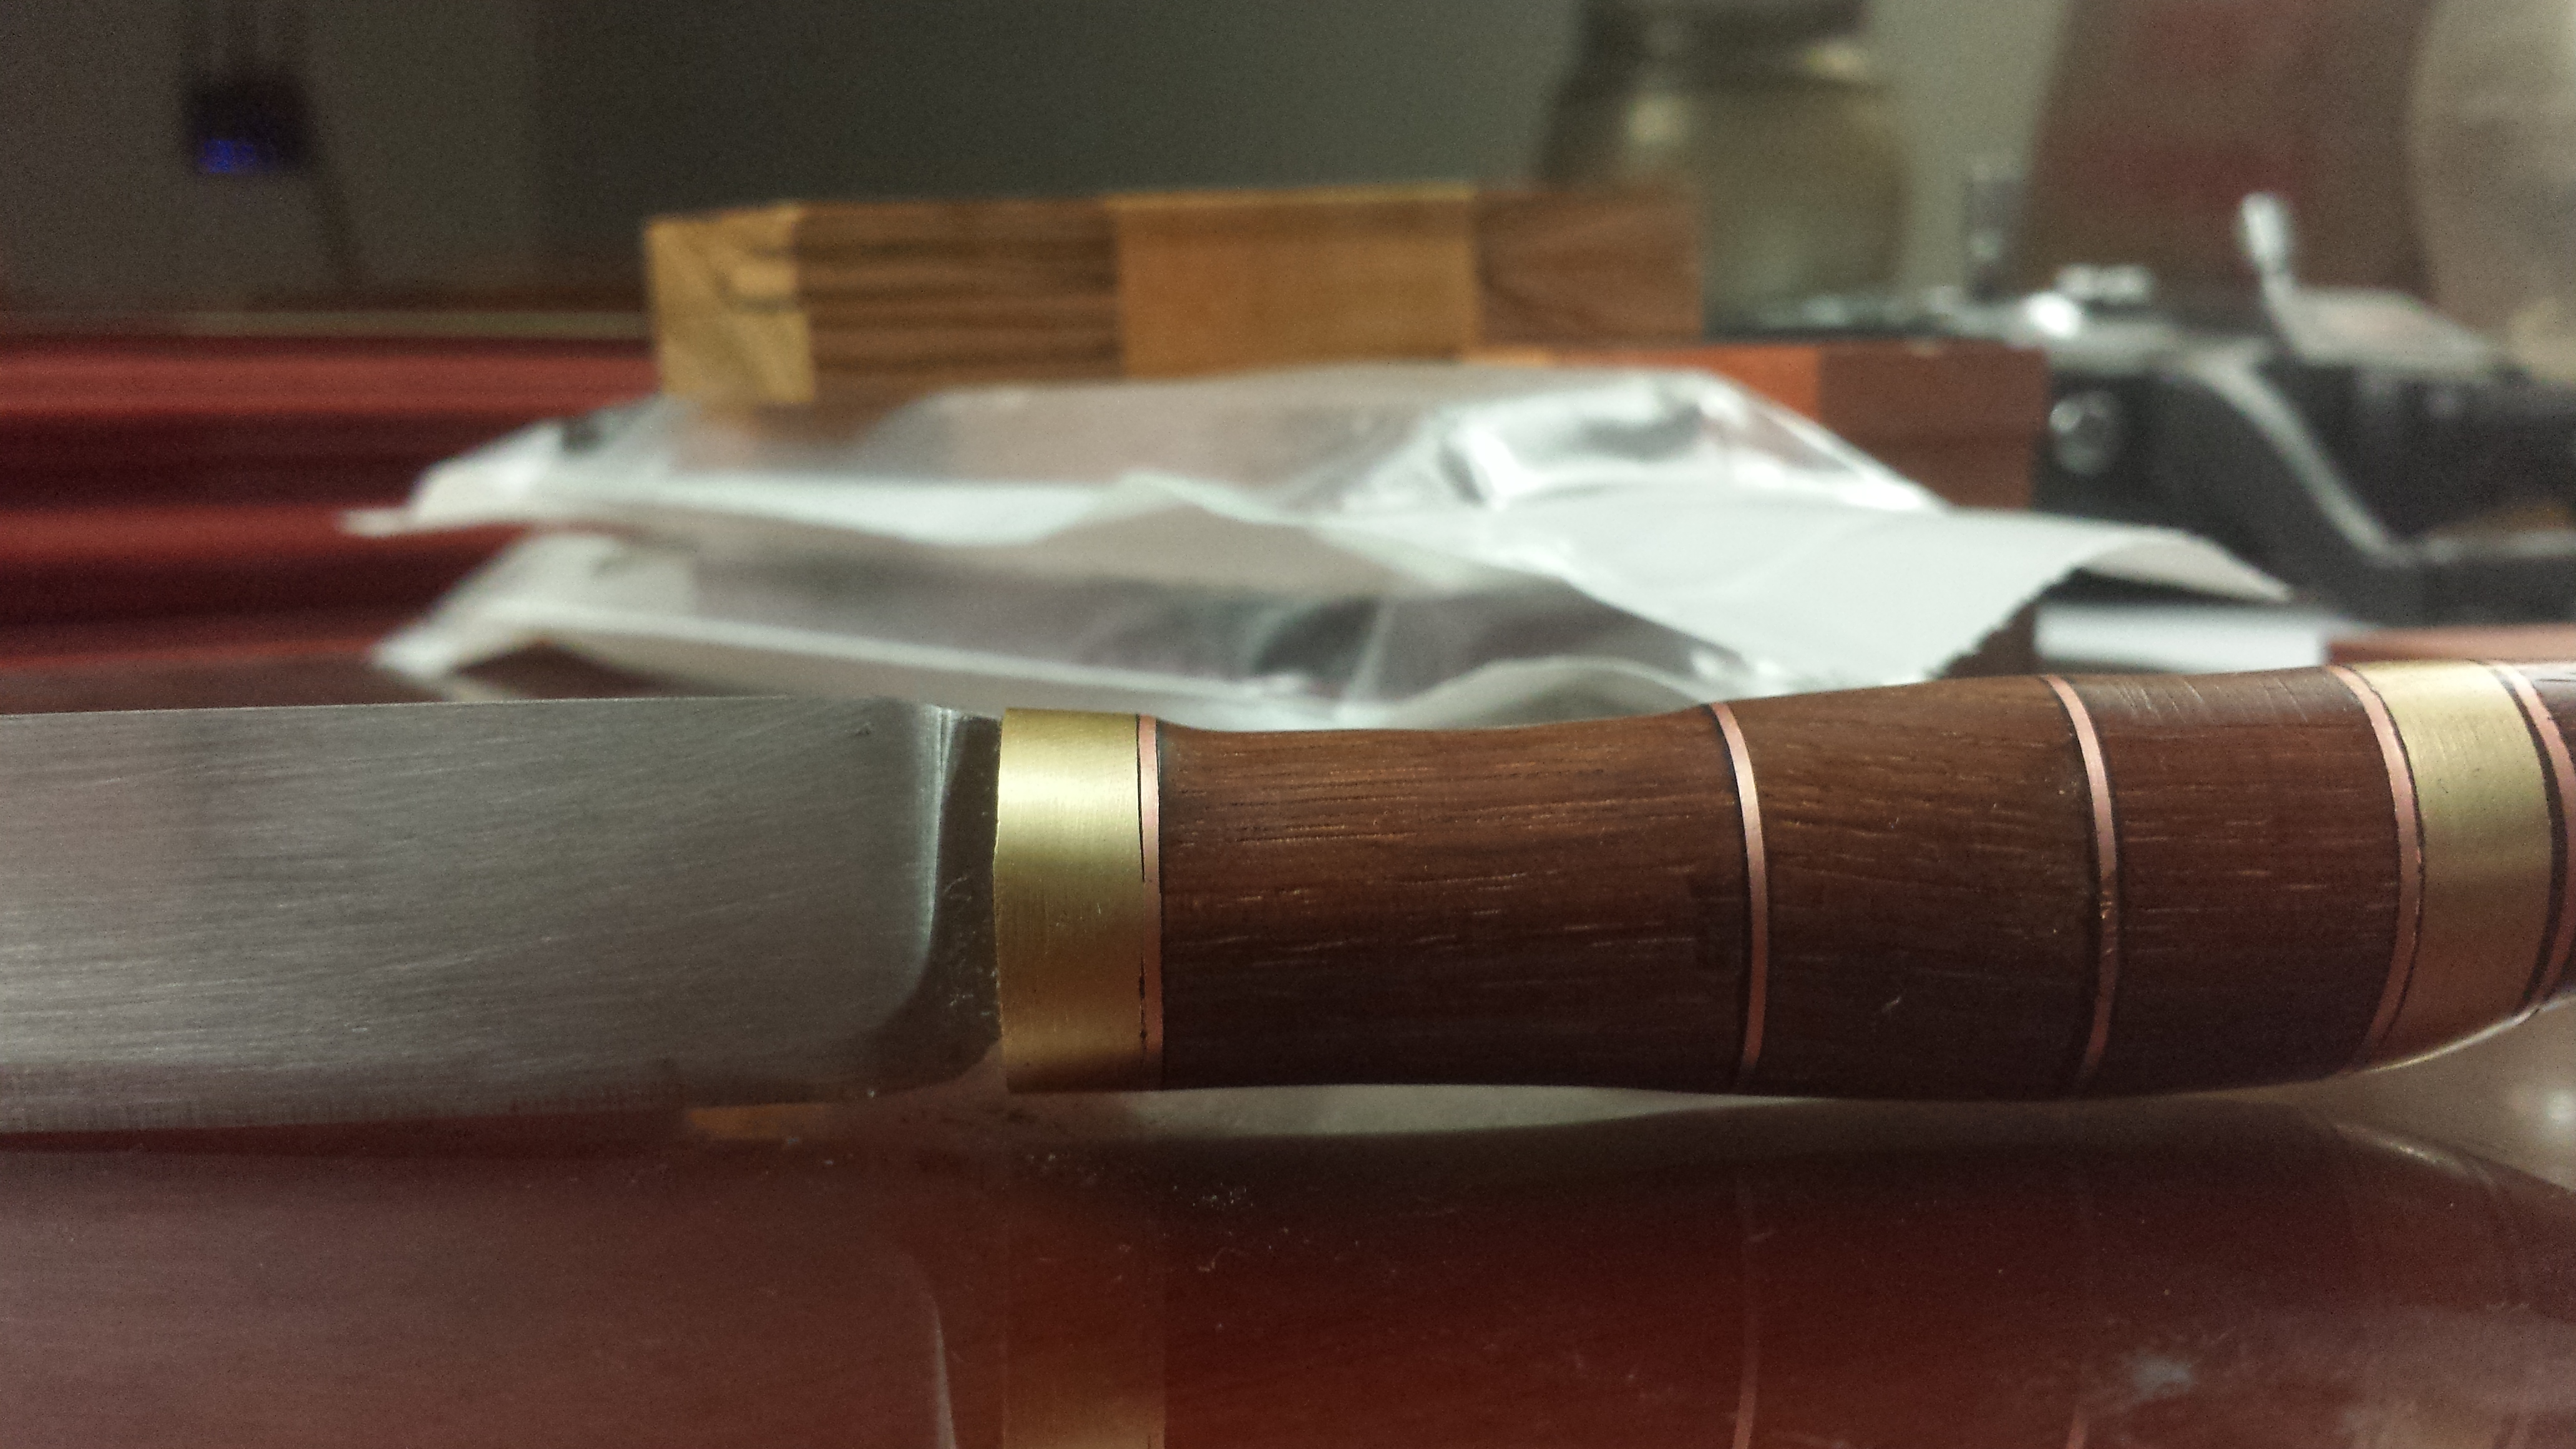
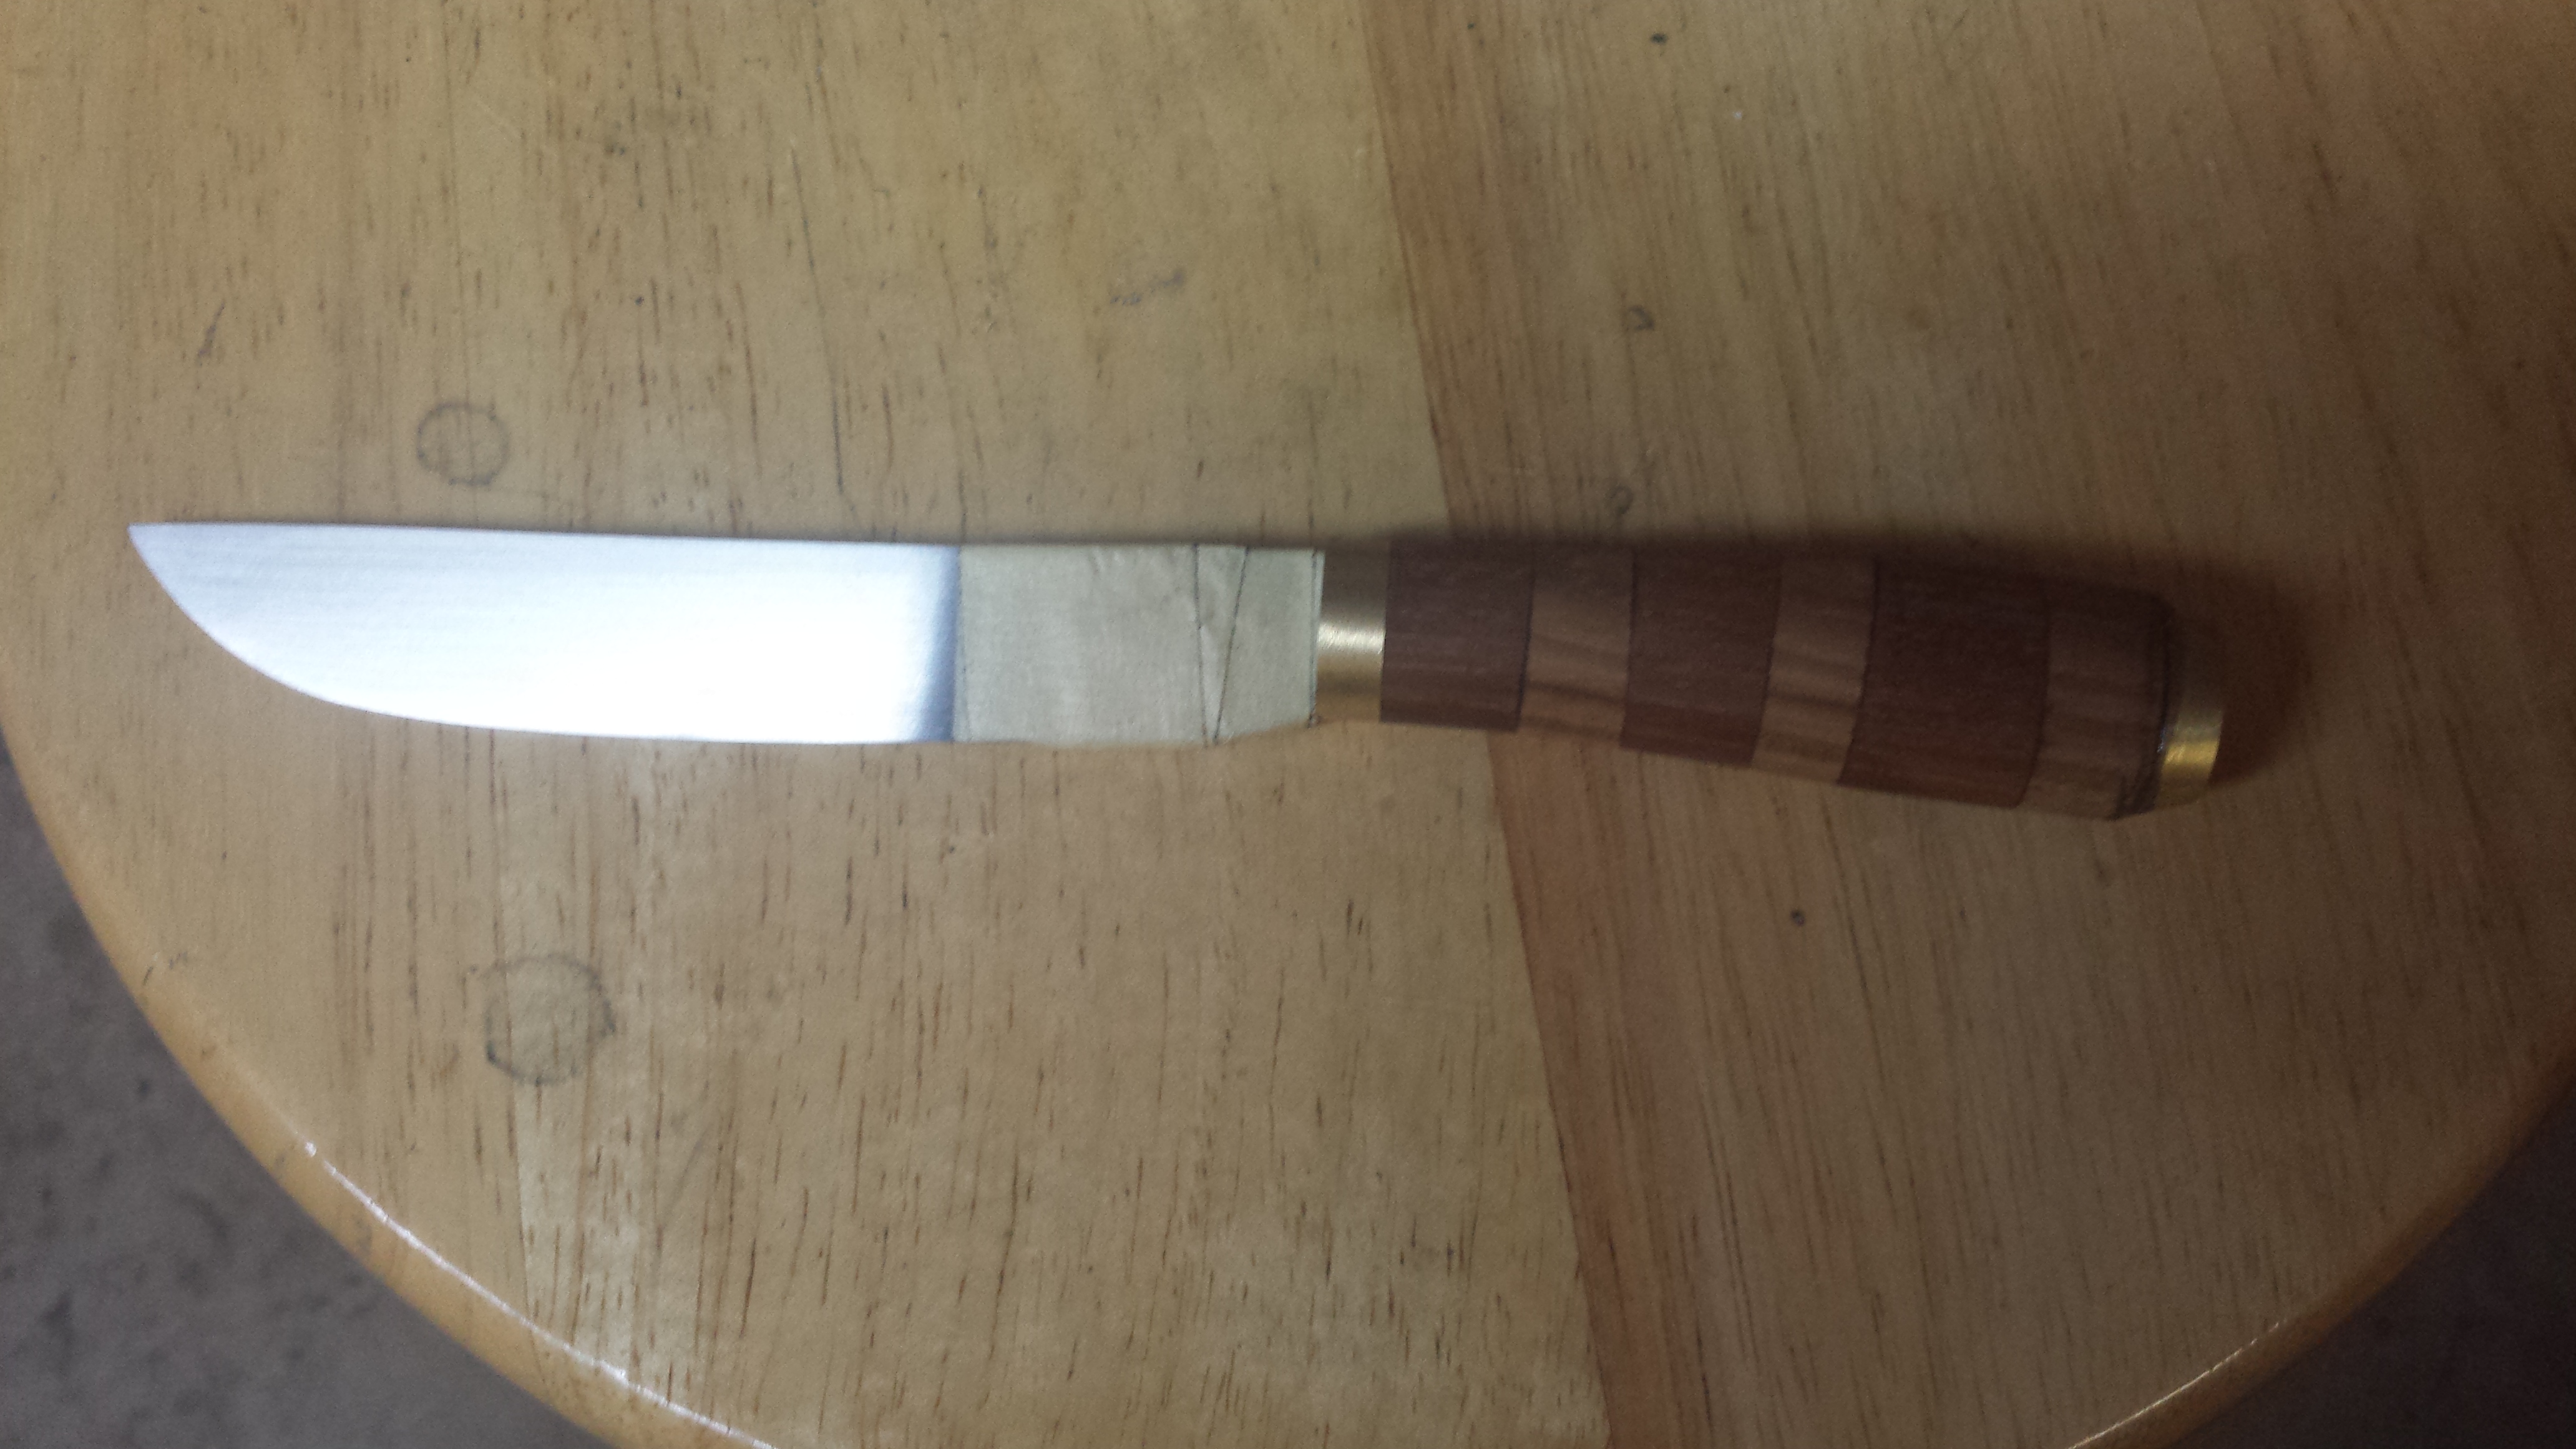
So this isnt totally done, needs an edge and some final polish work done, but I figured I would post a pic of it now as I do have a couple questions. The handle is Brass, Copper, and Hickory. I have put 2 coats of boiled linseed oil on this, and am curious as to how many coats of linseed would be " enough " or is there a way to tell when you are wasting the stuff trying to put more on? I sanded this up to 1200 grit and its nice and smooth, but plan to sand the brass parts carefully up to 2000 grit and then hit them with some buffing compound and and cloth wheel. And any recommendations on treatment after the linseed oil is fully dry, or just leave it as is? Blade is O1, has a hidden tang all the way into the last piece of wood at the end of the handle, At the moment all of the O1 knives I can make have been quite narrow blades, this is due to the fact I have 1/2 inch stock, and newb hammering skills. Its also the first time I have really gotten a good clean grind line on a flat grind that I felt comfortable leaving, I plan to sand the entire knife up to 2000 grit and then compound and cloth wheel it. The fit on the copper pieces could be better, you can see some dark spots where there was a gap that was filled by the epoxy, but the copper came from a length of 1/2 inch copper pipe I cut long ways and then cold hammered " flat " and the cuts on the wood were not by any means perfect either. but considering the number of pieces I am actually surprised it fit together as well as it did, I did try my best to get the fit as close to square as possible, but im new at this and have yet to learn all the tricks to this addiction. Next one I do like this, I am going to do Brass, Copper, Wood, Copper, Brass instead of having the second brass piece at the end, I like it, but I think it would look better if the second piece of brass were at the middle instead of the end.

-
Is that a bullet casing at the end of the handle? I like it, the handle looks very comfortable to hold, I hope my first puukko turns out half this well, ill find out soon enough as ill be starting it next week.
-
Thanks Thomas for the clarification. At this point, I think I owe you a bit more then a 6pack of tasty adult beverages for all the help and suggestions you have given me.
-
ahhh, ok, I guess that makes more sense, I bet some interesting textures come from that. Now I think I will have to try that process, So many things to learn and try and so little time to try them all...
-
Thomas, So you would use the masonry nails to " shim up " the guard to the tang, Am I understanding that correctly, I think on the next one I finish up in this manner I am going to give the " hit it to make it tight " idea a try, but If i end up with massive holes on each side perhaps shimming it in that manner with some masonry nails would make an interesting design once ground down to the level of the guard. Thanks for yet another great idea... Here is how that one looks now, handle is finally shaped in a way I like. still not a true Puukko style handle, but for what I envision this knife to be I really like the handle shape and it feels nice and light in the hand. When I first ground the scale off this blade after forging, i looked at it and said to myself " This is like grandpa's old fishing knife " and that use has pretty much stuck in my head ever since.

-
Yeah, Im noticing the patience part, I have another one ( first post, Second knife from the top ) that I am also working on at the moment, its the one I had to dismantle as the handle slid down the tang when gluing, the holes on that one are MUCH tighter then the holes on this one at least as far as the brass work goes. I think my biggest issue is sizes, I didnt measure the thickness of the tang, so when I drilled out the pieces, I just grabbed a couple drill bits, compared them to the width of the blade, found one that felt close and drilled, but afterwards I realized the tang was slightly thicker mid way down it, so to get the brass on, I had to make the holes slightly larger which created the gap, Lucky for me, the other one the tang tapers consistently to the end, going to reglue that one tonight and then hopefully finish it up tomorrow. I want to see how it turns out, It has 2 pieces of brass in it, and the wood is separated by a thin section of copper layers. I love this hobby.... Edit: THIN not THING....
-
After reading M Cochran's I realize I must have been more tired then I thought I was last night. he makes a valid point, more healthy to use standard veggie oil then motor oil, even if its brand new motor oil.. And with Veggie Oil, it smells like a french fry fryer..
-
Here is how that first one looks now, Other one will get glue treatment later tonight. and then cleaned up tomorrow.

-
Well I had two handled like this, the one in the picture is the one that everything stayed in place on, The other one the top brass piece and all other pieces slid down. I ended up tossing it in my shop toaster oven, let it sit for about 20 minutes at 200 deg, and then wrapped the blade and clamped it in the vice and then pulled all the pieces off one by one, wasnt too bad at all, Now just clean them up, and then reglue them,
-
Gah,,,, I love that forged finish you leave on most of your work... Yet again you have made something that I will invariably try to make but fail to come close to pulling off...
-
My first knife was also a rail spike knife. I keep seeing this style of knife with the curved handle and have decided I must attempt one ( I am quite new to this stuff ) in the near future. But it looks good, Your next one will look better as Im sure you learned a few things making this one to make the next one easier.
-
Basically the handle is a stack.. The intent, is to glue it all up, then take the belt sander to the brass pieces till they are close to the wood in general shape, then hand sand the whole handle down to a fairly uniform puukko handle shape, So really the brass is more the handle then a guard, however as you can see in the second picture, one of the sides in the brass has a gap, the other side is much closer to the tang. I had to re epoxy the end piece today, I would assume the heat from sanding down the brass on the belt sander warmed the epoxy up to its " loosening " point, so something I will need to consider tomorrow when I finish the grinding on it. I am actually making this as a " Can I do it " proof of concept for a KITH Puukko I want to try and make, This last weekend I pulled off a major ( in my opinion ) accomplishment with my skills, I was able to forge weld successfully 4 times in a row, I was making some twisted winebottle holders for the wino's errrr... I mean women in my family for mothers day and was using 3/16th round A36 and realized it was not strong enough to hold the weight of a full wine bottle ( Girlfriend being Italian, I have plenty to use for.... testing.... yeah... ) so I just ground off the mill scale from the ends of 2 pieces, wired them together, heat them and beat them and was able to get all 4 done first try. One broke while twisting, but the other three held solid even after trying to break them apart. So the Puukko I make for the KITH, is going to have at minimum pattern welded caps on it, If I can pull off a full puukko blade, I will feel very happy with my skills. plan to keep the attempts small, prolly 2 inch long by inch wide and 1/4 inch thick pieces, planning on doing 1084 and 15N20.