

NickOHH
-
Posts
526 -
Joined
-
Last visited
Content Type
Profiles
Forums
Articles
Gallery
Downloads
Events
Everything posted by NickOHH
-
Round stock works just fine, something you can try if you want to taper your reins not just leave em straight is do a hexagonal taper insted of square. Rotate 60 degrees insted of 90 and it's easier to round off and keeps the taper straiter and more even.
-
There's a pic of the ones I made last real easy to make and they work great. Just flatten our 4-6 inches for the jaw area flip and flatten and taper back to the round bar . Shape the "c" behind the jaw and punch whole in the boss rivet and set the jaws.
-
Mild steel are a good choice for your first goes at tongs, as said above bolt tongs are nice I think they are easier to make more forgiving to line everything up once they riveted. The problem with medium to high carbon steel is they're gonna be getting hot and then quenched while heating your project again which will harden them to a brittle state that can tolerate the stress or you have an oil hardening steel which when quenched in water can cause cracking. You can however use mild steel for the jaw and boss ( hinge) area and weld on spring steel reigns so you can have thinner lighter reins. You can use medium to high carbon steels for the whole but have to be aware of the risk of breakage and let them cool before quenching if they are more than a low black heat. I've had good luck with bolt tongs from 1/2 inch mild steel.
-
How to get coal out of everything...?
NickOHH replied to MarcyOHH's topic in Blacksmithing, General Discussion
Thats a pretty good trip for coal we have about a 50 mile trip,might as well make it worth while. I need to stock up again we have been goin through it faster lately. I want to get a smaller anvil in the 10# or so range for doing some more detailed work and for Marcy working on some small stock or copper/aluminum type work. Get your wife a small setup and some easier stock to work with and show her some of the possibilities I like workin with Marcy she just has a whole new perspective to stuff than I do. -
Very interesting approach to the axe. Well done , nice for your first one. Make another out of spring steel and see how it performs!
-
turning hammer into a bowl adze
NickOHH replied to NickOHH's topic in Axes, Hatchets, Hawks, Choppers, etc
nice post a picture once its done, i almosted used mason hammer, im curious wide/ long the blade turns out, theres some meat there to work with -
turning hammer into a bowl adze
NickOHH replied to NickOHH's topic in Axes, Hatchets, Hawks, Choppers, etc
im glad i ended up using claw hammers instead, they turned out pretty decent, still need to give em a proper try on carving a bowl with em, but from the prelimnary test they seem to work decent, and i havent gotten them razor sharp yet, coulda left the claws on for a bit more weight, but they still have pretty good bala tnce. i want to make a couple wider ones now, these around 2 inches across, i want to try for something near 4, just figuring out what to use or how to acheive it. -
My first try at a RR Spike Tomahawk
NickOHH replied to eseemann's topic in Axes, Hatchets, Hawks, Choppers, etc
i tend to like a nice curve in a chopping blade as it will penetrate deeper with less effort so it a nice design. alot of edge that will see little resistance, post a pic once you get it all cleaned up. -
Quenching, you hardened it by doing so it gets very brittle so it needs to be tempered to reduce the it to a manageable level. Gotta be careful working with steel with medium to high carbon content I only quench to do the final cool once it's lost most of its heat already.
-
Welcome aboard chan! You came to a great place to learn! Lot of talented people here that will share there knowledge just gotta show interest and ask if you can't find it , search is your friend. Bring a lunch you'll be here for awhile!
-
 finally got 3 different bowl adzes and a hatchet I recently forged all handled and oiled ready to go, still a final honing to be done, but they are pretty shard already, should be a pleasure to use, the adzes all have different edges on them so I can test them out, inside , outside and a combination bevel, all have advantages/ disadvantages, thought I would test them out before I make different sizes to see which I like. I Though I would give a go at a small hatchet from a ball peen while I was at it.
 -
welcome Corey, you've stumble on a great resource here! Im intrested to see your progression through turning that clip into a knife, it will be quite a work out, but that doesnt mean not to go for it! it would be nice to see a post when your done of various points along the way, best of luck in your en devour.
-
My first try at a RR Spike Tomahawk
NickOHH replied to eseemann's topic in Axes, Hatchets, Hawks, Choppers, etc
Nice hawk there eseemann, like the blade shape, get the most out of the material, shape it up with the grinder alittle bit, and you'll have a fine peice there i have yet to try my hand at a spike hawk, i have a few layin around, my have to try it soon. -
yea ive been havin some trouble lately too, but not bad, not bad at all! nice even long tapers and sharp points, good for your time! the first thing i did was flaten a triagular file! but i had a blast doin it and knew i was hooked! then i was hooked as i made about 500 hooks learning! but its a good way to learn the basics slowly moved on to more and more projects.
-
How to get coal out of everything...?
NickOHH replied to MarcyOHH's topic in Blacksmithing, General Discussion
a good layer of coal dust will help your body filter out all the germs and bacteria as well as all the city pollution :D Key is to get coal dust on everything so ya don't notice it anymore. -
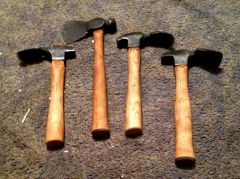
heres a pair i made yesterday, getting better.
-
Your old scraps, what could you do with them
NickOHH replied to TechnicusJoe's topic in Blacksmithing, General Discussion
those are some awesome mini tongs Crazy Ivan -
welcome Anunzi! Frosty has a good point about making a portable forge atleast for the meantime until you get used to it and make sure you dont want to modify it. there are some relatively easy to build that dont require welding or slightly better designs that you dont need to be a very good welder if you can get your hands on one for the afternoon (mines holding together just fine :D ). just need a brake drum and a peice of pipe with some kind of fan. can prop it up on some bricks if you need, theres a post on here about the "55 Forge" with differnt takes on using a 55 gallon drum to make a forge out of.
-
hey AZGUY, welcome to the forum. Do you have pictres of them? im not seeing anything. As long as you had fun, thats what really matters not good or bad. Theres always more to learn no matter how good you at this. Be warned though, its very addictive! the more you forge the more you'll need to forge! This forum is great for helping build your skills, alot of useful information and a lot of helpful people just browse, and dont be afraid to ask questions, and you will get answers.
-
You'll like the upgraded forge a lot! When your building up around the drum you will only need to smooth out the transition over the lip of the drum enough to be able to rack in more charcoal don't need to use a ton of clay. And I would suggest start with a bunch of smaller holes all over the cap and maybe one large in the center because you can always add more to suite your needs or enlarge them but I think you will find with your gate to control air flow as many holes as you can get in there with still maintaining a grate to keep the fire in the firepot will be perfect.
-
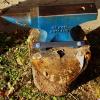
Just broken in!!
-
Newbie looking for some ideas
NickOHH replied to MarcyOHH's topic in Blacksmithing, General Discussion
Well put SJS, good advice. Your mental toolbox is as important or more than your actual toolbox . -
Problem with leaves breaking off the smaller I get.
NickOHH replied to bvbaird's topic in Problem Solving
i had the same problem tryin them with rebar, it can be done, and not a bad option for how cheap rebar is, i still use iit for make leaf keychains because i can make 20 of them for 2 bucks, but be prepared to lose a few due to cracks, if you keep using the rebar, work it really hot yellow to bright orange heat as soon as it cools at all heat again and it will help with cracking, but rebar doesnt have the same standards for quality as other metal unless you get it from a rebar manufacturer that specializes in it but then your not getting it as cheap anyway, best of luck keep at it! -
Newbie looking for some ideas
NickOHH replied to MarcyOHH's topic in Blacksmithing, General Discussion
Im noticing that frosty, the more i make hooks and the things i started out over the summer with, the easier they get and the nicer they start looking, so the more details i can put in them, faster, and not think about how im going to do that as much or how to fix something, and the more im learning how the metal is going to react so it has made everything else i want to try easier, and with less thought required before hand, which results in less mistakes (but there are still plenty :) ). -
This weekend i plan on making some punches and drift to start trying to make some make some wasted eye hammers and top tools. I have been talking to some people about design and am getting a better idea of the profile i should be looking for on it, and how to go about making it, and materials to use. I figured i might as well post and see what others punches and drifts look like so i can get some visual ideas of what people are working with, Thanks for sharing in advance!