
Steve Voigt
Members
-
Joined
-
Last visited
-
Mike, I’ll take you up on the conversation once I have some legitimate questions. For now, I need to read a bunch more. Example: I never even heard of a kiln shelf until this weekend. The maker of my little forge expressly forbids using borax, and I’ve been wondering if there was a solution to that. I’ve been able to do some acceptable hydrocarbon welds but the kiln shelf is a pretty cool idea. Re solid forges: my first forge was charcoal, and if I lived out in the country, I would probably just build a coal forge. But in my neighborhood, coal would probably be no-go with the neighbors. And it definitely would be a dealbreaker with the wife! She’s already pretty unhappy when I cook fossil resin varnishes in the back yard—coal forge would be a whole ‘nother level. So propane it is!
-
Frosty, I didn't know the file size limit--didn't see it on the upload page. I'll look for that next time. I think I read somewhere that Mike's burner was high velocity, but I didn't know yours was low velocity. Good info and more perspective. I don't have a lathe, but I have a Bridgeport J head and many years experience running it, so I'm all set. Your comment "The easy solution you see commonly is using a small dia. jet and high psi that draws excess air and a choke plate to control it"--I think this describes my current (purchased) little knife maker's forge. I was running it at 8-10 psi and not doing very well. Contacted the manufacturer and he told me to run it at 17-20. That works, and I've been able to weld some small pieces, but it sure seems like a lot of gas. I'm not knocking him at all--the forge does what it's supposed to do, and I've been happy. But I'm looking forward to seeing if I can make something that's a little more efficient, for not much cash.
-
Frosty, Ok, two half inch burners it is. Thanks again for taking the time to explain all this so thoroughly. I think I’m out of questions for now. It’ll take some time to assemble my materials and get this thing built, but I will definitely keep you guys updated. With pics, if I can figure out the “unknown server error” thing. I think I have a solid plan now (thanks to you and Mike), and that’s something. Mike, Thanks so much for the additional thoughts and perspective. Neither you nor Frosty tried to persuade me to go with NA vs forced air, but the listing of pros and cons persuaded me that NA is the better way to go, for me, at this point in time. I’m going to read through your book and then decide whether to build a Mikey or Frosty T. Whichever one I choose, the additional perspective from studying both types will help, I’m sure. Either way, I think two half inch burners is a good plan, based on what both of you have said. This discussion has been a huge help. I still don’t know squat, but I know way more than I did, thanks to you guys pointing me in the right direction. Thanks again!
-
Thanks Frosty, this is so helpful. Your list of pros and cons has convinced me to ditch the forced air idea. As a toolmaker and former machinist, I’m not worried about precision. Not having to tune the burner every time is a big plus. So is not needing a power cord, and having a smaller, lighter forge. Now I just need to decide whether to build the Frosty or Mike burner. One more question, if you don’t mind. Suppose I went with the Frosty burner. Is there any reason not to have two burners? I figure the volume will be right around 325 cubic inches, bumping up against the limit of one burner. Is there any downside to having two (other than cost, which is pretty low)?
-
OK, now a much more specific question. I'm considering a forced air burner (sorry Mike and Frosty). One reason is that I have a blower left over from forge #1 (charcoal brake drum forge, retired a few years ago). I'd upload pics but every time I try I get "unknown server error." Anyway, the blower is similar to this one: Removed commercial link... But mine is a little more powerful, 1.35 amps and 3000 rpm.I'll guess about 100 cfm. I think I paid about $30…15 years ago. Jeez, inflation. So, would this be an appropriate blower? I also have a brass gate valve and some cast iron pipe. Seems like that would get me most of the way to a burner, without spending any money, but if the fan is not optimal, I don't want to use it.
-
Thanks for the info Mike. Now that I’ve done some research, I see that you literally wrote the book on this. I’ll get a copy before I proceed any further. I’d like to avoid two burners if possible, but I’ll do two if it’s needed.
-
Hey Frosty, Thanks very much for replying. I didn’t think for a moment that you were blowing me off. I did google and youtube searches, but stupidly did not think to check “forges 101” and some of the other threads (right here! Duh.) so thanks for cluing me in. I will dig into those threads and educate myself. You’re right, I didn’t mention what I want to make. Holdfasts, a chair maker’s scorp/inshave, a riving knife (about the size of a cleaver), stuff like that. Nothing terribly difficult for a real blacksmith, which I’m not. But not doable with my current setup. I’m sure I’ll think of 50 more things I want to make, once I’ve ticked off a few of the items on my list. But anyway, thanks for the help.
-
Hi all, I have searched and not found a satisfactory answer to my question. Which is: Am I nuts to think I can build a good propane forge out of a 5 gallon steel drum that originally held turpentine? It is 10.5” in diameter and 13.5” high. it has a bung hole and I can flush it out before cutting, so I’m confident I can do it safely. I guess my question is, is the size and shape conducive to making a forge that I can get up to welding heat. Some background: I’m a woodworker/toolmaker. I’m not making knives. I have an atlas forge and I love it, but the size is limiting I would like to have something like a 5-6” diameter opening after all the insulation is in. if there’s a better way to go about this, I’m all ears. Thanks!
-
Hi all, it's been a while, but I wanted to update my post with some good news--victory! I wanted to follow Twisted Customs and Thomas Powers' advice, and raise up the muffle pipe, but I already had the deep cutouts in the brake drum. I decided to kill two birds with one stone. I clayed the drum, inserting mending plates between the clay and the cutouts. That allowed me to raise the muffle pipe about two inches. I am not sure which made a bigger difference, the height adjustment or the clay--maybe you guys can tell me. But it is a big difference. In addition to getting plenty hot enough, fire management is easier--when the fire gets hollowed out, I just push a little and fresh coals slide down the sides of the cone to where they're needed. And, I'm probably using half the fuel I used before. It's like getting a free drink with a free meal. If anyone wants to waste 15 seconds of their life checking it out, I posted it on my Instagram feed, embedded below. Thanks again, so much, to everybody who helped out!
-
Hi guys, thanks for the feedback so far. Frosty, you're right of course, I meant muffle and somehow turned it into baffle. Frosty, I'm having a hard time picturing what you mean with the bricks. Are you saying I should build an enclosure around the brake drum with the bricks? Thanks again.
-
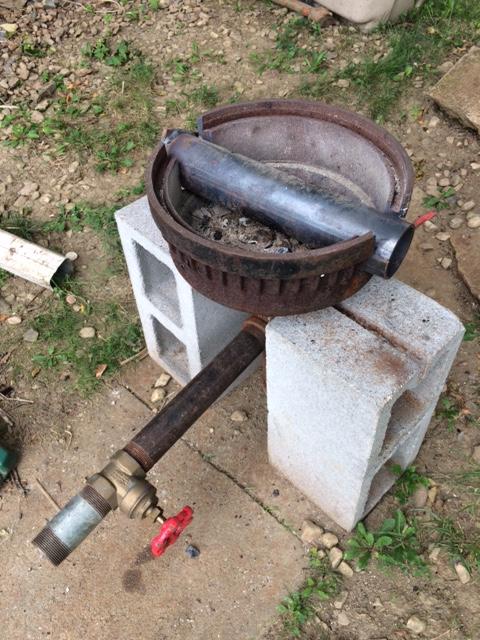
Hi all, I could use a little help here. I've been using the charcoal forge below, powered by a woodstove fan, for a couple years. It's a pretty big drum, 14" diameter, and the the inlet in the bottom is 2-1/2" pipe, so there's plenty of air and a good sized hot spot. I use this for heat treating woodworking tools and don't have much trouble getting up to critical temp. I decided to try adding a baffle, as shown in the pic. It's a piece of 2-1/2" sched. 40 with 1/4" plate welded to one end. I tried to heat up a planemaker's edge float (1/8" thick O1, and similar in size and shape to a knife). I was completely unable to get up to temperature. The best I could get was a dull red. After half an hour and half a bag of charcoal, I gave up, knocked out the baffle and just heated the work on the coals. Is there any way I can get things hot enough to make the baffle work with the set up I have? Or do I need to ditch the brake drum? Any advice is much appreciated. Thanks all.
-
Nick and Frosty, thanks for following up. Thanks to you guys, I think I've got a plan now: - bigger inlet for the firepot. - clay/sand mix to make an inverted pyramid in the pot. - a deck for charcoal reserve, build up the deck a little with the clay. That should be a nice improvement. Thanks again for the help! - Steve
-
Thanks for the replies. I will skip the inswool. A couple follow-up questions: - What is the recipe for fire clay? I see so many different mixes. Would something like 1/2 clay, 1/2 sand work? - Will increasing my pipe diameter to 2.5" (nominal) make a big difference? It's definitely true that the "hot spot" in my my fire seems to concentrated, so maybe as Nick says I have too much pressure and not enough volume? Thanks again!
-
Hi all, I would like to make some improvements to my charcoal brake drum forge, and I need some help. The drum is 13" diameter and 6" deep, so pretty big as drums go. It's bottom blast with 1.5" pipe and a grate. The air supply is a wood-stove fan, plenty of power, with a gate valve for control. I'm very happy with the air supply. Here's what I propose: 1) wrap a single layer of 1" inswool around the inside (1 ft. will be enough) and coat with...what? I'm not sure. But the coating will be applied heavier at the bottom, so the firepot becomes an inverted cone shape, rather than the straight cylinder I have now. 2) set the fire pot in the top of a 30-gallon oil drum (like the 55 forge). Because of the lip on the brake drum, it will sit about 1" above the top of the oil drum. So, I think I will need to build up the top of the oil drum about an inch (with ???), so I can sweep charcoal off the deck and into the pot, without having to negotiate it over the lip. My questions: 1) Is the inswool overkill? It's only $10 plus shipping for a foot, but if I don't need it, I'll save my money. 2) Do I need to coat the inswool (or just the sides of the firepot, if I skip the inswool) with satanate, or is there a cheaper or better alternative? 3) what should I build up the top of the oil drum with? 4) Finally, does this sound like a good plan? Will this improve my ability to get up to welding temps? Thanks in advance for any help! - Steve
-
Thanks very much for the advice everybody. I'm definitely going to try this out with some 1018 before I do the real thing.