Bad_Rockk
Members
-
Joined
-
Last visited
-
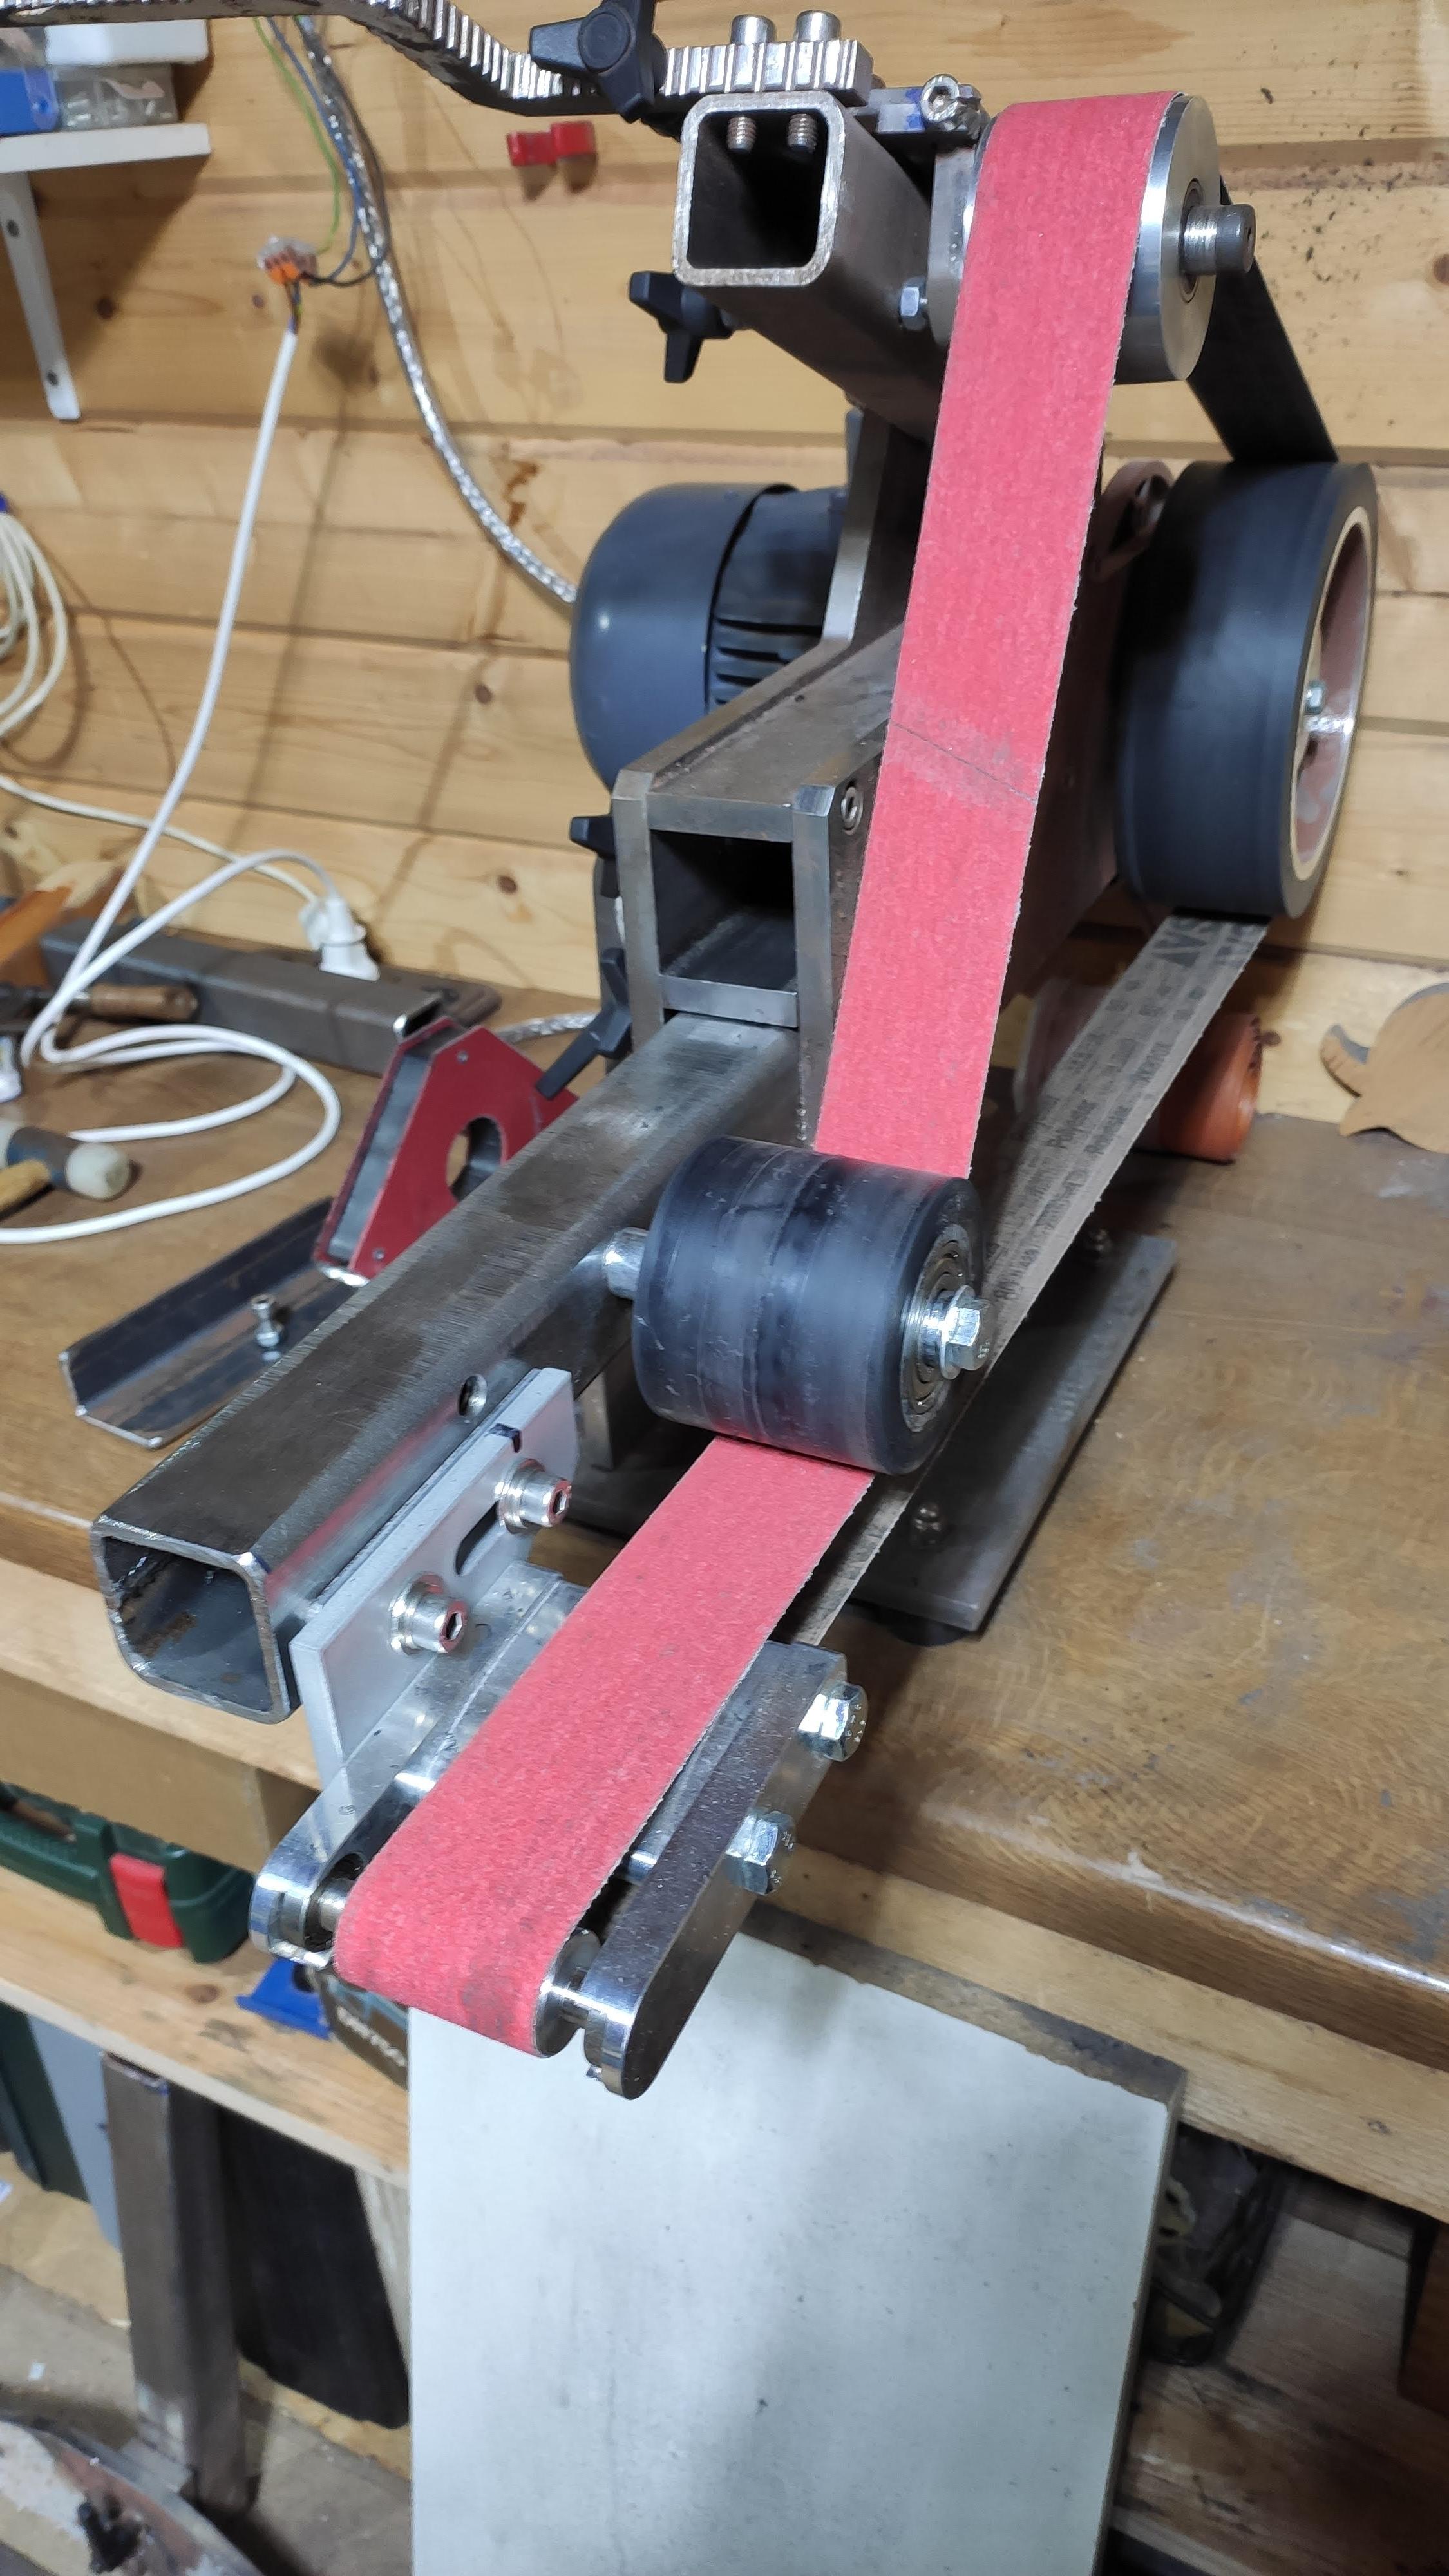
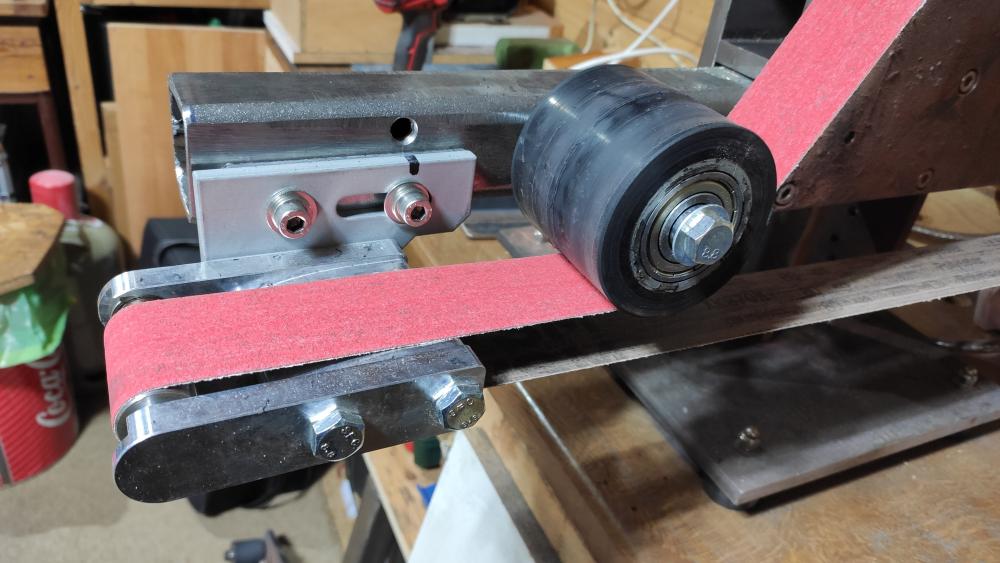
Here is a little update after some hours of usage. Since day one i had tracking issues. The belt was moving most of the time and i thought the tilting mechanism was responsible for that. Due to the fact that I used a standard threat the adjustability was not fine enough and due to vibrations it unscrewed itself during usage. I tried adding additional springs, nuts, locknuts to get rid of the self loosening effect but never really got it fixed. But I kept working with that situation until i got a small wheel attachment. With this the belt cuts into the small wheel holder when the belt moves to far left/right. Then I saw this video from Brian and tried that way of tracking because i already had build that mechanism but didn't used it. Link removed due to advertising This helped a bit but still to much belt movement. Then i took the tracking arm, tracking mechanism apart and double checked wheel alignment/positions. I could reduce the clearance of the tracking arm and the tracking wheel by adding washers. Additionally the position of the tracking wheel was of by 2 mm / 5/64''. The axle of the rubber wheel for the small wheel attachment was out of angle. I added a width across flat to turn the axle and adjust the angle with a digital angle meter. After everything was aligned... no big improvement... I checked everything again and found no major errors. It took quit some time to find the error. The screw holding the tracking mechanism to the tracking arm was locked to tight and the small modifications didn't transfer directly to the tracking wheel. Instead the system flexed until friction was negotiated and the a big adjustment was transferred to the tracking wheel. As soon as I loosened this screw tracking works as expected. Still I'm very happy that I build this 2x72'' and it gets used more and more often. The next project is already in planning. I want to build a heat treat oven and because it needs some welding I will take this opportunity to buy a stick welder and try welding it on my own.

-
Yes, I've learned my lesson. I do all hardening outside because I don't want to use my little gas furnace inside a wooden shed. Another reason why I want to build a heat treat oven. In my opinion it's safer to operate and more precise than a gas furnace. And I like to design and build stuff How electrolysis could happen during quenching? My new quenching tank is basically a low temp fryer. The heating element is placed below the container that holds the water/oil. And because I won't do hardening regularly I will strain the oil back to sealed containers after it's cooled down.
-
Since my last post I had to make my own experience to learn for further projects. I used a big glas jar (for pickling veggies) as a quenching container. It could be sealed and was the right size. For the first knifes I heated the oil with a glowing scrap piece of 1/2'' steel. Then I've read that this method is not ideal for the oil itself. So I tried to put the glas jar behind my two brick furnace while heating up... Dump idea... It took about 5 minutes to pop the glas and 1/2 gal oil was spill on the pavement. What a mess. Instead of knife hardening I spend the time cleaning. I then found an old aluminium milk can a my grandma's basement and gave it a try. It worked but the bottom of the can is not flat anymore so there is also a high potential of making another mess. So I found an sous vide cooker for 10$ and this will be my new quenching tank. Temperature control included and a solid stand. Additionaly I made a good deal on a new small wheel attachment for 45$ which others sell for +100$. Knife #3 was looking great but again I did grind to thin and this time the blade warped so much that I didn't tried to straighten it. I hung it on the wall behind my grinder to remind me to keep the edge thicker next times. Now my last rasp is cut in pieces but I also ordered some 1.2604 (3,2x60x675mm / 0.125x2.36x26.6''). This steel was recommended by a German knife maker and he told me that it can be hardened with simple equipment and that it will have good performance in a larger range of hardening temperatures. Just a good material to learn and continue knife making.
-
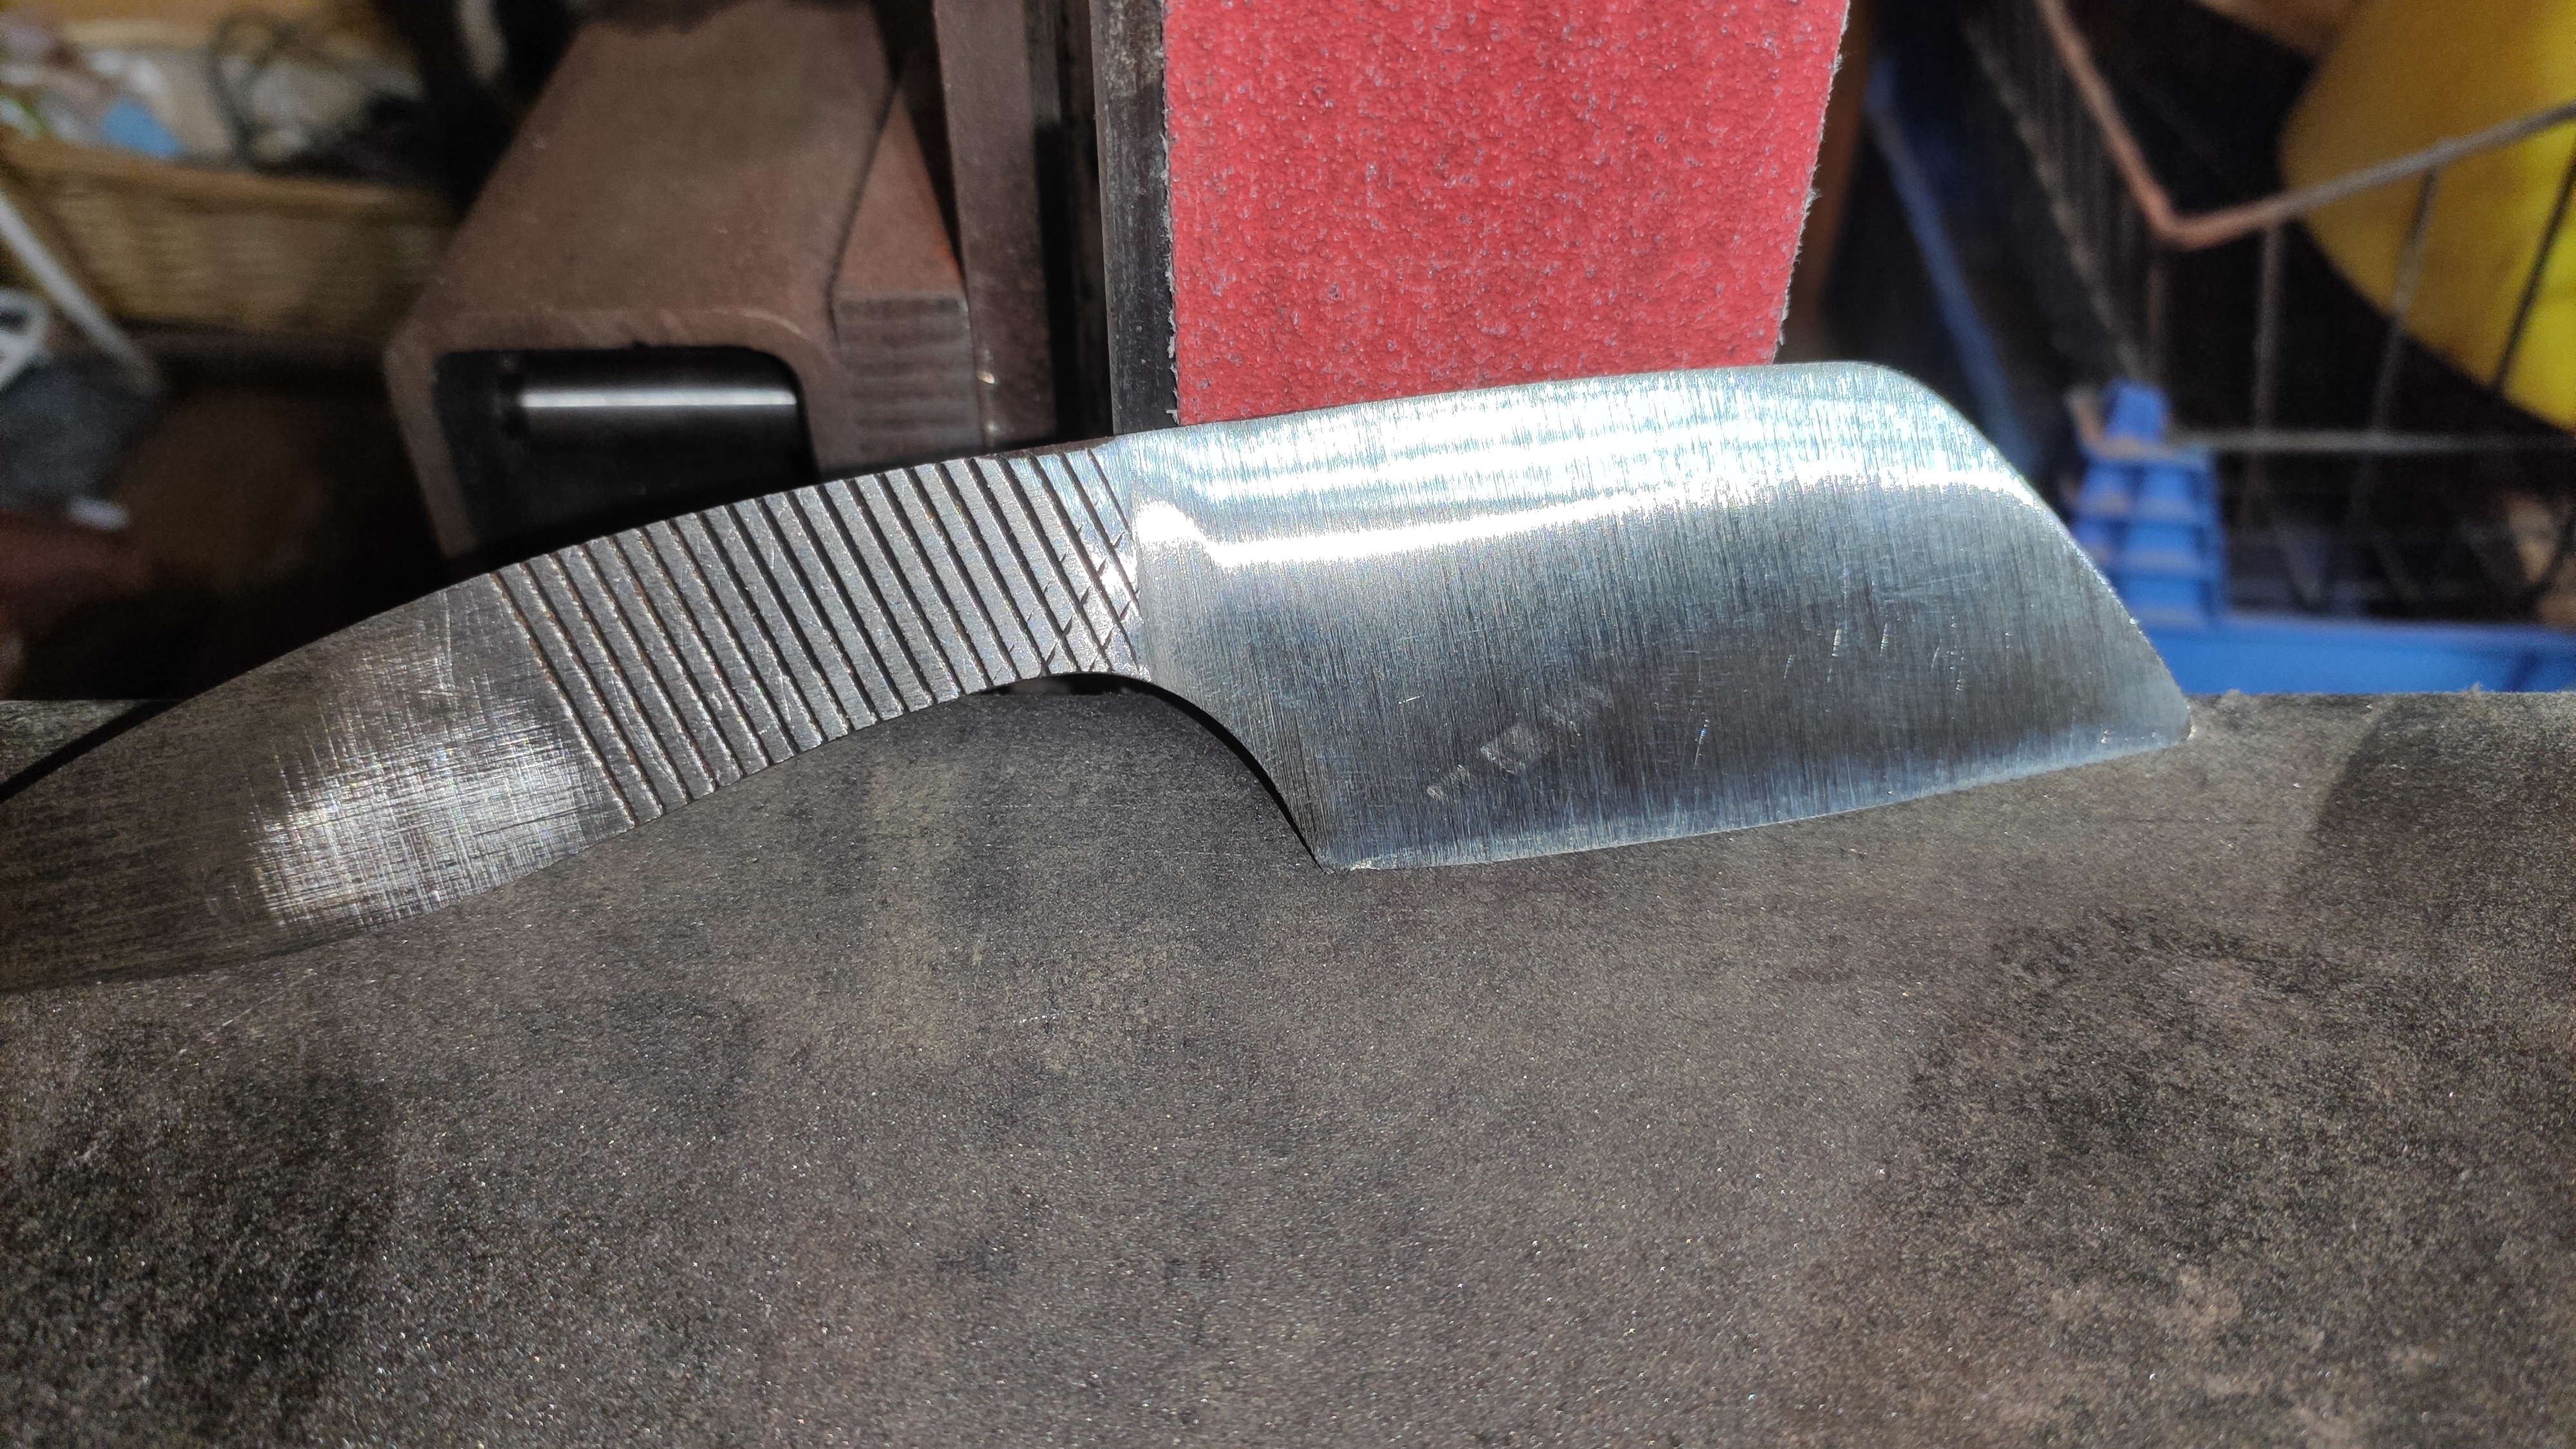
Knife #2 is ready to use. Compared to #1 it's shorter (because it was the left over part of the rasp of #1), spine thickness is reduced from 4.5 mm / 0.177'' to 1mm / 0.04'', also weight is 50% less. Just did a quick and dirty sharpening on the 2x72 to get it ready to try the thinner blade width. And it cut much easier then #1. I'll sharpen it on my sharpening stones as soon as I find time and patience for it. Why only one pin in the handle?! Because I forgot to drill the holes before hardening I did not invest any time in hand sanding because it's a try-out/practice knife. #3 will be longer then #1 but as thin as #2. I expect that to become my daily kitchen knife. So I'll go for a decent finish on the next one.

-
Thanks guys I'll keep that in mind. Yesterday I found some time to continue working on knife #2 and #3. Every minute working with my 2x72 is good invested time and a gain of experience. But my wishlist is getting longer and longer a small wheel attachment, a MDF wheel and polishing wheel for my bench grinder and a heat treat oven, some more belts... And best of all, it's a very satisfying time.
-
I'll do it asap after hardening for the upcoming knifes.
-
Hi Steve, can you please explain why to do tempering asap after hardening? If you already did, please tell me where to read up. The knife is the oven right now and there were no visible cracks.
-
I did it, Steve. I let them cool in the furnace over night and check the result tomorrow. Hardening if knife #2 also went well, tempering will be done tomorrow. This time it won't take a year to finish I really want to test the much thinner blade compared to knife #1.
-
My second knife is almost ready for hardening and today I cut my second rasp to be used for knife #3 and #4. I only have a two brick furnace for heat treatment. And when fired up I want to aneal the rasps after hardening knife #2. My question is, can I aneal both rasp parts at once? There won't be much space left inside but I think both parts will fit in.
-
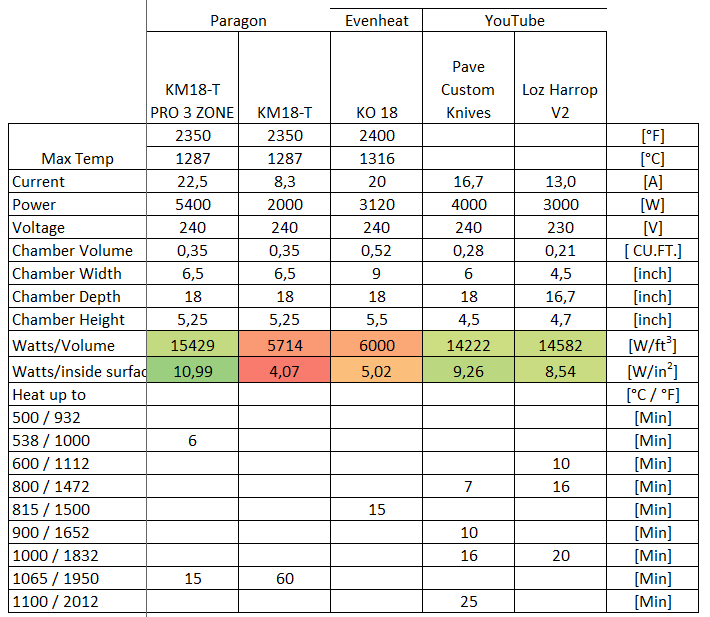
I already saw your topic and did further data collection. I contacted Paragon and Evenheat if they could supply heat up date of their ovens. I got fast replies and some data. I watched a lot of videos trying to find other DIY designs with fast heat up times. And there are not a lot of them. So I put it all in an excel spreadsheet to compare them: So all the fast heating ovens have similar specs according Watts/volume and Watts/surface. And those values are aprox. double or more to the recommendations I found online. Insulation is different on the compared models. Paragon and Evenheat use fire brick only as far as I can see, Paves design uses 60-80 mm / 2.3-3.15'' aerated concrete and Loz design has a layer kaowool around his fire brick. So it seems that insulations is not as important for the first heat up as I expected. Even tough I think a good insulation will reduce total energy consumption to hold a specific temperature and will increase temperature stability. So I'll take those values as a guideline for my own design. If someone wants to share his specifications and heat up times I could update my excel and upload it here.
-
Why waiting for 3 hours if it could heat up in 1 hour or less? Seriously I don't have a scheduled time in the workshop every week. If there is a small time slot (0.5-2h), I'll take it and work as far as I can get. So I'll try to keep me workshop clean and ready to use. When buying/building tools I rather spend some extra time/effort/money to get something that suits my needs than being dissatisfied with performance/usability.
-
Yes Frosty, a heat treat oven should be able to perform exact temperature ramp ups and soaks. In my opinion ramp ups and soaks are mostly depending on the used controller. The oven itself determines how easy the system can be controlled and how much energy has to be used. The max ramp down rate is also determined by the oven insulation (or the possibility to have active cooling, which would make the system too complex for DIY). I'm talking about the maths/physics behind it. I know that this (heat up time, heat transfer rates, efficiency) can't be calculated exactly without a lot of input data and calculation power. But I rather have a rough calculation that allows me to compare different variables of such a system and try to understand it, than building one and hoping it performs as expected. I can't evaluate the performance of that oven in the video. So for me a fast heat up time and temperature stability don't need to be contrary.
-
The chamber is aprox. W x H x D 6''x4.5''x18'', so comparable to other DIY builds. Yes his elements won't last long because he's overloading them. 10m 1,2mm Kanthal A1, 230V and 4kW will result in a too high surface load of 10,4 W/cm^2. The recommendation I found is a rating of <3,5 W/cm^2. I found this calculation to calculate heat transfer. I adapted his calculations to a heat treat oven chamber of 4.7x4.7x18'' using 2.5'' thick insulating fire brick i get a heat transfer rate of 860W, when adding a 4'' aerated concrete heat transfer rate decreases by 75% to 205W. Using 4'' rockwool sheets would decrease heat transfer rate by 91% to 75W. So there is a big potential for saveing energy. I know such a heat up time calculation is not exact and also no easy to do but I'll try to find an approximation.
-
Hi there, i found a kiln build video on YouTube and it claims that his kiln has heat up times as follows: 800°C (1472°F) → 6.38 minutes 900°C (1652°F) → 10.10 minutes 1000°C (1832°F) → 15.45 minutes 1100°C (2012°F) → 25.09 minutes compared to other builds this heat up time ist really fast. He uses aprox. 60-80 mm / 2.3-3.15'' aerated concrete (600 kg/m3) as additional insulation around IFB 23 bricks and 4kW heating. Internal dimensions aprox. W x H x D 6''x4.5''x18''. Is there a simplified calculation to determine heat up time to a specific temperature? I would like to understand why his design heats up much faster compared to other builds without additional insulation.
-
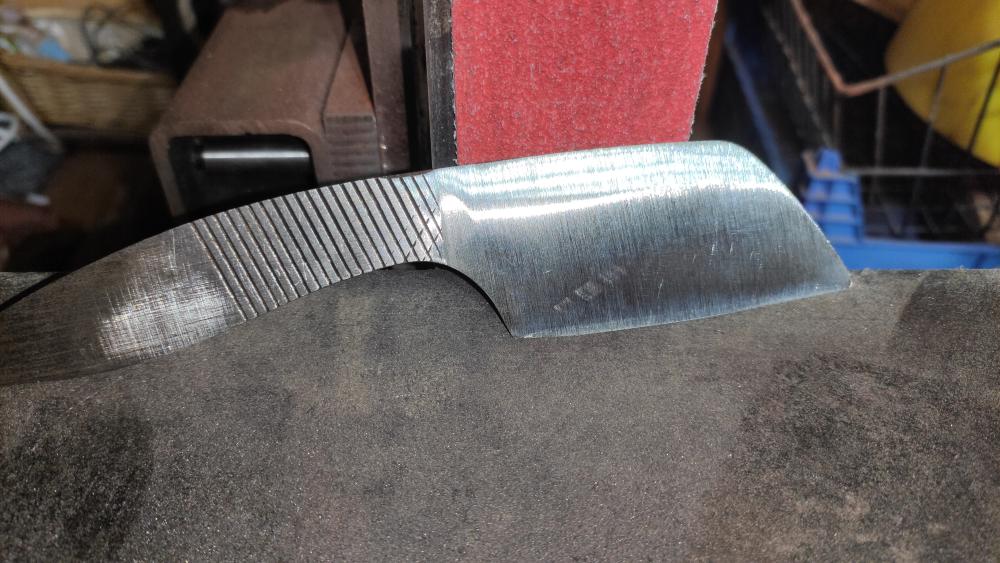
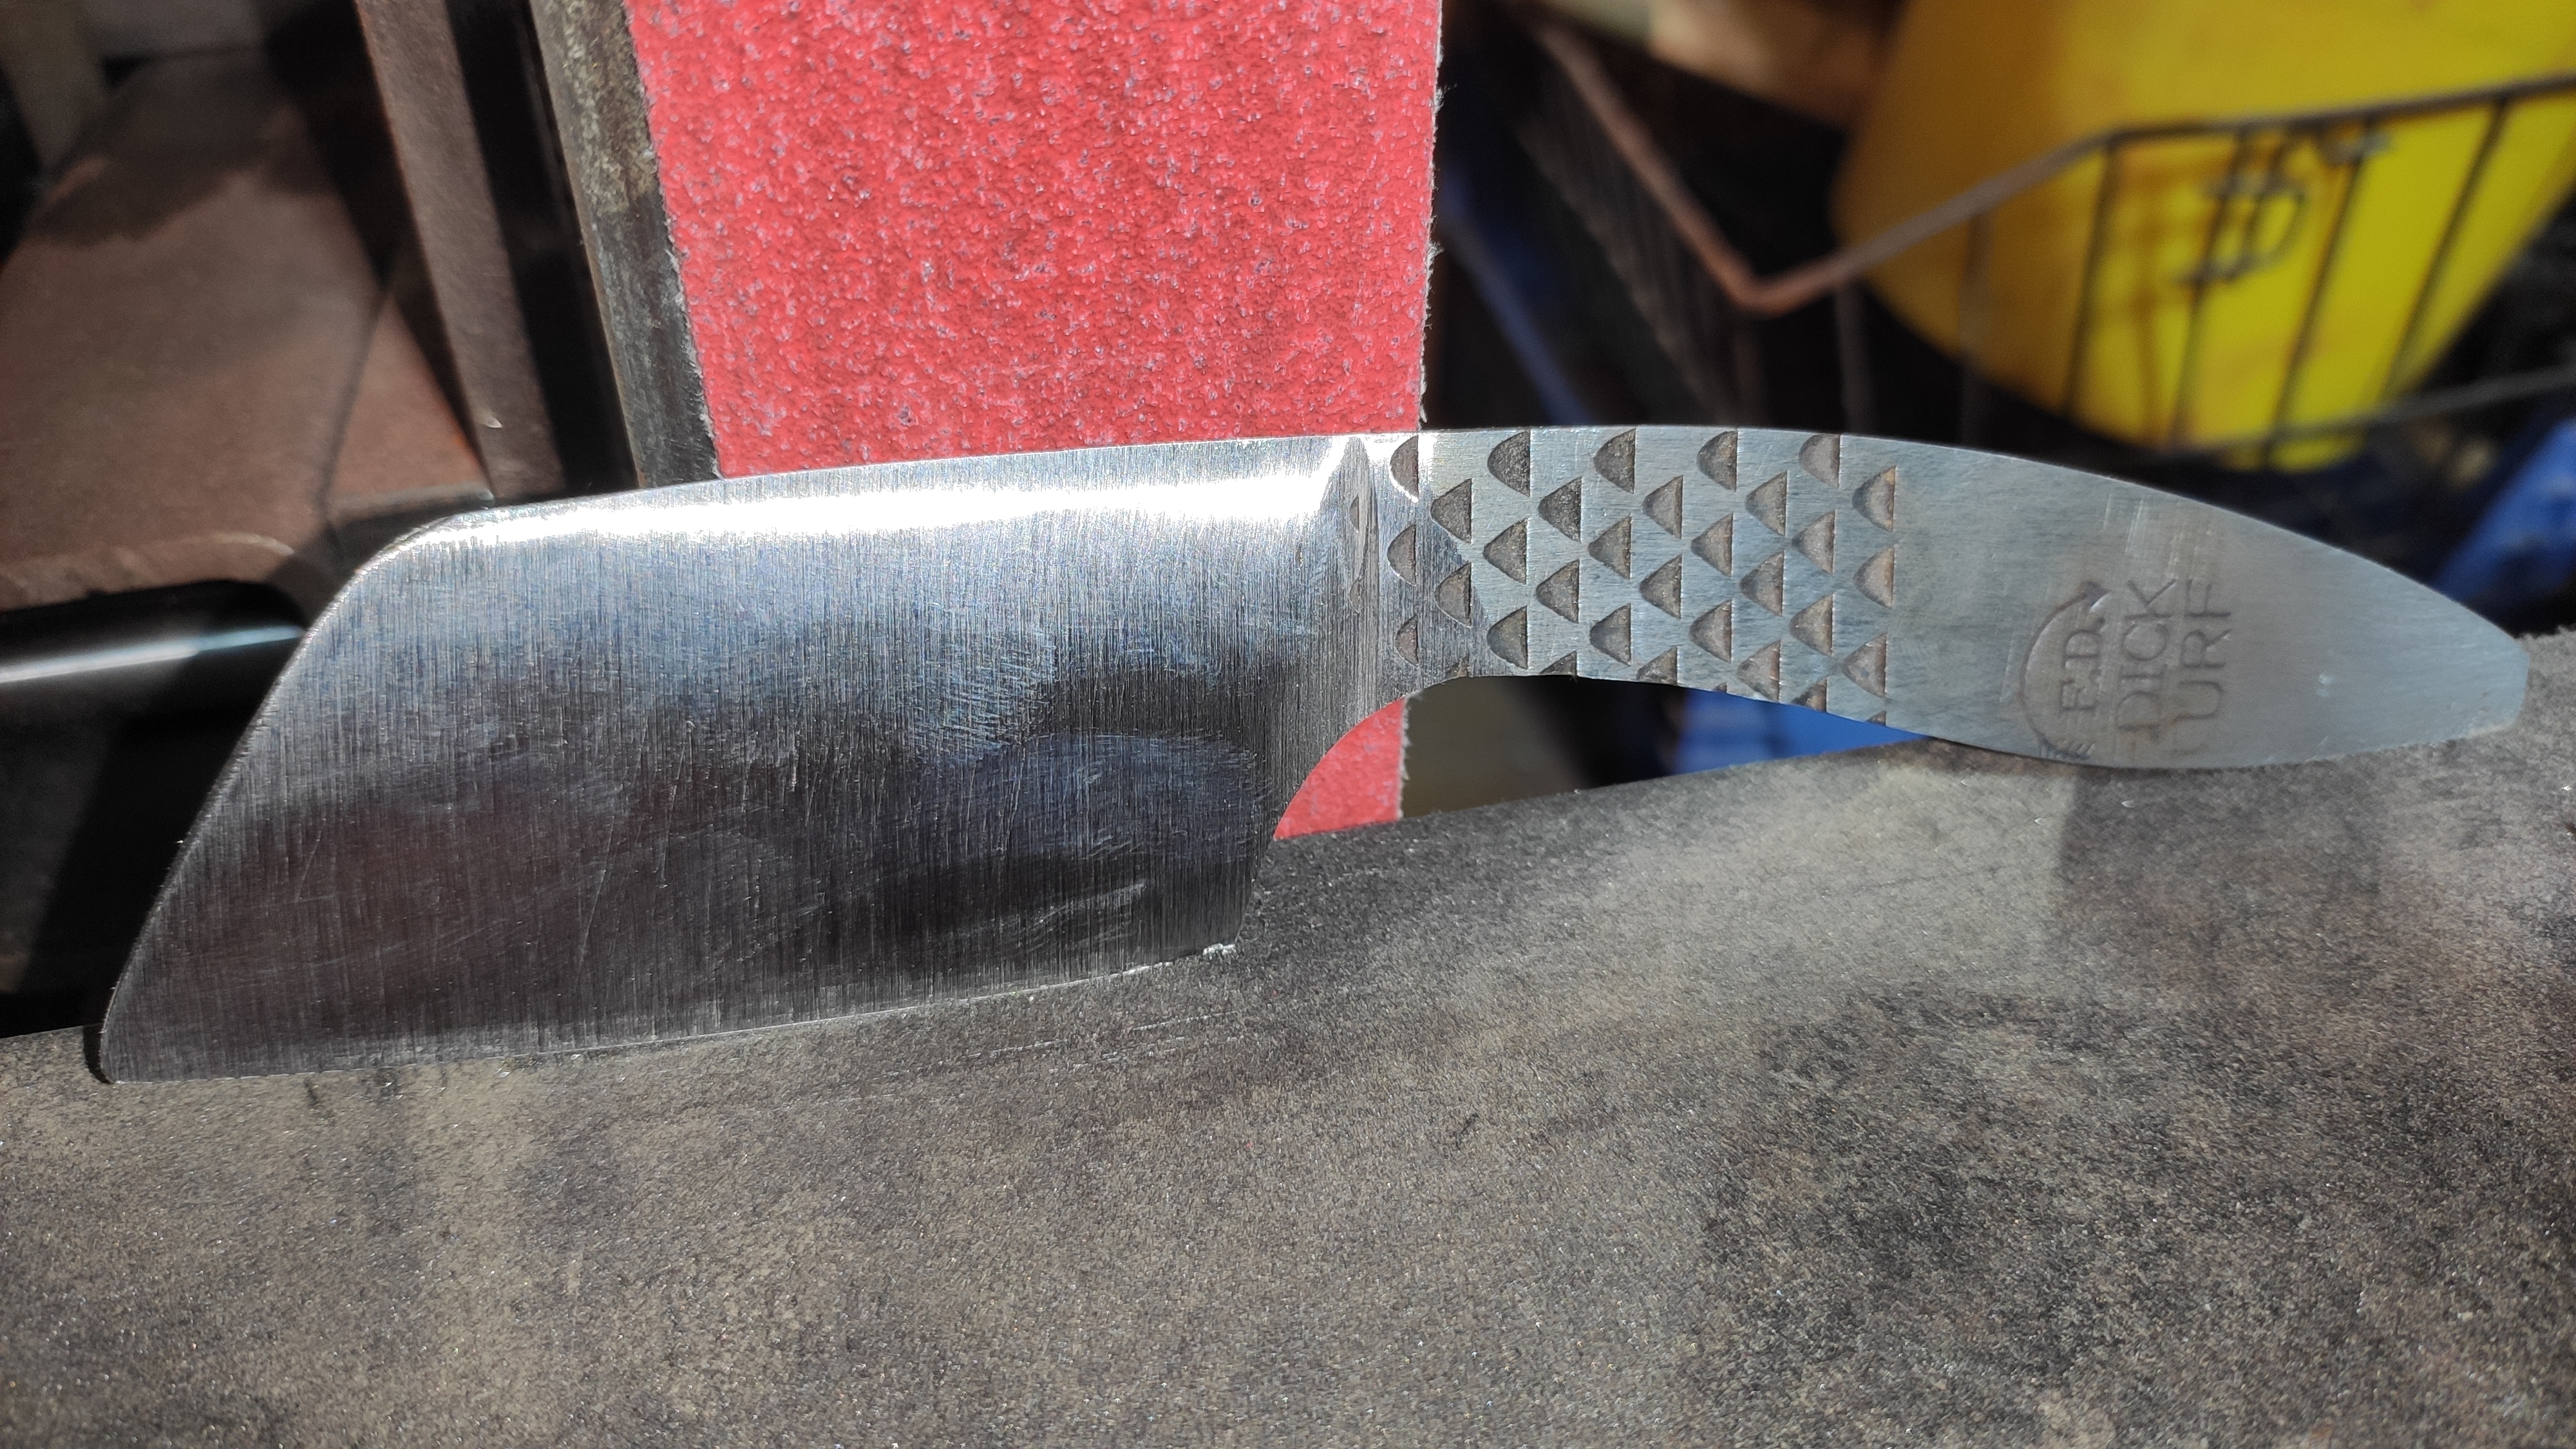
Hi guys, thanks for the explanation. I think I'll rework the textured area to achiev a smooth surface. I'll try to grind carefully and reduce the spine thickness as much as possible without overheating. Here is knife No. 2: I started this before the workrest of the 2x72 was finished. So free hand grinding. Because of that the edge already got too thin and I lost some blade height. For the next one I made a simple Bevel jig to avoid that. I already removed the texture. When I came back from the shop my wife told me: Everytime you come back from working in the shed, you're happy! And I have to admit that it's true. It's satisfying to create something on your own. And with the 2x72 it's much easier and faster than filing.