
brianbrazealblacksmith
-
Posts
1,683 -
Joined
-
Last visited
Content Type
Profiles
Forums
Articles
Gallery
Downloads
Events
Everything posted by brianbrazealblacksmith
-
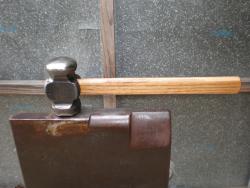
BP0924 I made some quickie animal heads today out of 3/16"x1/2" as a suggestion of something for others to try. They are made with half hammer faced blows over the near and far side of the anvil on a sharp edge. This picture shows the steps of a horse head and if you look you can see where the round hammer makes sudden divisions in the metal while holding the material on or over the anvil. The horse can be done in one heat with practice. They are similar to making tongs. You can make many other shapes and animals with this same technique. I'm including a drawing I made over 15 years ago of how to do a 3D horse head which should help to see the angles that you hold your material. With the flat stock you leave the top and bottom round dies step out and just check your material on the flats.
-

Another forge welded bundle
brianbrazealblacksmith replied to brianbrazealblacksmith's topic in Metal Sculpture & Carvings
You're very welcome. I just started taking pictures recently. It slows me down quite a bit, but I've needed to document these techniques for quite some time. I just learned to get on the computer since the first of this year. That was my New Year's Resolution. -
I made an example of a rose stem today while waiting on some pieces to descale. I started with 7" of 1/2" square stock. The stem took about 4" and the leaf and the forge weld took about 3". I started with the tenon then upset it in the vice with a monkey tool to get the hip. Then I just forged the rest down to shape. I went ahead and made a leaf to show how you can do a simple forge weld without having to forge scarfs. I thought you might like to see another approach.
-
Nice job, I like how you've accenyed the jowels and made them a major feature, definately looks like a dog.
-
Sorry, I didn't answer all your questions. No, that rag will not really help hold your handle on. What holds your handle on is the inside shape of your eye. If you do your final drift on the side you choose for the top of your hammer, it will be the biggest side for your wedges to go in. Also keep your handles dry that you are planning on installing by storing them above your water heater or somewhere similar. Monte Habermann, a smith from Orange County stressed that point, so they are as shrunk up as much as possible when they go on because humidity will affect them afterwards. I don't mind if you copy any of this. I hope you do and it may lead you to help me out someday.
-
Don't worry about the cold shut. It won't effect the hammer. All of Tom's hammers have it; Uri uses a punch press now so his no longer have it. I'm pretty picky especially with my own work. The punch is more efficient though because you're not dragging that bubble through your hole until it bursts which is what causes that cold shut. My tools are made from the same 4140 that I make the hammers and top tools with. There are better steals out there but I get 4140 for free from a suspension shop nearby. And I'm doing everything by hand with a striker so as long as I take care they'll do the job. They are easier to forge than the expensive high tech stuff. If I had a similar source, I'd rather be using staight carbon steals like 1045 for the hammers and higher carbon for the punches.
-
The reason I asked is because I figured you were using a slitting chisel because I thought I saw a cold shut in your eye. The pics were a little blury. I use a slitting punch that looks like Tom's and Uri's but it has a different grind that makes it a punch. You cannot avoid a cold shut when using a chisel through a thick peice of metal when you go through part way then the rest of the way from the other side. There is an article in Today's ProFarrier of us forging a rounding hammer that shows the tools. but here are some pics also.
-
What are you using as a slitter?
-
I was talking about your round face edges mostly. I can see you did a bit on your flat face. You have a nice crown on you flat face also, nice job. A rounding hammer is much more versitile than a cross pein hammer because you have a cross pein on your rounding hammer when you tilt your flat face, and you have more surfaces on your round side when you tilt it. I rarely use a cross pein hammer because of this. My first hammer that I made for myself is on my avatar and it is a fullering hammer. It is also more versitile because of the surfaces I have to choose from.
-
Excellent first hammer! You may want to grind more of a radius on your edges before you heat treat it. You'll learn to use the edges of your hammer more than you use the faces. You're going to excel at this blacksmithing and farrier business.
-
I've never used a carving block, and I do alot of different animal heads. I use my post vice to hold and back my work before I forge the neck. My vice is mounted on a tripod stand and anchored to the floor so it doesn't move, just like my anvil. I'm including a picture of the punches I use for the eyes and nose, and a curved chisel for the ears. If you'll notice they started as square punches except for the biggest eye and the curved chisel. The noses are made by filing two of the corners so I'm left with a cresent shape. The other two corners are left so I can tell how my punch is oriented. The eyes are made by driving a bob punch in then filing two corners and leaving the other two for the same reason.
-
Sorry, I'm not the one to talk to about that. I haven't worked with that profile, but I would imagine your forging range will be extremely narrow due to heat loss with that thin of material.
-
Titanium works very nicely. It yeilds to the hammer like nothing else I've worked with. It does have a narrow forging range, but just heat it up again. It upsets easier than anything I've ever worked with. I don't know what profile you are working with, but my brother took some 9/16 round put it in the vice, localized a heat with a torch, hit it once, and it upset into a perfect sphere about 3/4 round for making tongs.
-
Anvil Stand
brianbrazealblacksmith replied to henerythe8th's topic in Stands for Anvils, Swage Blocks, etc
Another thing that sand affords you is to reposition your anvil and use its other surfaces like a swage block, but I have a swage block and I need my anvil to be backed solidly so I prefer a solid mount. -
Canman, if you're looking for a hammer that you can feel the difference with, get a Hofi hammer and learn how to use it. Get your association to get Hofi over here for a demo or Tsur Sedan who studied with Hofi.
-
I agree with Mark about the inside corners. When I was with Alfred Habermann we made several different sized bending wrenches out of spring. They were very simple, and it would only take 1 or 2 heats. Bend your material to your gap placing a spacer in when your almost there then pinch out the corners with a fuller or cross pein. You can make the out side corners rounded or square, your choice. This simple technique adds considerable strength to any bend with no fussing around.
-
Anvil Stand Help
brianbrazealblacksmith replied to Avadon's topic in Anvils, Swage Blocks, and Mandrels
Hofi has the best stand on the market today, and I'm glad to see that he has mounting holes in the feet. When I was with Tom Clark, I never did convince him to add the mounting holes to his feet, but we did put them on the tripod vice stands my brother and I made for him. -
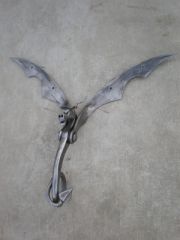 Dragon Doorknocker
 -
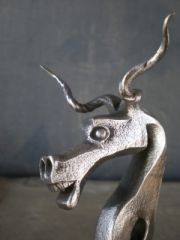 Dragon Doorknocker
 -
making your own hardie tools
brianbrazealblacksmith replied to bourne101's topic in Tools, general discussion
I found my pics of an example of a leaf spring hardy that may help you. This one is all forged, but it could be cut and ground. -
making your own hardie tools
brianbrazealblacksmith replied to bourne101's topic in Tools, general discussion
That's good to know. I've never been around water jets, but I've always been curious about the cost. Thanks for the info. -
Anvil Stand Help
brianbrazealblacksmith replied to Avadon's topic in Anvils, Swage Blocks, and Mandrels
That sounds like it would make a great base. -
Anvil Stand Help
brianbrazealblacksmith replied to Avadon's topic in Anvils, Swage Blocks, and Mandrels
If you are mounting to a stump or wood it should be buried in the ground at least 3 feet or preferably farther. I personally prefer a tripod stand because I do travel quite a bit. The feet of the stand have holes so I can anchor to concrete or spike into the ground. The stand that is pictured puts the anvil height at 27" which is rather low, but we do quite a bit of striking on it and I stand in the dirt on my side which is wallered out about 3". 30" is the height that I prefer, but like Mark Aspery said in a previous thread the height can depend on the individual and what you're doing. The anvil should be mounted solidly to the stand, and there are several ways of accomplishing that. The angle of the legs back the body of the anvil. Notice Frosty's stand, It is one of the few stands out there that I've seen that is backing the anvil properly. -
Anvil Stand Help
brianbrazealblacksmith replied to Avadon's topic in Anvils, Swage Blocks, and Mandrels
I've worked on every different anvil stand and more that has been described in this thread and the last threads I've read on anvil stands. I am going to repeat myself because I think it is one of the most important aspects of forging. The mount of your anvil matters! Can you imagine a power hammer being used just sitting on the floor? I've seen it. One association once supplied me with a 50# Little Giant on a wooden pallet and expected me to use it. I turned it on only to show them why I wouldn't use it. THE MOUNT IS EVERYTHING TO AN ANVIL!!! Yes, I can work on any anvil and get something done, but I cringe everytime I am forced to work on an anvil that moves. Once you have worked on a properly mounted anvil you will know what I am trying to communicate. -
Blacksmith Schools
brianbrazealblacksmith replied to Jeff Bly's topic in Blacksmithing, General Discussion
That is one of the most rewarding things about blacksmithing; you will never arrive. You will always continue to learn.