
brianbrazealblacksmith
-
Posts
1,683 -
Joined
-
Last visited
Content Type
Profiles
Forums
Articles
Gallery
Downloads
Events
Everything posted by brianbrazealblacksmith
-

A staple question
brianbrazealblacksmith replied to Lysdexik's topic in Blacksmithing, General Discussion
Paul, This is a forging technique I first saw at Tom Clark's school. Hofi and Tsur taught it. If you ever saw Tom making giant nails with strikers, you may have noticed this on the staples that held his swage block stand together. I next saw this from Alfred Habermann in the Chech Republic where it is very common to see used in a variety of applications. I have since seen it in older publications. I believe this is another one of those old forging techniques rediscovered in todays modern world. The pics are the steps. The finished one was done in 1 heat. -
Removing the coating from coil spring
brianbrazealblacksmith replied to Llabak's topic in Blacksmithing, General Discussion
I second that Glen! Springs are easy to come by. -
I call it the forge welded bundle.
-
Thanks guys, I enjoy sharing this information. No one should have to go through what I have to learn these simple things.
-
Yes, I finished it with vegetable oil while it is at a temperature that it will burn on, kind of like seasoning a cast iron skillet. I use terry cloth with oil on it and rub it on at the right temperature. By simple technique I mean a few things: 1. You're forging relatively small parts then joining them together after you've done most your forging. This simplifies things alot especially when I'm making a table or candelabra that has more pieces to join together. I have welded up to 36 pieces in a single collar. you could do hundreds of pieces. 2. The collar holds all the pieces together for forge welding. The wire is for protecting the pieces from oxidation while forge welding; I could have used another collar which would have been better, but it would have been confusing to some, and make me give a longer explanation. When your material is exposed to high temps it scales up, and since I have finished my hammer work except for the welding I'd rather the wire or a false collar be exposed to most of the oxidation. 3. You are welding on the end of a piece, so it is very easy to get in your hot spot. 4. The area you are welding starts out smaller than your hammer and is raised up by what I call a false scarf [the collar] so that the only thing in contact with your hammer and your anvil is the area you are welding. I cannot over emphasize the importance of this concept. So if I would have used a false collar to protect the area closest to the weld from oxidation it would have to be thinner than the collar like the wire was.
-
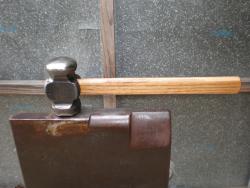
You're very welcome. Yes, that is a heading tool made from leaf spring. No, I did not make that hammer. Tom Clark made that one for me. I used the round side to forge the cups.
-
Coal or coke?
brianbrazealblacksmith replied to bourne101's topic in Solid Fuels: Coal, Coke, Charcoal, Wood, etc
Sam, Petroleum coke is made at all the refineries. It is the last thing made in the oil refining process. There are many different types of it. Most of it is shipped out on barges to Asia for making steel or Europe for heating. The best type I have used is the Chevron spong coke. I was told by the chemists that it is made from sweet crude oil coming out of Alaska. -
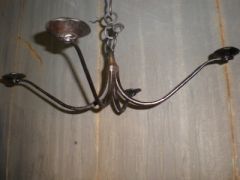
Here is a chandelier that I made and took pictures of the process yesterday. It is forge welded together with a technique I rediscovered on my own before I had gotten around any other blacksmiths. It is probably the simplest forge welding setup to succeed with your first time. My 9 year old made a grappeling hook out of 1/4" sqaure stock with a 1/8"x3/4" collar for his first hot project.
-
-
Brandon, you're on the right track, but that plate will bukle with the heat. You did not need to weld it to your forge stand. If it just laid loosely in the lip of the angle iron, it would have somewhere to go when it heats up. My portable forge is made in a similar fashion but I used 4 pieces of 16 guage with angle underneath to support my rectangular firepot, but they are not welded. When I go somewhere, everything comes out and I can get rid of the dust and load it easily by myself.
-
Coal or coke?
brianbrazealblacksmith replied to bourne101's topic in Solid Fuels: Coal, Coke, Charcoal, Wood, etc
Okay guys, I prefer good coal. The best coal I have had comes from a vein in Oklahoma a little south of I-40, but there is other coal out there that is fine. I also use coke because I live in California now, and it is more affordable. But another source of fuel that you may not be aware of is petroleum coke. They used it in the Ukraine when I was there, and I used it for over 5 years when I was in S. California. I used to get it for free from the chemists that analized it for the different petroleum companies. I burn over a ton a month, so it was quite a savings. It is so clean. You will never get any clinkers. -
Nice, Jeremy K, I like seing the steps!
-
Hey, Hammer Kid, Keep doing what you're doing.
-
Leaf spring stock
brianbrazealblacksmith replied to EWCTool's topic in Blacksmithing, General Discussion
Try using it to make a hardy. -
I don't mess with sucker rod much these days, but it is readabely availiable any where there is oil. I get my 4140 from a suspension shop here in the Central Valley. It comes in sizes from 2" to 5/8" round in 1/8" increments in between. It is their drops. They come in 2 feet to 3" lengths. It is what they can't use. Any shop that is making suspension parts should have something similar scrap.
-
What is commonally called "sucker rod" is the long lengths of solid round rod that have threded ends for linking more lengths of rod together to pump oil out of the ground. It comes in different sizes, but the most common size that I have run across is 3/4" round. The threded ends flare out larger then transition to about 1 1/4" square before the threds.
-
I prefer to use 5160 [coil spring] for most of my punches and chisels for doing hand work because it is readily availiable, it's affordable, and yeilds to the hammer relatively easily. I also use 4140 [sucker rod] for fullers.
-
Here are 2 different leaves done in the same manner as the above leaves. The amount of material that you isolate will influence the outcoome of your leaves. The first leaf is made of 3/8" square mild steel. After forging a spade, you just fuller the design. Then use a ball peen and the dish in the wood to give it life. The tools used are pictured. The second leaf is made from 1" round copper. After forging the spade, chisel like shown in a vice with copper jaws Then finish moving the material in whatever direction by tilting your roounding hammer. Next chisel or fuller the veins. Finally shape to desired shape. This one is shaped into a spoon rest, dish, ash tray, or whatever else you can think of.
-
Nice, John. I'm glad you threw in that scroll starter.
-
Heat Treating Punches
brianbrazealblacksmith replied to Archie Zietman's topic in Heat Treating, general discussion
For heat treating small hand punches and chisels used to forge with made from 5160, I bring only about 3/4" from the working end of the tool up to temp then quench about 3/8" in water, moving the tool back and forth and slightly up and down. [Do not over heat. Do not cool off too much. You'll hear a little ping if you cool too much, which means it just broke across its profile.]Now with the heat remaining in the tool I draw the temper from straw to blue depending on the tool, cool the same 3/8", scratch or brush, and draw the temper again, repete if I still have heat. Once I can no longer draw a temper, I cool the whole tool in water so I can use it. I always tap the finished tool over the horn of the anvil a few times. If I did something wrong it will break across its profile. That's how I've been doing it, and Alfred Habermann was doing pretty much the same thing, but I've also heard that you're never supposd to quench spring in water. I also treat small punches and chisels made from 4140 and 1050 in the same manner. Larger bodied tools, I treat differently. -
Nice hardies Steve and LDW. I like that little treadle hammer. I used a top and bottom butcher or side set and a set hammmer. The tools used are in the pictures except for the bottom butcher which is on my other anvil.
-
Okay, Sam. Thanks for showing us your hardy. Come on guys, show us your hardies.
-
Cool, I probably shouldn't have used the words "of his design". I'm sure others before us have thought of it before. "There is nothing new under the sun." It is very rewarding to rediscover things for yourself. Great execution of that hardy, ApprenticeMan!
-
Thanks John. Check out this hot cut hardy. Alfred had me make 2 of these hardies of his design to take with him to Japan. Here's one we made today. It was made from 3" of 2 1/4" x 5/16 " leaf spring. I call it the pocket hardy.
-
OOps, Karen again- I forgot to mention in the last post, for those who don't know, we are in Tulare, Ca. (Central San Joaquin Valley.)