
brianbrazealblacksmith
-
Posts
1,683 -
Joined
-
Last visited
Content Type
Profiles
Forums
Articles
Gallery
Downloads
Events
Everything posted by brianbrazealblacksmith
-

Slitter Geometry
brianbrazealblacksmith replied to archiphile's topic in Slitters, Punches, Drifts, etc
Alwin, the grind is different and the way I use it. Hofi's is a chisel; mine is a punch. I grind it basically the same except more like a cold chisel, and I drive it almost all the way from one side before I punch out the plug from the other side. Most all of my punches are ground this way no matter what shape[round, square, rectangular, etc...] I've been doing this for many years before I met Tom Clark and saw Hofi's slitters. I was excited to see someone else using the same principle; everyone thought I was crazy. There is so much less resistance this way. I have to go to work now and Email my son, Mark, and wish him a happy birthday. -
Slitter Geometry
brianbrazealblacksmith replied to archiphile's topic in Slitters, Punches, Drifts, etc
right. No, they are not all fullers. The one with the hardy shank is the bottom fuller to match the top fuller. The other two are to support the hammer while driving the drift so you don't damage the cheaks on your hardy hole. I just came up with this solution so the hammers can be done on an anvil that doesn't have a large enough hole. We used bolster blocks ["camels" as Alfred called them] or a swage block with larger holes to accomodate the cheaks before I figured this one out. These are much simpler to make than a camel and they are alot easier to lug around than a swage block, and as your hammer develops and changes where the exact support is needed they scoot over to adapt to this need. -
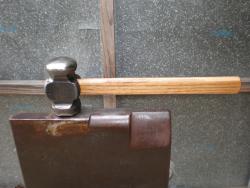
Slitter Geometry
brianbrazealblacksmith replied to archiphile's topic in Slitters, Punches, Drifts, etc
I make all kinds of hammers and top tools this same way some are more involved than others. I suggest starting with the rounding hammer because it is the simplest and can be forged to finish in the least amount of steps. The faces are forged to shape with a flatter and the cupping tool as you release the drift. I'm going to be putting a 2# chiselier hammer that Ed and I made last week in remembrance of Prof. Alfred Habermann up for auction as a donation to I FORGE IRON for the Spring Donation Drive. All proceeds will go to I FORGE IRON. -
Slitter Geometry
brianbrazealblacksmith replied to archiphile's topic in Slitters, Punches, Drifts, etc
They are the same pictures, we took them a while ago. That drift started with 9" of 1-1/4" round 4140. The drift is 19" long, and I can make any size of hammer or hole with it that I would want to make. The top and bottom fullers have a 1-1/2" radius and are about 1-1/8" wide. Here are the tools needed to make that hammer on an anvil without the need for a swage block. -
Slitter Geometry
brianbrazealblacksmith replied to archiphile's topic in Slitters, Punches, Drifts, etc
Hofi learned this from Habermann on smaller top tools and hammers like Alrfed's famous "chiselier hammer". Hofi took it a step further and applied it to larger hammers and sledges. Hofi also made a major improvement with the geometry of his slitting chisels. This method is a very old technique that Alfred Habermann shared with hundreds of smiths at courses he taught at Helfstien Castle in the Chech Republic for over 25 years. Other smiths have also been doing this or something very similar today like Erin Simmons, Brent Bailey, and I'm sure countless others who have never had any contact with Habermann. This is an old technique that has been rediscovered by many smiths. -
Slitter Geometry
brianbrazealblacksmith replied to archiphile's topic in Slitters, Punches, Drifts, etc
Thanks Scott, you should see the video. Nine heats, it can be done in seven. -
Anvil tool holder
brianbrazealblacksmith replied to DenK's topic in Power Hammers, Treadle Hammers, Olivers
That's a big hunk of hot steel! Please do post more pictures! -
Slitter Geometry
brianbrazealblacksmith replied to archiphile's topic in Slitters, Punches, Drifts, etc
The difference is that I'm not just slitting and drifting a hole for a hammer like I would for a mortice. I am developing a "house" for the handle by forging the cheaks up onto the drift which enlarges the hole. The geometry is basically the same, but I start smaller than I want to end up with in the end. -
modeling clay
brianbrazealblacksmith replied to saintjohnbarleycorn's topic in Blacksmithing, General Discussion
We used clay alot in Alfred Habermann's shop to communicate with. We did not speak each others language, so we used clay to quickly hammer out ideas. I like what Avadon had to say about oil clay. I've used different types and sticking can be a problem. -
As copper nears its forging temp you can see shadows flash across its surface, then dull red, then red, then bright red, then gone. It will heat up faster the thinner you get of coarse so pay attention.
-
I've always bought my copper from Industrial Metal Supply and it is basically pure copper. I don't know about the rod you have, but I've heard you should be careful when it comes to scrap copper that you're not sure of. As for the forging of heavier copper you'll like it. It moves like yellow hot steel only alot longer just like pure silver does. You can heat it to red and forge until you notice it getting harder. If you continue to try and force it out after this you can beat the outer surface onto itself and form blisters which will pop and cause pitting. I usually heat it on top of my fire so I can see it because once you go past bright red it will melt rather quickly. I believe the dust from grinding can be hamful just like other metal but even more so. I don't grind it and I work outside. I haven't had any metal poisoning, but you can taste it when handling it some times, so somethings going on there. I'd like to hear from others as well on this subject.
-
Slitter Geometry
brianbrazealblacksmith replied to archiphile's topic in Slitters, Punches, Drifts, etc
I just thought of this. There is a noticeable difference in the ease at which different metals yeild to the hammer. This is what I'm calling forgeability. It can be just as noticeable as the forgeability of white hot steal compared with stone cold steal and every other stage in between. When starting out the forgeability of your choice of materials can have a great influence on your success. Rob Gunther came up with a way of hardening mild steal with what is called "super quench" and it really does work. I know the information on this is out there and it is made from easily obtainable products. Also Mark Aspery has been teaching and doing demos using a case hardening compound that is very effective on hardening mild steal for some larger tools that would be extremely difficult to forge by hand for first timers. I think this is worth consideration. Mark can you add to this. You are much more eloquent than I am. -
Improving the floor of smithy
brianbrazealblacksmith replied to urnesBeast's topic in Blacksmithing, General Discussion
Cut the floor out where your station is and use the remaining floor as shelves. -
I love it. I can't think of anything else that I'd rather be doing most of the time. You are always learning.
-
Anvil Stand
brianbrazealblacksmith replied to Ed Tipton's topic in Stands for Anvils, Swage Blocks, etc
Alwin, I've posted pictures before of an anvil stand that I use in my shop and on the road. The racks are removeable; they are made out of 1/2" round stock that has been bent around to hold my tools then bent again to go in and out of two holes that have been drilled in the base. Although my anvil doesn't come off, you can use many other different methods to secure your anvil down where it can be removeable. -
Sand anvil stand
brianbrazealblacksmith replied to Alwin's topic in Stands for Anvils, Swage Blocks, etc
I'm surprised no one has mentioned one of the main reasons for using a sand base. You can turn your anvil and use the other surfaces like a swage block. I know it's rarely done, but I've heard of Alfred Habermann doing it. There are more sufaces on an anvil than just the top. -
Yes and no, it just depends on what I'm doing and how well my tongs hold a certain profile. If the tongs don't really hold it well you are going to have to make a tong that does or just bring it out and make sure your hammer and anvil are lined up properly where they support your work and just hold it in the air. Hand work is really no different than power hammer work, if you are not holding your material correctly where your dies don't support your work you are going to feel it in your joints. I don't have any picture to show you this ,but if you were to see my hammer making video you would be able to see what I'm trying to explain. I am using tong clips, and am holding my tongs very loosely. Everytime you see a missed or chattery blow you'd notice the change in the grip of the tongs. The tongs I am using do not really grip the hammer I am making, But it doesn't matter. What matters most is holding the material under the dies[hammer and anvil] and hitting it squarely. Hand work by yourself is no different. Missed or chattery blows will always disipate somewhere. Don't try and hold it or force it; it doesn't work that way. A power hammer will teach you that real quick. Hand work is no different. I hope I'm communicating this cleaarly for everyone. This is very important.
-
There probably is, but I don't know if it would be noticeable unless you were trying to pry with them. Tongs are not for prying with except for scrolling tongs, they're for holding. I don't think you'd notice any apprieceable difference in the two, but they are very simple and easy to match up which can be one of the most challenging things about making tongs.
-
Not really, they are pick up tongs for holding under the hammer [power hammer or striking hammer] on the anvil. They are great for manipulating your stock, whether it's a hammer start or a small punch or chisel. They have a small end so they don't get hit by the hammer, but like I said this is only one example.
-
That is one thing that Alfred talked alot about. He likened it to holding something with your arms straight out and how much easier it was to hold it with your arms bent. Here is just one example of Alfred's style of tongs that I made for making hammers; they are a simple pick up tong. Hofi has many other styles that he learned from Habermann and even more examples where he went in his own direction and made even more possibilities.
-
The first time you forge you are able to accomplish something that you are pleased with because you took some hard stubborn steal and moved it around while it was hot, like clay. You can make something the first time you try. The next time you get better. The more you do it the better you get. You are always learning and it will never stop. You will never arrive; you will never stop learning.
-
This is one way and a really good forging exercise. I saw Bob Patrick do this at Tom Clark's school. The 4th step, next to the finished half tong, can be done in one heat. I'm just showing the passes you make to divide up your material. The first pass starts on the near side of the anvil by choosing the amount of material you want for your jaws and placing it on your anvil then srtike it 3 times with your round face of your hammer straight down with a near sided half hammer faced blow then turn your material 1/4 to the left if you're a righty. Now devide your jaw from your boss with the same 3 blows on the far side of the anvil turn the same direction and divide your reins from the boss with the same 3 blows on the far side of the anvil with the round face of your hammer. Turn 1/4 always in the same direction and come back to the near side of the anvil and divide your tong blank from the rest of your rein with the same 3 blows, turn again and stay in the same spot with the same 3 blows. That is the first pass and the first cut piece in the picture. Now switch to your flat face of the hammer and begin to develop your divisions by attacking high spots angling your flat face to develop the structure of your tongs in the subsequent passes. Next, cut then draw your reins.
-
Slitter Geometry
brianbrazealblacksmith replied to archiphile's topic in Slitters, Punches, Drifts, etc
Most of the people on this forum are going to be doing hand work and they are not going to have access to power hammers just like I have not most of my 29 years of experience at an anvil. You do not need to try and force out any tool made from H13 by hand when you can use other more easily forgeable steals that are more affordable because when you are starting out, you are not going to be forging tools that will be lasting you a lifetime. I still haven't forged tools that will last me a lifetime because I use my tools alot and they take abuse because of the nature of my work. I am saying that it is most important to know how to make, use, and maintain your tools, and when you are doing hand work you can and probably should start with more easily forgeable steals until you develop more of an understanding of what is involved in making, using, and maintaining any tool. You should not and do not need to start forging with H13! It does not yeild to the hammer and it is not as forgiving as other more forgeable steals. Start with something more manageable. I've heard the preachers of super steals, and I'm still not buying it. I do hand work, and I will concede that under the force of a power hammer H13 will hold up like no other material, and yes any steal can be dangerous if not used properly, but some are definately more forgiving than others. Until you have spent enough time at the anvil to understand this, I'm only advising you all to start with what will be easier to work with or buy your tools from a good tool maker like Uri Hofi. -
Slitter Geometry
brianbrazealblacksmith replied to archiphile's topic in Slitters, Punches, Drifts, etc
Yes, and when I need a tool I will make it that instant and use it. -
Slitter Geometry
brianbrazealblacksmith replied to archiphile's topic in Slitters, Punches, Drifts, etc
No, I'm not saying that. I'm saying that it is possible and the geometry is one of the most important factors. I had to be very mindful of my punch when I did that and when I punched my plug out from the other side,since it was a square punch and I wasn't lined up perfectly, it twisted with one sharp blow seeking the path of least resistance, which was the hole i'd punched from the other side, but a perfect plug still dropped out. I'm trying to point out that you do not necesarily need H13 or S7 for hand work. There are other steals out there that are much more easily forged that are less expensive and more readily availiabe and safer to use. I've seen too many pieces of H13 break and fly away like a bullet. And you can mess up H13 and S7 just as easily as you can mess up anything else. Learning how to make, use, and maintain your tools is more important than being led to believe that you have to have some kind of super steal to do the job. I use spring steal,4140, or straight carbon steals for hand work and I'm pretty sure from what I've seen out there in the world that I'm asking more of my tools than most. I am only doing hand work with a stiker and I will admit that these steals will not hold up as well under a power hammer.