
Dan C
-
Posts
810 -
Joined
-
Last visited
Content Type
Profiles
Forums
Articles
Gallery
Downloads
Events
Everything posted by Dan C
-
I'm learning, this is new to me. What I read on this forum, as well as other sites recommends heating to non-magnetic, quenching in water and then testing it on the anvil to see if it gets brittle hard and breaks. I just tried it without heating & quenching and the rasp bends. Then I tried a couple of old files as you suggest, one being a Heller and they all snapped as you said. I noticed on those files that you can't really see the grain, it looked more clay or glass like. I also did a spark test on the inside of the breaks for both rasps & files. The Bellota rasps spark the same inside the break as outside, and noticeably more than a HC railroad spike, but less than the Heller or other old file I tested. I can't see any demarcation on the rasp that would indicate it was case hardened though.
-
Any grinding I do, I plan on annealing first though would leave on enough to show that it was a rasp in former life. Interesting thought on folding the teeth back down. I have enough of these, so when I have time I can experiment. Good idea on spark testing the center of the rasp, I'll see what that shows.
-
Digging thru the archives on rasp files & knife making, here are some that I've found. This might help someone or myself later not have to do so much searching. Info regarding how to make a rasp snake, various brands & hardening tests http://forums.dfoggknives.com/index.php?showtopic=4295&page=2 Ways to harden & temper http://www.iforgeiron.com/topic/27222-farrier-rasp-steel-type/ Richard Hanson Knife Making http://www.iforgeiron.com/topic/30540-richard-hanson-knife-making/?hl=%2Brasp+%2Bfiles Kukri Rasp Knife http://www.iforgeiron.com/topic/10294-kukri-with-feathers-8/?hl=%2Brasp+%2Bfiles#entry101839 Summarization of steps involved http://www.iforgeiron.com/topic/9704-file-knife/?hl=%2Brasp+%2Bfiles#entry95607 How to draw file http://www.iforgeiron.com/topic/6213-wow-draw-filing/?hl=+rasp%20+files Annealing, soaking & the teeth http://www.iforgeiron.com/topic/1975-kinives-from-files-advice/?hl=%2Brasp+%2Bfiles#entry15303 Files & filing http://www.iforgeiron.com/topic/23326-files-filing-primer/?hl=rasp
-
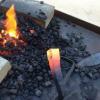
Picture failed to upload, trying again.
-
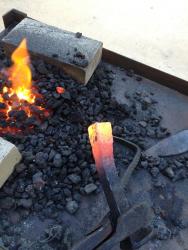
Test results look promising, I'll definitely try forging some knives with the Bellota rasps. Heated the end of one to non-magnetic and then quenched it in water. Broke clean with one hit with an inch hanging off the anvil. The picture quality isn't very good, but hopefully you can see that the grain appears small & compact.
-
I'll post an update when I've had a chance to experiment with the Bellota rasps and what I forge from them. They're going to have to wait a little longer before I can do something with them as I know have several new orders from people w/ cash in hand. I'm going to set at least one aside for hot rasping. I did find this thread which answers my question regarding annealing and removing the teeth. http://www.iforgeiron.com/topic/1975-kinives-from-files-advice/?hl=%2Brasp+%2Bfiles#entry15303 It would make sense if making a knife to anneal it first and grind off some of the teeth, whereas if doing something else with it I'm not so sure.
-
Rasptlesnakes...I love it! Those would go over well where I live also. Would you have any photos of the snakes or hatchet? Do you anneal the files before you forge them? I saw posts where it was recommended, but annealing before forging doesn't make sense to me unless you are doing it to soften the metal to shape or grind. What color are you forging at? Less than a dull red and it risks cracking, though more carbon > chance of burning it up in the forge.
-
Thanks Momatt. When you forged the rasps did you do it with the teeth on, or anneal it and grind them off first? I'll check out the knife making lessons.
-
I recently traded some bottle openers for a large bag of horseshoes and 10 Bellota farrier rasps. Separately I got a large assortment of old files that I plan on making strikers, small knives, basically anything I think people will buy or trade for. From reading this forum, I see the general recommendation is to start with steel of known quality vs. going with unknown material. That said, money is tight, I've paid for all my smithing tools and earned extra income by working with what I can get. I live close to a railyard and the workers there are more than happy to trade me beer & openers for steel they have lying around (and I saved all the emails arranging the initial trade in case it ever comes up). My big sellers have been gardening tools, spike & wrench bottle openers and the sometimes despised spike knife, which I quench in ice water and don't temper. So far no complaints on the ability to hold an edge or being too brittle. My questions are: - I've seen mixed comments regarding the quality of steel in the Bellota rasps which I plan on experimenting with first. Suggested method of heat treating and your experience with them? - Other ideas on what to make that's fun & profitable besides knives with rasps or files? I saw a post on making rasp spurs, another on a rasp alligator and snakes. What have been your best sellers? Pictures please if you have them. - If making a knife out of a rasp or file, do you anneal and grind the teeth or ridges first before forging? Do you bevel the edge? - Ever since I saw these kitchen knives I've been dying to forge one for myself, for gifts and to sell. I know many people who love to cook and would pay a reasonable price for a unique knife such as this. The rasps I have are Bellota Raptors, 14" long by 2 1/4" wide. How would you cut the file to maximize the number of knives you could get out of it? I think I'd start with a cardboard template and lay it out on the file with the handle or tail running straight behind the blade. Thanks!
-
Depending on how it goes you might like to add some additional details like this one. Great video!
-
Using a Carbon Arc Torch for Brazing and Heating
Dan C replied to ciladog's topic in Welding/Fab General Discussion
I didn't think the lack of a heat shield was an issue. I did later adjust the angle of how the rods meet to be steeper and that seemed to help with the flame longer & more forward. If I could've found one at a decent price I probably would've bought one. FYI. for the wire or cables, the cheapest & easiest solution I found was going to Walmart and buying the cheapest 10' jumper cables that they had. -
Using a Carbon Arc Torch for Brazing and Heating
Dan C replied to ciladog's topic in Welding/Fab General Discussion
In case you can't find a torch here are the instructions I used. http://www.instructables.com/id/Make-a-carbon-arc-torch-for-your-220-volt-stick-we/?ALLSTEPS -
Using a Carbon Arc Torch for Brazing and Heating
Dan C replied to ciladog's topic in Welding/Fab General Discussion
I don't think they're used much anymore because of other options which give you better control over the heat. And when using one you need to use at least shade 14.0 due to the extreme brightness. Normally I use an auto darkening heat, but switched to a flip helmet because I ended up seeing spots from the split second time it takes for the mask to darken. I think it's a good option to have in your toolbox, and does save on gas. Just wish there was a source for the other type rods which would give you a more stable flame. -
Using a Carbon Arc Torch for Brazing and Heating
Dan C replied to ciladog's topic in Welding/Fab General Discussion
Thanks Ciladog. Good suggestion on the insulating tape. I'm pretty paranoid about welding in damp conditions, or even welding w/o having all of my skin covered to avoid any rays or incidental contact. Only tingle I've ever gotten was from a thunderstorm when lightening hit a nearby lightpole and I was holding an umbrella. The tingle from that lasted at least an hour. What type of electrodes are you using with the arc torch? -
Using a Carbon Arc Torch for Brazing and Heating
Dan C replied to ciladog's topic in Welding/Fab General Discussion
Here's my homemade carbon arc torch, pretty easy to fabricate and if you search online you find information on building one. Mine doesn't see much action, but for occasional use to melt something or free a rusted bolt. I have been considering it's use for preheating when welding tool steel, but haven't done so yet. I can only find gouging rods which apparently burn hotter and make it difficult to control. What supposedly works better are flux impregnated carbon rods which provide a stable flame. I searched online & called around and couldn't find anywhere that sold those. I did not know about not using it with an inverter and did so with a DC inverter. The welder didn't seem to be damaged, but the rods will wear unevenly so I went back to using my Lincoln 225. -
hypothetical RR track question
Dan C replied to Dogbyte's topic in Anvils, Swage Blocks, and Mandrels
That's a very nice RR track anvil, well done! I found another use for a piece of track. Last night I was trying to straighten a rock bar for someone. My postvise was too small to act as a press for the bend, but heating a 10" section of the bar, then putting it on the ground I used a 2' piece of track to press it down which got the majority of the bend out. I then did minor adjustments on the anvil. -
100LB Peter Wright Repair-Preheat
Dan C replied to PaulKrzysz's topic in Anvils, Swage Blocks, and Mandrels
Seems like Mr. Gunther's method has been the most tested, why would you not stick with what's known to work? Still I have questions about using that method. Would you use the Stoody 1105 directly after grinding to fresh metal and preheating, assuming the fill would be 3 passes or less? I don't think my anvil has areas that would need to be built up. It's in pretty good shape minus a 1/8" divot in the center of the face and two gouges in the heel, as can be seen in the picture above. You can also see someone else's welding repair which is c-shaped. Then is there a reason that you can't reshape a slightly mushroomed edge by moderate hammering from the side cold with a 2 lb or smaller hammer and maybe minimize the amount of steel you are going to grind and dress? -
100LB Peter Wright Repair-Preheat
Dan C replied to PaulKrzysz's topic in Anvils, Swage Blocks, and Mandrels
I have a 200 lb PW in good working condition. There are a couple of gouges on the heel and a 1/8" divot where it looks like someone did a c-shaped weld repair. I generally avoid these areas when forging, but wondered about using Robb Gunther's repair method. Would you use the Stoody 1105 after grinding to fresh metal, assuming the fill is 3 passes or less? I don't think my anvil has areas that would need to be built up. My anvil's edges have some mushroomed areas but no chipping. I've searched this forum and the recommendation seems to be to lightly grind & dress the edges. The other common recommendation is to work the anvil as is and make a forging hardy. Stupid question, but is there a reason that you can't reshape a slightly mushroomed edge by moderate hammering from the side cold with a 2 lb or smaller hammer, or would the only way to do something like this require bringing it up to forging heat then reshape the edges, all of which would then require heat treating the entire anvil face? I read that long ago anvil companies once offered this service. -
Anvil.. what should I offer him ?
Dan C replied to ah1988's topic in Anvils, Swage Blocks, and Mandrels
I don't think that's a Peter Wright btw. As someone already suggested maybe a Mousehole. It took me a long time, but I just paid $250 for a 200 lb PW. Here is how it looked when I got it. Notice the difference in footings. -
If you weld, an alternate solution would be to fabricate one out of steel. I used scrap 2x2x1/4" & 2x3x1/4" square tubing and angle iron to make mine. Not as adjustable as a container filled w/ sand, but I did later lower it by switching to a thinner board that sits between the anvil & the stand. Then I filled the legs and tray w/ sand to minimize any ringing. The eyebolts are to be used for a spring loaded hold down I plan on making out of rebar and springs from a drum brake. I went with a tripod design in case the ground wasn't level it wouldn't rock.
-
How Can I Start Blacksmithing For Under $50?
Dan C replied to HypnoprisM's topic in Blacksmithing, General Discussion
The forum covered this topic before in the following thread, good video on getting started... http://www.iforgeiron.com/topic/23500-what-do-you-need-to-get-started-in-blacksmithing/?hl=%2Biron+%2Bbloom#entry238858 -
ideas on a twisted rr spike please
Dan C replied to royce unruh's topic in Blacksmithing, General Discussion
While figuring out what to do with it, I wonder if you could use it in your vise to shape a thin rod into a corkscrew. -
How Can I Start Blacksmithing For Under $50?
Dan C replied to HypnoprisM's topic in Blacksmithing, General Discussion
I started with a piece of RR track that I got from asking a railyard for. They gave me a 3' section for free which after cleaned up I mounted vertically. My forge was & is a brake drum forge which I made w/ scrap angle iron. The refractory cement was the most expensive part of it. You can get 2" pipe from a place that installs sprinkler systems for cheap. You are going to need to know how to weld, or have a good friend who will do it for you for cheap. I'd recommend learning if you don't already know how. A Lincoln 220 arc tombstone can usually be found for cheap and won't do you wrong. Here are some pics of what I'm using. The anvil I eventually bought using the money I made from selling openers, knives, gardening tools & stuff from railroad spikes (which the guys at the railyard give me for free in exchange for openers & beer) Don't scrounge for spikes on RR tracks, highly illegal and belongs to the RR, they will prosecute. Look for ways to save money on materials. Steel fabrication shops usually have cut offs that sell for scrap prices, Home Depot or rental places sell their worn jackhammer bit cheap which can be used for hardy tools. Search these forums, there's a lot of great ideas that will get you going. For your forge blower scrounge up a squirrel cage. Here are pics to show how I'm using mine. -
ideas on a twisted rr spike please
Dan C replied to royce unruh's topic in Blacksmithing, General Discussion
Hard to say what you could make out of it without a picture. Here's a bottleopener I made yesterday, maybe you could do something similar. -
Don't know if this would work w/ your setup, but here's mine. I hinged the fan to a 2" pipe flange and then used picture frame wire w/ knots tied in it to control how much air flow goes into the forge. The fan also somehow changes speed based on the amount of pressure against it, so flush against the flange the forge is roaring. I doubt I'll have it cranked up that much very often, as it goes thru coal much faster and will burn up carbon steel easily, but good to have the ability. Dale, saw the forge you put together in your First Time Build Forge thread, looks good! You might consider adding a dump gate at some point. I was able to build my forge for $20-30, the refractory cement and 2" piping were the more expensive items. Instead of using a 2" T-pipe, I cut a hole in the tuyere pipe and then t-welded the horizontal pipe from the blower into it. The frame was all scrap angle iron I got when someone discarded fire pit. Warped and covered w/ scale, but free. Initially I used my air compressor as the blower, but changed that this weekend when someone gave me a squirrel cage. Big improvement!