
Quarry Dog
-
Posts
412 -
Joined
-
Last visited
Content Type
Profiles
Forums
Articles
Gallery
Downloads
Events
Everything posted by Quarry Dog
-
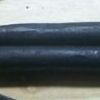
If you look carefully, the anvil actually says 2-0-21. This calculates out to 111 Kg or 245 lbs. I hope I don't offend when I say that it would appear your scale seems to be flattering whoever it's weighing but a couple of pounds, although your anvil may have taken insult to it. That square hole under the horn is most likely a handling hole, for handling while they were forging/welding the thing together. The "H" is most likely an inspection mark, judging by the fact that it looks like a plain typeface character. I think the same goes for the "1" punched over the hundredweight stamp. As far as the make of the anvil, I don't have the foggiest idea. It looks to be in rather good shape though, so I personally don't think it really matters, especially not at a nice solid weight like that.
-
The guy the runs the shop always gets on us if we leave the blower going when out steel isn't in the fire. As far as judging how hot my fire is, I usually base that off of the color. This is made easier by the fact that my safety glasses are around a 2 or a 3 shade lens, and the fact that the shop is well shaded so that you can see the colors very easily. I also take a sacrificial piece of steel on occasion and burn the tip, and then let it cool down till I can't see it in the available light, and finally put it close to my face and cover it with my hand until I can't see it again. This seems to be a very effective method of callibrating my color scale, but I guess it works so well because we hardly ever have enough clouds down here to block out any light.
-
So i bought this anvil
Quarry Dog replied to m31desantis's topic in Anvils, Swage Blocks, and Mandrels
Glad to have you M31. I've got to say that there is one positive side to your ASO...The fact that it's not a small block of granite, they really like shoot rocks at you when you miss with the hammer, I've tried it. Unfortunately, your anvil is most definitely a cast iron ASO. Two things make me say this: You can see the casting line right up the middle of the picture in the advertisement. This could mean cast iron, or cast steel, if it weren't for the next bit of evidence. It actually says cast iron in the advertisement description. I marked it in bold, and italics, and underlined it. As long as you take care not to mis-strike and make sure to work your metal as hot as it will allow, that ASO can last you a long time. There are a couple of downsides to it though. The first concern is that it will start showing it's age very quickly. The next, and possibly more important, is that it will not give you the same return on your efforts as an actual anvil would. What I mean by that is that when you strike a piece of metal on an actual anvil, it rebounds back into your work from the other side, thus working it from two sides at once, almost doubling the amount of work produced and bouncing your hammer back up for the next strike. Your ASO will only absorb the impact that you impart upon your work. Not only will it refuse to rebound, it will actually take some of your initial impact away from your work. This effect will rapidly tire you out. Also, it will refuse to bounce your hammer back up, thus making you lift your hammer up after every blow. These combined effects will quickly tax you. In other words, that ASO will work you to death for the same results that even a piece of railroad track stood up vertically/on end would give you(I hear that's actually a very good arrangement). It may be enough to spoil your view of blacksmithing and make you think that it's all hard work, and absolutely no fun. A proper anvil would give you a much better idea of what it could be like. Ask around about an anvil whenever it seems like it might fit into conversations. You never know who might have/know someone that has an anvil. I've found 2 when I wasn't really looking. I found the first by asking my favorite bartender if she had any leads, and she put me in contact with a farrier, who put me in contact with a welding shop, that was selling an anvil for one of their customers. I just recently ran into that farrier again, and repaid him with a beer. The second I found by just asking the guy that was drilling my well about what kind of steel his 4 inch drill rods were made of, and then we got talking about steel, and then anvils, and he just happens to be holding one in a trailer on the lot that he stores his drilling truck at, just for me, since I'm running out of room in the garage. Funny thing is that anvils are supposed to be extremely hard to find over here in California. Even if you cant find a proper anvil, any massive piece of steel would work reasonably well. Anvils used to be made out of solid wrought iron, without a tool steel faceplate. Their face was even softer than mild steel. Both of these substances would serve you better than an ASO. I hope I've been helpful. -
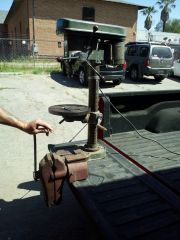
Well, these followed me home today. http://www.iforgeiron.com/gallery/image/37345-drill-press-pipe-vise/ It took a little oil to get the belt tensioner on the drill press to slide right, which explains why the belt isn't long enough for it. It's also missing the set screw for the tensioner. Other than that it works fine. Oh and the vise works great too.
-
 Found these today.
 -
I fully agree, and I guess I did leave a few points out for interpretation. Well, as a general rule, I try not to use green coal in the middle of the fire, unless I'm trying to make a cave of coke. The reasoning behind this is that green coal makes for a very dirty fire, and seems to produce more clinker. It's better to let it cook into coke on the edges before you put it in the fire pot. So yeah, again, avoid water directly in the firepot, because (a) it could crack the firepot(I've seen it happen, and it didn't take much water. It's the same reason you never cool off a cast iron skillet with water.), (b) you're trying to slow roast the green coal, not actually burn it, and ©the firepot is best controlled by other means. The dumping of water on the coal is more to keep the fire from spreading beyond the firepot, instead of letting it run free across all the coal that your trying to slowly process into coke. If you reduce your air, yes, your fire is easier to control, but it's not as hot either (unless you're already blasting coke out of the pot, which is not ideal to begin with). You need all that heat, as well as a clean fire, for easier welding. I've found the best way to control the fire inside the pot (which is primarily coke, even if it is the lighter breeze resulting from coal) lies in 4 factors: How high you pile the coked coal. This makes for a deeper fire that heats up stuff faster. If you're going through too much fuel and don't need the extra heat, feel free to remove some coke and put it to the side so you can use it later. Wherever your coke is piled deepest, is usually where it is hottest. It's also usually easier to get your work covered in deeper areas, which also makes metal heat up faster, as compared to when you have it just sitting on top of the fire, where it heats a lot slower. If you have a deep part of the fire without much airflow, it's not gonna be as hot as it could be. The area with the best airflow is usually the brightest/hottest part of the fire, although if it is shallow, you might get a lot of scale heating metal at this spot. If you don't like where your hot spot is, put your poker in where you want the hot spot, poke down toward your airhole until you feel it hit, and then wiggle it around. This will result in an air jet going right where you want your hot spot. I'll readily admit that I learned this on a bottom blast forge, and have no idea how to translate this for side-blast forges Once you've got your depth, and your blast is where you want it, then you can worry about controlling the fire with the amount of air you push through the tuyere. I also have noticed that if I cut off airflow about 5 seconds before removing the metal, I don't get as much scale. I imagine even an industrial coke, or even an anthracite fire, can go at least 5 seconds without air flow. As a last note, it seems that a little bit of water on the green coal just outside of the firepot makes it coke up into larger clumps. I hope this clears up any points that I didn't make clear at first.
-
That's why it's called the "Instructor Forge". Only people who've been around awhile are allowed to use it without supervision of some sort. I usually get stuck on the durned thing. To top it off, the blower only kicks on when there's enough juice to make enough blast to knock coked coal out of the pot. It's just enough for industrial coke though, the stuff we have seems heavier than just normal coal. The airblast works good enough on your tuyere. Anything that doesn't move when you start up, ain't gonna move while you're working, it's the stuff that hasn't settled/adhered to the tuyere that you have to worry about. P.S.: How is tuyere supposed to be pronounced? TOO-yair? TOO-yeer? TWEER? TWAIR? TUAR-ay? Am I even spelling it right?
-
Thanks much for the link. 9 pages of wonderful information, although it seemed like Brian Brazeal and Uri Hofi were going at it for a minute.
-
I believe I can see why hand cranked blowers are not suitable for coke fires. The coke fires I saw were run on the masonry "Instructor Forge" which has an electric blower mounted to it with a switch + rheostat on one side and a switch on the other. They kept the blast going a good bit almost the entire time. I also hear that you have to constantly feed coke fresh air, or it dies really fast. Coal dust isn't so much of a problem when you're starting a fire with a hand blower, as when you start the fire you crank it pretty good, thus blasting any loose coal dust past the fire you're starting. The problem is when you wash a deposit down the tuyere, it dries out, startes breaking up, and ends up with the grain silo effect. The video is in very, very slow motion, trust me.
-
I don't know much about burning straight coke, although there have been a few times where guys in the shop used it for their fire. Mostly though we just use coal. With coal I would advise sorting through the remnants of the last fire, getting the fire going really well. Once the fire starts getting beyond the firepot, just add a little bit of water at a time to the green coal, until the fire is more controlled. This will aid in coking the green coal, as well as keep the fire isolated to the firepot. Two very important things to note: Never poor water directly into the firepot. If the firepot is hot, this may cause it to crack. It may also go down the tuyere, which leads us to the next point. When adding water to the fire, always keep on the blower for at least 1 minute afterward. If you don't their is a good chance that unignited coal dust will run down into the tuyere. Once this dust dries out, it will travel back to the bottom of the firepot, and ignite from contact with the flame. The resulting explosion can be VERY loud. We had a new guy do this about 4 months ago and I heard it 3 rooms over. I walked into the classroom area and everyone was shaking off dust that had been knocked loose from the rafters. The guy from the next forge over said he saw 4 inches of flame shoot out of the blower... 0_0 I hope this information helps anyone that plans on using coal. I'm curious to know if this applies to coke as well, since coke firepots are usually heavier, and i'm not sure about the dust that is associated with coke.
-
Smithing in the 3rd. world.
Quarry Dog replied to Frosty's topic in Blacksmithing, General Discussion
Definitely welding @ 9:50. They're using copper plated steel filler rod (the copper plating increases shelf life by creating a barrier between the iron and available oxygen). The scale finish when they're done is a dead giveaway. -
I'm just curious, why the pointed tips? I haven't run across any old square or slot punches, but all the old round punches at the shop that I hammer at have flat faces. Is it so that it's easier to find a mark from a centerpunch when starting the hole?
-
making a rifle in 58 minutes
Quarry Dog replied to Steve Sells's topic in Blacksmithing, General Discussion
Hmm...I tried the link at the beginning of this post and it appears that the video has been removed. I think I found the same video elsewhere, although it's broken up into a 10 part series. Here is a link to the first video: http://www.youtube.com/watch?v=uSESf_mU3VI&list=PLpptl1XpQsR444H0gQfTuojc3gw0uSGDu&index=1 I also have a playlist on my channel that currently includes all 10 parts. I wish I had the amount of talent that this man had when this was filmed. "...with the tools he himself made, and the combined skills of a blacksmith, machinist, foundryman, woodworker, and engraver." I'm pretty sure I'm older than he was by a minimum of 5 years, and the only thing I can really claim is electronics technician (not as cool as it sounds), although I'm getting close to taking my 3/8" 3G welding test. That's the computer/machine age for you, brainrot. Although if it wasn't for the internet, I most likely never would have known this video existed. -
Nice bottle opener. Haven't seen that way of doing it before. Does it like to kick off to the left when you use it? If it does, maybe try putting the lip on the top of the eye, so that you pull down on the handle to open up that Fat Tire.
-
So then Grod would be your nephew... Quite the interesting family. :P
-
Is he related to Mongo, from Blazing Saddles? Thank you John, my computer screen needed a bath anyway, although I think the Coca-Cola I was drinking might not clean as well as other products. I imagine if he could knock a horse out with one punch, his great great uncle Grod could have taken out an anvil pretty quick.
-
Identifying alloy steel with spark testing is a myth today
Quarry Dog replied to ciladog's topic in Metallurgy
I can't say as I've ever heard someone being able to name a specific alloy by spark, and I have to agree with you that anyone that says they can was making a boast that they could not back up. I have however known people with very reliable guidelines on making an educated guess of what kind of metal they are spark testing. I have a feeling that you are misinterpreting someone else's statement. It's either that, or they were most likely mistaken in their wording, no matter how much they affirmed that they were using the right word. I like to call this a "That's what I said,""No this is what you said," moment, and I've actually had video to prove it to them (or have it proven that I said something stupid) on occasion. For instance, I don't think I know anyone that could tell you the difference between 2 types of straight steel (just carbon) that are only separated by 5 or 10 points, or 2 closely related types of nonmagnetic stainless. Obviously, if you've never looking into a sparking specific type of metal, like aluminum, you won't know how it sparks, but if you try to, you will definitely know it sure ain't steel. If, however, you've done some research though, you can easily identify the general composition as magnesium, cast iron, high manganese, ballpark of straight steel, HSS, titanium, etc. A perfect example of what I have heard from several people who've been around awhile is what the guy in this video shows. The answers are here. As a final thought, it seems that with this post you're playing a game of "prove me wrong." I'm sure I'm not alone when I say I'd much rather see a cool find, a bit of actual advice, a personal accomplishment, or hear a pertinent question, than watch a contest of "Who's got the bigger ball peen." -
Made this today...
Quarry Dog replied to Everything Mac's topic in Blacksmithing, General Discussion
Thanks for the temp correction Frosty, I'll pass it on to guy I heard it from. -
@ John B: I haven't made a corkscrew, but this guy has.
-
Made this today...
Quarry Dog replied to Everything Mac's topic in Blacksmithing, General Discussion
If it's the storebought laundry type, the worst it will do is clump up on you, which can be mildly annoying. As far as the anhydrous type goes, I'm gonna go out on a limb and say that if it's not well sealed, it may absorb moisture and turn into the pentahydrate and then the decahydrate forms. I hear the anhydrous works better than the storebought laundry stuff, although I haven't had the opportunity to try it myself. I also hear that you can bake the laundry stuff on a cookie at about 350 F for an hour or two and you'll end up with the anhydrous stuff, although your house will smell horrible afterwards. -
Items to make as a test of ones skills
Quarry Dog replied to Everything Mac's topic in Blacksmithing, General Discussion
Oh wow, I can't believe it took 3 hours for it to occur to me how you did the base without the twists going different directions. Until I saw that detail, I was thinking you bent it, cut down the middle, spread it out a little, twisted one end down into the hole a few times and then flattened the bottom between a piece of hardwood and a hammer. I really need to stop driving finishing nails with that 16 pound sledgehammer. At least I can say I wasn't actively thinking on it for the past 3 hours, so I can claim some small level of intelligence. -
When is it appropriate to Forge Weld?
Quarry Dog replied to George Geist's topic in Blacksmithing, General Discussion
My forge welds almost always come out solid, but they always have a visible overlap, because I need some work on my scarfs. I will, however, say that I've had the most success with the following method. I start with a fresh fire, and alot of flux (I'm still trying to figure out how to efficiently apply it, as it always seems to stick to the spoon, or stick in the hole in the cap of the aluminum beer bottle). I then watch, as the metal approaches welding heat, for the flux to start flowing again. Once the flux flows, I gaze at the intended weld, looking for a subtle shift in the way that it flows that shows that the skin of the metal is flowing. I crank one more good turn and then gently stop the blower, and wait about 10 seconds after I see this change. I do this to burn out the oxygen and make sure that heating is uniform through the metal. I then pull the metal out, lay the weld together, and hit it with a hammer, and then I do the weld at least once more to make sure that it is solid. I have not missed a weld or burnt the metal in a welding attempt since I've started doing them this way. I guess that's not saying that much, given that the total is only about 20 welds since then. Looking into the fire would normally be bad for your eyesight, due to the extreme intensity of the incandescance of the white hot steel, but I use darkened z87.1 rated safety glasses, or I use oxy-acetylene welding goggles if I'm expecting to do more than 4 welds that day (I like to call 'em "Mad Bomber Goggles"). This takes visibly white hot light and filters it down to a bright orange or "dark" yellow that is alot easier on the eyes. I used to get headaches when I would try to forge weld before, and that was when I was looking at the fire sparingly, which resulted in almost half of my weld attempts resulting in burnt metal. As far as modern welding, I'm getting ready to take my 3/8" vertical certification for MIG here in a couple of weeks. I'm having minor problems with undercut on my cover pass. I haven't done stick welding on a regular basis in a very long time, so I guess I need to brush up on that. -
Agreed on the eye/hearing protection. For safety glasses I use a dark tinted set of safety sunglasses (make sure whatever you use is z87.1 compliant). I like them because they fit close to my face, and the tint allows me to watch for the metal to start flowing as it approaches welding temperature. I still use a full faceshield when using grinders, sanders, wire wheels, and other similair equipment. For hearing protection I use the "mushroom" earplugs with the solid neckband that you can either hang below your chin or rest on the back of your neck. The main benefit I find with these is that you can put them in by the neckband and don't have to physically touch them with your hands to either put them in or take them out. Anyone that uses or has used foamies, even the ones with the string on them, with hands covered in coal/oil/etc. will tell you that they're black before you get them to your ear. Even if you put them in when your hands are clean, you can't get them back out if you are talking to someone without dirtying them, and I imagine coal dust is not conducive to a clean ear. With the neckband earplugs, you can pop 'em out, have a conversation, and pop them back in. No yelling or going "Huh!?", although you might do that anyway once you get used to them and forget to take them out. Another option for earplugs is to use the plastic ones with the little baffles on them. I don't like these because they dig into my ear and really start to hurt, but they do seem to work a little better. They have a little plastic piece that sticks out just enough that you can pull on it, and it's firm enough that you can push it back in, without getting coal/oil/sand/rust/scale/etc. in your ear. Just my 2 hundredths of a dollar.
-
It's been a good long time since I've had a rat problem, but here in southern California it seems like one of the biggest rodent problems is gophers. I know of 2 really good ways to eliminate entire colonies of the ugly little buggers: The first involves covering up any of their holes that you can find and running a tube from your car exhaust into their tunnels. When you see a puff of dust from an uncovered hole, cover it. Run the vehicle for at least half an hour. This is not as effective as the next method, and they return in a couple of months, due to the exhaust being heavier and some areas being well ventilated enough to prevent them from asphyxiating. Even more effective is to take an oxy-actylene/propane torch, strike it up, and tune for a perfect flame. Extinguish the flame by smothering QUICKLY in a thick piece of leather. Once smothered, insert the torch into a hole and let it run for at least 15 minutes. Pour a gasoline trail into the tunnel and light it. You will hear a thump and see little puffs of smoke radiating across your yard, indicating where their airholes used to be. This will "eliminate" any animals in this tunnel system, as they have inhaled the EXPLOSIVE mixture, and it may also visibly cave in shallower tunnels, as I'm sure it does for portions of the deeper tunnels. This is effective for about 6 months, only because eventually neighboring colonies will figure out that this tunnel system is uninhabited. Hopefully snakes move in instead. If you're dead set on coexisting with them, or if you just want to be ready for when they eventually come back, you can take preventive measures when you plant something, use the aviary wire with the half inch openings to make a basket around any plants that stand at least 3 inches above ground (they come out at night sometimes and they will crawl over smaller barriers). Make sure that the bottom of the basket is solid, unless the basket will go more than two feet below the ground (the deepest they're supposed be able to dig is 18 inches). They may try to chew through the basket, but as soon as they climb through, they will get nicked, and they will bleed to death, as their blood does not seem to clot. I would advise not evening attempting this with a full lawn. As a matter of fact, in southern California, I would suggest a layer of weed barrier followed by 3 inches of pea gravel. Virtually no maintenance, no watering (lawns are expensive around here), and nothing to attract the gophers. Hope this helps someone. Use of an oxy-actylene/propane torch is NOT recommended as you are putting an explosive gas into a container, the tunnel. It may also travel into a foundation of a building or the building itself. When ignited you may destroy things you had not intended to destroy.
-
I totally did not understand how those were used until I saw the picture of them being used in the vise. I can get the more complicated stuff pretty easy, but throw me a simple concept and look for the void between my ears in the blank stare I give you. <_<....>_>....0.o