Joel OF
Members
-
Joined
-
Last visited
Everything posted by Joel OF
-
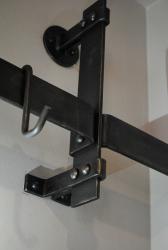
Adjustable collar making jig video: Installed today but waiting for my clients to finish renovations before taking proper pics.
-
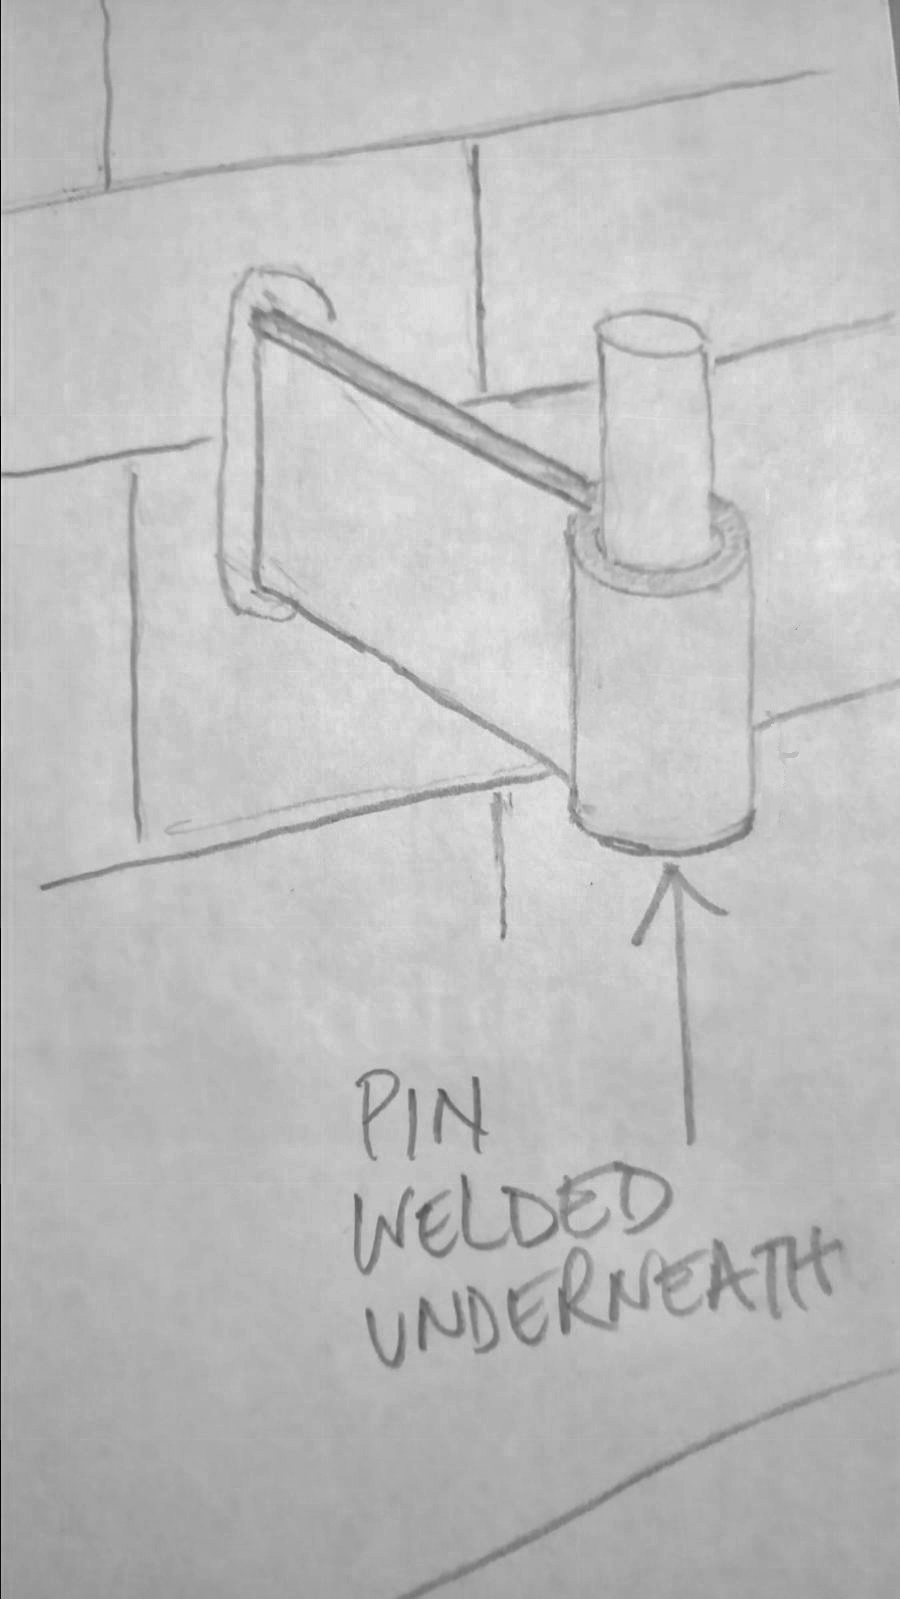
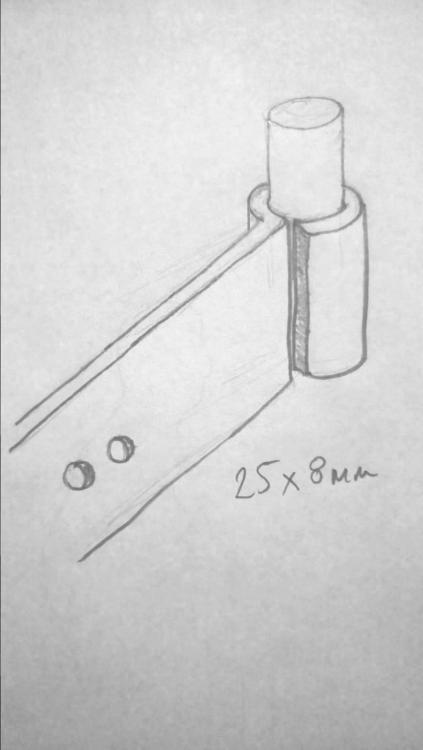
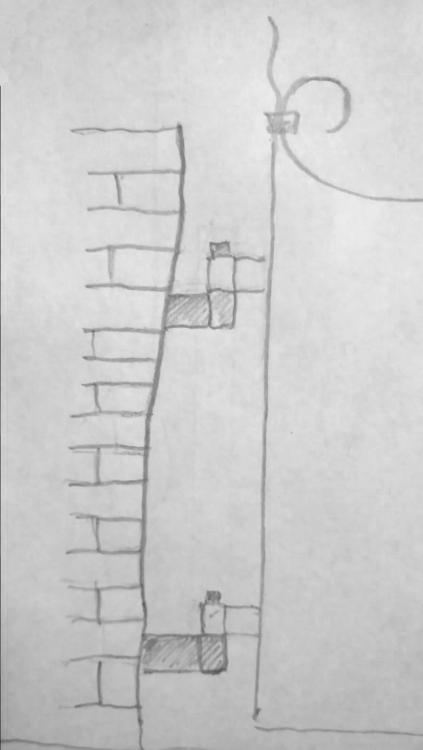
Hi folks, Is there a dark art to drilling slotted vertical holes in masonry, or is it just a case of drilling a series of vertical holes? Nearly all of my clients have period buildings with old red brick piers, never block work and rarely new brickwork. I have attached a few doodles of a hinge pins forged from 25 x 8mm flat bar, they could even be 25 x 6mm now thinking about it for the light weight I'm working on. I have also drawn in a couple holes in the wing(?) for resin to key into, it may also require some chiselled teeth. Is there a rule of thumb for oversizing holes for resin? Cheers

-
I can see the lesson adverts now, you and Don pouting and leaning back to back like Starsky & Hutch with hammers and tongs in your hands. After the show I affectionately Photoshopped Don's face into Yoda's body and added the tagline "USE THE FORKS!" I was going to email me him the picture but I chickened out.
-
Good to put a face to the name at last. It also came through in my Ian Wallace newsletter email, as I have PLI via them.
-
A very good start indeed! Far better than my first hooks.
-
Thanks, I think maybe an extra word that should have been added into to patience and process paragraph is 'determination'. I don't want to embarrass myself by admitting how long that took to design do, but it didn't happen over a weekend I can assure you. An complete inability to visualize anything more than a bit of a blur or transfer ideas onto paper is constant source of frustration and the only way I can work around it is by working on designs every evening till late, getting up every day at 5am (or earlier) to carry on drawing, working on them at the weekends... You could make it, and easily, there's very few techniques in the gate. Learning the techniques required by yourself would take longer (shorter amount of time if you watch the videos and learn from my mistakes, because I make mistakes and show them), but I know I could teach you all the techniques required in to make that gate in 3 hours. There's only upsetting, short tapers, accurate bending and adjusting your hammer blows to keep a rivet tail straight. Trust me, I also give 1 day lessons to complete novices and they've successfully made items with 100 times more techniques involved without any prior experience.
-
I think the most danerous tools are the ones with inherent danger that you can't do anything about, even with proper use, so you're therefore most likely to be injured by them, but they may not be the tool which is capable of doing most harm. E.g, twisted wire wheels on angle grinders which throw out wires & you can't stop that. One in the eye could be a disaster. VS An oxygen bottle falling & the regulator being damaged causing possible severe injury, but that's not likely to happen because you chain them to the wall.
-
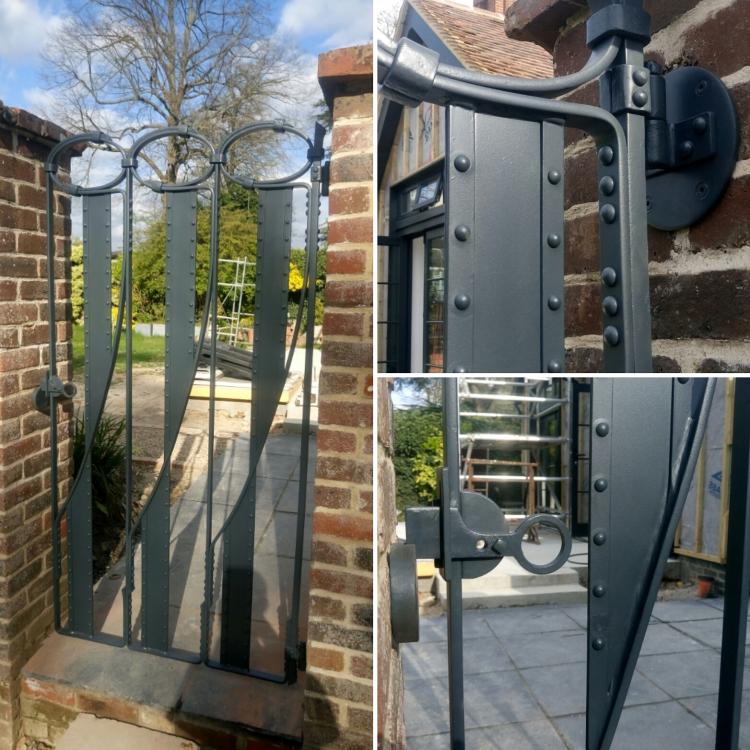
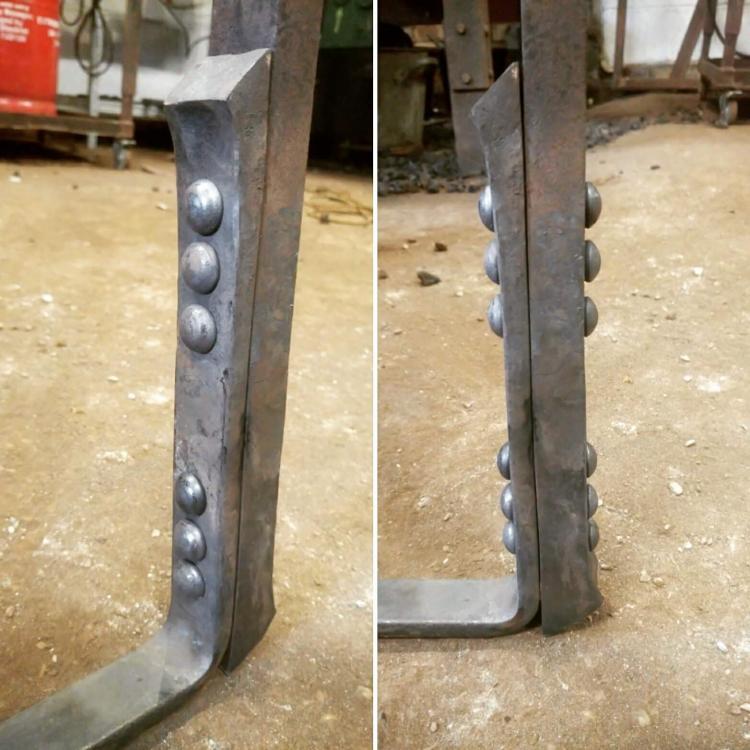
I found that I needed a 12mm protrusion for the 10mm rivets. If you're buying rivets with pre-formed heads I suppose the length required is going to depend on your supplier. A friend on Instagram who specializes in riveting buys 3/8th rivets from a different supplier to me & the 10mm ones I buy because he says the 3/8th head is more hemispherical. I've yet to go round & close up any little gaps between the vertical upset bars and the bars they're riveted to. The bottom right corner. The pre-formed head is the internal one
-
As a self taught person and relative newbie (forged first taper in May 2013) I've come to the conclusion that anyone with patience and the knowledge of a few principles of how metal moves can be a blacksmith. You can scale the principles up or down and tackle things you've never done before with confidence that it'll work. We haven't got to worry about esoteric complications like wood grain and knots. The vast majority of work I do I've never done before, I've certainly never done any riveting like this before. Where there's a will, there's a way.
-
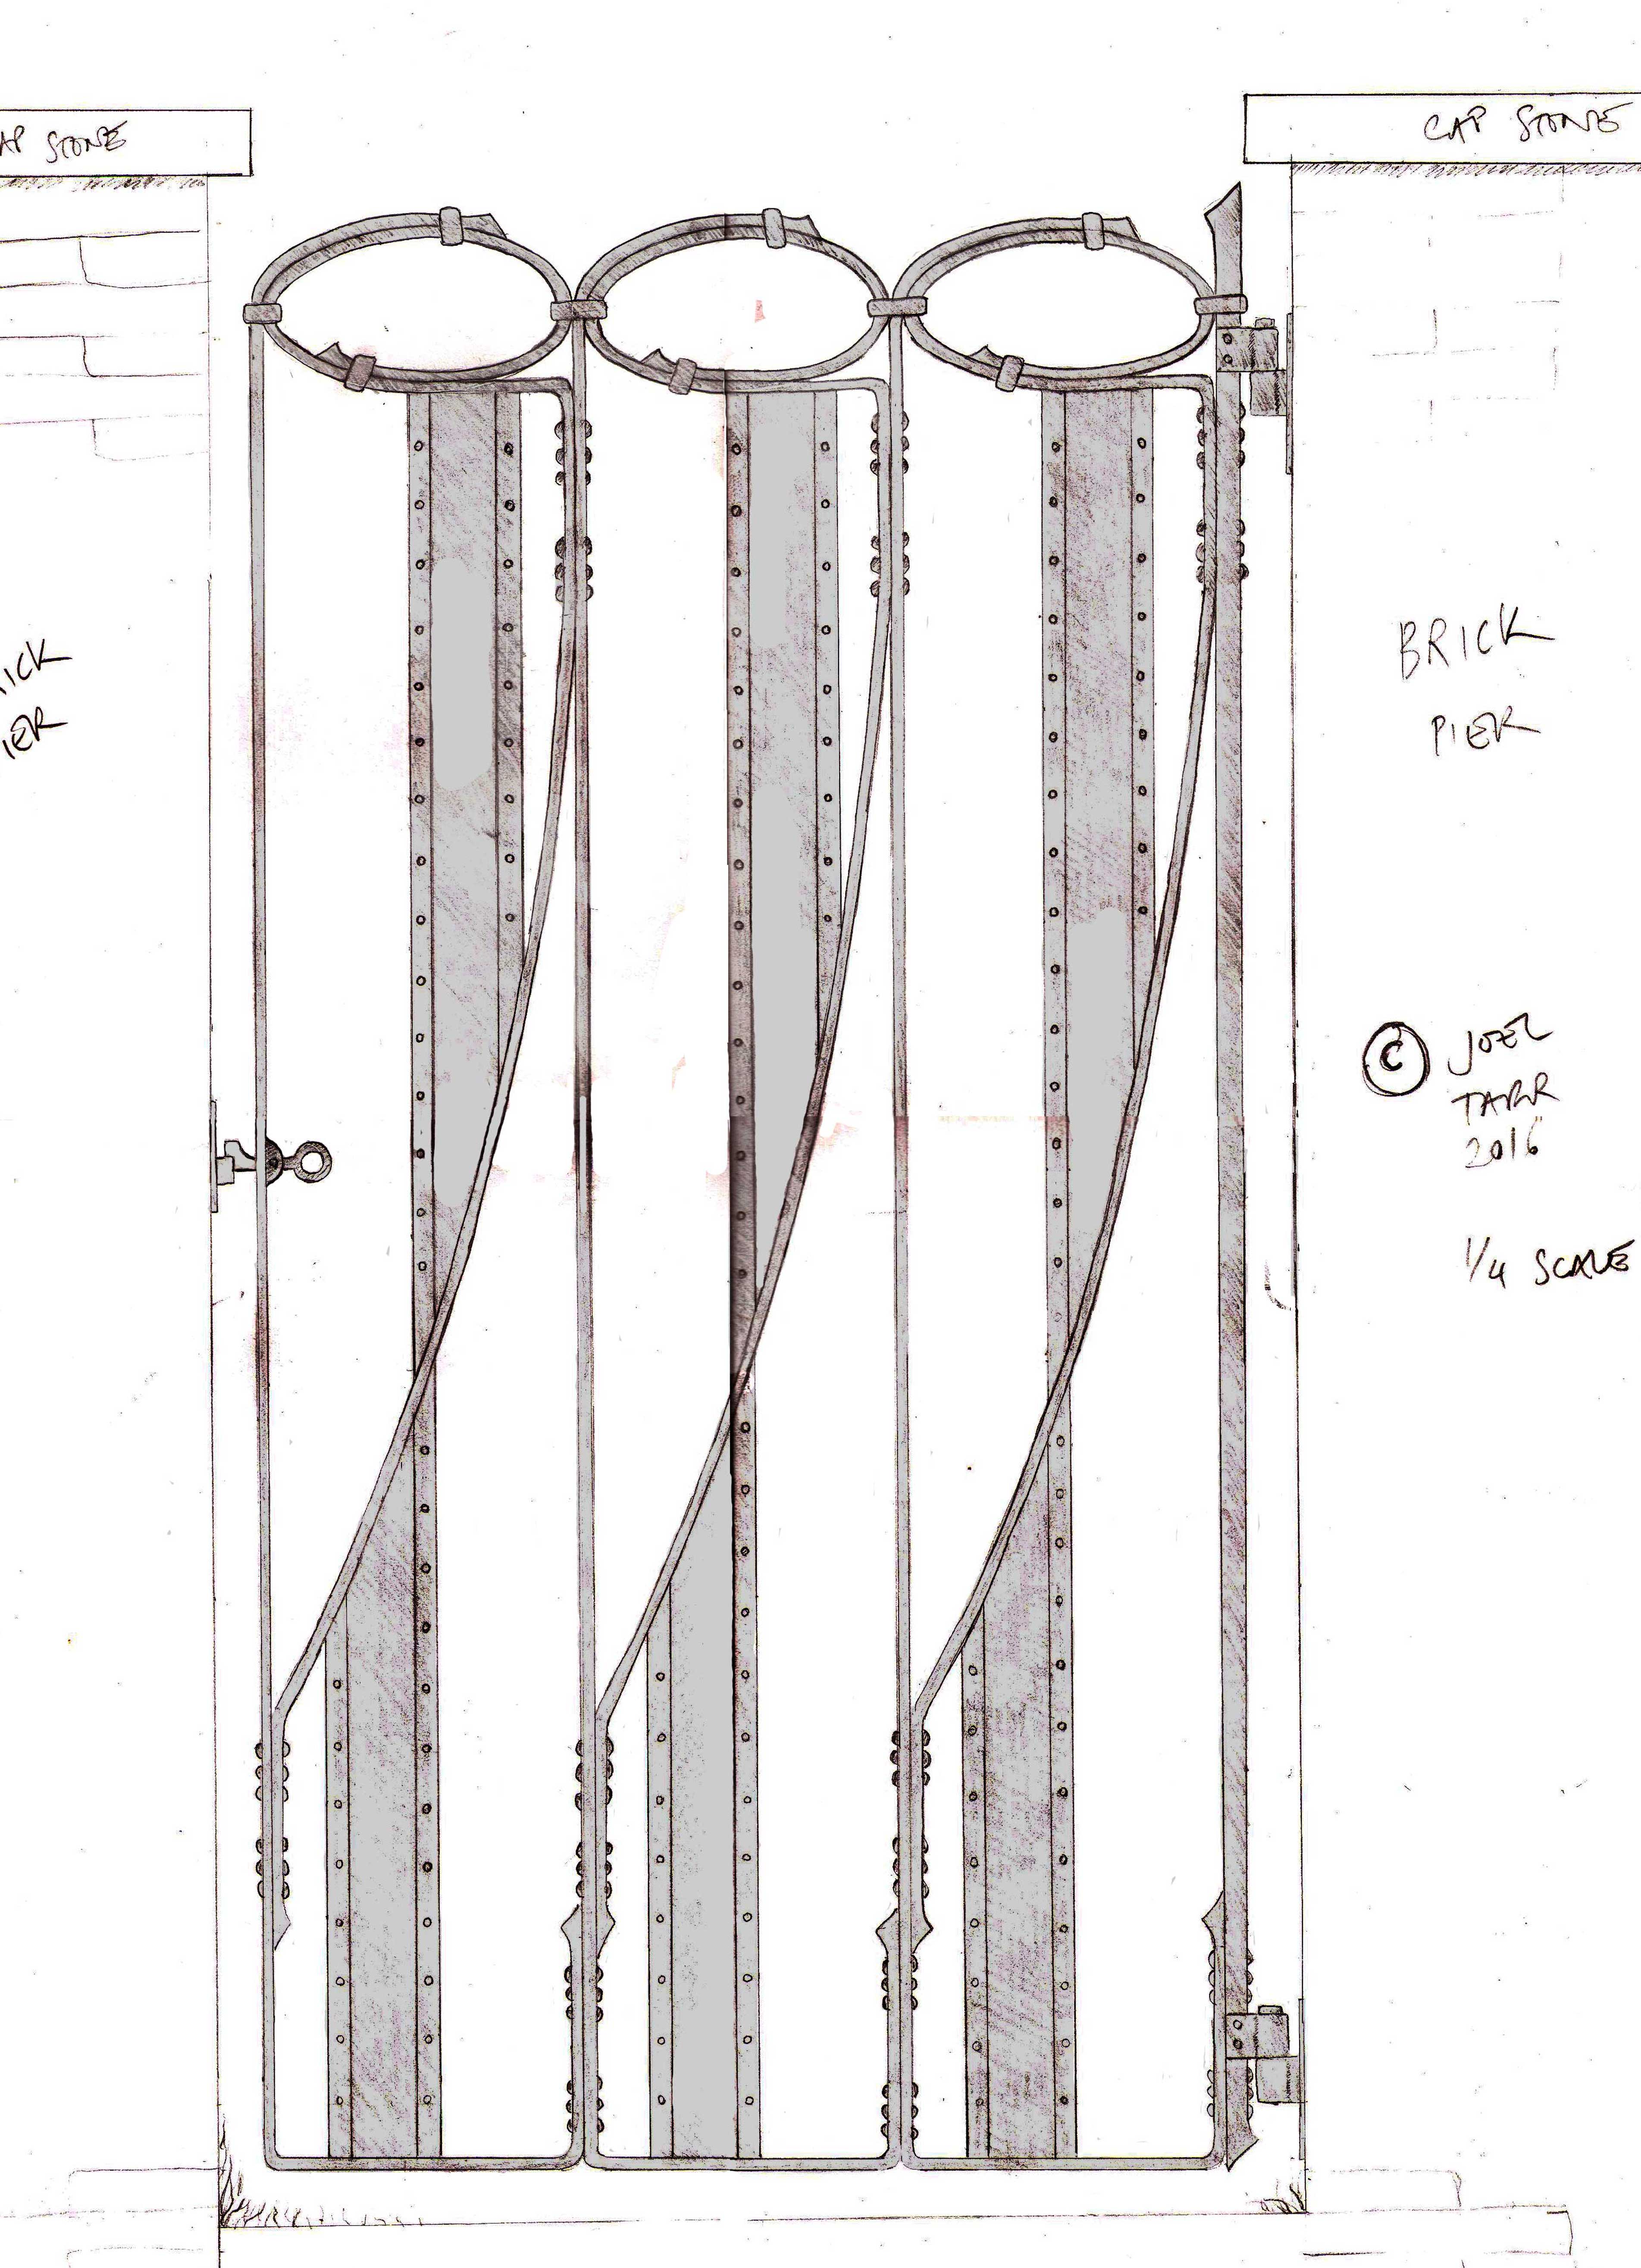
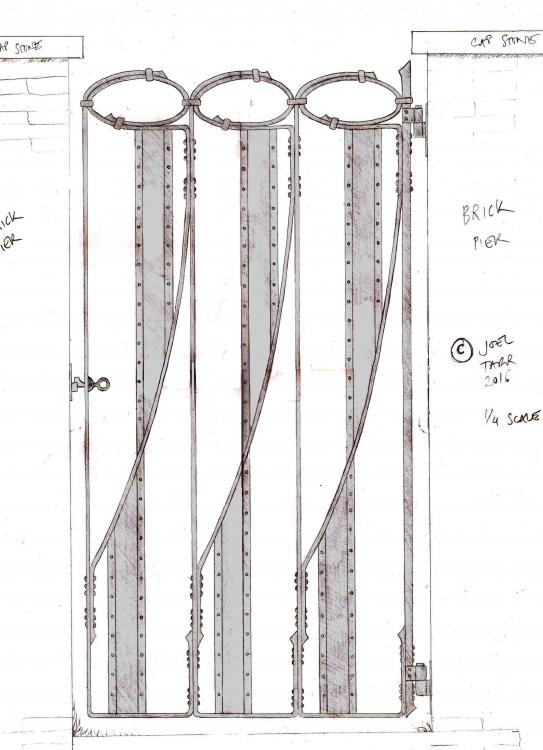
I am working on this Art Nouveau / Industrial design gate which is full of rivets and upset end finials. I've used it as a vehicle to produce a few videos, mainly on riveting, but also accurate bending of steel around jigs. The videos are very much intended for newbies looking for some general info, the videos aren't slick by any means but they hopefully contain some useful theory/techniques. The gate itself is almost irrelevant and if nothing else, you can enjoy watching me struggle. I am self taught and I've never done this before so any viewers are effectively learning at the same pace as me. I don't know if my methods are "industry standard", but regardless, what I'm doing is working and should work for others. My setups are very low rent and duplicateable, (if that's a word?), I don't have any specialist gear other than an oxy propane gas torch and MIG welder. There will be a video of collar making using my very basic adjustable jig under my flypress (this jig can also be used on an anvil, for those without a flypress) when I get to the collaring stage. Hopefully these are of use to someone... Trial and error figuring out rivet tail lengths:https://www.youtube.com/watch?v=IIikn0XOG5g Language Riveting setups and heating rivets:https://www.youtube.com/watch?v=e1r8kNiBXlM Cold riveting small rivets: https://www.youtube.com/watch?v=cT0P43Xh1Ro Upset finials and bending using jigs: https://www.youtube.com/watch?v=J2YbfAkp1es
-
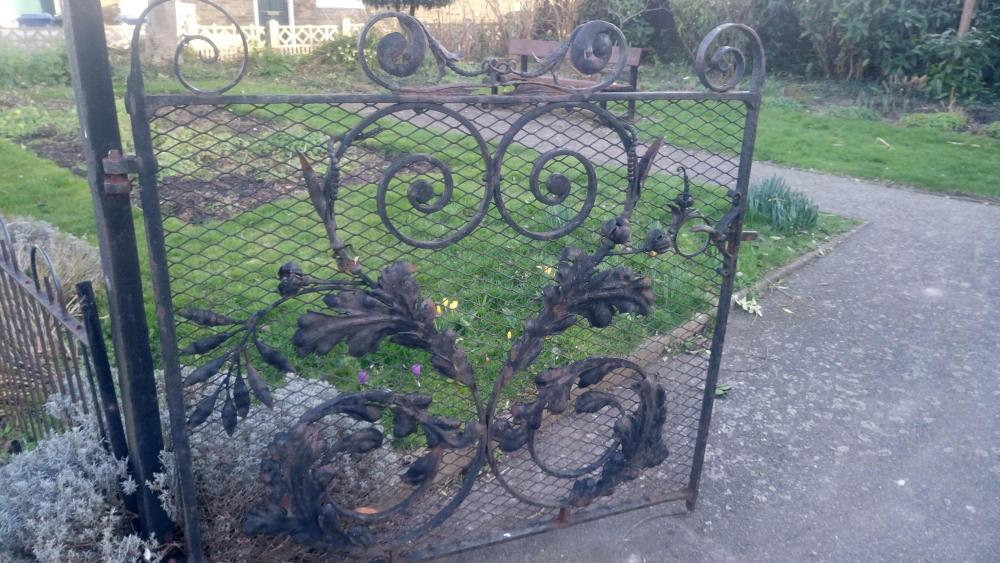
Hi folks, thanks for the input. I didn't make the point in my original post that the clients stipulated that the existing gate should be repaired and re-used as it was donated to the memorial gardens many years ago. I'm pretty sure that unless it turns out that it's vastly cheaper to just use it as a template and make 2 new ones, (then possibly salvage parts from it to decorate the garden elsewhere) that the answer's always going to be, repair it. The combination of decorative elements bemuses me a little. You'd think that if you're going to put realistic floral features in they'd all be of a theme and true to a particular plant, but to my mind there's a real mish-mash in there. There's the humourless huge leaves (oak leaves?) in conjunction with the playful seed pod things. I've had a flick through my copy of the CoSIRA Catalogue of Drawings for Wrought Ironwork which has a lot of designs of traditional English ironwork and it seems this pod detail was common. Thanks for all the technical and financial advice. Re: the finances I've definitely learned the hard way about under quoting and underestimating how long things take. I've been down to my last £5 several times. Luckily I'm starting to develop small queues of commission work or at least have other avenues of income (lessons mainly) to keep me afloat, so if it starts looking like I've got to work for a figure I don't feel comfortable with, I've got enough on to be able to walk away and say to the client and myself it's not for me.
-
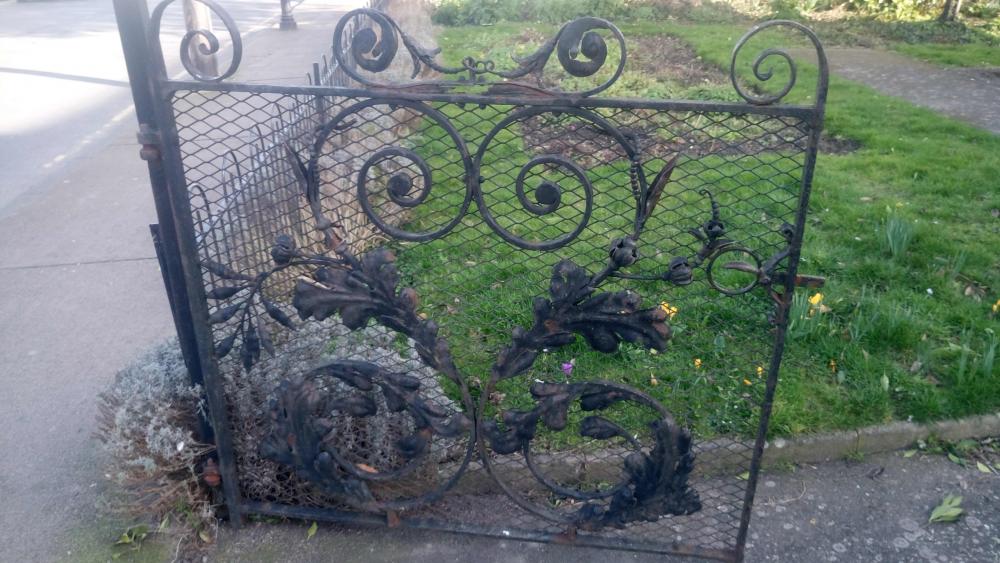
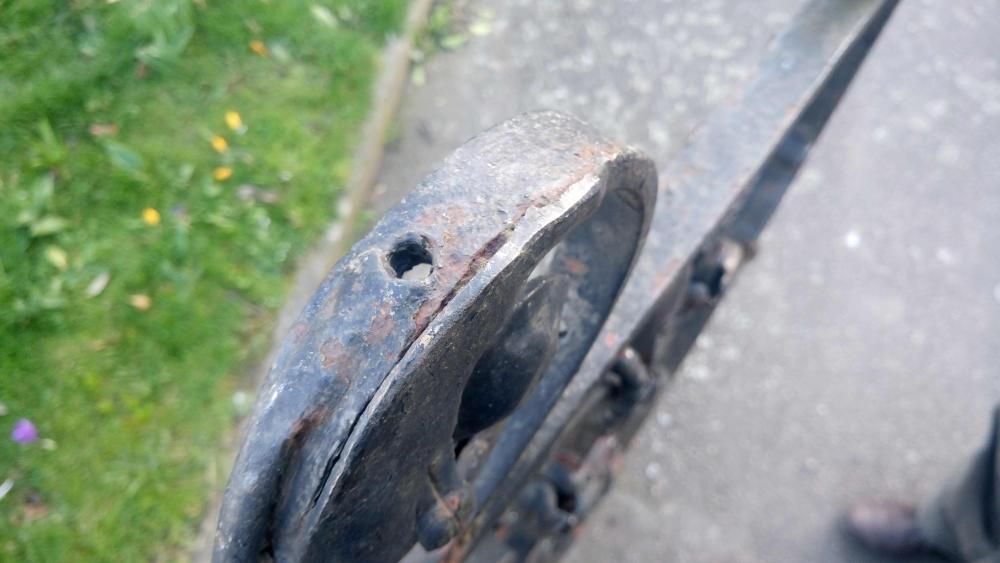
Hi folks, I have been invited to quote for a large-ish project based around improving a war memorial gardens. The style of work involved in the job really isn't my taste, but it's grabbed my interest nonetheless. Not too long ago there was a time when I would have run a million miles from a job like this as I am not experienced at forging this kind of sheet/repousse ironwork, but I am not at the point where I feel confident enough that I can figure it out and do the job right, though needless to say any input that can make my efforts more efficient will be greatly appreciated as I don't want to massively under quote and end up working for free. I would never let the job go out sub-par and would work my skin to the bones to make sure of that, especially because of it's historical and sentimental importance to the families of the fallen, though as I'm sure you can understand, I have to earn so efficiency is of the essence. This thread mainly centres around the restoration and duplication of this gate. The other ironwork involved in this project isn't so demanding. The main part of the project requires this gate to be restored and a mirror image to be made for it to become one of a pair. For now please ignore the horrible weld mesh in the background. My questions are 3 fold: 1) If this proves to be made wrought iron, can anyone give me any tips of welding the mild steel repair components to wrought iron existing gate? I have heard it's not easy. I have a stick and MIG welder, no TIG. A mirror image duplicate would be made of mild steel. 2) There is no original picture of the gate. Can anyone hazard a guess at what some of the random holes were for? That's just more of a curiosity than anything, the project doesn't require me to add in parts to where the holes are, we're all just scratching our heads a bit as to what they're for. 3) Any tips for cutting and forging the large leaf shapes? I don't think it's Tijou levels of repousse, but any pointers that help steer the boat down the river to a faster resolution are welcome. E.g my inexperienced thought process would be: precisely mark up the positioning of one leaf on the master gate, cut it off, draw around it on a sheet of equivalent thickness mild steel, add on 10% to all dimension in every direction to allow for reduction in proportions during sinking, offer up my copy to the original till it's right, then re-weld the master leaf to the master gate. If you think this sort of sheet work should only be tackled by someone experienced then I'll do what's right for the job and get a 3rd party involved. I do make the occassional bowl so I understand the essential techniques of sinking and raising. For your background info I have indicated to the project manager that I'd need to have the existing gate taken away and cleaned to reveal the levels of corrosion, work needed to repair and also detail required in the duplicate gate before I can even begin to hazarding some figures. Any extra info you feel is beneficial would be greatly appreciated. Cheers. (Apologies @John B forcing your hand to join in, but you know your trad English irownwork)


-
Haha, nope, right handed. Being self taught means you do what's comfortable. I have the bick facing the other way because if I need to get right to the tip for something delicate I haven't got to strike across myself or walk round the other side, I just side step till I'm in the right spot. My workshop is aesthetically pretty but it's a pain in the backside. The layout is pretty much dictated by where I can safely put things on the super uneven floor. It's an old sheep shed so aside from the V sloped floor for the pee to channel away there's random steps & umpteen scuffs so moving anything by trolley or jack is "interesting".
-
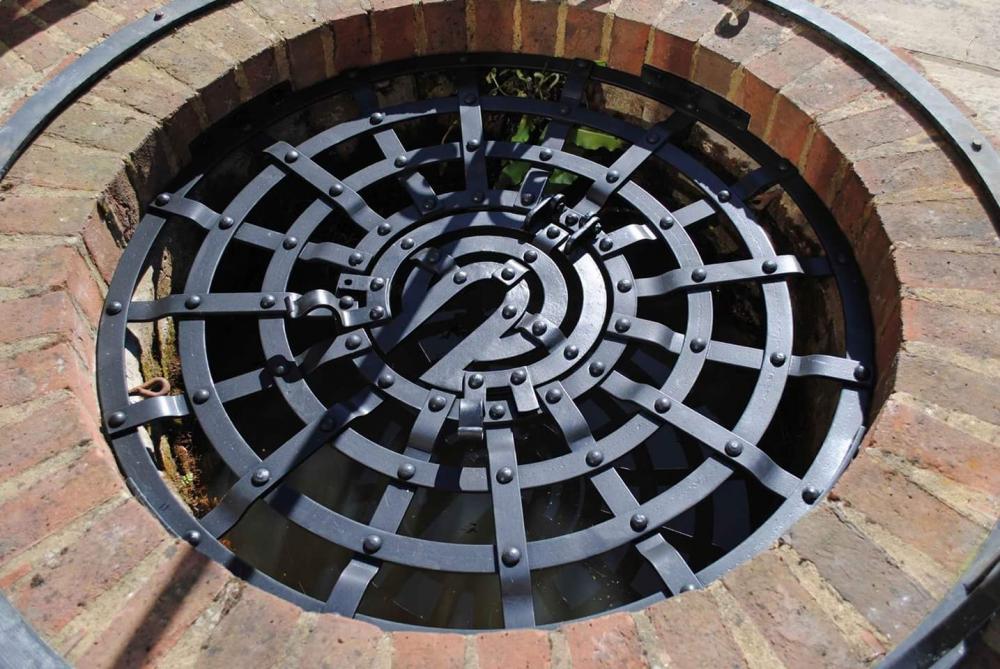
For the smaller diameter hoops/rings in this well cover I couldn't roll them as my ring roller is manual & not that strong & it would have killed me. 30mm x 6mm flat bar on edge. I made jigs to form the smaller rings hot by rolling some flat bar, on the flat, welding them to my bench, then bending the hoops around that. Doesn't matter that the central hoops aren't complete, same principal. Arc welded, though.
-
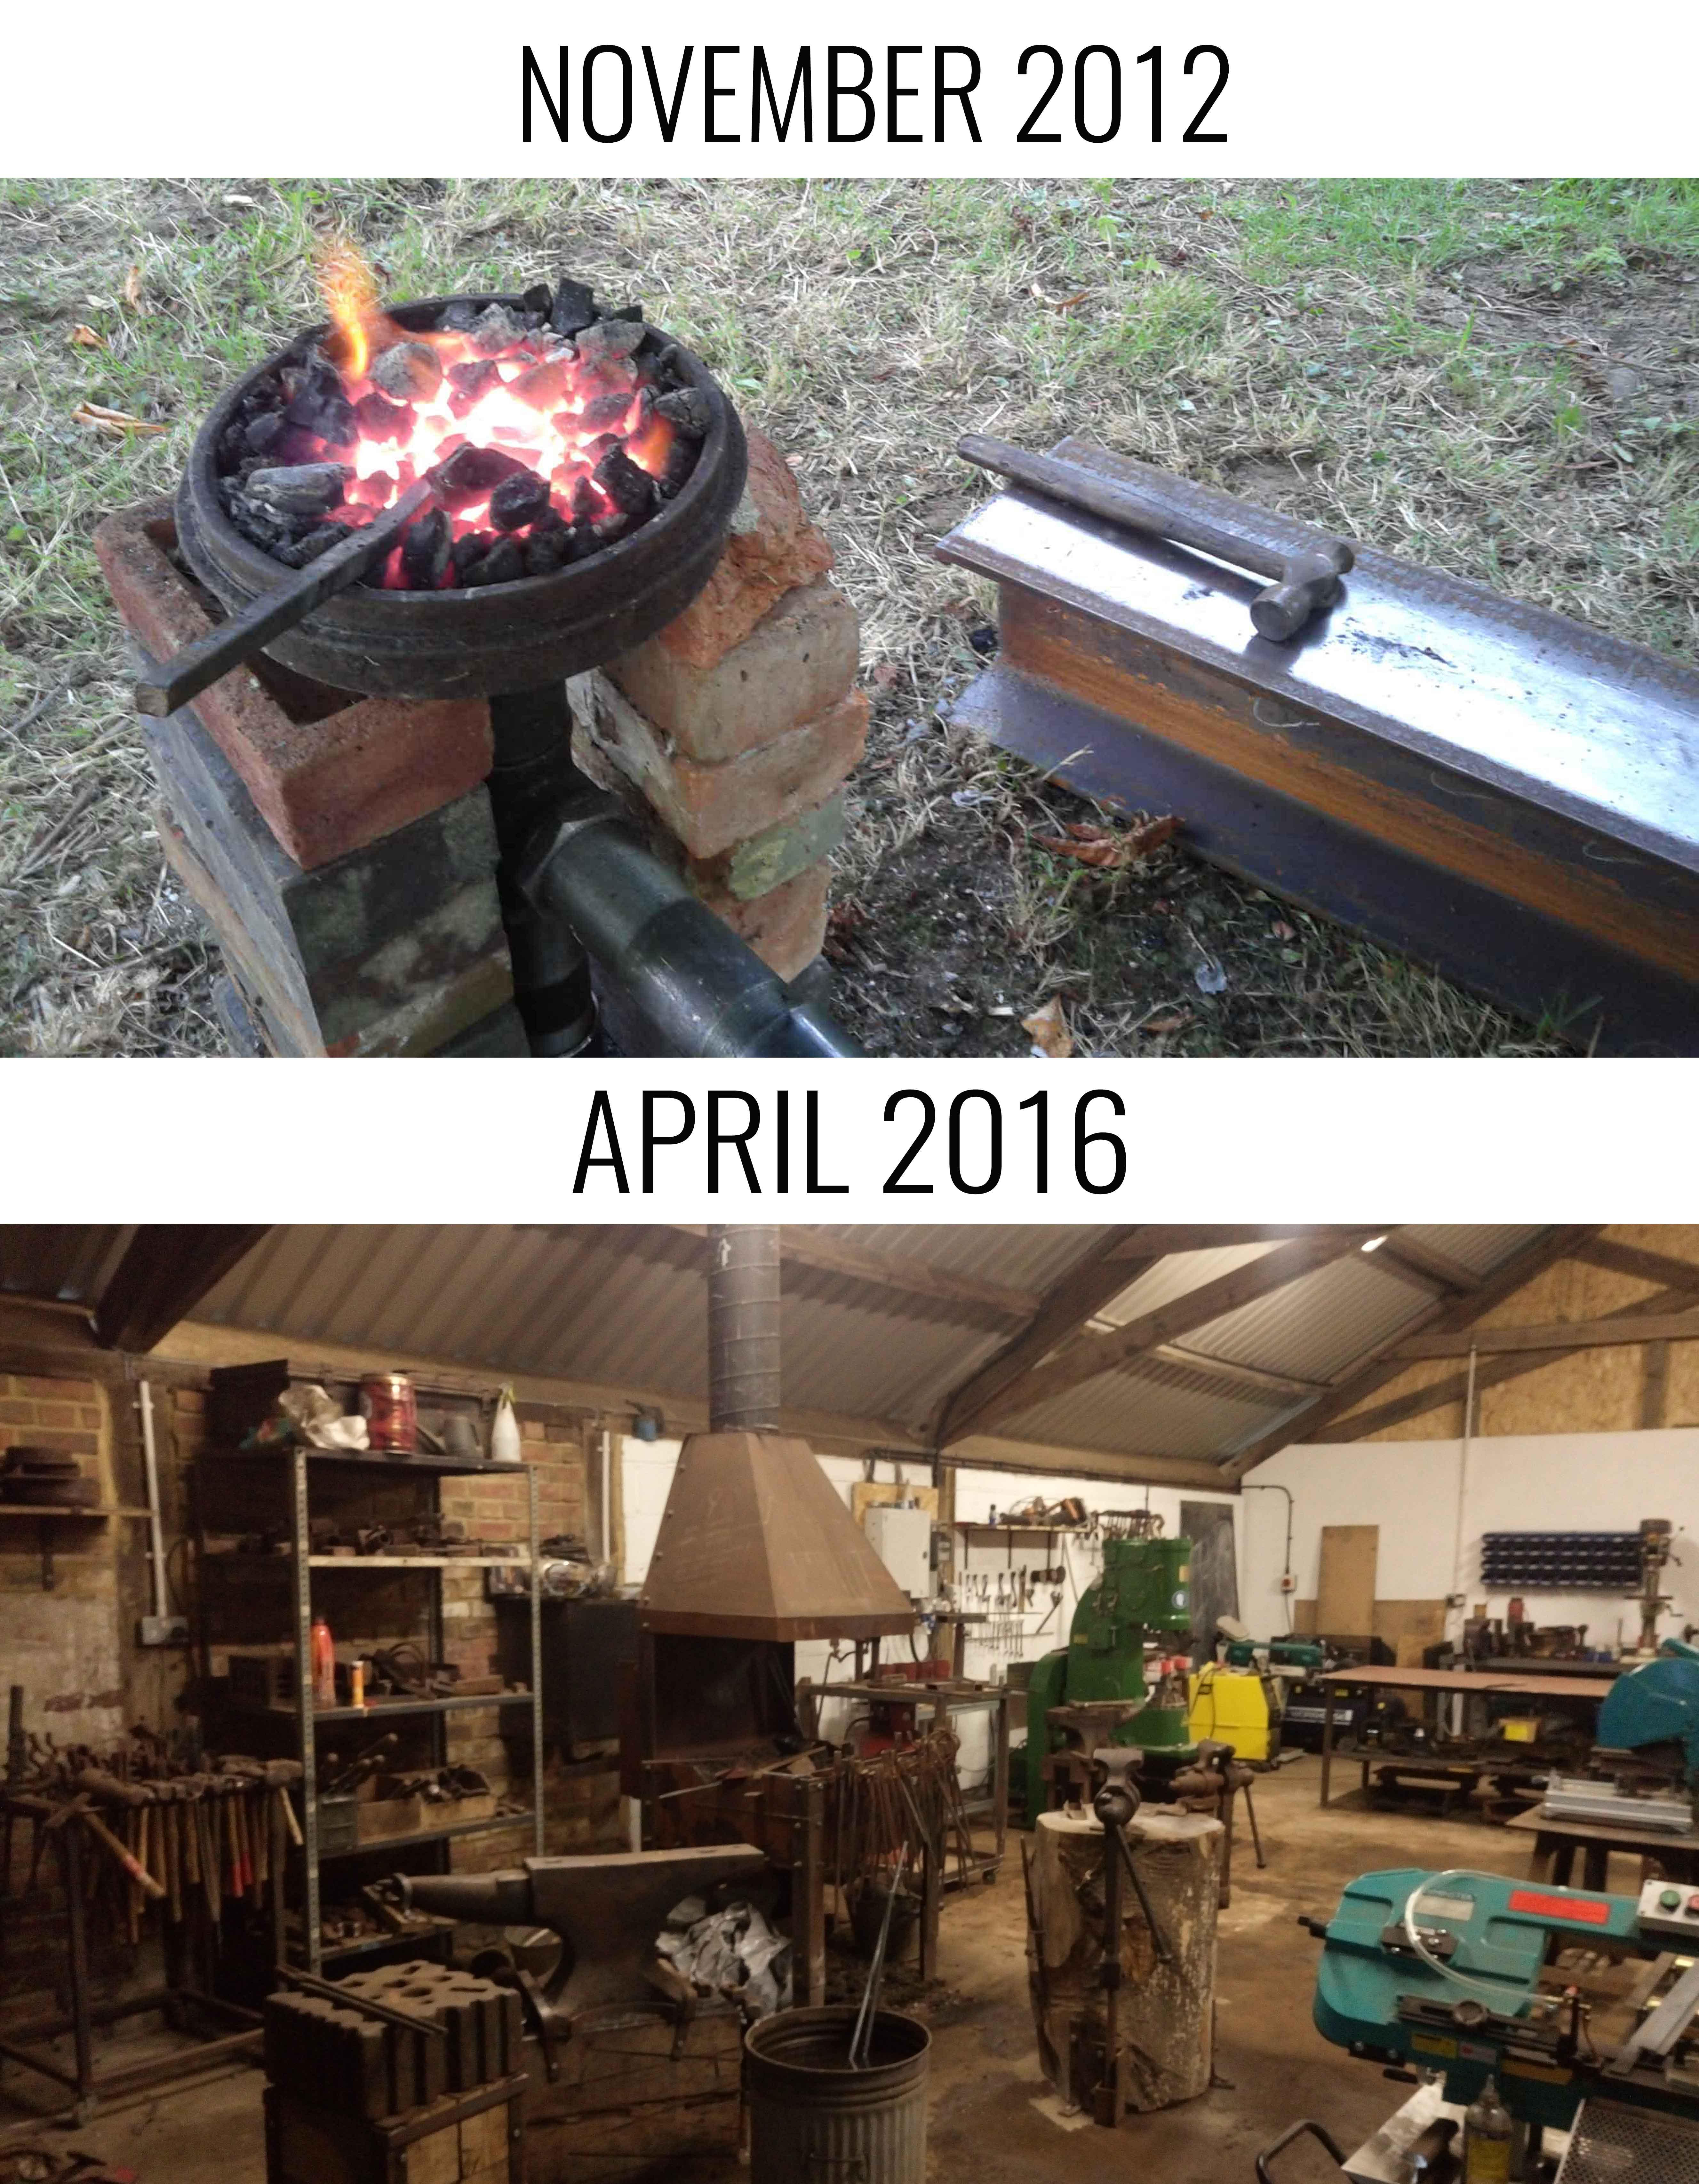
Granted this is taking things to the extreme (as I've invested everything into blacksmithing and eat/sleep/dream it) but I've put these pictures up for the obsessed hobbyist newbies who wonder if it can become something more. I don't have any natural talent, I just learned patience and the fundementals of how the material bends. I now give day lessons to supplement my income from commissions and repeat constantly in lessons Metal moves the most where it's hottest or weakest. What's not in contact with the anvil is as important as what is. If it's not in the right spot don't hit it. Accuracy is most important as it'll take you longer to undo a mistake than to do it right from the start.
-
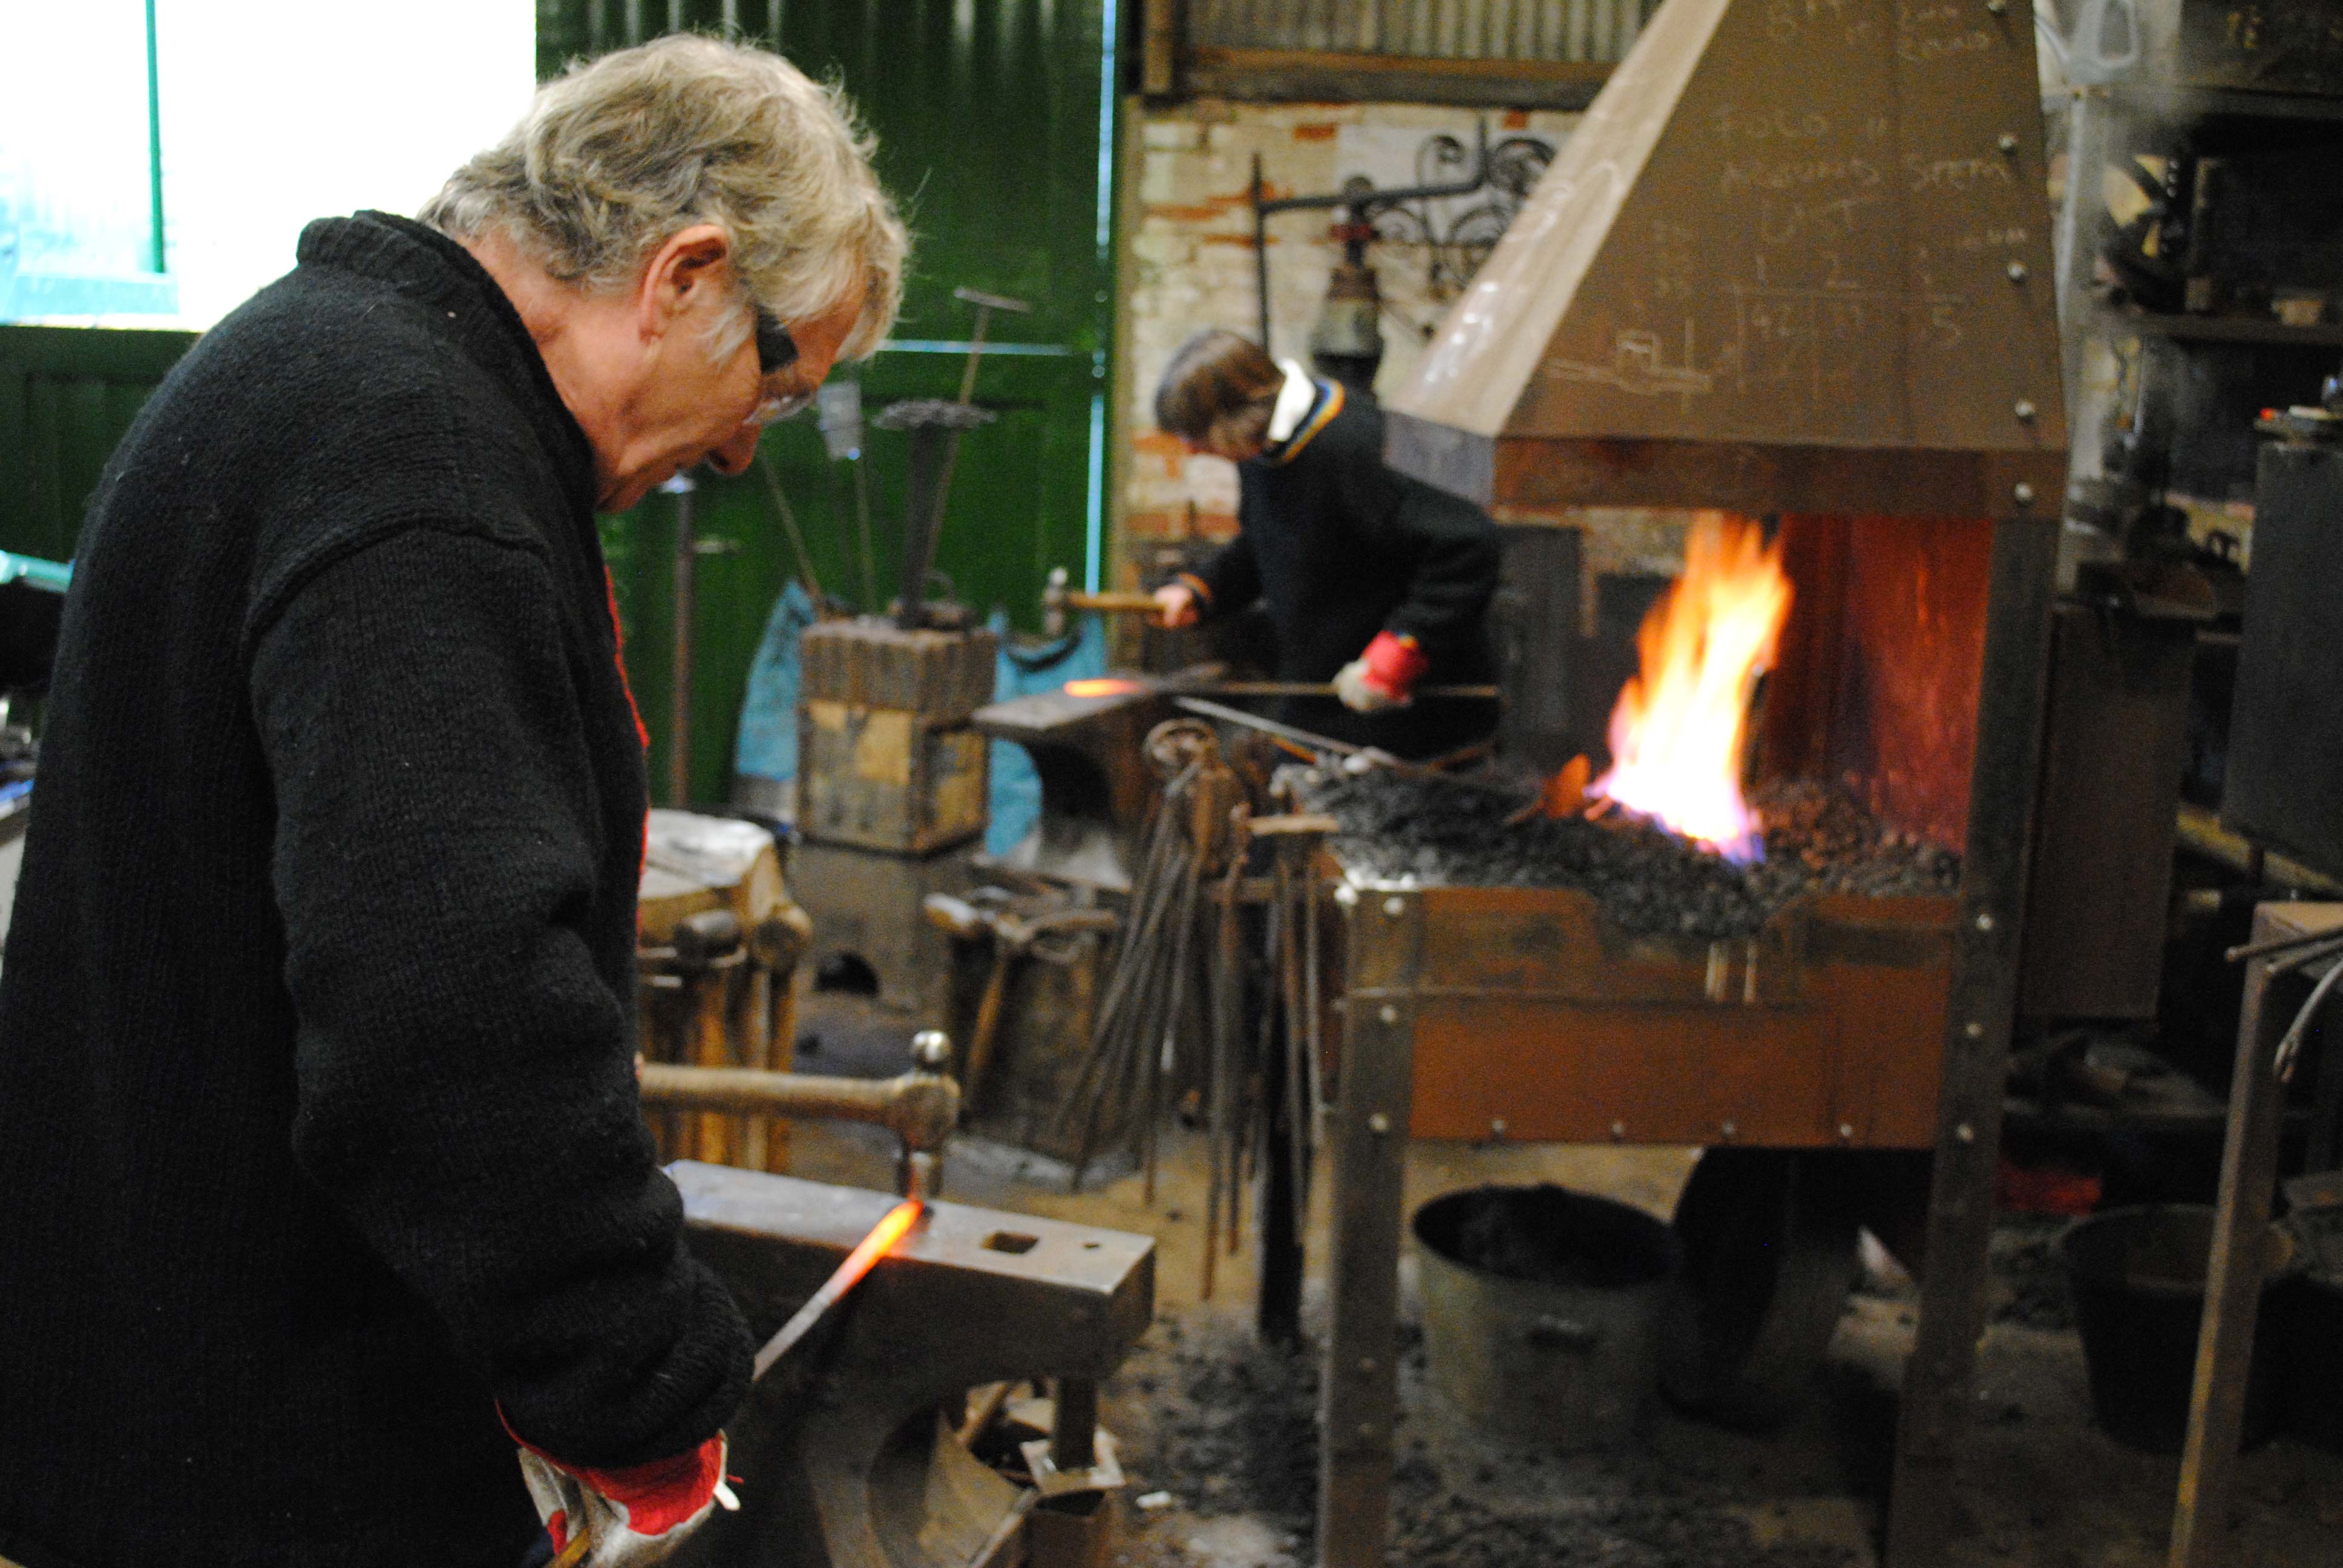
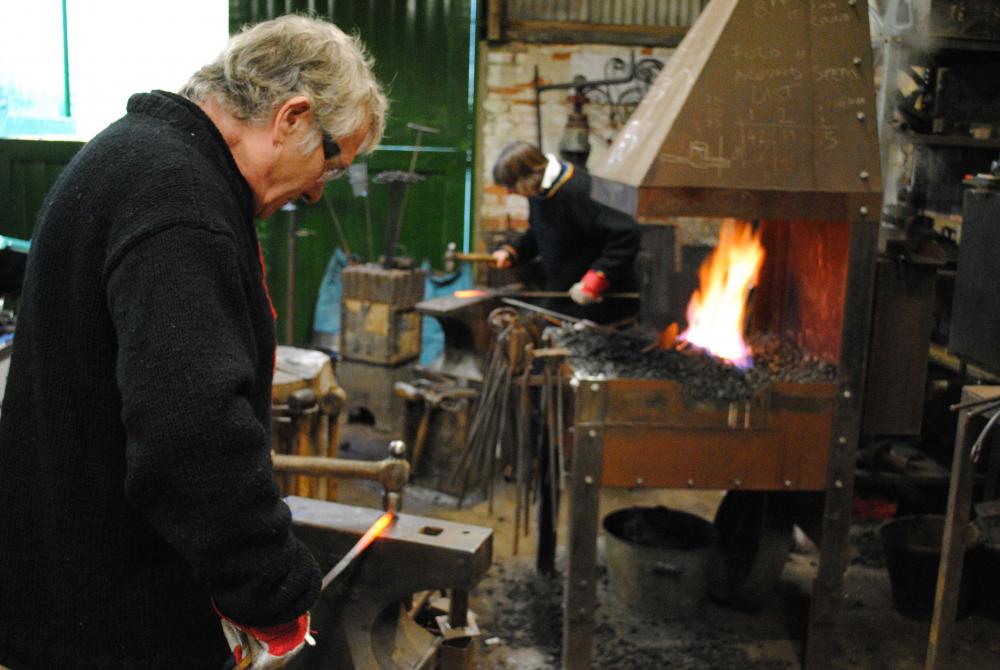
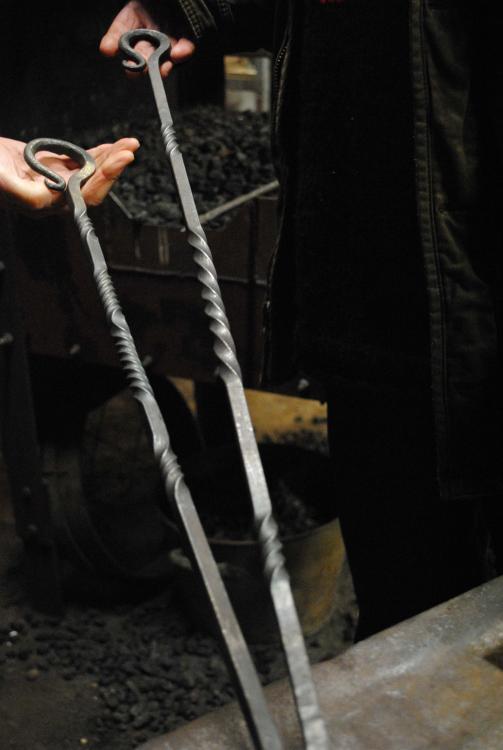
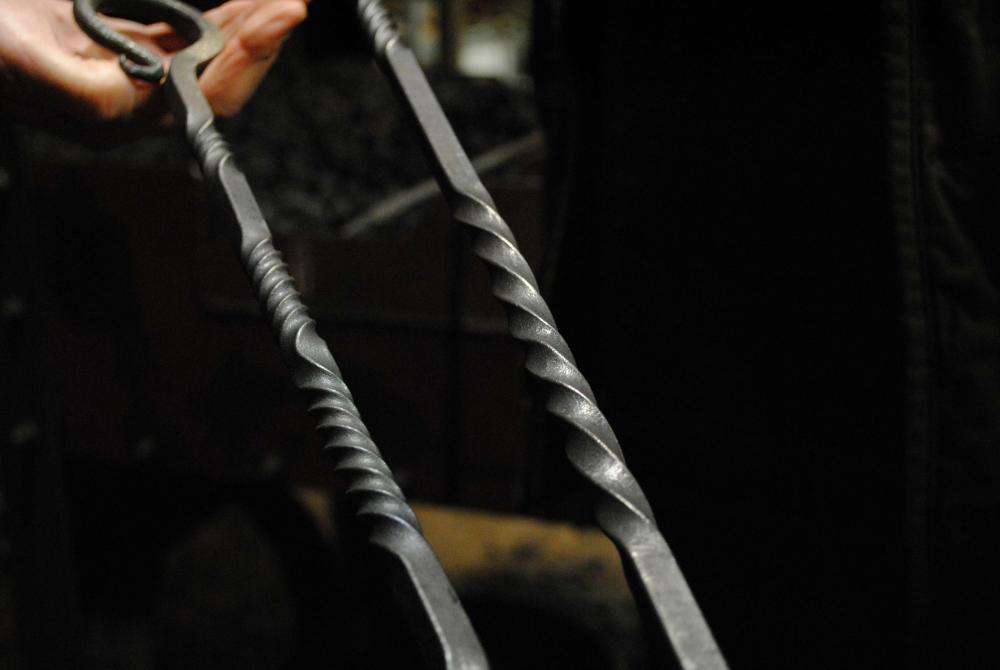
For the obsessed self taught newbies who like me began with no knowledge of metalworking, engineering, welding... Pictures from the day lesson I recently gave to my old bosses who owned the shop I used to work in when I began torturing some scrap in the brake drum. Making some traditional aesthetic fire pokers...

-
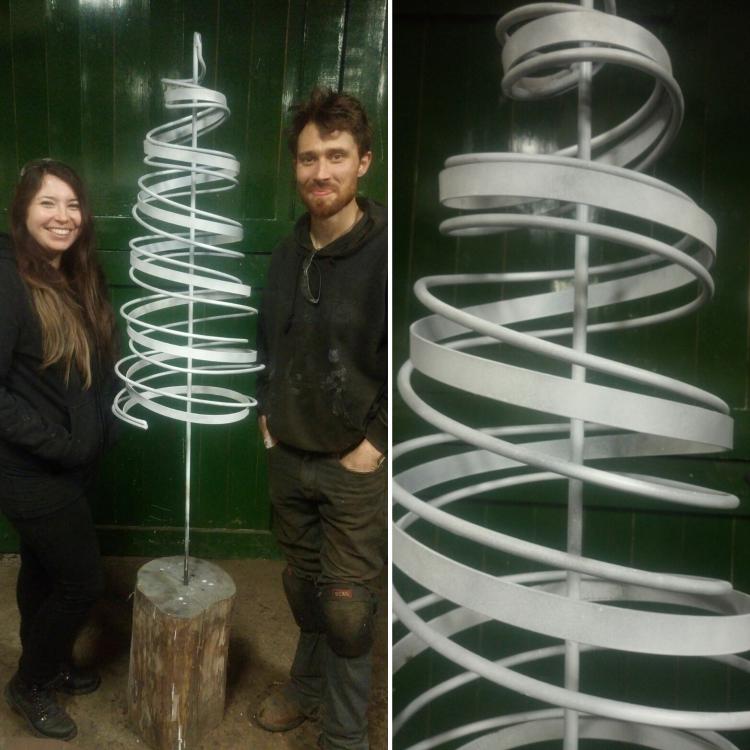
Nice idea, I bet they'd sell well too. In the UK there's a comedy TV show called QI (Quite Interesting) that's all about every day "general ignorance". I remember an episode a while ago when the presenter got the 4 panelists to draw christmas trees and only one drew the branches going the right way - they slant upwards, not downwards. I wonder if you slanted the texture upwards if they'd look odd? I certainly saw them as christmas trees. I think it's one of those things where even if it's technically inaccurate you know what it is & you either don't see that there's some a miss, or you suspend your disbelief. The wench & me made our christmas tree this year to fit in a tight corner of our small flat.
-
Great tool Jim! Do you find the socket tilts at all? Do you have to focus your pressure at the bottom of the socket to avoid that?
-
You'll probably find most people's answers will be multifaceted with one of the main considerations being their scope of work. If they're specializing in something then they'll probably get beyond beginner status quicker than someone who's a "general blacksmith" & has a larger range of processes to become proficient & practised at. Whenever I think "yeah I reckon I know what I'm doing" I soon enough see something incredible on Instagram that makes me think "I know nothing".
-
THAT, THAT, THAT.
-
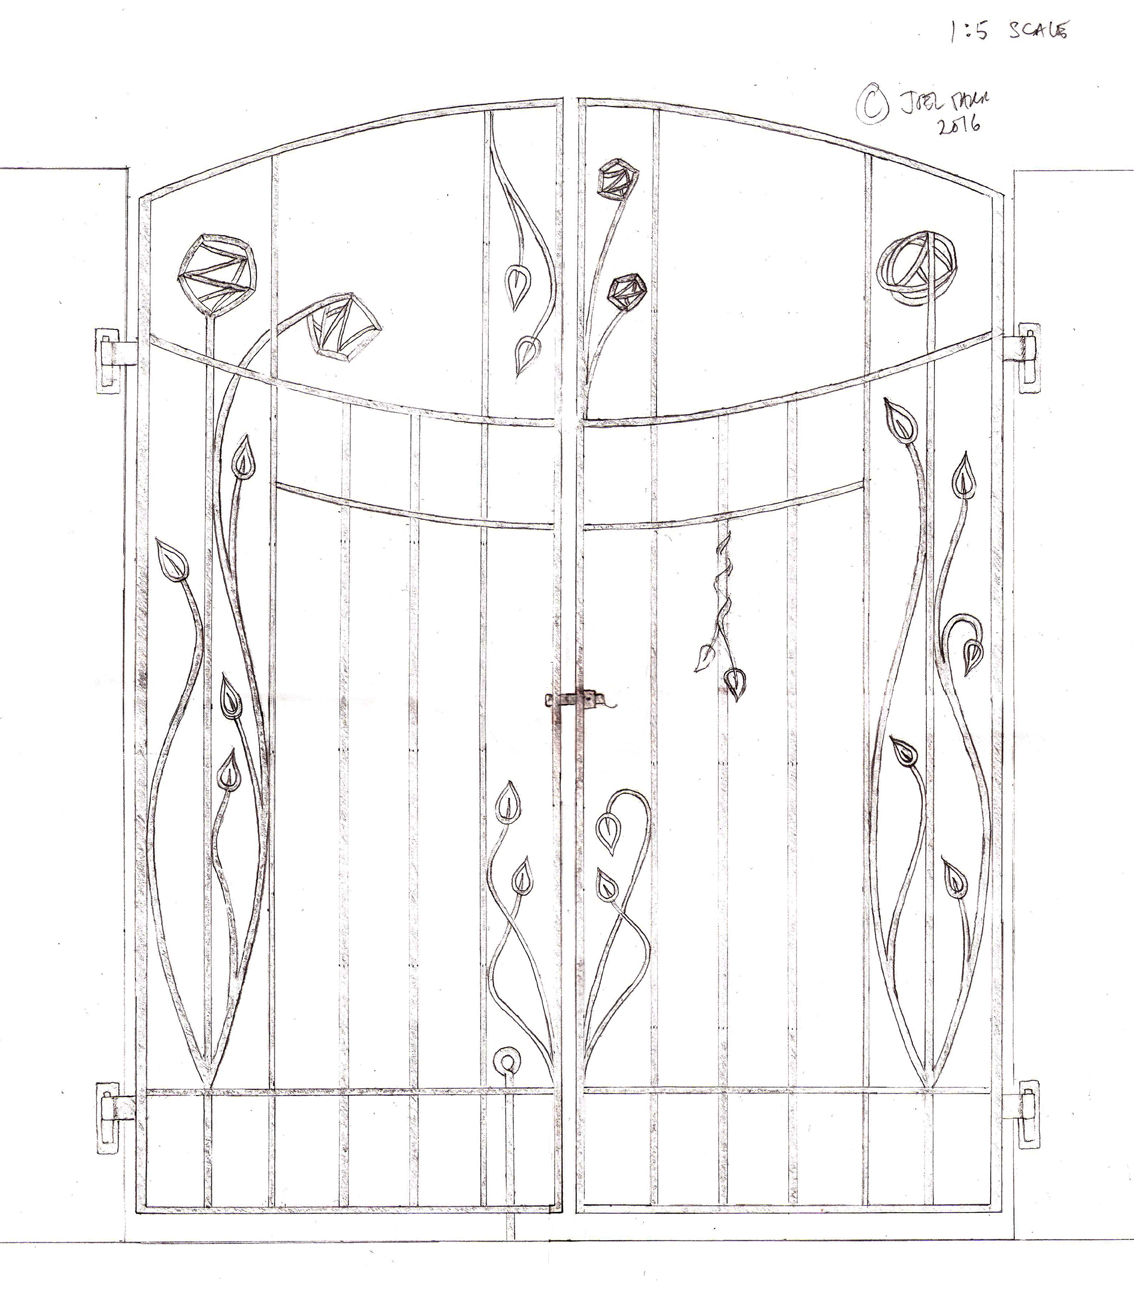
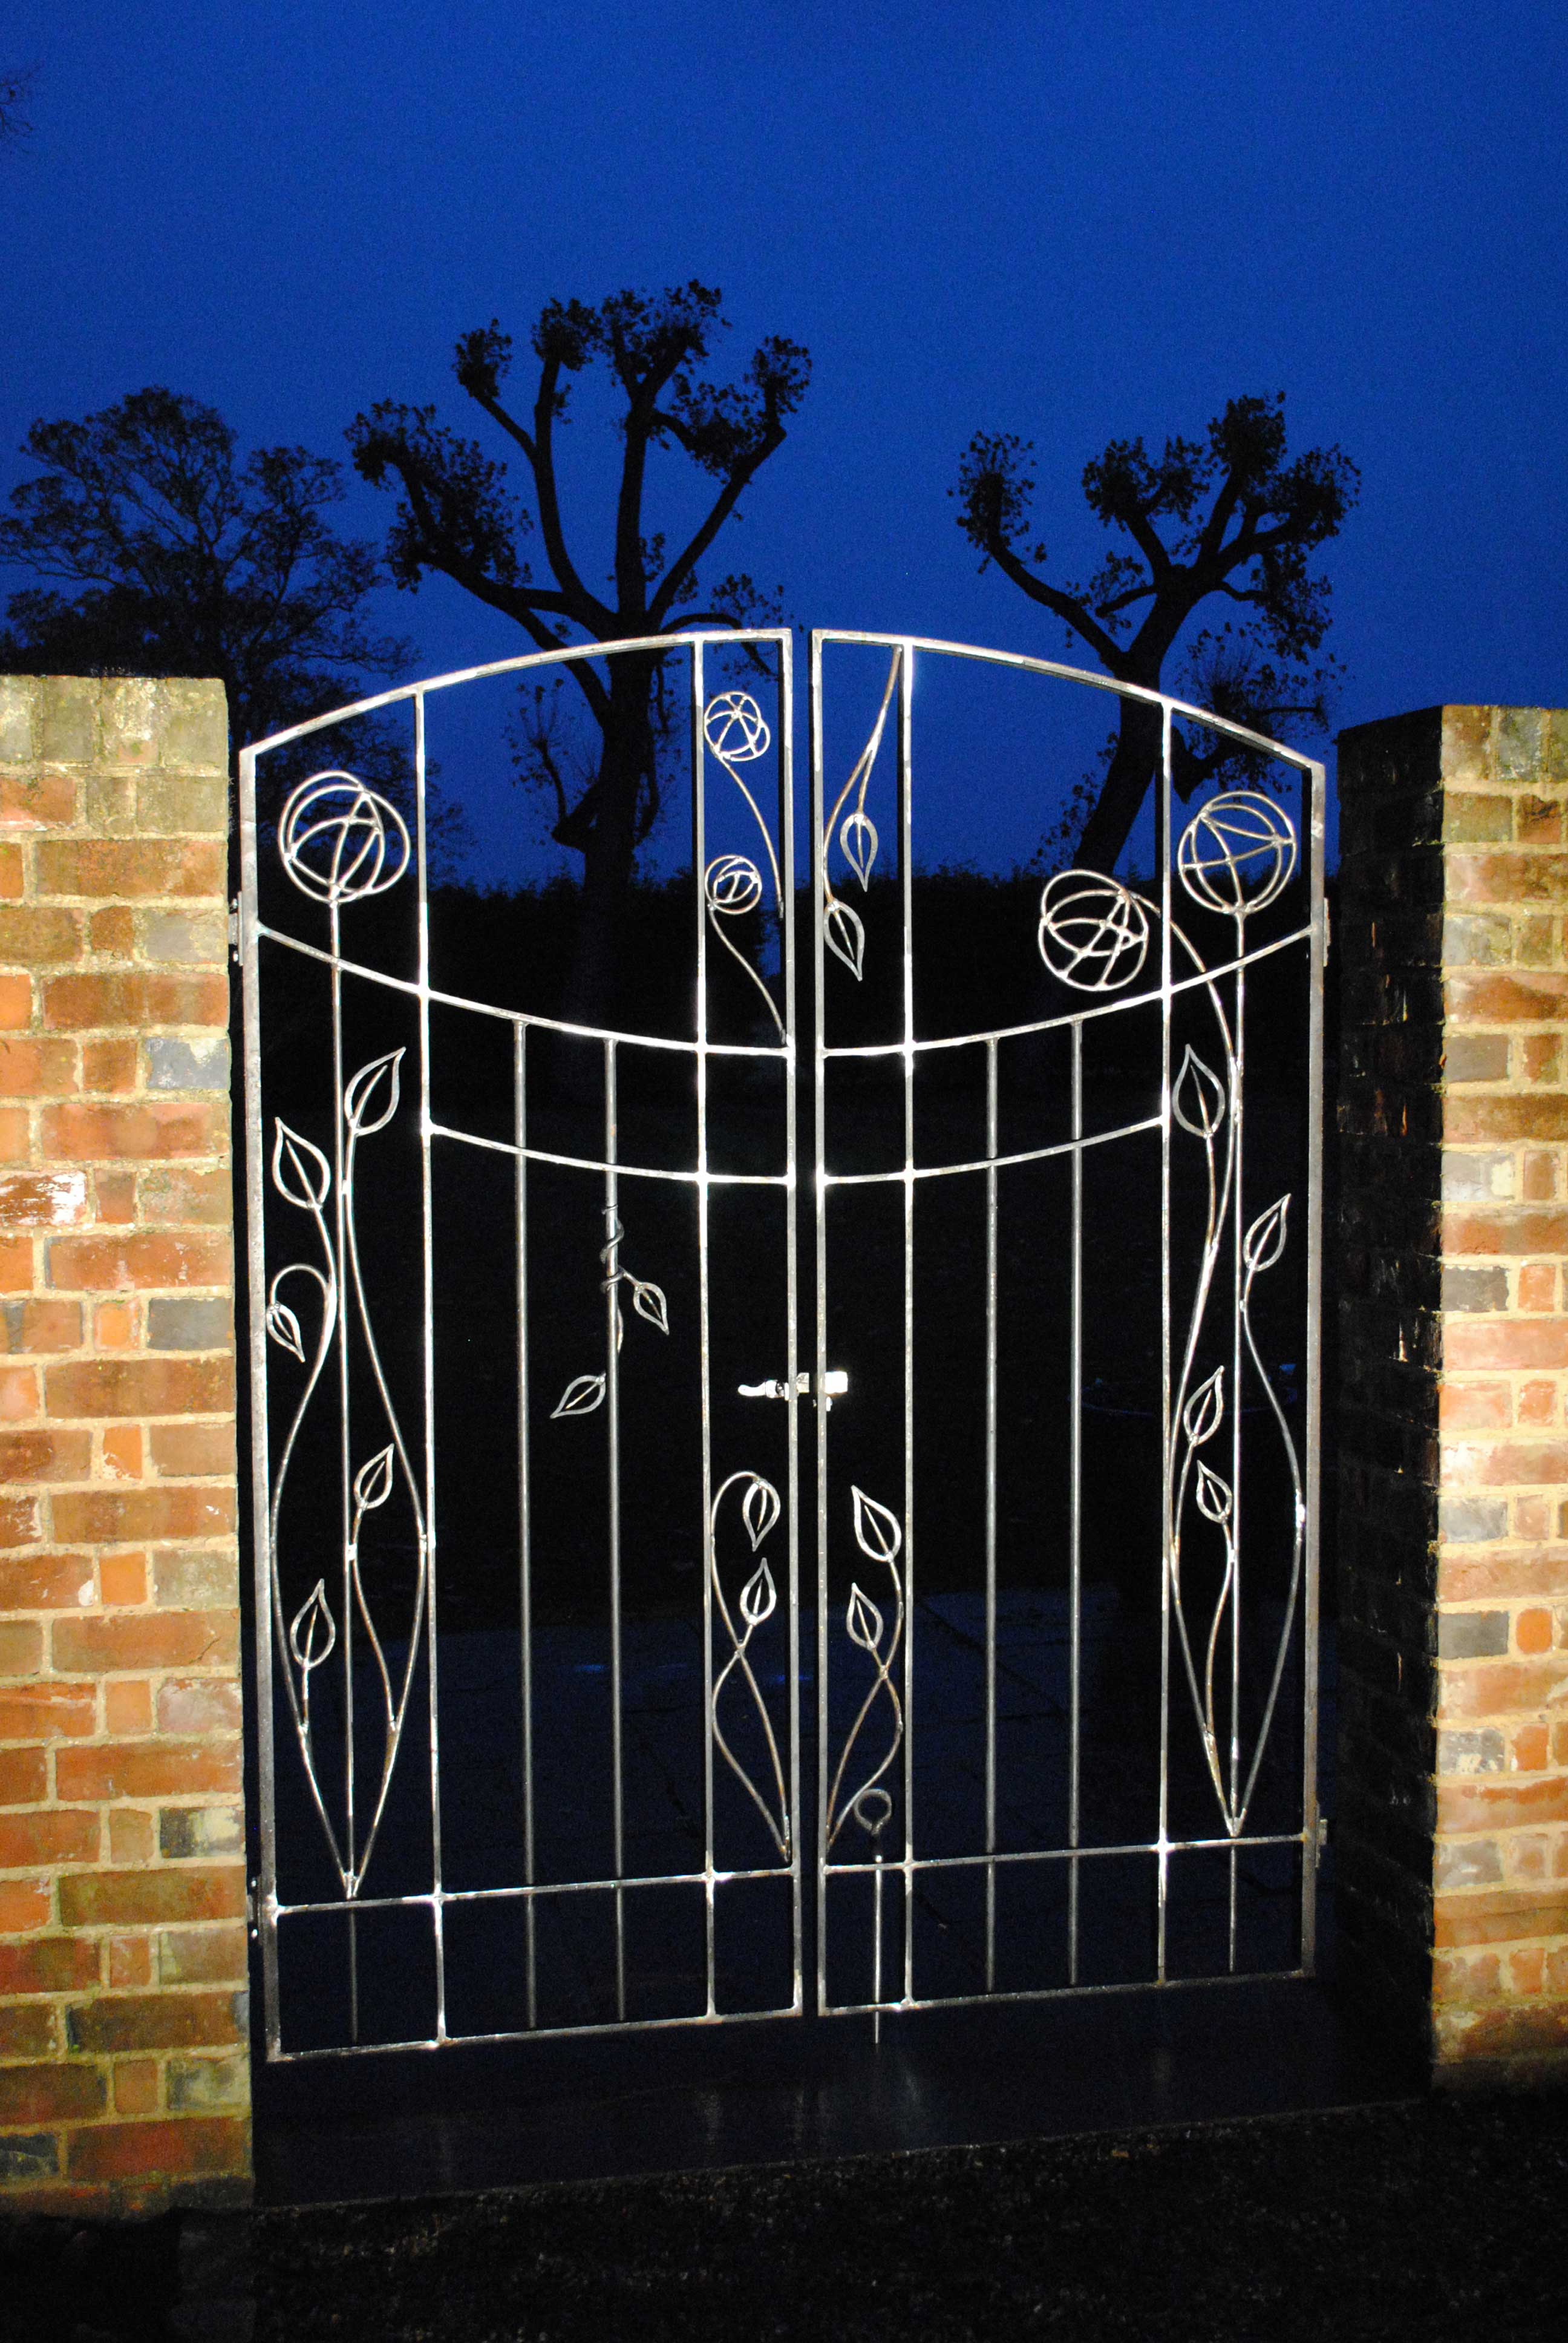
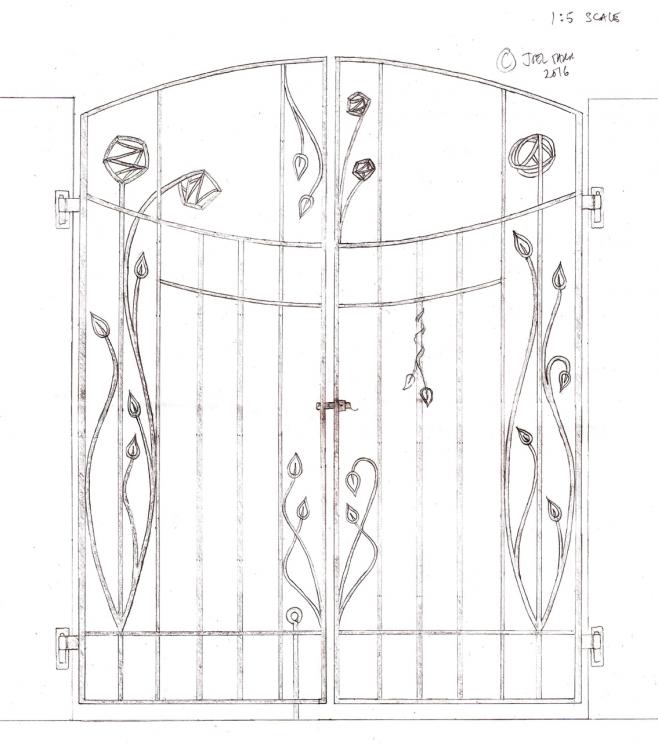
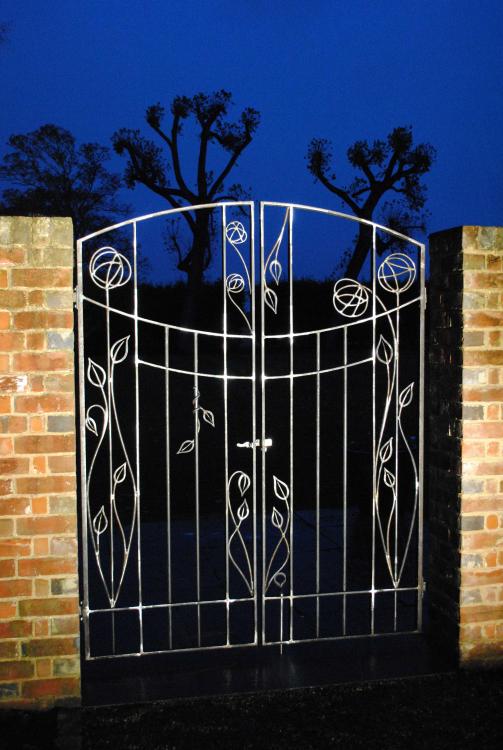
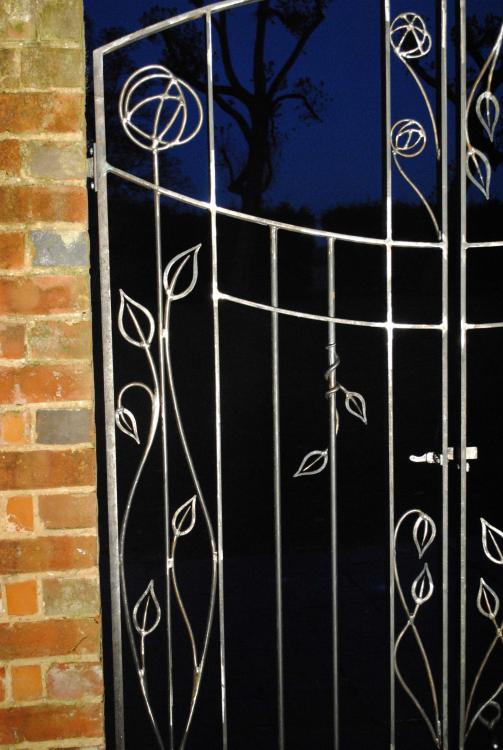
Cheers folks. Glad the vase like shape was recognized, that was the object of the exercise. I'm well and truely familiar with Mackintosh and am even planning a trip to the Willow Tea Rooms for my birthday so I can sit in his chairs, he is my hero. The variation off his style (into Victor Horta style art nouveau curves) was deliberate. My rose designs were also inspired by, not copied.
-
I've been working on some arts and crafts stained glass style gates and yesterday I had a dummy run install to check they're 100% before they go off for zinc flame spray & a green vinyl top coat chosen by the client. The client requested a small design change so the final design was just a smidge different to what I originally pitched, for some reason my original drawing won't upload so I can't post that. They're the 2nd pair of back garden gates I've done this year for clients who wanted leafy gates to keep the dogs out of certain areas of the garden - hooray for dogs. Needless to say these pictures were taken from the "back side", I didn't make them back to front. Nearly everyting was cold formed, I rolled the 40 x 12mm top curve and the 40 x 10mm lower curves. The roses and leaf stems where all cold bent but the leaves and the 40 x 6mm hinge eyes I did hot. Here's a video on the leaves... https://www.youtube.com/watch?v=RA7CiBSJk3U
-
Andy Hopper art on Instagram has some good power hammer jiggery worth a look.
-
To relieve hard edges in swages, (or even to smoothe out mistakes, welds etc), grinding your metal with a twisted wire wheel or twisted wire cup brush whilst your metal's hot is a real time saver compared to filing. Very controlable too.
-
Cheers Mr Dwarf. I have you on my radar for a visit at some point in the future when I'm headed northwards, but for now I'd ideally like to visit someone a tad more local.