DSW
Members
-
Joined
-
Last visited
Everything posted by DSW
-
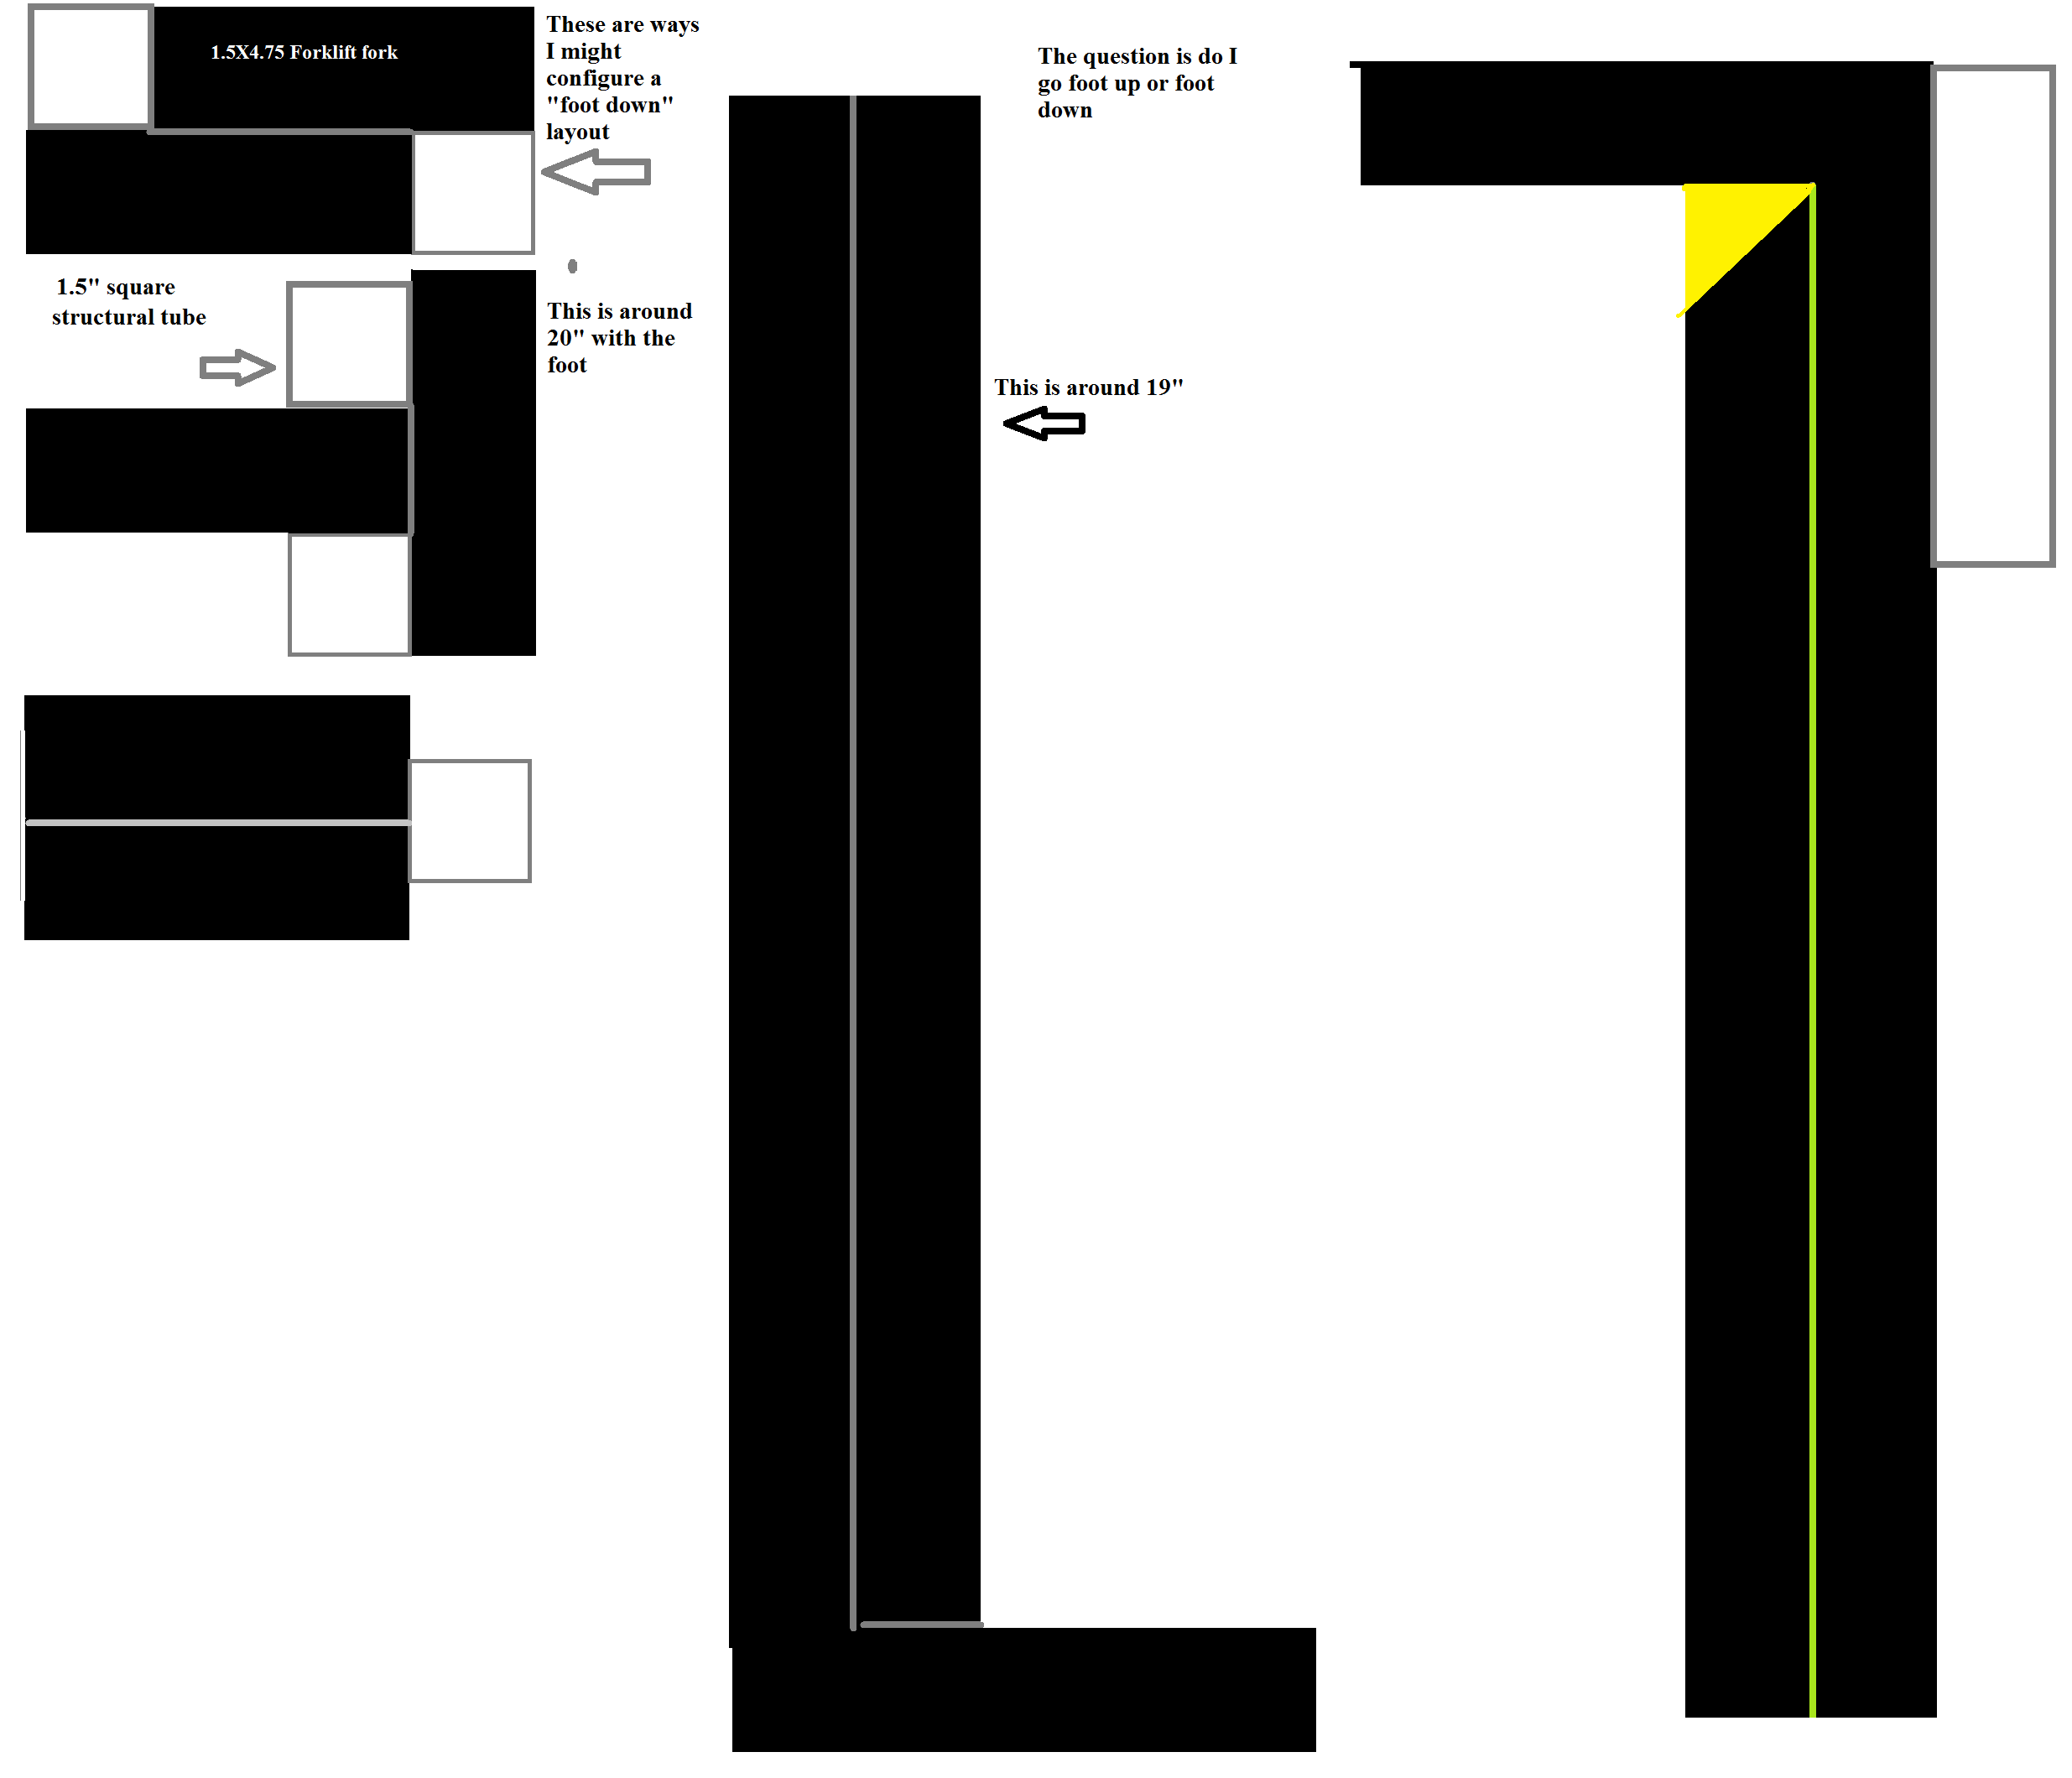
My prep to weld would be a bit different. I'd bevel the top of the one piece by cutting it at an angle, say 45 deg, and then bevel the vertical sides ( green line) with a big grinder vs simply gapping. This of course assumes the correct tools to do the prep, OA torch, decent sized plasma or abrasive chop saw to do the heavy bevel, grinder ( preferably 7" or larger) to do the edges. I'd agree on trying to find someone with a bigger welder. Even though my Maxstar 200 will run on 120v power, for this I'd want to be on 240v power to burn it in well. 240v buzz boxes aren't all that expensive usually on CL. I see them fairly regularly in the $50-150 range for the Ac only ones and the AC/DC ones often aren't much more than $100 extra. I've even seen the bigger industrial ones go cheaper than the box store home owner ones will. Ask around you may find someone who has a machine you can use or who will help you out. Auto mechanics often have welders for example.

-
Portable hole...
-
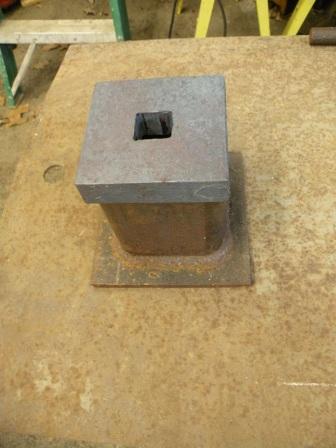
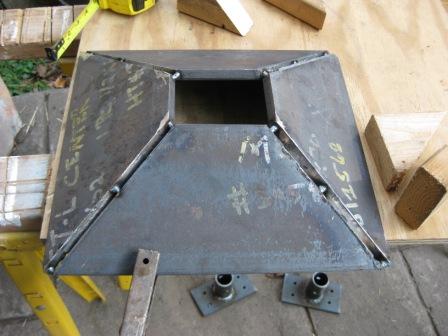
I've never tried to do a corner post that way. If I was going to try, I'd cut the 1st say 22.5 angle ( to use your example), then rotate 90 deg vs 180 and cut the 2nd one. 2nd question if I'm reading your right is about compound angles. One of the simplest ways I've found to do compound angles is to "cheat" and cut wood templates using some plywood and a compound miter saw. With the stock flat on the table, you tip the saw 45 deg to make your 90 deg corner. Then you angle the saw left/right for the angle out of vertical you want. Compound angles confuse a lot of people. If you think these are tough cut crown molding for stain grade trim...LOL As you can see with this pict of my fire pot, 45 deg mitered corner angles aren't needed with flat plate, you can but them up tight and fill the back with weld. In fact the premade "bevel" makes it easier to weld out. The 2nd way is how I did the layout for the fire pot ( though I did cut plywood templates on the chop saw and tape them together for a test demo. I knew my top opening dimensions and my bottom opening dimensions. I laid everything out from a center point. So if the top was 12", 6 " each side of center and marked the top of the bar. Bottom 4" opening, 2" on center, mark the bottom of the bar. Connect the dots. 3rd way is the "cheat" most use to cut crown molding. You set the stock in your saw at the angle it needs to be tipped over at, and then cut 45 deg corners as usual. With steel, it usually means building a custom jig to keep the stock tipped at the correct angle and clampable. with smaller stock, I've seen it tacked in angle iron to set the "tip" and then cut "normally". In this case it was a complex shaped alum extrusion used for window well grates and it was cheapest to waste the angle than mess up very expensive custom stock. I could probably have bought twice the angle needed for everything than it would have cost to get 1 replacement length of custom stock, plus the 4 week lead time to get it.
-
Angle you use on the chopsaw varies anywhere from 20deg to 30 deg depending on the size of the tube used, assuming the tubes are the same size. Angles can vary from 12 deg to 45 deg if you are fitting 2 different size tubes. It's even possible to do angles besides 90's this way. You just subtract the angle from one side and add it to the other. It's possible to do notches quite accurately this way if you know the angles. A quick search online will find plenty of posts where the angles are detailed if you want. A lot of the 4x4 guys use this to notch tube for brush bars and so on. 7018 is a great rod, but it wouldn't have been my choice for a repair. I can distort it too easily with a hammer, so it's fairly soft. Once done, it's very hard to undo the damage "repairs" like this can cause. Most of the "repaired" anvils I've seen were better before the "repair".
-
You can try PMing the original poster and ask if they can repost the picts or if they have possibly posted them on another site where you can view them. Yeah it's sad that IPS doesn't seem at all interested in fixing the problem they created that lost all the old picts.
-
http://www.msn.com/en-us/news/us/police-3-officers-killed-during-dallas-protests/ar-BBu5aky#image=1 Looks like 2 snipers shot 10 police officers and killed at least 3 this evening in Dallas at a "Black lives Matter" protest. You can bet things are going to get pretty ugly for a while. Hopefully we won't have open season on the police else where. Prayers go out to the friends and families of all the officers involved. Also hopefully now some of these instigators and the media will shut up and quit soaping things up every chance they get.
-
I have a couple of general thoughts as well. It would probably take me longer to do the ends than actually bend the scrolls, assuming I made a jig for bending ( and with a batch of 100+, a jig would be the 1st thing I did.) Second thought would be I'd want to do these on a gas forge vs coal. That way I could have 3 or 4 in the forge heating while I was working on one and I wouldn't have to worry too much about burning up things if I got distracted for a minute or 2.
-
POt itself looks like it might still be in reasonable shape. It looks like the tuere is what is broken. You might be able to drill out the old bolts and retap for new studs and salvage the pot and clinker breaker. As far as the tuere, that would depend on how good a welder you are, but it should be possible to fab a new tuere if need be.
-
My 1st thought would be to cut out some stars from flat stock and use them to make yourself a top and bottom set of dies to form what you want. Something similar to doing a ball or acorn die. Once you get the rough profile forged in, you can forge in more details with possibly a 2nd set of dies. I wouldn't try to punch out the whole center of the star, I'd just punch a round hole to hang it up with. Of course you could go at some heavy bar stock with a mill or grinder and shape the end of a punch like a star and try that as well.
-
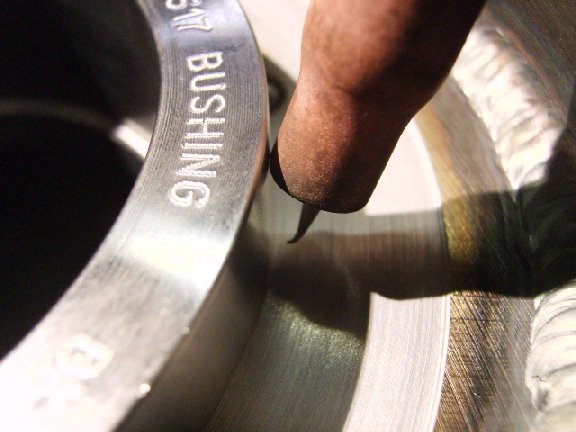
Pict of a bent tungsten from a guy I know who does this on another site. Used to get into tight spaces to do fillet welds.
-
We'll give you the magical secret trick answer, but 1st you have to give us the secret handshake and get out your decoder ring... Oh and then we have to kill you. Sorry, you know how it goes... Rules.
-
I've searched but I haven't located any good info. I'm trying to figure out what sort of demos etc as well as what is available as far as camping / hotels for Quad State. I've been thinking of trying to combine a trip out to visit friends out in Wisconsin /Illinois with Quad State this year. I'm looking to see what demos etc there might be and on what days, so I can do a bit of planning. I'm trying to decide if it works better to hit Quad state on the way out to visit them, or on the way back. I figure the 1st day at Quad State is the best time to hunt for goodies tailgating. If I go out to see the friends early, Friday at Quad state is easy. If I go to Quad State 1st, I'd either need to leave early to see friends, or plan to stay all three days and work that stay into the costs if this makes sense. In theory I'd want to see my friends on at least one day over a week end so other people out there I know can come when they are off work. I'd then spend a few other days with them forging/welding. I'm not sure if finances will allow that much time however if I have to figure in all three days the weekend before or after to make Quad State work. Anyone have a link that has more info besides the one on SOFA's site that just lists the dates ? I remember finding one site that had the info from last years event but I can't locate it any longer so they may have pulled it down.
-
Notches, chisel marks, punch marks etc can often be felt even if not seen. When using jigs, stops or reference marks on the jig/table can help you with repetitive bends. Your reference mark may not even need to be in the heated area. It might simply be the end of the piece pushed up tight against a stop, or a mark on the stock you align with a specific part of the jig.
-
Ah they were card carrying members of the "Self Help Society" and they decided to help themselves...
-
Did you read about the one who broke into the house and then got beaten with his own bat? I wonder if it wasn't one of those dangerous alum assault bats since it was black... http://www.nydailynews.com/news/crime/would-be-burglar-florida-beaten-bat-article-1.2690988
-
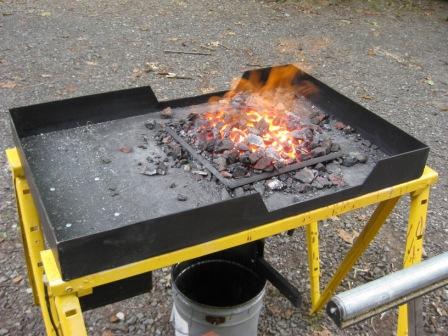
I hadn't really given a whole lot of thought to simply making up a temporary "dam" to close off the far side when not in use, but it makes a lot of sense and very easy to do. Thanks. Every year mine evolves in some small fashion. That might be the one for this season. The idea of replacing the fire pot with a shallower one is another interesting twist. Personally I have too much time/effort in building the one I have to simply swap it out for a different job, but it's certainly thinking outside the box. Not a bad thing overall.
-
Your fire pot looks deep, maybe 5-6" based on the 2" side angle. That plus the 2" angle may put your steel above the sweet spot in the fire, or cause you to build a larger than needed fire and waste fuel. I cut two "depressions" in mine on opposite sides that roughly correspond to the raised "lip" on my fire pot. That way I can get my steel down where I want it in the fire. Down side is that with long stuff I'm occasionally knocking some coal/coke out when I put stuff in the fire, but it's not much if you pay attention and keep it raked in tight. My pot is about 4" deep and the top of the pot is maybe 1/2" below the cutout shown. That seems to put the steel roughly in the sweet spot of my fire on average .
-
Might. I use my bandsaw for cutting most heavy sections. My preference being the stationary horizontal bandsaw, but I often use my portaband in the field. If the material is hard it may damage the bandsaw blade though. I usually "test" materials I'm not sure of. Usually that means I'll take a regular hacksaw or file to it and see if it cuts. If I can cut it with the hacksaw, the portable bandsaw will cut it no problem. If it skates and won't cut, then It's hard and I'll choose some other method of cutting. That way if I damage a hacksaw blade it's no big deal. As far as the chop saw goes, orientation of the stock can make a big deal on how well it cuts. For example 1/2" x 4" flat stock. If laid flat in the 4" direction, it's almost certain to load the blade and take forever to cut. If stood on end instead, so it's only 1/2" the blade is trying to cut, it will cut much better. Angle iron can be set on a ^ to cut better. Not always an option but something to keep in mind.
-
Keep this in mind. Abrasive chop saws often don't cut "thick" stock well. The waste can't clear the cut and it smears and loads the blade matrix. At that point the blade won't cut well at all. Once loaded up though the blade will not cut well until the loaded surface is removed. Just like with a bench grinder you may need to dress the wheel to expose new clean abrasive. A waste chunk of concrete or hard stone will often wear away the loaded part of the wheel and restore it's ability to cut well again. Looking at the pict with the ruler in it, I'd have to rate those rods as "thick" and easily able to load up an abrasive saw blade and reduce it's ability to cut well. I'm betting that, not necessarily being "hard" was the problem.
-
I was going to make a comment about you running around in spandex and cape with a hammer there Frosty, but spandex would be a lousy material in the forge. 2nd thought was leather, but that gave me a vision I'd dearly love to get out of my head. Maybe if I wash out my eyes with acid it would help...
-
-
The dragons I've seen done with tongues all had them forged out, then tig welded in place. You could also change the design and use an open mouth and use that as the opener, sort of like the "claw" style openers vs the loop style you are using now. That would give you a lot of foam around the mouth after you open the beer possibly.
-
Thomas, Thomas, Thomas... Obviously you need to go back and retake, Evil Villains and Extortion 101 again. 1st hold the world hostage with your evil ( death ray, nuclear weapon, plague, army of zombies, devise designed to sink the British isles, remote controlled asteroid of destruction, etc.) #2 demand that they pack up all of the anvils, post vises, power hammers etc and deliver them to your island. #3 sit back and enjoy the fruits of your nefarious scheme while laughing insanely. ( twirling mustaches having gone out of style along with the dark cloaks at the end of the 20th century) Sheeze just what is this world coming too... They just don't make evil villains like they used to. The standards have just dropped so low since they discontinued lashings and floggings as a means of incentive. By the way, just how well does the volcano work for heating stock?
-
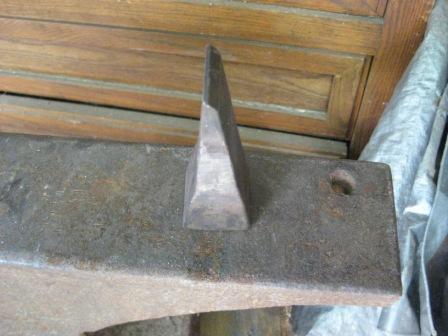
Mine started out as a left over piece of 1 1/4" 4140 that I necked down, then upset in a swage block so that it fit my 1" hardy hole. Then I drew it out and shaped it.
-
here's mine.