DSW
-
Posts
2,161 -
Joined
-
Last visited
Content Type
Profiles
Forums
Articles
Gallery
Downloads
Events
Everything posted by DSW
-
I like that idea as a portable vise stand. I hadn't thought of that one before.
-
I thought about that as well. I have a few spline type sockets for driving torx bolts that might work also. Hey they are Craftsman. Lifetime warranty right?
-
I'm wondering about a wipe on polyurethane finish. If need be you could add some black to the finish to darken it some. Easy to touch up if need be and pretty durable.
-
Oooo! Now I need to make up a multi faceted drift like that. I wonder if I can find a splined shaft with a 3/4" to 1" diameter. I wonder if I can get away trying to drive a hot drift thru a box end wrench to form a splined drift.
-
i built a tripod hoist crane for job lifting off road
DSW replied to angiolino's topic in Member Projects
I forget how to do the exact calculations, but bending/ buckling is going to be the big factor in this. It's member length / diameter and then the stiffness/resistance to buckling comes into play. That's why you can stand on a 12" 2x4 stood on end with no problems, but try the same thing on a 12' 2x4 and it snaps in half and collapses. Larger diameter is usually stiffer than heavier wall thickness. one other thing to take note of is the tension members shown at ground level in that picture. That will keep the legs from splaying out under load. With a load of 2 tons, I wouldn't count on ground contact alone to stop the legs from splaying. the tension members will be critical. -
Hammer size will depend on who is using it. 8-12 would be fine for me, but might be on the heavy side for a younger kid. Different people like to have someone strike in different ways. I did a lot of splitting with sledge and wedge as a kid, and have driven a ton of pins doing concrete work using sledges over the years. However when I was asked to help strike at one of our meetings on a demo, I got a crash course in how the smith wanted me to strike. One hand on the end of the handle, one hand up near the head and it was sort of a pivot motion, vs a swing like I'd have normally used. It felt awkward for a while, but wasn't so bad by about mid way. ( Sorry I wish I had a better way to describe this)
-
I'd say you did pretty well for #2. It took me quite a while to avoid the stem cracking at the connection to the leaf. One thing I learned is that there is an "up" and "down" to these as you make them if you are doing the 1/4 turn neck down. The stem is offset to one "side" of the stock. I was often turning the stock any old way when I put it on the anvil after the initial neck down while drawing it out. That caused the mass at the end to move up and down a lot as I needed to straighten it out, and I'd have a lot of cracks. Once I realized this and kept the mass supported on the anvil while necking down, I had a lot less straightening to do, and a lot less cracks to deal with. Spreading some times still gives me issues. I spread much better on the near side than the far side of the leaf for what ever reason. I have to really pay attention when I spread the far side to get them even. I see a lot of pitting on the back of the leaf. I'd brush your stock more to remove scale and make sure you keep the anvil face clean. I'm betting what I an seeing is scale beaten into the stock.
-
anyone doing this with their kids?
DSW replied to natenaaron's topic in Blacksmithing, General Discussion
stupid disappearing text again... I'd disagree about plasma cutters and welders. I know plenty of guys who have taught their kids to use these at an even earlier age with supervision. Boy scouts allows kids to work on their welding merit badge at those ages. I think I was 11 when I started welding in shop class as well as working with power tools like the bandsaw and table saw ( though we needed to ask permission any time we wanted to use the table saw). A plasma cutter or mig welder is a lot safer to use than a power saw or OA torch I was using in shop class. Forklift, I'd have to know the circumstances of it's "use". I could certainly see them driving it from A to B around the parking lot no problem. I'd probably have issues with them lifting objects with weight, or racking items. I know I was envious of my one neighbor who was able to drive a truck on the family farm at 11 or so. Granted it was usually driving in a straight line following the tractor, or moving the truck across the field to the barn so that someone else could unload it. I think a lot of this depends greatly on how kids are brought up and how mature they are. I know Jr's and Sr's at the tech school I wouldn't trust with power tools unsupervised. On the other hand I know a number of kids I'd have no problem letting them use tools at a much younger age if I watched them. Sadly not as many kids are brought up the way I was and learned to respect tools and understand how dangerous they can be if you are fooling around. Same goes with knives, axes, archery gear or BB or pellet guns. All stuff I was using at that age. -
Protective rust finish on specialist steel.
DSW replied to blackleafforge's topic in Metal Sculpture & Carvings
There was some discussion about this in my class this summer, talking about a Coreten sculpture my instructor had to do repairs on in Philly. From what I remember it stops rusting when exposed to oxygen, but in places where two pieces touch and water can get in there was accelerated rusting that was causing issues. I wish I'd paid more attention to that random discussion. -
Hmmm, if pulling Romex would be hard, that leaves out BX/MC that would have been my one suggestion. That or liquidtite flex conduit. I'm not sure if your ducting could be considered a "chase". If so you might simply be able to get away with regular THHN stranded, if you could manage to pull it without chafing the insulation. SO cord would be as flexible as an extension cord without that heavy plug on the end that might hang up when pulling.
-
I'll have to look and see what I have in picts. Many of the leaves I made I sold almost immediately at the fair to people who were watching. There may be a few picts of the stuff on the table that shows a few. I think I may have a couple "feather" key chains tossed in my box from the last demo. If I get a chance I'll try and excavate them from the pile and take a pict or two for you.
-
Years ago I found I needed an intermediate prescription for welding and general job site work. The old pair I had even was strong enough to let me drive with them if need be. The newer one sadly isn't strong enough to do this. I talked to my eye doc about exactly what I need and where so I could get the glasses as close to what I need as possible. He set me up with the prescriptions. The magnification is stronger than I need to read with, but weaker then I need for driving. My current pair focuses from about 16" to a bit past 4 feet really well. I do wish it focused down to about 12" for tig welding though. I have these set in a pair of prescription safety frames with shatter proof lenses. I was a bit edgy about changing over from glass to plastic because of scratches, but so far no issues with some care. They don't get pitted from grinding sparks like the old glass lenses did though which is a bonus.
-
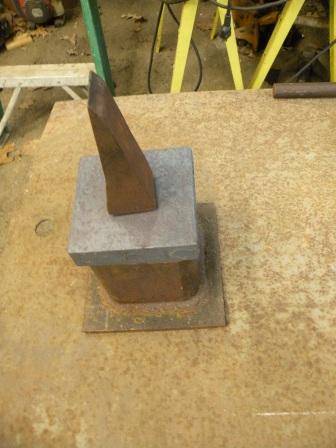
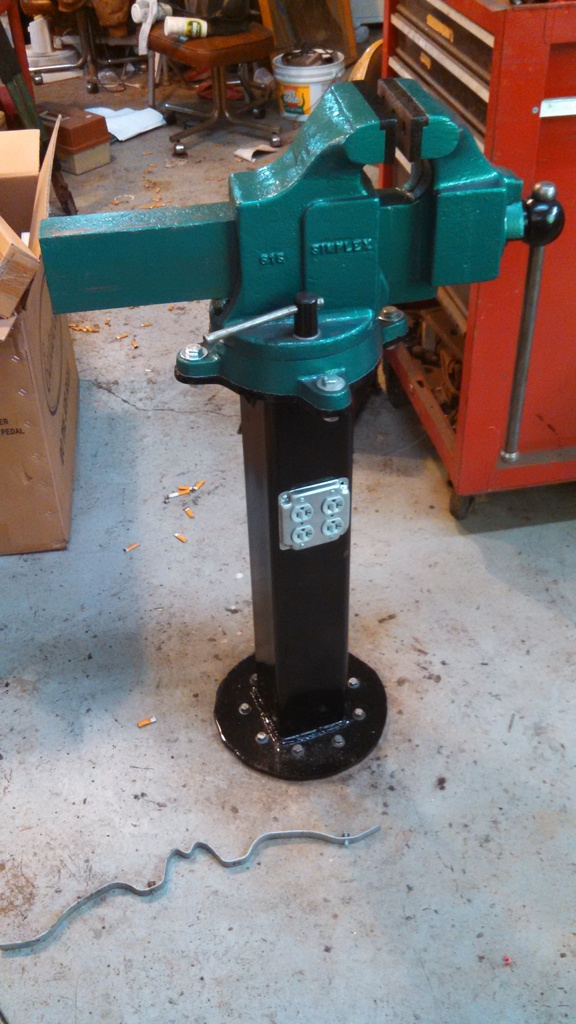
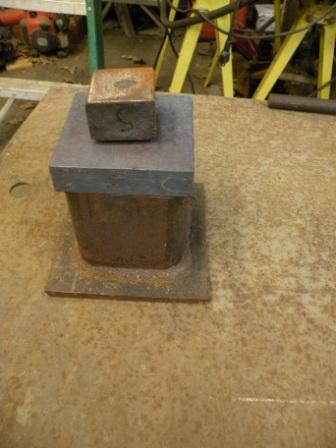
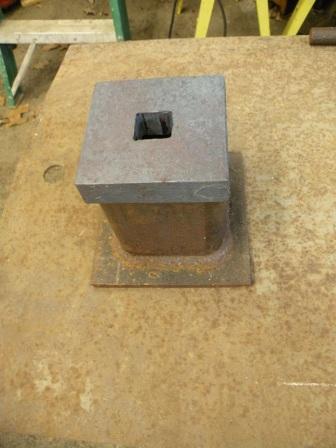
Auctions are usually the last place I go. Anvils always sell high around here. Try using Searchtempest to search CL listings over a larger area. best bet though is to attend blacksmith meetings and see if anyone has something they are selling tailgating, or simply individual connections. I got one anvil thru a friend of a neighbor of one of my customers. ( yes third level removed from the seller. ) My big anvil came from the guy who I was sharing machines with at the tech school taking a machining class at night. My Chiropractor also pointed me towards someone with an anvil they had that they were willing to sell. That one I passed on because it was beat pretty good, but the price wasn't bad as a starter anvil for someone. I've also found things at the farm where I help teach 4-H archery. I've told them I'd like dibs on 2 decent post vises they have if they want to sell them, and I know of two blowers I think they have when they get around to cleaning out the old barn. Sorry, about the confusion. Frosty coined this my "portable hole" and I've posted it fairly regularly lately to new guys who have "anvils" with no hardy hole. It's simply a piece of 3/8" wall 4x4 square tube on a 6x6" 1/4" thick base with a piece of 1" thick steel welded to the top with a square hole in it matching the 1" hardy hole in my smaller anvil ( bigger anvil has a 1 1/2" hole). Not shown in these picts are the hole in the base underneath in case you need to drive a tool back out if it gets stuck, and the 4 mounting holes in the base I drilled after taking these picts.


-
You have to be patient. You are in a good area for anvils, but may have to travel a bit, say 2 hours each way. Down side is that there are also a lot of people in this area who are willing to pay top dollar for anvils for decorations and many times you often find those offered. The cheap ones go fast as many people buy them up and then jack the prices to resell them. Get the word out to everyone you can and chances are you will locate one. Have cash in hand, and if you have to clear money with the "boss" have a budget cleared in advance. That way when one pops up on CL or elsewhere, you can jump on it right then. If you have to wait and check with the wife, chances are it will be gone when you get approval. Those anvils you listed would work. Not really the style I prefer, but certainly usable. I'd need to see what you have, but it certainly sounds like you already have some decent stuff to work with. The hardy tools can be used in a vise, or a separate "portable hole". I seldom use hardy tools like my hot cut in the anvil. Instead I prefer them in a separate holder so I don't loose time taking them in and out of the anvil.
-
Apron use seems mixed. Many of the smiths I know who do smithing professionally wear 1/2 aprons. I use mine when forge welding to cut down the burns on the shirt. I have worn my heavy leather welding jacket when working heavy stock, mostly for heat protection. It's amazing how cumulative hearing loss is. Sadly years ago I did a lot of saw work in construction with out hearing protection and now have to deal with some hearing loss. Any time I use power tools, cutting, grinding, even lawn use, I'll wear hearing protection. Same goes with most forging operations and I have a very quiet anvil. I have 3 pairs of top rated muffs as well as plenty of the disposable plugs. In fact I keep spare plugs in the glove box of all my vehicles. Boots and bad backs... Depending on what causes your back problems, a set of orthodic inserts might be worth a look. I used to have sciatica issues fairly frequently until I got orthodic inserts. That solved the vast majority of my problems. The semi custom ones from the orthodic shoe store near my house cost about $150 a pair. The new custom ones from my podiatrist are about $600. Worth every penny in my book to not have to deal with back and foot pain. I've tried the ones you just buy and stuff in the boots. Not worth it. Go some place where they mold and fit them to you and know what they are doing like a good orthodic shoe store or a podiatrist.
-
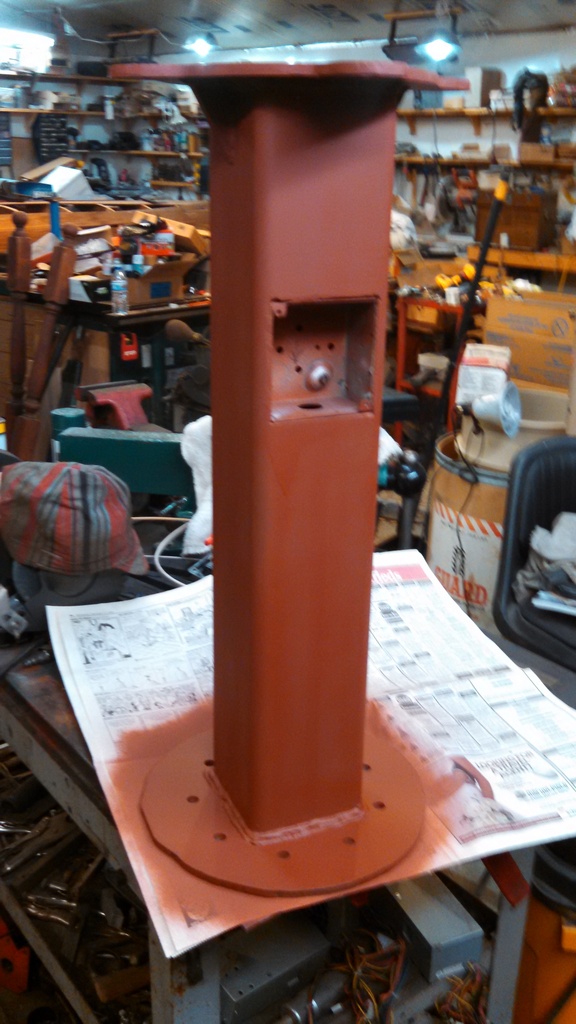
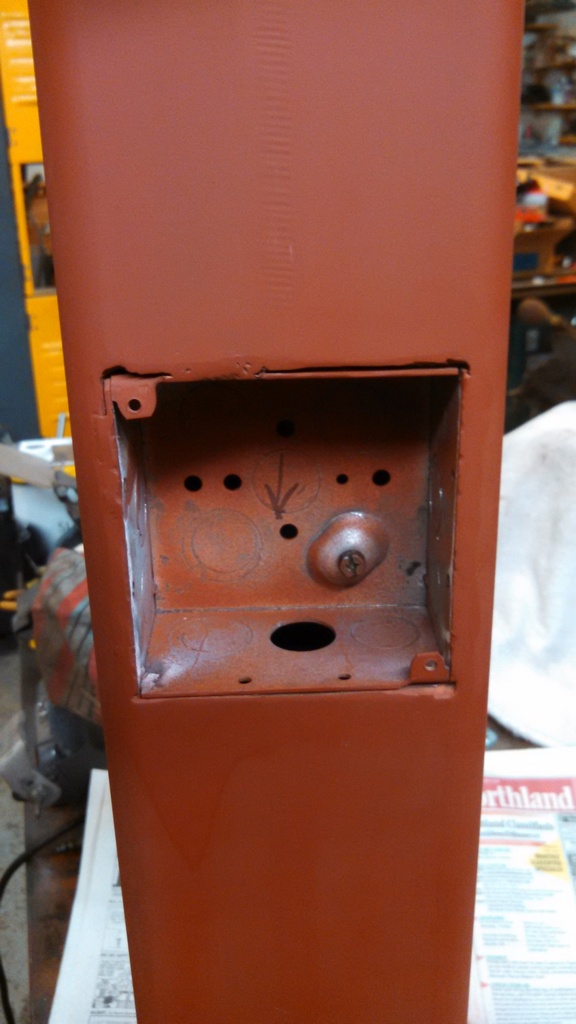
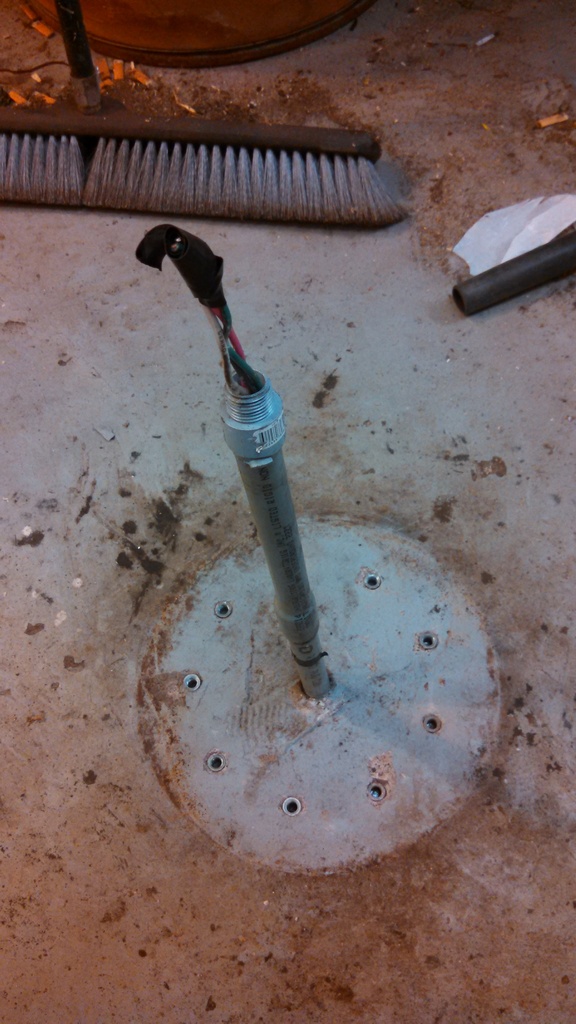
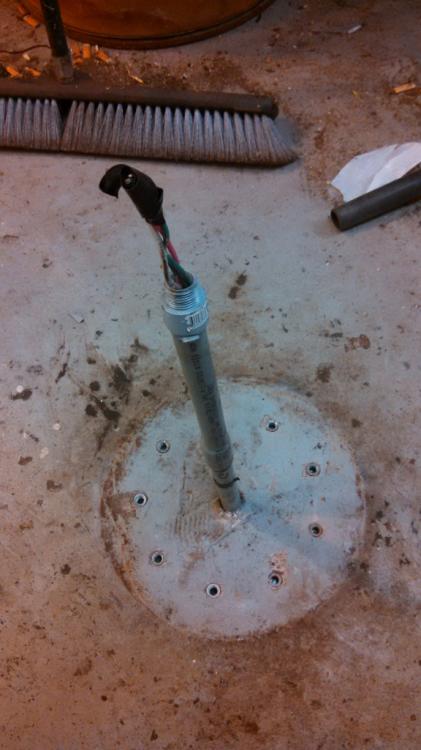
Credit for this goes to Thumper68 over on weldingweb who posted this up. I thought it was an excellent idea for someone designing a shop and who uses pedestal mounted tools. He's using a vise, but my 1st thought was this would be perfect for a pedestal mounted 2" belt grinder or buffer. I was thinking that with a bit of planning it would be possible to put boxes in the floor before the pour, sort of like Frosty's Gozintas rather than simple conduit. That would give you multiple possibilities later if need be. You could later pull additional wires and set up new pedestal locations if the boxes were linked with conduit in runs.


-
yeah things like this are always a good reminder to check smoke alarms, and make sure fire extinguishers are charged and up to date whether it's for home, hobby or business. I know what it's like to need a fire extinguisher and not to have one.
-
Aaron the Newbie from Ga (pics included)
DSW replied to AaronForgeNewbie's topic in Introduce Yourself
Cotton, leather and wool all make good fabrics for use around hot metal and flames. Synthetics are BAD! Nylon and so on melt and stick to your skin and keep on burning. They are also a nightmare to remove when you get to the burn ward and are almost a guarantee you'll need grafts. It drives me nuts to see guys using those cheap nylon leather mechanics gloves to do hot work. They just don't realize the serious risk they are taking. Never skimp on good personal protective equipment. No matter what the cost upfront, it's always a lot cheaper than the injury. Eye protection, hearing protection and good solid clothing is a must. -
For demos I use 3 1/2" of 3/8" square to do 2 leaf key chains. I'll take the hack saw and score a light groove all the way around so I can easily feel it on the hot cut when I go to separate the tow when I'm done. Then I drill one hole on each side for a split ring. I like to leave the end with the ring at the original 3/8" square so people can see what it originally was, By doing 2 at a time, it gives me more to hold with the tongs. I've also prepped longer lengths in a similar way separating them with a groove. So basically it's the same 3 1/2" blank repeated over and over on the same piece of stock.
-
I agree. Hopefully insurance will take the brunt of the costs. Our prayers are with him right now. It's heart rending to see everything you worked for destroyed. Hopefully he'll be able to bounce back.
-
Needed - Simple projects for tenons
DSW replied to beammeupscotty's topic in Blacksmithing, General Discussion
Trivets either for cooking or to put a plant on, basic square frames maybe for a picture, Sign frame/shelf bracket/plant hanger -
Hot cut
DSW replied to Forging Carver's topic in Hot Cuts, Anvil devils, metal cutting on the anvil.
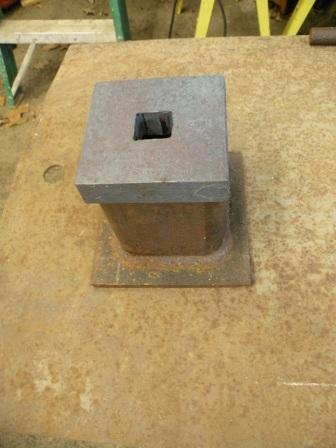
Mines a chunk of 4" square tube 3/8" wall thickness sitting on a 6x6 1/4" plate for a base. Top is 1" thick steel. Tube and bottom plate came from the scrap barrel at the tech school after the kids practice the base welds. Top is scrap a friend of mine gave me when I was practicing to do my unlimited 3G/4G mig certs. I drilled out most of the hole, then filed out the rest. I thought about drifting it to final shape by heating it in the forge, then driving a 1" square punch thru, but in the end I was itchy to get to play with it and ended up filing it all to size one night at the house. -
Hot cut
DSW replied to Forging Carver's topic in Hot Cuts, Anvil devils, metal cutting on the anvil.
Stupid disappearing post again... When I forged my hot cut, the whole thing went into the forge. I kept the coal forge on low so it would heat all the way thru vs just heat the outside up. I will admit I "cheated" and started out with a piece of 1 1/4" to forge down and upset to fit my 1" hardy hole. Beginning part of Mark's video shows how I formed the shank and upset for the base. Like him I had a swage to use to do the upset, though now I have a portable hole so I won't have to beat on my anvil. After that I tapered the working end. I had to make a rough blunt taper when I started to draw out the blade to avoid fish mouthing. I'd rough out the blunt taper, then start to draw down the rest of the stock. Then I'd blunt the end taper again, and draw down more. The sites no letting me post the actual link to Marks video. copy past this yourself. www.youtube.com/watch?v=pxTdbC5MLRQ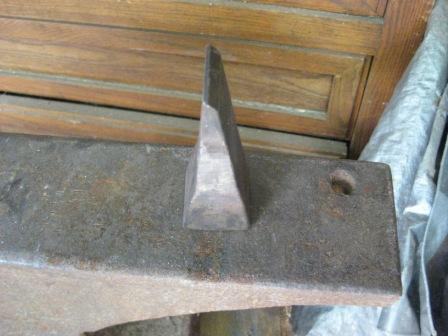

-
Heating a 10x 10 shed will be different than heating a 20 x24 garage obviously. Same goes with your heat source. Personally I'd want insulation as not all functions occur with the forge lit. Cutting stock, finishing etc can be done more comfortably in a heated space. I have a 10 x 30 "shed" that is separate from the house that I use as storage space in the winter. With R19 in the walls and R 30 in the ceiling, I can manage to keep temps in the low 50's when the outside temps are between 30 and the single digits with just the overhead florescent lights being left on. A small space heater on low keeps the temps up when it gets even colder. We use it to keep paints and so on from freezing.
-
Very nice. Only downside is that with my limited wireless connection it took forever to get even half the picts to down load.