

anvil
-
Posts
3,246 -
Joined
-
Last visited
Content Type
Profiles
Forums
Articles
Gallery
Downloads
Events
Everything posted by anvil
-

What did you do in the shop today?
anvil replied to Mark Ling's topic in Blacksmithing, General Discussion
This works for close, and perhaps "close enough", But if you want to be able to create an object in your minds eye, transfer that, in this case a taper, no matter the ending, to a real finished project and be able to duplicate it you need one more math detail. And considering the "higher math" used in this thread and use of spread sheets, you need to know the weight of parent stock per lineal foot or inch. Now you can compare the volume/weight/mass of your imagined object to its matching volume/weight/mass of parent stock and know exactly what length of parent stock you need to create your object. These numbers are given in most steel spec sheets and, I'm sure are in the Mechanics Handbook and could be added to the spread sheet that was made. This also brings up another critical detail and that is transitions. Transitions are where different shapes begin and end. For a tong blank, where do the jaws begin and end, same for the hinge boss. Where do your reins begin and are they rectangular for a ways, then does the taper start? To me, these detail are what makes it possible for me to draw anything and forge it in iron. When you break your drawing down to these areas, you then can figure up how much parent stock is needed for each part. You then know just how much total parent stock to start with and can center punch the transitions and make/forge each individual section no matter how complex your project is. And duplicate it anytime you need if you keep your drawings and notes. As for scale loss, unless you are a total nube and beating your work to death with too many heats, scale is not a factor. Edit: what I mean by weight of parent stock per lineal length is how much does say 1/2" square stock weigh per inch? Same for 1" etc. -
Are these a product of 19th century forging processes?
anvil replied to MattyG's topic in Historical Ironwork
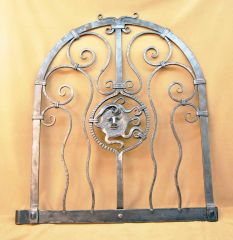
It doesn't appear to me to be blacksmith related. In that era, as is the case today, scrap, or drop ended back at the "smelter" and not thrown away. So I doubt it was any kind of blacksmith shop. If you have a lot of those pieces then consider sacrificing one or so then burn off the rust/sand to actually see what the original material was. In a forge you can get it hot enough to remove the "gradoo" but not hot enough to hurt the metal, assuming it is ferrous. -
Are these a product of 19th century forging processes?
anvil replied to MattyG's topic in Historical Ironwork
What type of building are you excavating? No matter its age, even back to the 16th century, there should be records to show its history. From your description above, it could be anything, even a merchants store to a storage building to a blacksmith shop. What time frame do you put these items? Looking forward to where this goes. -
Not enough information. Most important, are you talking of replacing castings in your "custom made fence"? Or are you talking of forged pieces that need to be replaced? Two different worlds.
-
Nice forging and hinged "hold on"!!
-
You have prolly seen how Clay Spencer attaches his dies to the hammer. But if not, Its pretty straight forward. If I remember correctly, he makes a "U" out of 1/4"x1" and welds it to the bottom of the die. This goes thru the die plate on the hammer and is held in place with a tapered wedge. Tap the wedge out, change the die. Heat from welding on the tabs has never been a problem for me.
-
Nice Chisel!
-
communications is sometimes hard to deal with especially on line. The important thing is that your vice is secure. As long as the acorn wont move left/right, fore/aft and there is something under it to absorb the force, best attached to the post, you will be alright and burying it to get proper height makes no difference. Have fun
-
Or, weld a piece of heavy angle iron to the metal post at the bottom, at the right height you need with a hole drilled in it the size of the tenon. No need for a clamp. Then if you need to remove the post vice, just unbolt it at the top and move it. I often do this so I can lay my post vice across my layout table, hang the jaws over the edge, clamp a rivet header in the jaws, then I can lay a railing section across the top and head rivets in awkward places. In your drawing, the top of the welded on angle iron would be at the bottom of the acorn. I'm guessing you still have a tenon at the bottom of your acorn. If not, I would weld one on as a vice repair. then the shoulder of the tenon/acorn rests on the top of the angle iron plate and the tenon keeps the bottom secure without having to use a clamp like you show in your drawing. It doesn't make any difference if the angle iron/acorn are buried. The benefit of this is that your pipe post and the heavy angle iron are one piece.
-
 Nice! Great joinery! And I have done similar for lost 4 legged friends,
 -
What did you do in the shop today?
anvil replied to Mark Ling's topic in Blacksmithing, General Discussion
Nice, but a little flimsy. That is why I use 3/4" square for most of my tongs. You can either forge weld on reins or draw them out. Lol, I still have and use my second "flimsy" set of tongs,, not the first as they were beyond use. -
What did you do in the shop today?
anvil replied to Mark Ling's topic in Blacksmithing, General Discussion
I got a similar deal on my Bev B3 a few decades ago. A blacksmith/machinist was selling out and headed to the Azores to set up a blacksmith shop. He had rebuilt it and offered it for sale in the "Ring". I was the lucky one to get it. Best lady in the shop! I can force 5/16" mild steel thru it and use it primarily for leafwork etc. -
Something to consider when forging knives,,, especially knives,,, is that every blemish on your anvil face will be forged into your knife that will have to be removed by filing or sanding.
-
My first piece of armor: Spectaclehelm (spangenhelm)
anvil replied to Cavpilot2k's topic in Cold Worked Iron and Steel
Very nice! Especially for your first. -
I agree with JHCC and would bend it in the shop.
-
Embarrassing Lesson in Heat Treating
anvil replied to Steven Bronstein's topic in Heat Treating, general discussion
Great Post! And a great lesson for all. -
What did you do in the shop today?
anvil replied to Mark Ling's topic in Blacksmithing, General Discussion
Absolutely correct. -
Altho all the advice above is good and should be considered, using a "new" or properly restored anvil is a real joy and will be a usable treasure for those who use it over the next hundred years. To have a welding shop do it is pretty expensive, but if you have the equipment given in the post above about repairing an anvil, with due diligence on your part its very doable and less expensive than a new anvil. If you have the proper rod, and follow the instructions, you can't lose. So the real deal is check the price of rod and equipment you may need and decide if its worth it to you. It was for me and having a refaced anvil has been a real joy. As far as a wooden hammer, its good advice and many do use them. However, its not needed. Just learn a bit of hammer control, which is what its all about. Like Frosty said, crown up and hit it enough so you only straighten the high spot, and not hard enough to thin it out. If you ever happen to see a farrier shape a shoe, hot or cold, you will see what I mean. Have fun.
-
What did you do in the shop today?
anvil replied to Mark Ling's topic in Blacksmithing, General Discussion
Personally, I feel thats a lot of over kill for a coal or charcoal forge. There just isn;t that much heat to cause a problem. Your hood should be cool enough to touch and if yer belly isn't getting too hot, neither will the wall behind it. -
JLP Blacksmith Teaching Center.
anvil replied to jlpservicesinc's topic in Building, Designing a Shop
Radiant heat rules. I've done two infloor water systems and wood heat works the same.\ Never seen this type before. -
What did you do in the shop today?
anvil replied to Mark Ling's topic in Blacksmithing, General Discussion
No matter what,,, It appears you are truly "having a Ball!!" I watched the vid. My process is a little different. I make the shoulder on all 4 sides, but not to final depth. I make the taper as small as possible, just big enough so I can get in and forge the ball on the smallest radius anvil edge. This maximizes the material I have at the neck, thus minimizing stress and breaking it off. I then forge the ball, basically hitting the high edges inwards. With experience, the fewer blows to completion increases. Thus minimizing breaking it off. When the ball is done, I then forge my taper to completion. I usually mark all transitions so I know how much material I need for each part. I know where the taper stops, marked with a scribe or center punch,, light and on an edge if using square stock so the mark can disappear when the edges are champfered. And I know it ends at the neck on the ball(where it transitions from ball to shoulder/taper). Knowing this, I can start forging the taper at the "big" end( transition from parent stock to taper) and work down to the neck until I hit my taper length and neck thickness. This way, I leave the thinnest part, the neck, the thickest until the very last, thus minimizing stress and breaking it off.. Enjoy -
What did you do in the shop today?
anvil replied to Mark Ling's topic in Blacksmithing, General Discussion
If you are making a ball that is to stay on the end of the bar, not be removed, then don't make a shoulder, just do an upset if you want a larger ball than the parent stock. Then concentrate on forging the mass to a ball and concentrate on not decreasing the thickness of the parent stock. If you are making a ball that will be removed from your bar, then you need to make a shoulder. If you are doing this on the edge of the anvil, then you need to have a "sharp" anvil edge. When I radius the edge of my anvil, I radius it from where the step is back to about where the heel begins and leave the rest sharp. So I make my shoulder back in this area. Note, its not razer sharp, just no radius. You need to use the edge of your hammer face as well, not the face. Thats why I use a square faced hammer, not a round faced hammer for my daily driver. Now rotate your hammer handle in your hand to bring the hammer edge into play and minimize the face. Notice how long the taper is on your parent stock in the above pic. Your taper is too long by a magnitude. it should be almost zero taper. If your anvil edge is fully tapered from step to the back edge of the anvil face, then, depending on the radius, it might be easier to make a cut off hardy with one vertical face and the other tapered. If you have any taper, a very short taper on the ball side is better than on the parent side. I prefer using square stock when making "removable" balls. Its easier for me to forge the edges into a ball shape than with round, altho either works. I use equivalent weights to figure how much parent stock is needed to get your end results. As above 1: figure the volume of the ball as above. you get inches cubed. Use this to figure how many pounds or oz it is. 2: get a weight chart for your steel size. easily found on line, many blacksmithing books and your steel supplier. This will give you the pounds or oz per foot or inch. Half inch square stock is .85 pounds per foot. Convert to pounds per inch. Now do the math to figure the needed length of 1/2" square stock you need. If you are going to leave it on the bar, then do it the same way, then taper your bar. The important deal is to keep your taper as short as possible and the taper as thick as possible whilst making your ball.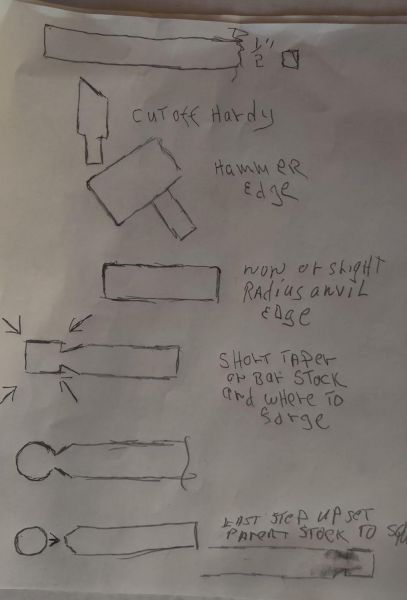
-
Please help me identify these marks
anvil replied to nolanewbie's topic in Metal Sculpture & Carvings
New Orleans has a rich history in cast iron. I'd check around there for historical groups who might be able to help you out. -
The are simple to forge over the edge of the anvil with your hammer,,, and great practice.
-
I recommend 3/4" square for general use tongs. I'd rather draw out and/or forge weld than upset. Its far easier to get the different masses that way, especially for a beginner