Frozenthunderbolt
Members
-
Joined
-
Last visited
Everything posted by Frozenthunderbolt
-
Snail forge - try typing it up as a word doc. and then attaching it to your post - that way we get to see your process, and you don't get in trouble with the mods :-)
-
Love my flip up gas workers goggles for this reason! They're vented clear so can use them as safety goggles when hammering, and easy flip down for when I'm looking into the forge.
-
4 pneumatic bottle jacks - one in each corner under the table top it is attached to. Have it set so fully released is a comfortable low position for rapid removal and fully jacked up will (hopefully - depending on piston length) be a better height for fine control. Have a play :-)
-
RE: handle. You want it as smooth as possible for a clean release for a straight or rotational throw. You also don't want to add much weight to the handle end. I would be inclined to leave the handle portion as is, possibly grinding the teeth down a bit smoother. you could dip it in 2 part epoxy to fill the gaps between the teeth and then sand it back to be perfectly smooth.
-
Beautiful lines on both the axe and handle - I like the square poll on the back.
-
Clean looking first attempt. I like your organized forge setup too! A place for everything and . . .
-
I'd say quench just the tip, and temper the tip end 30mm (inch and a 1/2 ish) to a blue temper. For a thrower you want to be able to get a fairly strong tip sharpened in for penetration. Leaving the rest of the body annealed/air cooled soft is good advice.
-
Punched into the flats on an octagon with a hot cut? That would be cool. Thanks for the idea Mr Powers
-
Hey Theo, I can finally comment! Great knife - if you want to make the printed part demountable for cleaning then what about replacing the pins with grub screws on either side, and put a minor depression into the spine of the blade beneath to locate them. Easy to remove with a hex key then.
-
Love that Hamon CR! Do you have a home made/old timey claying recipe to hand or do you only use a commercial one (I'm a bit cheap!)? To clarify my earlier post, I was glad my rough forging was approaching yours - but your bevels are neater than mine, not the other way round! Thanks for the photos, it's really helpful to have the visual step-by-step.
-
Looking good - particularly the folded handle ones. Twists on a handle can be a mite uncomfortable to use - better to put them at the end when making a loop handle - the pommel end as it were. Good on you though.
-
Good to see one of mine looks a wee bit like it at this stage (albeit with cleaner beaten-in bevels!). Can't wait to see it done! You guys are inspirational.
-
Could you please post a close up of how you have secured the wire wrap J.W.S. I would like to have a go at borrowing your idea if I may?
-
One of my fun little side projects has been playing with making a couple of light little frontier style hawks with a wrapped tapered eye. I know that there are those that will say that the wrapped eye isn't as strong as a forge welded or drifted one. They are right, but sadly forge-welding is currently beyond the capabilities of my current forge, and my current skill level. Thankfully, frontier style hawk is made with a tapered eye so it slides up the handle from the bottom, and locks in place as the handle swells towards the head. My concept is that with a wrapped eye, spring tempered, this increases the adaptability to different handle sizes anyway by my way of thinking. I started by cutting some rough bits of leaf-spring (hence my disinclination to put a finer finish on these two pieces). I then tried two different tacks with the two pieces; 1. I tried wrapping the eye first and then disrupting the steel to thicken up the steel. 2. I reversed the order - this lead to a better blade, though I achieved a better eye on the first one. I tried differential quenching on these blades - dipped 2-3 cm of the edge in my oil quench until it stopped bubbling, pulled from the oil until the heat crept in and blackened the oil and then re-dipped the entire head until cool. Result? Sharpened the better head (than I put a 45cmish handle on) cut through 15 cm of seasoned, sound olive wood without chipping, rolling or appreciably blunting. Happy with that. Here are the pictures of the rough forged bits: Shined up a bit on the angle grinder: Handle (hand cut hickory) on the more robust of the two heads (Note: Not yet finished with boiled linseed oil, but it will be). In the end I'm pretty happy with the second more robust one that I have hafted; reminds me a bit of a franchiska but lacking the up-swept tip. I cut through about 15cm of 5 year seasoned olive with this one with no blade damage. I worked on another two of these yesterday with square ends on the wrap and drawn out (not quite enough - eyes are a shade to small) from shorter stock. Interestingly, I experimented with water quenching the blade edge on one and succeed in getting my first ever crack! Now I know with my eyes as well as my brain why you only quench leaf-sping in oil!
-
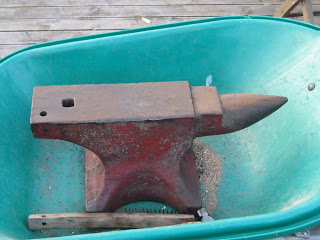
I think you nailed this perfectly S.S.; this is precisely the way i see it for me at the moment too! Especially the horseshoe question lolThickness is ok IMO, but I would make it about 1/5 to 1/3 narrower than it currently is.Well, I did it. FINALLY managed to track down a 1/2 decent anvil (it only took me asking everyone I knew and didn't know, constantly, for about 3 months!). I can just lift it myself; guessing around 60-70 kg in weight. The guy I got it from said it had been in his shop at work for at least 50 years (not being used and stubbing toes). It would appear to be cast iron (no makers mark that I can see through the rough casting finish, rust and paint). However, to me this looks like a weld line for a steel hard-face (and it rings and returns the hammer differently to the step and horn, so I'm fairly confident it's a welded face. The edges of the hard-face are slightly mushroomed (I'm guessing this was used by a farrier?) The top of the face has what I think could be considered light hammer damage, but is still very usable and is better the bit of rail road track that I have currently. Stoked to have something with a horn, and hardy and pritchel holes (if small ones - that's only a 16oz hammer I was testing rebound with next to it!). The only particularly odd feature of this is that their appears to be a square hole identical to the hardy hole in the body of the anvil about 5-10cm beneath the horn. Anyone have any ideas why/what for? Leave me a comment.Cheers BGD - just signed up :-)Thanks for the advice guys, I was trying to figure this one out too! I'l try both 'wocking' with wood, and starting with a reverse curve, with the bevel to draw it straight.It may be that some of those multi-punched plates with holes are draw-plates for wire making (if they aren't beveled for use as nail headers) which might explain the tongs;used two handed to pull the fire through the plate?Sir, you really do some beautiful work. Very nice piece!Fantastic! I feel that with the grey finished handle, the forge finish works better than with the brown one.I've got to say, that from a (Semi) practical point of view, I would lean towards the bottom left design. It is simple (light - not adding weight to the sword) but provides decent protection.Beautiful! Can't wait to see it finished. If you go with the oak, can I suggest roughing up the inside faces of the slabs, then sealing with polly before gluing, as otherwise the tannic acids in the oak may well eat away the steel.