
Frozenthunderbolt
Members
-
Joined
-
Last visited
Everything posted by Frozenthunderbolt
-
Wrapping the handles in leather thonging can help with the comfort levels
-
Opportunity to buy a Peter wright anvil (legit?) 100kg Link removed Large cast forging Anvil. Has 100 stamped on the base and 130 stamped on the side. Dimensions are 675mm long x 305mm high. Approximately 100kg's plus. Comes with its own heavy duty metal stand. What's a fair price to bid up to do you think?
-
Drago, try investing your silicone with either: - A mixture of either paraffin with HPDE melted into it (I've read but not tried 4:1) - A mixture of Paraffin and hot glue sticks (7:1.5) You may get better definition as a result, YMMV but it could be worth playing around with. Full disclosure, I haven't tried playing with the casting myself, but have come across these ideas more than once whilst reading on the subject.
-
My bottom blast LPG cylinder forge works well on wood - with two irons in the fire it heats them as fast as i can work them. I would say that had I the opportunity, I would get a second cylinder and make mine taller so I can have more 'green' wood 'coking' up above. With my current blower (a hair dryer) I get plenty of heat for forging, but not enough to forge weld, though I suspect this is a result of my air flow, rather than my choice of fuel. If I had the chance to build a 55gal drum retort I'd still give it a go (I tried digging a pit burn, but it didn't work well), but at this stage wood can work fine as fuel.
-
XXXXXXX fine shape. A bit thin in the spine (by my eyeball-ometer) for my preference, but to each their own :-) You would get beautiful rocking motion with the curve you have there. Can't wait to see it with the handle on.
-
-
Using the bandsaw in wood shop - split 10 mm up my index finger. Cut the tip of my left thumb and side of my left index when cutting a branch with my sheath knife. Angle grinding copper to make a punch dagger only a few minutes work, young dumb, no PPE. Splinter in my eye - most disconcerting to have dug out with a needle when numbed. Got a poem about my scar lessons: My hands they are a tracery, a place to see, The lines, the scars, life’s etched on me, No gift for free, nor clarity, Or talent, not paid in blood. That once was riven, now freely given, For metals and for wood, to spin to win, For inks and string, for lessons now understood. “For every thing there is a price” Say those who feign to pay, Cuts now and then? Well such things mend, While knowledge never fades. For a price is never costly, When fair trade is freely given, For to think, to do, to make, to use, Is the purpose of all living.
-
'Pretty' Nice he says! That is now, bar none, my favorite pattern-welding pattern I've ever seen.
-
Hi Folks, I've lurked here a long time, signed up more recently and gotten into things properly yesterday. (Fire and metal hot and hammered!) I've always been fasinated by shifting hot metal, and watched smiths for hours when ever i could when younger. Played with large nails and a sledge head a few years ago to make primitive arrowheads, have done a fair bit of cold-'forging' of plate to make smaller bits of armor. So happy I'm now into it for real. On the hunt for a decent anvil, made my first tongs, and a fire tool, started to beat on some files with a view to getting them knife-like ;-) More realisticaly, I need to find some more scrap at the dump and improve my hammer control, and make some more tools first.
-
Here's my current set up: - I got lent a a small Rail road track anvil to use until I can get something better. About 30cm from 'horn' to end, and 8cm wide. - 2kg brades ball pein hammer - just about killed me after the first hour, so I went to a carpenters hammer - much more accurate and I was good for another hour or two. - Started with an ancient set of channel lock pliers, used them a while then pulled them apart and drew out the handles and adjusted the jaws - need to file a bit and drill out a new pivot hole tomorrow. - Kept another smaller pair of channel locks to use in the mean time. Cant wait to make more, better tongs! - Made a fire tool first (not very clear in this photo sorry) Fired up my LPG bottle forge today - used wood (bamboo and banksia). Had the wood 'coaking' in charcoal above the actual coals as I went. - The slots I cut (see http://archaicjed.blogspot.co.nz/2015/07/making-forge-from-lpg-bottle.html) work perfectly to concentrate the air, and the hairdryers heating element burnt out after half an hour (which is better - i just need the fan!) It kept perfectly cool thereafter. A picture of the fire towards the end of the run. Sorry it's sideways it refuses to rotate! Got things plenty hot in 1-2 minutes per heat, with 3 in the fire most of the time.
-
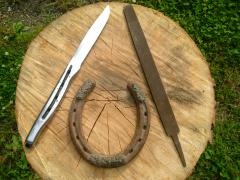 Welded the file to the shoe then forged it out?
 -
Hi folks, I built a forge from an LPG bottle today. Link to my blogger page with the build log and photos here: My forge build. I'd love any feedback Next step - get a couple of drums and make a charcoal retort to feed it with. I've got heaps of fruit tree prunings, eucalyptus and alder to burn. Bit of I-beam or railway track to keep me going till I can afford an anvil and I'll be underway! Making a forge from an LPG bottle.Haven't done any blacksmithing in a loooong time. Wanted to make a forge to do it properly this time - so this is the build log for my forge. Starting with an old LPG cylinder. Opened the valve wide; left for a week. Removed the valve and filled with water (left overnight) to purge any gas pockets. Emptied water and got the angle grinder ready Cut the bottom off with a fast-cut disk. Cut about 5 cm off the bottom piece - just past the shoulder to make it a smaller diameter in order to fit inside the gas bottle. Cut several slits in the bottom; this is going to be the grating in the bottom of the forge - the slits will let the air in from the blower to get the charcoal glowing hot. Cut several slits in the bottom; this is going to be the grating in the bottom of the forge - the slits will let the air in from the blower to get the charcoal glowing hot. Base plate in place - I'm going to leave it removable rather than adding refractory cement etc at this stage. Marked out the cutout for workpieces. Cut out the marked piece. Flipped upside down, welded on the two long legs and then ran out strapping. I found a steel-strap carboy holder that put the forge at the right height when sitting on top of it. The two legs fit through the lattice. Welded on the cut out piece as a final short stabilizer. Checking to see if box section will work to make my air feed. Note: Marked for blower feed extension. Cut the marked section and a center slit ready to burn outwards. Bent out the flaps. Checking the fit of the sections. Note: The extra slit was to hold a removable metal piece to dump ashes. This design was later changed as seen below. Fitted to the carbouy rack. Mocked up with a hairdrier for a blower. I will need to get a dimmer switch to wire inline to control the fan speed, and some ducting to get it further from the heat! Welded a bolt on the inside of the dropper tube. Marked out the bottom cap on sheet metal taken from the side of a toaster. Cut, folded, drilled, fitted and nut in place. All done! Yet to fire it up, pictures when I get it fully finished and on fire! From my reading, I'm thinking the following mods even before I fire it up: - Take the bottom cap of the drop shaft and replace with the large bucket of water underneath for the air lock. - Drop a few firebricks and some clay inside to make a better (smaller) space for a fire. (I'll only be doing small things to start until I have the skill to take on something bigger)
