
irnsrgn
-
Posts
2,184 -
Joined
-
Last visited
Content Type
Profiles
Forums
Articles
Gallery
Downloads
Events
Everything posted by irnsrgn
-
BP0276 if the BP's ever make it back on line.
-
Wassit/Wheressit/Lostssit/put a new roll of film in the digissit camersssit
-
Acetylene tank is full of a porous material and ACETONE, you have a problem now of disposing of it, the welding supplier may be able to dispose of it for you, but be prepared to pay for the service as it is classed as a hazardous material.
-
yes, an inch of wire sticking between the tip and the weld puddle is the standard recommendation that should have been in the owners manual/instruction book. flux cored wire is messy as far as spatter is concerned.
-
might be the quality of your tip dip, all its supposed to do is keep the little hot ball bearings from building up on the very end of your tip, and inside the very end of the nozzle. and some wires spatter a lot more than others creating problems. it won't clean the build up off the tip, you have to do that, then use the tip dip sparingly to keep the build up down. flux cored wire gives much more problems than gas shielded wire too. If your using flux core wire, you need an inch of stickout to preheat the flux also.
-
In my 50+ years as a Blacksmith, Weldor and Machinist, I guess my success was not allowing myself to contract tunnel vision. And I guess some forget that the lowly dirty Smith did have a tradition, they developed most of the original Machine Tools so they could do their jobs easier, better and quicker. The term "Machine Shop" comes from the Blacksmiths who started developing and using Machines to make their jobs easier etc, so the people started calling the Blacksmith Shops, Machine Shops as the Smiths shops were full of all sorts of Machines that they used to accomplish their tasks.
-
when I made sockets for chisels, I just used black pipe or tubing and a tapered cone mandrel to drive then down onto it hot, after swaging the small end some first, then cut the socket off the pipe for attachment to the chisel. I bought the chisels at flea mkts that had the handles missing and someone used a metal hammer on the sockets to drive them, destroying the socket part. cut off the old socket and arc welded or torch welded the new socket in place, then forged for a nice transition . If you look inside old chisel sockets you can see the forge weld inside, from being fullered wide, then wrapped and finally forge welded over a mandrel, the inside is usually a cold lap seam.
-
the thin plates will flex between themselves like the leaf springs on a vehicle, you will only have about 60 to 75 % of the strength of a solid plate. Do it right the first time, its cheaper in the long run.
-
14" shopcraft band saw
irnsrgn replied to civilwarblacksmith's topic in Saws, bandsaws, hack saws, etc
most woodworking places have them, they are called TIRES, try woodcraft, Rockler, and Lee Valley tools. Urethane Bandsaw Tires - Woodcraft.com Urethane Band Saw Tires - Rockler Woodworking Tools Urethane Bandsaw Tires - Lee Valley Tools You will have to put the urethane ones in boiling water to be able to stretch them on, but they need no glue to hold them in place. -
My two aunts and my grandfather sometime around 1905 or so, both aunts, my grandfather and the shop are all gone now. when I was young the location of the shop was a movie theater which is now gone too. My father at the right in 1941 when the shop was first built I believe, I am still in the same shop and have been since 1951.
-
Pre-Heat Oxygen Pressure for Oxy/Acet Cutting
irnsrgn replied to Dave Hammer's topic in Welding/Fab General Discussion
3 hose torches are straight torches used for machine cutting, like my pattern torch shown below. -
no problems with flooding here 10 miles from Missouri river, but farmers are in dire straights and Monday the 1.75 inch hail didn't help the crops either to the east of me, The tornado just 4 miles east of town completely disimated one farmstead and severely damaged 3 others and a church.
-
Pre-Heat Oxygen Pressure for Oxy/Acet Cutting
irnsrgn replied to Dave Hammer's topic in Welding/Fab General Discussion
preheat pressure/volume is set with the valve under or to the side of the cutting oxy handle, cutting oxygen is full force straight thru the torch. the main oxy valve at the hose on the handle should be wide open. -
nice looking gates, inovative design, except around here we have a few MORONS, who would welcome the targets for target practice.
-
300 and up are being upgraded for viewing each one has to be individually checked for codes etc
-
Even Sam Yellin had an Arc Welder in his shop, although it was kept hidden most of the time. Its probably a good bet that an oxy/acet rig was somewhere in the shop.
-
rule of thumb for rivets and bolts. 2 times the diameter of the material to form a rivet head (Oval). 2.5 times the diameter of the material to form a bolt head, (square or hex). for bolts and rivets, heat just the very end (4 times the diameter) to a bright orange or yellow heat and upset the end a bit. then drop in the header and form the head.
-
Welcome Justin, FWIW, clay is a good way to learn smithing, just form some to the size of the iron material you want to work with and use a hammer lightly on it. Clay works just like hot soft metal does under the hammer.
-
prarie Blacksmiths web site
irnsrgn replied to Bud williams's topic in Prairie Blacksmiths Association
PBA members, I can not elaborate at this time, but we all need to put Betty and Clarence Mertins on our Prayer lists at this time as they need it badly due to a serious health problem. I will post more as I am allowed too. Jr. -
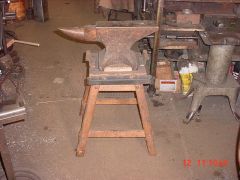 This is my first attempt at securing the anvil to the demo stand before I went to the eyebolt system, the clips were just reversed and the nuts tightened down.
 -
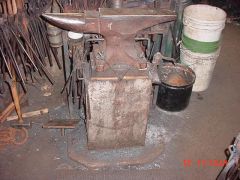 This is a picture of my main forge anvil, I use a thru bolt and some eye bolts thru a bolster with hand forged wingnuts to keep it from moving around. on my light oak demo anvil stand I use the same idea but with short eyebolts thru the 1.5 inch base the anvil sets on.
 -
I have to go with Unkle Spike on this one. 90kg = 198 lbs is a rather large anvil to start with. If you are not doing really large work with the help of several strikers, what good is a big anvil, I suppose bragging rights comes into play, you know "My anvil is BIGGER than your anvil!" First let me address adding weight to an anvil. At one of our conferences with a guest demonstrator the anvil used was 200 lbs or + mounted solid to a probably 200+ steel base. After the first day the demonstrators forearm was swelled up, and he could hardly grip a hammer handle without pain. The second day the anvil was set on a wooden made up base and after the first 3/4 hour or so of the demo the tennis elbow strap the demonstator was wearing to help combat the swelling and pain came off as it was not needed anymore, because the anvil became a live anvil again granted it had a ring instead of the dull thud of the day before and magnets were placed under the horn and heel to lessen the ring. Point being having an anvil to solidly mounted to a solid metal base is counter productive to its use and can be injurious to the smith. Even a piece of 1/4 inch plywood between an anvil and a solid metal base with make it a live anvil and more able to absorb the shock and have good rebound. Second, why do we tie down (anchor) an anvil in place to start with? If the anvil is setting properly on its base it won't move around to start with. If the smith is gonna do a lot of bending fork or other prying work the anvil will skid around on the flat top of the base, so it must be secured from these unwanted manuevers on its part. Usually firmly securing an anvil will lessen the ring it has if it has one. Staples and all kinds of other devices won't do much good over the long run if the anvil is not properly seated to the base to start with. This is a picture of my main forge anvil, I use a thru bolt and some eye bolts thru a bolster with hand forged wingnuts to keep it from moving around. on my light oak demo anvil stand I use the same idea but with short eyebolts thru the 1.5 inch base the anvil sets on. Shop anvil This is my first attempt at securing the anvil to the demo stand before I went to the eyebolt system, the clips were just reversed and the nuts tightened down.
-
the copper plating sounds like the best way to go. IMO
-
if you are really gonna try the brazing thing, you would do well to tin both surfaces first. tin the plate first then the ASO position the plate and use a rose bud to heat the plate, when you get to the right temp the plate will suck down on the ASO.