Rob Garner Posted May 11, 2012 Share Posted May 11, 2012 First, I would like to say thanks for a great site. For my first question (and definately not the last), can anyone give me a rough estimate on how much ITC-100 it will take to cover an area that is 16" long by 9 1/2" in diameter? I am still working my way through old threads but have not found an answer yet. After looking at what seemed like hundreds of pictures, I chose to start with an 11 gallon air tank from Harbor Freight. Mainly because I couldn't find a suitable piece of pipe locally. Started out by cutting off the front end cap (the rear is identical), drilling the burner holes and bending up a front mounting foot. Then rolled a reinforcing ring out of 1/8"x1 1/2" flat stock. Next up was a hinge for the door. Then the mounts for the propane manifold and the door latches. Still need to make the handles. The plumbing and burners. The door work openings. Front is 3" x 4" and the rear is a piece of 2 1/2" i.d tube. How it sits as of now. Still have a little ways to go but I am happy with the way it is turning out. The insulation. Thinking about adding a 2" wide x 1/8" thick ring around both ends of the body and the doors to hold/protect the insulation and to provide a place to put a rope seal of some kind. Something like this: When the stand gets built I will add a long work rest to it as well as channels to hold the soft firebrick in case the doors need to be removed. For the removable floor I am thinking of forming/casting it out of mizzou castable plus mixed 3 to 1 with foam micro beads (bean bag fill). Have about 2/3rds of a bag left over from my smelter project. Quote Link to comment Share on other sites More sharing options...
Loneforge Posted May 11, 2012 Share Posted May 11, 2012 Nice looking forge you got there. Can't wait to see it going! Quote Link to comment Share on other sites More sharing options...
Roy Honcho Gregory Posted May 11, 2012 Share Posted May 11, 2012 That sure is a fine build you got going on. Quote Link to comment Share on other sites More sharing options...
kevan Posted May 11, 2012 Share Posted May 11, 2012 Very professional looking job. Quote Link to comment Share on other sites More sharing options...
AJAX Posted May 11, 2012 Share Posted May 11, 2012 looks cool, but i would do more than just tack welds on everything Quote Link to comment Share on other sites More sharing options...
Chris Jones Posted May 11, 2012 Share Posted May 11, 2012 I think you might have voided the warranty on the cylinder as well...;) nice build though. Quote Link to comment Share on other sites More sharing options...
Ben van Leeuwen Posted May 11, 2012 Share Posted May 11, 2012 Ahh, but if he hasn't dropped it, it might still be covered. Nice looking forge. You've made a very clean job so far. Quote Link to comment Share on other sites More sharing options...
RandyScott Posted May 11, 2012 Share Posted May 11, 2012 Your question was: " For my first question (and definately not the last), can anyone give me a rough estimate on how much ITC-100 it will take to cover an area that is 16" long by 9 1/2" in diameter?" Hard to say due to the variables. I just finished a freon tank sized forge and used about a quarter to a third of a cup. I apply it very thin. Some folks apply it thicker. Buy a pint of the stuff as it never goes bad. I have just a tad left and bought a pint in 2006 and done about 6 forges with it. If you use the forge heavily you will need to recoat with ITC-100 every year or two. Quote Link to comment Share on other sites More sharing options...
Rob Garner Posted May 11, 2012 Author Share Posted May 11, 2012 Thanks for the compliments folks. They are appreciated. On 5/11/2012 at 12:22 AM, MOMPY said: looks cool, but i would do more than just tack welds on everything It's still in the mock up phase. Once everything is finalized it will get finish welded and then sand blasted before painting. On 5/11/2012 at 1:43 PM, RandyScott said: Your question was: " For my first question (and definately not the last), can anyone give me a rough estimate on how much ITC-100 it will take to cover an area that is 16" long by 9 1/2" in diameter?" Hard to say due to the variables. I just finished a freon tank sized forge and used about a quarter to a third of a cup. I apply it very thin. Some folks apply it thicker. Buy a pint of the stuff as it never goes bad. I have just a tad left and bought a pint in 2006 and done about 6 forges with it. If you use the forge heavily you will need to recoat with ITC-100 every year or two. Thanks for the response. I'll start with a pint and go from there. I don't anticipate using it much at first, it's more for the occasional weekend project. Quote Link to comment Share on other sites More sharing options...
Robert Yates Posted May 13, 2012 Share Posted May 13, 2012 wow Nicely done . Sam Quote Link to comment Share on other sites More sharing options...
VaughnT Posted May 13, 2012 Share Posted May 13, 2012 When are you going to build mine? That is as good a build as I've ever seen, and I particularly like the attention you paid to the little details. If you want to make another, I'd sure be glad to talk to you about it! Can't wait to see it finished and lit. Quote Link to comment Share on other sites More sharing options...
archimedes Posted May 13, 2012 Share Posted May 13, 2012 greetings, are those stainless steel taper flares? where did you find these for purchase? . . . .or are they also home made . . excellent fab results. learned a lot for my own freon forge design. thanks for posting the excellent pics. i would like to find a place or individual to purchase the stainless steel flare(s) for 3/4 black pipe. (i have given up attempting to order anything from the Zoeller forge website.) Quote Link to comment Share on other sites More sharing options...
Rob Garner Posted May 15, 2012 Author Share Posted May 15, 2012 On 5/13/2012 at 1:48 PM, samcro said: wow Nicely done . Sam Thank you. On 5/13/2012 at 1:51 PM, VaughnT said: When are you going to build mine? That is as good a build as I've ever seen, and I particularly like the attention you paid to the little details. If you want to make another, I'd sure be glad to talk to you about it! Can't wait to see it finished and lit. [Dr. Evil voice] for one million dollars... [Dr. Evil voice] Thanks. On 5/13/2012 at 7:28 PM, archimedes said: greetings, are those stainless steel taper flares? where did you find these for purchase? . . . .or are they also home made . . excellent fab results. learned a lot for my own freon forge design. thanks for posting the excellent pics. i would like to find a place or individual to purchase the stainless steel flare(s) for 3/4 black pipe. (i have given up attempting to order anything from the Zoeller forge website.) No, they are just pieces of 1" gas pipe that were sand blasted after forming. Sorry can't help you with the stainless flares. Thank you Quote Link to comment Share on other sites More sharing options...
VaughnT Posted May 20, 2012 Share Posted May 20, 2012 [Dr. Evil voice] for one million dollars... [Dr. Evil voice] Well, hmmph! I'll remove you from the Christmas Card list, then! Quote Link to comment Share on other sites More sharing options...
kevin1050 Posted June 4, 2012 Share Posted June 4, 2012 I did a layer of ITC over Plistix. But, I put it directly on the inswool. The inswool really sucked up the Plistix and the ITC went on very easy over that. Now I am waiting for everything to dry out so I can fire it up! Plus Wayne is a really nice guy to deal with. He has put up with a couple of my phone calls and his wife is nice to talk to also! Quote Link to comment Share on other sites More sharing options...
WayneCoeArtistBlacksmith Posted June 4, 2012 Share Posted June 4, 2012 I'm afraid that Kevin misunderstood my recommendation. "I would suggest that you use one inch of blanket and then use a castable refractory about 1/2 inch thick and then paint plistix over that." I ment, to cast over the Inswool, or other blanket, with a castable refractory (Kast-0-Lite, or other castable refractory), then after that has cured paint over it with Plistix. Plistix and ITC 100 are both Infrared Reflective procucts. Plistix is $10.00 a pint and ITC 100 is about $40.00. Painting the ITC 100 over the Plistix would be redundant. I guess that if you were going to use ITC 100 without the Castable Refractory step the cheaper Plistix did soak into the blannket and form a barrier so that the more expensive ITC stayed on the serface. A second application of Plistix would have done the same thing, I think. I'm sorry if I was not clear and, hopefully. this will be clearer. Quote Link to comment Share on other sites More sharing options...
kevin1050 Posted June 6, 2012 Share Posted June 6, 2012 I got some left over ITC from another smith and thought it wouldn't hurt anything if I put it over the Plistix. I have yet to use the forge and will report how it works now the coatings are in. Quote Link to comment Share on other sites More sharing options...
Zengineer Posted March 7, 2013 Share Posted March 7, 2013 Any updates on this one? Would really like to see how it turned out, and hear how it worked for you. Quote Link to comment Share on other sites More sharing options...
Rob Garner Posted April 24, 2013 Author Share Posted April 24, 2013 Thanks for asking. Unfortunately no. Between last summers ungodly hot and humid weather and :Homer voice: stupid family issues :homer voice: it has been languishing in storage. With the weather getting better I am hoping to get it finished here soon. I have everything on hand already, just need to get to it. Quote Link to comment Share on other sites More sharing options...
jay_cat Posted April 25, 2013 Share Posted April 25, 2013 This is exactly what I was about to get into before I figured out I don't have the time or a welder. I even have a airtank with the ends cut off, Kawool and ITC100. Great pics. If I ever get around to completeing my build, this is a nice reference. I was is the same boat as you. After looking at the parts in my garage I just pulled the trigger on a propane forge off the web. I was up an forgeing a week later. I'm glad I bought one before building because now I can figure out what I will need when I do build. Quote Link to comment Share on other sites More sharing options...
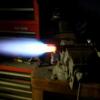
Rob Garner Posted March 13, 2015 Author Share Posted March 13, 2015 xxxx xxxx It's been awhile since I started this. Well it's update time finally. Almost forgot about this thread. The forge has been completed and is functional. Made some modifications since the last pictures were posted. Starting with the burners, decided to make custom ones based on some made by David Hammer. https://www.youtube.com/watch?v=VxzdqcPzXj8 The concept is the same except mine have stainless flares machined from solid round that also locate them in the forge body. The mig tip adapters are machined for a slip fit in the burner tubes assuring they fire straight down the center of the burner. The tubes are 1.25" od x .25" wall dom tube. The air inlet holes were given a large chamfer and then polished along with the inside of the tube to smooth out the airflow. Plumbing changes consist of swapping the needle valve for a much better hydraulic one (the burners remain stable down to 1/2 psi in idle mode). Also changed all the compression fittings over to flares. The copper tubing is 3/8". The insulation consists of two layers of 1" blanket. The first is a full wrap and the second is fit around the ifb 2600 firebrick floor. I also formed a 16 gauge stainless sheet insert for if/when I try welding. The paint is just high temp header flat black. This was the first fire up. (Sorry my camera sucks anymore.) https://www.youtube.com/watch?v=HPIhPe4gDfQ Doing some testing with it at work today gave these results. Material: 3/8" x 2 1/2" x 12 3/16" 1044 blanks. I lit the forge and let it run for about 2 minutes at 15 psi. then put a piece of stock in. It took 3 minutes flat to get the entire piece to a bright orange color. Still have more testing to do but so far I am pleased with the results. If everything goes right I'll be using it on a job at work next week and will try and get more pictures and some video for you guys. Quote Link to comment Share on other sites More sharing options...
Rob Garner Posted March 21, 2015 Author Share Posted March 21, 2015 Well, I must say that it works better than I had expected. I made a small rack to heat 5 pieces at a time and it had no trouble keeping up. The job was hot bending the previously mentioned 1044 blanks. I managed to get 69 pieces formed in 2.5 hours. The forge was set at 15 psi. at the start and took approx. 25 minutes to heat up with 5 pieces in it. I left it set that way because of how often the door was being opened. Started with a 100 pound bottle that was about 3/4 full and probably used about 20 or so pounds. Also need to get a better thermocouple. The one I had for my digital multimeter was good for 1800 degrees was melted at some point. Was to busy to really pay attn. to it. Quote Link to comment Share on other sites More sharing options...
Andrew T Posted March 24, 2015 Share Posted March 24, 2015 Nicely done. Looks like that press could do it cold. Quote Link to comment Share on other sites More sharing options...
Rob Garner Posted March 24, 2015 Author Share Posted March 24, 2015 Thanks.Yes it could. But the material just breaks because it's a medium carbon steel. Quote Link to comment Share on other sites More sharing options...
VaughnT Posted March 26, 2015 Share Posted March 26, 2015 Gorgeous! Quote Link to comment Share on other sites More sharing options...
Recommended Posts
Join the conversation
You can post now and register later. If you have an account, sign in now to post with your account.