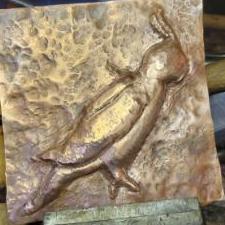
Malenmetal Posted June 16, 2022 Share Posted June 16, 2022 Hi, this is my first attempt at a helmet it's based on a mandalorian helmet from star wars. I know it's rough, nothings straight, needs planishing and some welding. I've done a little copper work not much besides flowers and a little "repousse", so advice is appreciated. I started tig welding the cuts,using oxy brazing rods, but I ran out of argon and then tried to use 72 25 but that was a mistake,lol. So my man question is how can I flare the neck part of the helmet. Any help appreciated. Quote Link to comment Share on other sites More sharing options...
George N. M. Posted June 16, 2022 Share Posted June 16, 2022 Welcome aboard from 7500' in SE Wyoming. Glad to have you. I think that this has been a BOMTICC (Bit Off More Than I Can Chew) project for you. One of the thing you have to earn about armor making is that things have to be shaped and assembled in a certain way because once assembled it can be tough to impossible to do the necessary forming operations. For example, the crown should be fully formed, planished, and smoothed prior to attaching it to the brow piece or the fore and aft piece that goes over the top. Now, you will need a very long stake to be able to smoth out the crown pieces. The sides should have had their bottoms flared prior to assembly. You may be able to do it now by placing the bottom endge over the horn of an anvil or other round object and tapping it from the inside. If the material were steel this is something best done hot because you are stretching the metal in the flare. Since it appears that you are using copper you may be able to do it cold if you anneal the metal to get it as sort as possible. If you don't already know, you anneal copper, brass, or bronze by heating it and then quenching it in water. It is the opposite of what happens with high carbon steel where quenching hardens the metal. Frankly, it is kind of a hot mess right now. If it were me, I'd drill out the pop rivets and disassemble it and start over. You may have to discard some parts because of burn throughs or other damage. It is tough to get all the planning right. Often, a person really wants to get into a project and complete something cool but you have to rein yourself in and think about the project logically, beginning to end. As youself, "Can I do X if I do Y first or does it have to be the other way around?" This can come from hard experience or you can carefully think it out before ever touching a piece of metal. It often helps me to draw things out and even make a paper or cardboard prototype. Also, it is sometimes a good idea to assemble things using small nuts and bolts before permanent assembly using rivets or welds. Good luck, and consider any mistakes made or time lost to be tuition for learning how to do better on your next project. BTW, what part of Chicagoland are you in? I grew up on the South Side (7600 South and the Lake, next to Rainbow Park and Beach). "By hammer and hand all arts do stand." Quote Link to comment Share on other sites More sharing options...
Malenmetal Posted June 16, 2022 Author Share Posted June 16, 2022 Thanks for your advice. I think I'm going to keep up "finishing" this one just tryout different finishes and stuff on it and start from scratch soon. For the next one I'm definitely going to scratch with a cardboard model, and use some bolts to help before riveting. Ig I'll chalk this one up to what not too do but had a lot of fun so far. Next time I might use cherry max rivets if I can get them from work. I'm in the nw suburbs mount prospect now but have lived in Jefferson park before. Again thanks for the advice. Quote Link to comment Share on other sites More sharing options...
George N. M. Posted June 16, 2022 Share Posted June 16, 2022 You also might want to try real machinist's (dome head) or tinner's (flat head) steel rivets which are more traditional in armoring rather than modern pop rivets which always look inappropriate and a bit cheesy IMO. That said, if you are doing fantasy armor that may not be as much of a problem. Also, if you are making helmets or other armor just for the look of the thing rather than the actual functionality of turning a blow from a weapon structural strength is not as big a concern. For example, armor for boffer combat can be made out of plastic or cardboard but armor used in blunted steel or rattan (SCA) combat has to be very functional and close to the original thing. Good luck and keep posting here. We LOVE pictures. Also, I believe there are some armoring forums, particularly connected with the Society for Creative Anacronism (SCA). "By hammer and hand all arts do stand." Quote Link to comment Share on other sites More sharing options...
Malenmetal Posted June 16, 2022 Author Share Posted June 16, 2022 I'll look into the rivets and other forums. I just making it for a fun project. I'll keep the thread updated as I work on. Thank you. Quote Link to comment Share on other sites More sharing options...
Scott NC Posted June 18, 2022 Share Posted June 18, 2022 If it were me, I would leave that helmet as is and put it on the bookshelf and tell everyone it saved my life and I survived the battle. Of course, I don't mind telling a tall tale or two... Then you could start a new one keeping Georges tips and advise in mind. Personally, I think it's got character. There is a repousse section on the forum. If you haven't seen it you might find it interesting. I tried my hand at it and gave up fast. Quote Link to comment Share on other sites More sharing options...
George N. M. Posted June 18, 2022 Share Posted June 18, 2022 If you take Nodebt's advice you should put a fairly deep crease in the upper left side to simulate a blow from a right handed opponent. "By hammer and hand all arts do stand." Quote Link to comment Share on other sites More sharing options...
Scott NC Posted June 18, 2022 Share Posted June 18, 2022 (edited) I was looking at that hole on the right hand side of it and thinking an arrow could have made partial penetration.... If it stuck, you would look like a pretty formidable opponent. Edit: I just wanted to add, Malenmetal, that I see things from an artistic view and was not making light of your project. I like it very much as a first attempt. Sometimes things go off track around here. I really would put that on my bookshelf and appreciate it. I might even let it set outside until a patina developed and then move it to the bookshelf. You have talent and desire, develop it. Scott. Edited June 18, 2022 by Nodebt Fix something... Quote Link to comment Share on other sites More sharing options...
Stash Posted June 18, 2022 Share Posted June 18, 2022 I would recommend Thak Ironworks on youtube. He does a bunch of armor and repousee (sp?) and is a very gifted craftsman and artist. Well above my pay grade, but I do pick up lots of good info from him. Steve Quote Link to comment Share on other sites More sharing options...
Malenmetal Posted June 22, 2022 Author Share Posted June 22, 2022 Thanks guys, I have see thaks videos and they really inspire me. I've been really busy with work lately but got some more time on a rivet gun this last week. I think I might weld up the helmet then a little gun blue and call it there and start the next one. I've been enjoying home metal work as there are no federal rules like at work and plan to keep it up when it slows down at work. Quote Link to comment Share on other sites More sharing options...
ThomasPowers Posted June 23, 2022 Share Posted June 23, 2022 That hole is definitely a blaster burn; looks like a helmet for a SF con anyway. I rather like the "brain" look however... for dishing: use a much "flatter" dishing hammer ground or forged from the main face of a ballpeen or my favorite; a railroad bolt---not spike, bolt! Forge into a block of wood with a dish carved into it. (The rule is hard on soft and soft on hard; so steel hammer over wood dishing form and rawhide or wooden mallet over steel ball stake for smoothing things out. Check with the local SCA group for someone doing armouring locally; they are generally very helpful with new folks---I claim it is because after doing it yourself; most folks decide that the "excessive prices" on things are DIRT CHEAP! (And the others become friends or shop help!) Quote Link to comment Share on other sites More sharing options...
Malenmetal Posted June 23, 2022 Author Share Posted June 23, 2022 Thanks for the advice man Quote Link to comment Share on other sites More sharing options...
ThomasPowers Posted June 23, 2022 Share Posted June 23, 2022 The SCA armoury was in my garage during college and I still have a ton of tools for armouring 40 odd years later. Quote Link to comment Share on other sites More sharing options...
Malenmetal Posted October 6, 2022 Author Share Posted October 6, 2022 Quick update, I haven't had alot of time with work but I was able to terribly tig weld the sides of the helmet. Added a patch over one of the holes, to look like a "combat patch" Quote Link to comment Share on other sites More sharing options...
Scott NC Posted October 25, 2022 Share Posted October 25, 2022 Keep working on your tig skills. That helmet is becoming more and more interesting. I have never heard of a "combat patch" on a helmet, but it has a nice ring to it. Maybe you could tig weld some spikes on it. Quote Link to comment Share on other sites More sharing options...
Frosty Posted October 25, 2022 Share Posted October 25, 2022 I believe they were just called repairs. Suits of armor were amazingly tough and often took many hits in combat without damage requiring repair. From what I gather from my bit of reading, a helm that required patching was most likely to be replaced and maybe salvaged for parts. Just get some scrape steel and run beads on it. Butt welds are easy to burn holes through and take practice. Get comfortable running beads on the face and then do lap welds and in no time butt welds will go like butter. When I was in school we learned to weld and braze with oxy acet torches before they let us try arc welding. It wasn't until I was took a trade school welding class I touched a tig torch. By then I was good at torch welding and experienced with arc so tig was easy. I sometimes forget lots of folk start out on tig and don't have that slow action gas torch practice to build from. Keep at you'll love it once you the the hang. Honest. Check this out, Master class arms and armor. https://www.youtube.com/watch?v=pLocCQeYX_0 Adam Savage REALLY likes armor and has a number of good videos. for example, https://www.youtube.com/watch?v=XY_RldJvCWs&ab_channel=AdamSavage’sTested Frosty The Lucky. Quote Link to comment Share on other sites More sharing options...
Goods Posted October 25, 2022 Share Posted October 25, 2022 That’s funny. I was taught to Tig weld by some of the old die maintenance members here at work many years ago. (That’s been my main method quick prototype idea trials at work, when I couldn’t bring myself to wait for someone else to do something.) I’ve setup many robotic mig/mag welders and the new pulsed servo torch systems are awesome, but rarely did any hand mig welding. Now, I have a little flux core welder in the shop and it’s a bit of a love/hate relationship… I have never torch or stick welded, but would like to have that ability. Keep it fun, David Quote Link to comment Share on other sites More sharing options...
Scott NC Posted October 25, 2022 Share Posted October 25, 2022 36 minutes ago, Frosty said: believe they were just called repairs. Give me a break. Combat Patch has so much more charisma. I still think a broken off arrow head would look better sticking out of that hole. I remember fondly learning how to gas weld when I was but a tyke. Quote Link to comment Share on other sites More sharing options...
Frosty Posted October 25, 2022 Share Posted October 25, 2022 My lack of charisma is showing again eh? So, yeah combat patch works and sounds sexier. I'll dry my blanket and keep it to myself. Did you REALLY skip to Jr. Hi (AKA Middle school) as a tyke!?! Frosty The Lucky. Quote Link to comment Share on other sites More sharing options...
ThomasPowers Posted October 29, 2022 Share Posted October 29, 2022 Combat Repairs were common; many maille shirts have patches of a different size rings/wire sometimes several different ones. Unfortunately the ones on display in museums are usually the *best* ones; the damaged ones are in back in storage. The Royal Armoury in Madrid, (now moved IIRC), used to have broken blades and damaged armour on display and I saluted them for that! In one of my research books; there is even a "repair kit" with etched and gilded tools for use by upper class servants to repair armour on a march or after a battle. Remember that fancy armour was an insurance policy that screamed: "This person is worth a whole lot MORE *ALIVE* for ransom than dead for looting." Full decorated plate and a trained war horse was like a Lamborghini in the early Renaissance. Peasants were lucky to have a leather jacket and a spear. Quote Link to comment Share on other sites More sharing options...
Charles R. Stevens Posted October 29, 2022 Share Posted October 29, 2022 Failed analysis as it applies to battle damage is it’s own animal. As we usually get to see the damaged equipment and personnel that make it back to base, we forget that those are successes and not failers. that many times patched mail shirt is the one you want to study, some one survived to have it repaired, otherwise it would have been broken down into pot scrubbers because it was a cursed object. Quote Link to comment Share on other sites More sharing options...
Cavpilot2k Posted October 30, 2022 Share Posted October 30, 2022 And when it comes to repairs, sometimes a piece of armor became too damaged to repair. Plate was then often cut up to make the pieces of a brigandine. We know this because many surviving brigs have pieces of plate of varying thicknesses and ages, indicating they were made from scrap and remnants of damaged contemporary plate armor. OP: Is there a reason you are using copper rather than steel? Quote Link to comment Share on other sites More sharing options...
Scott NC Posted November 4, 2022 Share Posted November 4, 2022 On 10/25/2022 at 5:39 PM, Frosty said: Did you REALLY skip to Jr. Hi (AKA Middle school) as a tyke!?! I learned thread cutting on a lathe in a high chair... Quote Link to comment Share on other sites More sharing options...
Frosty Posted November 5, 2022 Share Posted November 5, 2022 Hmmm. I learned thread cutting at my Grandmother's sewing machine on her stool. I had to wait till jr. hi metal shop 1 to learn to cut threads with a lathe. What I learned in Dad's shop was OJT. Frosty The Lucky. Quote Link to comment Share on other sites More sharing options...
Scott NC Posted November 8, 2022 Share Posted November 8, 2022 Yes, I have been known to exaggerate a wee bit from time to time. I inherited my grandfathers lathe and spent a lot of time and material turning bar stock into chips and turnings before taking classes at a votech. Never did get degree though. Quote Link to comment Share on other sites More sharing options...
Recommended Posts
Join the conversation
You can post now and register later. If you have an account, sign in now to post with your account.