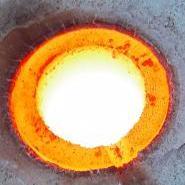
June 2, 20206 yr Hi All, I am new here but I wanted to share my 3 year long project to create a functioning arc furnace capable of melting pretty much any metal using simply the electricity from a common outlet. That was the goal anyway... After 3 years, I determined that, while a common 120V household outlet would likely melt steel in small quantities (less than 5 oz.) it wouldn't be efficient for anything larger. The project was inspired by a similar project produced by Gregory Hildstrom, you can simply google Hildstrom carbon arc furnace if you are interested in seeing his project. Anyway, his ran on a very expensive lincoln 275amp welder. My goal was to produce something similar but which would shrink the size of the furnace and increase its efficiency to the point where melting and casting steel at 2,000W was a reality. The accepted minimum wattage to melt a pound of steel from most sources is about 300W of direct heat from an arc furnace, making it much more efficient than coal or external (burning) heat source, which usually requires many thousands of watts of input to melt the metal due to all the wasted heat from inefficient combustion and the need to heat the surroundings to the melting point of the metal. Whereas an arc or induction furnace directly brings the metal up to its melting point and the incidental heating of the surrounding is only useful to keep the metal molten long enough to cast it. The stages were as follows: Furnace Mark I, II and III utilized a UPS tranformer putting out 24V AC or 36V DC (once rectified) Mark I was an AC furnace using two handheld graphite electrodes and was an indirect heat type. there was no smoothing and the arc was unstable and not easily capable of what I was looking for. It was scrapped for parts. below is the super simple schematic of the furnace. Mark II Mark II was a rectified DC furnace which was manually controlled. It tended to trip it's breaker constantly as it had no current control mechanism. Mark III was the first Computer controlled furnace and while it worked and the computer was supposed to regulate the current by shunting it through a resistor when it went too high, it was not fast enough and the leads began to overheat from the high current running through them (the transformer leads were only 10AWG and couldn't be changed as they were part of the transformer. This furnace also had a water cooling system in it which would keep the electrode cool by housing it in a water jacket and feeding the coolant through a small PC radiator to maintain its temperature. Mark IV was the most sophisticated furnace yet. It ran on a 1500W switch mode power supply and had both an arc furnace feature and an induction preheater. Sadly it was never completed and burned up the Pulse width modulator used to control its current during testing. These are a few of the pictures of it. A schematic would be very time consuming to create so I never did. Below are some of the production pictures and initial testing. The Mark V Furnace Worked and is the one that will be the benchmark for any future furnaces. It is capable of around 6,000W but is run around 3,000W most of the time. Power supplies are expensive so I did just cop-out and buy a 200A welder which I couldn't even build for the price I got it for and it has been very reliably running between 60A and 100A. The furnace has an arc length adjustment which, once the amperage is set, is how the total wattage of the furnace is determined. Cont'd below Below are some of the pictures of it running with both copper and steel. it will melt up to 3 lbs of copper all day long on a standard 120V outlet at 1,500W A view of the control board of the furnace. The screen displays amperage, voltage, wattage and Watt-hours of runtime. The Amico welder below is an IGBT inverter welder capable of 100% duty cycle at 153A running on a 240V two phase outlet. This is a blob of molten steel that cooled enough to get a good picture over the top. This was about 18oz of steel and took around 8-9 minutes to melt at 1,900W. Videos of the furnace running can be found here. https://drive.google.com/drive/folders/1QrslaRjOQTNyxaA5C7mcQu4EX4auMvuc?usp=sharing
June 2, 20206 yr How are you controlling the Atmosphere and alloying? It's a strange thing that what you melt may not be what you end up with when poured and cooled. I think it would be neat to replicate some crucible steel like Huntsman used to make.
June 2, 20206 yr Author 20 minutes ago, Chris C said: Your link is locked, CGun. Sorry. This one is open: https://drive.google.com/drive/folders/1QrslaRjOQTNyxaA5C7mcQu4EX4auMvuc?usp=sharing 23 minutes ago, JHCC said: Welcome to IFI! If you haven't yet, please READ THIS FIRST!!! Thank you. I just read through it. I also added to my profile.
June 2, 20206 yr Author 3 hours ago, ThomasPowers said: How are you controlling the Atmosphere and alloying? Currently I have two options. The crucible housing is pretty well sealed, and as you may have guessed, as the steel beings to melt it starts to burn, this shouldn't change the composition of the molten steel other than potentially introducing slags to it. Most industrial arc furnaces have elaborate and very expensive testing methods for the composition of their steel, mine will not be scientific but I feel I could get a decent investment cast steel product using a mild steel bath. As such, if I were to try to make crucible steel, it would need to be cast, then worked out in forge through hammering. As it is, my goal was small investment casts that only need to be the strength of a mild steel for now. The second method is to trickle argon into the crucible with a copper tube at a rat of 1cu. ft./hr. This worked very well to keep the metal pure, but Argon's breakdown voltage is very low so the machine will not produce the power at a given arc length as it does in air. So the arc must be longer which tends to burn through lid refractory. Unfortunately there really aren't any non-exotic materials that will withstand the 10-15,000 degrees of a high powered arc for long... that said, I am making a hot face refractory from aluminum oxide with a fireclay (30% fireclay, 60% Aluminum oxide and 10% Sodium silicate binder) for the new lid currently. I am building a new crucible housing as well. This is for steel as all I had was a graphite crucible when I ran the first melt and, even knowing that the steel would absorb the carbon from the crucible, I ran that melt anyway. It carved a hollow in the crucible so the new one is made of Zirconia with a graphite anode at the bottom. we will see how that goes. 2 hours ago, Chris C said: That thing is just crazy! It took 3 years of experimenting and lots and lots of frustration to get it to where it is at. The only thing I may end up doing with the Mark VI version of it would be to make the housing contain everything except the external electrode wires and the cooling lines. Does anyone have any ideas on how to test the steels alloy without a digital spectrometer or some other million dollar piece of equipment? Edited June 2, 20206 yr by Mod34 Trimmed quote
June 2, 20206 yr There is a lot of steel chemistry in slags both for protecting the melt and changing it. I have some bloom I am thinking of melting as it was extremely very slaggy and wondering if I could get a decent puck from it in a total melt. Trying to consolidate "chicken soup" bloom is a real pain. Using wooden hammers and a stump as metal ones would just splash it.
June 2, 20206 yr Welcome aboard CGun, glad to have you. I am so out of my depth anything I might think is prime Dunning Kruger material. It sure puts to bed my thoughts of buying carbon gouging rods, firing up the Ranger 9 and just arcing away. I do however know the difference between having an idea and having a plan. Two very different things and I'm pleased as can be to follow along with a man with a plan. Frosty The Lucky.
June 2, 20206 yr Author Melting the steel and fluxing it should remove a lot of the slag. At least that is what I do with lead (beeswax flux) and Aluminum (borax flux). I have never tried to flux steel because the challenge is always keeping it up above melting. I have heard that calcined lime can be used as a flux for molten steel and should do the same thing as fluxes does for other metals. when steel is molten, unlike other metals, I have read a level of slag on the surface is beneficial to provide insulation and an atmosphere barrier. Steel slag also has the advantage of being electrically conductive so the furnace still operates normally. But again, it has been three years just to get steel to melt reliably, so I am looking forward to the knowledge of the forum members here going forward on metallurgy and casting procedures. Edited June 2, 20206 yr by Mod34 Excessive quoting
June 2, 20206 yr Author Thank you for the welcome! If you have a ranger 9 already, The system I built isn't specific to my welder beyond knowing what it's open-circuit-voltage is for the micro-controller input. I am very excited to actually have this thing working and I am looking forward to learning from the members here. After all... any fool can melt metal, it's what you are capable of doing with it once it is molten that defines the nature of the craft. Most of my challenge was in getting the computer to maintain an arc and make that arc adjustable... everything else was cosmetic or involved refractory and heat resistance which has been known for the past 2,500 years. I can't wait to get the new crucible housing done and start slip casting some lost wax projects. Edited June 2, 20206 yr by Mod34 Excessive quoting
June 2, 20206 yr 1 hour ago, CGun said: I also added to my profile. I see you're in Saratoga Springs. I occasionally get up that way on my business travels, so I'd love to drop by to say Hello once travel restrictions at my job have been lifted.
June 2, 20206 yr Oh I have the welder I've never attempted an arc melt other than welding. Reading your post verified what I'd determined decades ago, an arc melter is WAY more complicated than just striking an arc in a crucible. The closest to a useful maybe thought I have is to look into phosphate bonded zirconia refractories. I find sodium silicate has way too low a melting temp to even rigidize ceramic fiber in the outer liner of a propane forge. When you say 10,000 - 15,000 f. environment I start thinking ablatives and plasma shielding. Frosty The Lucky.
June 2, 20206 yr Author I originally thought that too but then I read Tim Tinker's (I don't think that is his real name) blog. He was a chemist who turned to making backpacking stoves. He has a whole section on the chemistry of Sodium silicate refractories and how they behave when fired, mainly that the silicate becomes silicon dioxide in the presence of high heat and atmospheric CO2. This is why, when it is used in fireplaces it is becomes water insoluble. I am going to give it a shot and if it doesn't work, I will go on to something else (some form of ablative I guess. I think the 10,000F is the temperature of the plasma in the arc and not a measurement of the surfaces and air surrounding it. but I would say it is still a pretty harsh environment nonetheless. The new crucible is fused zirconia which should survive for a while. It is what is closest to the arc. The lid is probably 2-3 inches from the arc so it gets some heat but not as much as the steel. This is also why it is set up DCEN so that a majority of the heat is on the surface of the metal and not at the electrode. If you hook it up backwards, it atomizes the whole 12" electrode within about 4 minutes. hooked up correctly, each electrode lasts for 45 minutes or more. In doing research, I looked at Magnesium Oxide - Chromium refractory bricks, but those are only available in industrial quantities. so I am just going to have to deal with the fact that the steel crucible will probably need to be reworked every 10-12 firings. In essence... my refractory becomes an ablative for the ceramic fiber beneath. Do you know where I could get Phosphate bonded zirconia in non-industrial quantities? Edited June 2, 20206 yr by Mod34 Excessive quoting
June 2, 20206 yr I don't know about the 2400 years on the refractories; Huntsman had a lot of issues getting refractories that would work well for molten steel and he was just back in the 1700's! (Yes they have been melting steel for a long time; I've read "Crucible Steel in Central Asia" by Dr Feuerbach; but refractory issues seem to have been a fairly constant issue.)
June 2, 20206 yr I'm way out of my depth on this. I understand the reason for DCEN it's common to welding for similar reasons. Putting the heat from the arc on the surface of the joint melts the joint rather than the rod increasing penetration without all the bad aspects of over amping a weld. That I get. Not the specifics but the basics make sense in my ignorance. I can see the handle I have on refractories live in a different world. Frosty The Lucky.
June 2, 20206 yr Author I am glad I am not the only one with issues with refractory. As Frosty pointed out.... my refractory has just become a slowly consumed ablative on the lid. I was using a super simple plaster, crushed firebrick, perlite, aluminum oxide and talc. It actually held up to 2 steel firings, 2 copper firings and countless hours of experimentation before giving up the ghost and I could probably get one more copper firing out of it. The crucible is what is crucial and zirconia is going to be the way to go I think as graphite gets absorbed into the steel. 5 minutes ago, Frosty said: I'm way out of my depth on this. I understand the reason for DCEN it's common to welding for similar reasons. Putting the heat from the arc on the surface of the joint melts the joint rather than the rod increasing penetration without all the bad aspects of over amping a weld. That I get. Not the specifics but the basics make sense in my ignorance. I can see the handle I have on refractories live in a different world. Frosty The Lucky. I actually am hoping some of the guys, like yourself, on here could help me sort out my refractory issues. I thought I saw somewhere on here (I have been lurking for quite a while before I joined) that there was a DIY refractory page.... Edited June 2, 20206 yr by Mod34 Excessive quoting
June 2, 20206 yr I think the chemical activity of stuff at high temps can be surprising to everyone! We know a whole lot more about things that work nowadays; but I feel that a lot of that was through trial and error rather than being able to sit down and design a refractory from the ground up and have it "work" as expected. As some of the really really fancy ones are fairly expensive; ablative may be the way to go! (In Merv the grog for the crucibles was crushed previously used crucibles---upcycling at it's best!)
June 2, 20206 yr Author 2 hours ago, JHCC said: I see you're in Saratoga Springs. I occasionally get up that way on my business travels, so I'd love to drop by to say Hello once travel restrictions at my job have been lifted. Might be fun! 1 hour ago, ThomasPowers said: (In Merv the grog for the crucibles was crushed previously used crucibles---upcycling at it's best!) plus, I feel like the crushed used crucibles are a good idea. after all, that is the only part that survived the high temperature right? I may end up using a dish zirconia crucible from the surface layer of the lid to resist the intense UV and high heat put out by the arc. Something like this inverted with a hole drilled through it for the electrode to go through: Edited June 2, 20206 yr by Mod34 Excessive quoting
June 2, 20206 yr The DIY refractory section or thread is probably somewhere if it wasn't lost when the forum changed OS a few years ago. Things got really flaky and maybe half of the posts were lost, especially pictures. I stopped messing with DIY refractories years ago, when I discovered commercial refractories WILL outperform my best efforts. I still have probably 3/4 sack of 20 year old fire clay and it's still dry. I keep it in a salvaged steel 15gl. grease barrel with a gasketed clamp on lid. I really miss having access to those. <sigh> Have you tried a kiln wash? Plistex is a good one, it fires like a ceramic and is reasonably resistant to high temperature chemical erosion. I've switched to using Kastolite 30 li, water setting, castable high alumina bubble refractory. Another bubble refractory was just posted and using evacuated alumina spherules (bubbles) and a higher % of alumina is both rated to a higher temp and is more chemically resistant. Frosty The Lucky.
June 2, 20206 yr Author I honestly think a 3000F refractory will work for everything except the lid where it is in direct line of sight to the arc. I will have to order a bag of Kastolite 30 water setting stuff. I hate to pay $40 for shipping. I wonder if my local masonry supply could order some and throw it on their next shipment... Thank you fr all your help and knowledge on the subject! Edited June 2, 20206 yr by Mod34 Excessive quoting
June 2, 20206 yr 5 minutes ago, CGun said: I will have to order a bag of Kastolite 30 water setting stuff. I hate to pay $40 for shipping. I I don't know how much you will be needing but you can PM Glenn and get it here. Pnut
June 2, 20206 yr Author 12 minutes ago, pnut said: I don't know how much you will be needing but you can PM Glenn and get it here. Pnut Thank you! I probably only need about 20lbs
June 2, 20206 yr Check with HVAC service and supply companies, it's a common refractory for furnaces. If they don't sell they know who does. I get it from "Distribution International" in Anchorage Ak. but the company has brick and mortar stores all over the country. They'll order the exotic stuff too if you want, it's a good outfit. Frosty The Lucky.
June 2, 20206 yr Author So after all this talk today, I took the furnace out back with the new lid and the old furnace crucible housing as it hasn't degraded as badly as the original lid to fire it up and see how my DIY refractory survived. Anywho....In the process I ran a melt of just over 2lbs of copper in the furnace. Settings were 2,000W for a total runtime of about 12 minutes (about 45A at 44V). The watt meter on the machine said 640Wh consumed. This amounts to a total electrical cost of about $0.10 to bring 2 lbs of copper up to pouring temperature. This is the first time I have run a cost benefit analysis and I am actually shocked it is so low. I forgot to check it for a minute after it was melted and the copper got up over its pouring temp with an estimate of about 2,600F based on its incandescence (so a very rough estimate)... but it looked like the brightness of molten steel. Anyway here are some of the pictures. unfortunately I forgot to take a picture of the melt while it was liquid because it would have been a good shot, but I was trying to move to keep it hot and pourable. I realized after I had the molten bath, in my excitement to get going, I hadn't prepared any molds so I quickly drilled some holes in chunks of old firebrick and poured into those. And just like Frosty had warned me, the Sodium silicate did get a little gummy on the lid and turned to glass. however, it held up OK. I am now thinking that the refractory in direct contact with the crucible and lower anode will be fine for many firings while the refractory of the lid may be more of an ablative coating which occassionally needs to be repaired or restored. (yes it was concave shaped before I started).. It has been cooling for about 45 minutes and is still too hot to touch. I am wondering if this has more to do with the off-gassing contaminating the semi-liquid rerfractory coating and not so much a degradation of the coating itself... What does everyone think?
Join the conversation
You can post now and register later. If you have an account, sign in now to post with your account.