ThomasPowers Posted June 23, 2020 Share Posted June 23, 2020 Why it's so much easier in a brand new field. I remember reading about the early days of radioactivity when folks were doing groundbreaking experiments pretty much on their kitchen table. Now do you know why BBs are called BBs? Quote Link to comment Share on other sites More sharing options...
CGun Posted June 23, 2020 Author Share Posted June 23, 2020 Because they are bigger than BAs but smaller than BCs? or in other words... bigger than a Bada** but smaller than British Columbia. Quote Link to comment Share on other sites More sharing options...
ThomasPowers Posted June 23, 2020 Share Posted June 23, 2020 Based on shot gun pellet sizes. When you get a gun that will load and shoot British Columbia please do let me know. Quote Link to comment Share on other sites More sharing options...
CGun Posted June 23, 2020 Author Share Posted June 23, 2020 oh I thought you meant where did the phraseology come from... like why do the shot sizes go from B to BB to BBB to T and then to TT and F? There probably is some unified British shot size standard developed by Westley Richards in 1852 that standardized them.... I don't know myself though. Quote Link to comment Share on other sites More sharing options...
ThomasPowers Posted June 23, 2020 Share Posted June 23, 2020 Well they originally shot shot. Quote Link to comment Share on other sites More sharing options...
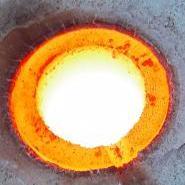
CGun Posted June 24, 2020 Author Share Posted June 24, 2020 So I couldn't wait so I set up the crucible with its water cooling system and took a crack at running it. Bottom view under crucible housing where the water cooling comes in for the anode: View of the top: This is temporary to find any issues before I ratchet everything down. And it works! This was just on the preheat cycle so I didnt let it get too hot. Had a few water coolant leaks but other than that it works great! Now to test how far down the anode will melt.... Quote Link to comment Share on other sites More sharing options...
ThomasPowers Posted June 25, 2020 Share Posted June 25, 2020 Water, Leaks, Electricity: I bought my first house from a widow of a fellow who was working under the kitchen sink with metal cabinets and a drop light with electrical outlets on it. He was a maintenance guy at the local phone central office and did a lot of work with electricity. Left a wife and two young kids---PLEASE BE CAREFUL! Quote Link to comment Share on other sites More sharing options...
CGun Posted June 25, 2020 Author Share Posted June 25, 2020 The water is distilled and has about 5% anti-freeze mixed with it (ethylene glycol) making it non-conductive, or at least tremendously resistive. Otherwise, the current could travel through the waterlines and short back off the case through the aluminum radiator which is hard fastened to the case and thus the ground. Also I didn't try to mop anything up while touching both the cathode and anode lines... I shut it down first... I just let it run while coolant was dripping, then shut it off and mopped stuff up. I think I have plugged most of the leaks at this point. I am not in the habit of playing with wet electrical connections. That just seems like I would be begging for a Darwin award. Thank you for your concern though... I have a young child and I cannot imagine leaving her without her father, so I am overly cautious about things that could be dangerous... not so much when I was young and it is a miracle I still have all my fingers from all the "fireworks" I had made by raiding my dad's reloading supplies... I'm a little wiser now... I hope. Quote Link to comment Share on other sites More sharing options...
JWR Electric Posted October 27, 2021 Share Posted October 27, 2021 I know this thread is old, but I really wanted to chime in real quick and also propose an idea or two since I am also designing an arc furnace of my own. I am a certified welder, so I would like to confirm that the info about welding in this thread is correct as far as I understand. Also, I was impressed when I read about the idea of coating your electrodes in copper. This is exactly how the carbon arc electrodes I've used in the field are constructed. So hats off for coming up with such a smart idea. Also, if you want a idea on how to get your electrodes coated in copper easily, roll the electrode up tight in some copper foil and spot weld it along the seam. However, instead of using copper, What I do is coat my electrodes in veegum bonded silicon carbide with a pinch of zirconium silicate. The reason I do this is because silicon carbide has an insanely high breakdown temperature and is very refractory, as well as becomes conductive at high temperatures. This means that the electrode is consumed somewhat less since the carbon is being coated with refractory material and some of the burden from the arc is being transferred to the silicon carbide. My next experiment will be to create an electrode from ultra fine silicon carbide and pure, unbonded graphite in a 50/50 ratio bonded with some veegum and a pinch of zirconium silicate. My theory is that said electrode will have enough conductivity to get the tip of said electrode hot enough during the initial few seconds after striking an arc to electrically activate the silicon carbide. And since silicon carbide has a massively high thermal breakdown temperature, theoretically this should result in an electrode that lasts a lot longer and doesn't get the metal melt nearly as contaminated with carbon as with a pure carbon electrode. I'll be making a new thread that goes into more detail later on in the experimentation process after I have made my first successful prototype. Quote Link to comment Share on other sites More sharing options...
CGun Posted October 28, 2021 Author Share Posted October 28, 2021 (edited) Hi Wow, I didn't even realize this thread was still alive and that anyone else was interested in melting steel with a desktop arc furance! I would love to see some pictures of it! As to using SiC to make the electrode, are you talking about the electrode descending into the pot or the anode at the bottom of the pot. How are you bonding the SiC into the shape you want? That is an interesting approach and have never thought of making my own electrodes as the refractory nature of them makes this difficult. SiC has a much higher electrical resistance than Graphite which will mean less of your energy is going into the metal and more is being dissipated by your electrodes as masses of heat that could be used to your advantage if you could figure out a way to do it! The crucible in my furnace is SiC/Graphite and keeps the steel relatively clean and doesn't add much carbon to it. The reason industrial arc furnaces use a steel anode instead of any other metal is that it doesn't really pollute the steel in the pot with added chemicals, as all it would do is add steel. That being said, because mine is water cooled, very little of it actually melts. In fact, last time I emptied the pot to clean the electrode, none of hardened molten pool was even stuck to it. But since the crucible is SiC already, maybe I should just use it as the anode and go from there and water cool the conductor at the bottom of the pot. As to coating the electrodes in copper, I wish I could take credit for that, but they are just bought that way as gouging electrodes. I am re-thinking my armature though and may go up to a larger electrode size to get it to last longer. As to the electrode contaminating the metal, I don't think it does much. Graphite electrodes are used in industrial arc furnaces. The carbon that sublimes off of it does so as Carbon Dioxide (in the presence of air) I believe, and very little of it enters the pool. Otherwise, they wouldn't need to add carbon to the metal, they could just run the furnace for a bit and the electrodes would add it in. I am interested in your SiC electrodes though, they should last longer in air at the arc temps I am running at (probably 10-20,000k) but most of the heat goes into the pool as you well know, running DCEN like my furnace does. Those are all good ideas! I need to experiment a little more with mine. It has been put away for a little while as I have temporarily moved on to other projects. Thanks for following up on this thread. I am probably going to pick your brain as I go forward with my redesign. That's the problem... I am never quite done with the furnace even when it works well like it does now. I always am thinking of ways to add more power, to make it more efficient, to make it prettier and more ergonomic to use... plus the fact that I want to computerize the whole thing so it can be operated remotely from a safe distance.... All addendums that someday I will address. Let's see some pics of your arc furnace, I always love to see other peoples approach to a project and since there are like 5 guys in the Continental U.S. who have built one of these... even more so! Edited October 28, 2021 by Mod30 Remove @name tag Quote Link to comment Share on other sites More sharing options...
CGun Posted October 28, 2021 Author Share Posted October 28, 2021 The next project with this furnace will be to introduce a decarburizing port into it. I am probably just going to use the Bessemer method and a small inflator pump. this will be part of the crucible housing and once the pump is started, it shouldn't need the arc to stay molten as the air will burn iron and increase the temp of the pot (hopefully), then pour with a slag ladle to keep slag from going into the mold. The end of the decarburizing tube will be a porcelain grill element tube like this: Quote Link to comment Share on other sites More sharing options...
ThomasPowers Posted October 28, 2021 Share Posted October 28, 2021 Have you read about Kelly's experiments decarburizing? Quote Link to comment Share on other sites More sharing options...
CGun Posted October 28, 2021 Author Share Posted October 28, 2021 I haven't. Do you have a link? I don't want to buy a tank of pure oxygen as I have no where to store it right now and air is free and has enough oxygen to get the job done. Quote Link to comment Share on other sites More sharing options...
DJLonghammer Posted August 18, 2023 Share Posted August 18, 2023 On 10/28/2021 at 10:08 AM, CGun said: The next project with this furnace will be to introduce a decarburizing port into it. I am probably just going to use the Bessemer method and a small inflator pump. this will be part of the crucible housing and once the pump is started, it shouldn't need the arc to stay molten as the air will burn iron and increase the temp of the pot (hopefully), then pour with a slag ladle to keep slag from going into the mold. The end of the decarburizing tube will be a porcelain grill element tube like this: Hello, I apologize for jumping in late, I just discovered this thread and am new to IFI. I take much inspiration from your project and would like to create something similar. If possible, perhaps a Czochralski growth setup. I’ll try to do as much I can from the information you provided, but am also curious about seeing your setup in person. My location is in CT Thanks, Alex Quote Link to comment Share on other sites More sharing options...
Clayton Teague Posted January 12 Share Posted January 12 Could you direct me to an electrical diagram of your model 5 of your arc furnace? Would very much appreciate learning of your approach. Thanks, Clayton Teague Quote Link to comment Share on other sites More sharing options...
Recommended Posts
Join the conversation
You can post now and register later. If you have an account, sign in now to post with your account.