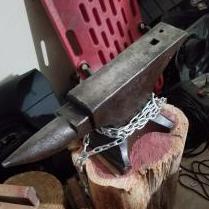
December 20, 20196 yr Hello all, I just yesterday got my hands on a 150lb (1-1-10) Peter Wright, 1860-1890 it looks like. I paid right about $0.50/lb. This is my first anvil. My 7 year old got to make a crude rebar knife 3 months ago at a tractor show, I went to a festival with a large number of smiths back 2 months ago, and this last Saturday I took a class- made nails, leaves, flowers, and horse head bottle openers. Had a blast. Here's the reason for the price- this girl has seen her better days. The face is... I don't want to say trashed? It needs love, and I want to give it. The local smiths recommended building it up with 7018, then hard facing in 2 passes, all with a 400-450 preheat- the recommendation was over the phone, they didn't see the degree of delam. I read the article on restoration using Stoody rods, but that is a bit of a pricey prospect for a heavy equipment tech. I have access to a large amount of 7018 rod, a fair amount of 6011, then maybe 5lbs each of WearArc 3-IP and 5-IP. I am not in a position to argue with the way recommended in the 1998 article- I have 9 hours of smithing experience, and have seen less than a dozen anvils in my life leading up to the festival I went to. I understand PW has quite the legacy, and I want to respect that. My game plan was to chisel off the loosened pieces of face, thoroughly clean off the corrosion, chamfer and slightly undercut the edges of the breakage points, pre-heat with a pair of torpedo heaters, then use the shop Miller to build the whole face up to a reasonable level, likely in a stitch pattern to prevent excessive localized heating and stresses (may even throw in power-needling in between for stress relief) then rough-grind level and flat before a double layer of impact-resistant hard face- be that 5-IP, 1105, or something else. It should be said, I am not a welder, but I can weld reasonably well and have access to certified welders that would be lunch or a 12-pack away from helping me if need be. Anyway, I want to do this right. I'm a dozen or so articles into reading, a half dozen YouTube videos in, and many conversations with people in real life. I would appreciate the input of those with waay more experience than I. As an aside, for my class I was on a 75kg Euroanvils anvil. Had quite nice rebound and a pleasant, though muffled, ring. Thanks in advance! (Yes that is a cutting edge- I didn't have a better straight edge long enough to span the face)
December 20, 20196 yr Welcome to IFI, I always suggest reading this to get the best out of the forum. READ THIS FIRST I can't help with your question because when I tried what you are proposing many years ago, I caused more harm than good. Is this the article you read? Anvil Restoration Robb Gunther and Karl Schuler's Anvil Repair Process - Anvils, Swage Blocks, and Mandrels - I Forge Iron If I had seen it and followed the directions to the letter, my outcome may have been different.
December 20, 20196 yr I have been a certified weldor for 35 plus years. When i purchased my first anvil my first thought was weld the bad spots then put in my mill to make the face perfectly flat. I have come to realize that it is good idea to beat on it a while first before you do something that depending on your skill level could ruin it. and may not even be needed
December 20, 20196 yr There would seem to be usable surface on the face of the anvil. Turn the horn the other direction and use the anvil for a year (2000 hours) before making any decisions. You may find that you do not need to make any repairs. Take the time to research what is the best option to repair the anvil or find a repair day at an event.
December 20, 20196 yr Author Fair enough, but do you think there is enough meat left to fuller (words... wrong??) I think that even out at the heel the radius is a bit much to try and draw out for, say, another bottle opener such as the ones I made (I know it's a bit crude, but by golly, I made that!) I may be wrong though. Like I said, I may be a capable HE Tech, but a Smith I ain't (yet)
December 20, 20196 yr The first thing I would make for that anvil would be a hardy tool that has radius edges for drawing out. A heavy piece of plate with a stem welded on will work. Other hardy tools to fuller can be made. You can also draw out metal using the horn. The items you show look a whole lot better than my first attempts.
December 20, 20196 yr Author Well, then all of that being said, what WOULD you do for the time being? Knock back the flakes of delaminated hard plate? The hardy SEEMS to measure about an inch and a sixteenth, though it is fairly worn at the very top. I have a variety of pieces I was planning on using before this beauty showed up- old seized track adjusters, lengths of rail, thick cutting edges (stupid-hard steel with wicked abrasion resistance, couldn't speak to impact) I need a forge now... hmmmmm.... I have a good friend who is intent on building a waste-oil burner powered forge but I rather enjoyed the coke forge at my class. That and propane is much cleaner than waste oil.... decisions decisions... That, and the fact that of my 20 or so hammers, I still need a rounding hammer- the one at class was forged from old hydraulic cylinder rod. I loved the way it felt and did work. Probably going to have to wait till the new year, we will be driving up to CO to visit family for the last week of the year.
December 20, 20196 yr If you have solid fuel available, look up JABOD, just a box of dirt. Start using the anvil as is and figure out what you can not do with the anvil. That includes work-a-rounds such as hardie tools. The more you use that anvil the more useful it will become.
December 20, 20196 yr Please don't monkey with the face plate until you have used it and found out what it cannot do in it's current condition. It still appears to have plenty of intact face attached. Probably took a hundred or so years to wear that much off, looks like it has a few hundred left in it. Just my opinion... Have you done ball bearing and ring "testing"?
December 20, 20196 yr Author I don't have any ball bearings at this time, but I have gently rapped it with an 8oz pein. Out towards the heel it is crisp. Up towards the shelf and in general around where it has developed a belly to it, it still rings but is a bit deadened. You can tell the delamination is there. I'll try seeing if I can wrangle up a ball at work before we leave for a week for Christmas I at the very least would like to remove the bits that look prone to flying off in a couple of hits (they are small and only 2 or 3) and maybe clean up the mushrooming of the iron. I've had hardened steel embed in my arm before, I'd rather not repeat the experience if it can be helped. When I get home I'll snap some closer and better lit pictures of the worst of the flaking. Edited December 20, 20196 yr by CtG
December 20, 20196 yr Driving up to Colorado? Are you in the New Mexico area? I am and took an abused anvil to an anvil repair day hosted by a professional welding instructor and smith in the southern part of the state. I supplied a propane tank for preheat and covered consumables and got my anvil back in great condition as per the Gunter/Schuler method. (BTW Robb Gunter was the demonstrator at the December meeting of the New Mexico Artist Blacksmith ABANA Affiliate) I'll second the suggestion to make a hardy tool with the radii you want. Make it for your anvil so that you can slip it in the hardy and use any of the 4 different ones. Welding on wrought iron is a bit different than welding on steel. You may want to practice a bit before you mess with your anvil.
December 20, 20196 yr Author College Station, TX I was considering buying a lump of wrought to practice with before I try to weld anything- practice never hurts anyway! Any way you slice it I will need to practice making tools anyway haha
December 20, 20196 yr Little Blacksmith is in College Station. You may want to try contacting him, as he is doing classes now. I would just grind off the mushrooming, and smooth the edges up to a nice radius. You do not want sharp corners. If you need one, put it on a bottom tool in the hardy hole. Also the bottom tooling does not have to a a solid square shank. You can use flat bar and go across two corners diagonally across the hole.
December 21, 20196 yr Author I took a class at Steep Hollow Forge in Bryan. I saw a Craigslist ad for someone selling coke-fuel and doing classes, wonder if that is who you mentioned.
December 21, 20196 yr I would grind and weld that anvil. Using the proper methods. My position clearly goes against the popular opinion here, but as one of the rare professional smiths who still post on IFI I would like to point out that efficient forging on every edge and face is the bread and butter of shaping a work piece. Where on that anvil can you make a crisp half-faced blow? With the majority of the mass under your hammer? Those type of blows are why it's worn out. Half-face and other edge adjacent work chipped and spalled it because the old timers knew that's how you make complicated shapes quickly, and when the anvil gets knackered fix it or buy a new one. A hardy block with various radii sounds good, but on a London pattern there is no mass under the hardy hole and the loose connection between tooling and anvil sucks energy out of your strike. If your anvil moves in any way when you hit it, you have lost energy. It's probably just fine for making a knife. If you are doing 15 minuets of forging on the flat, then 2 hours of grinding, go for it. But it seems like a car with a flat tire to me. It will still work, sort of, but it could easily be a lot better.
December 21, 20196 yr 12 minutes ago, Judson Yaggy said: Using the proper methods That is the secret to restoring an anvil. However very few understand how to do it.
December 21, 20196 yr Indeed, but I would be remiss if I failed to mention both the correct method (look it up people) AND the fact that having a better tool will help produce better work with less effort.
December 21, 20196 yr I posted a link yesterday to the correct method. If I remember someone said they couldn't afford the proper welding rods.
December 21, 20196 yr 3 hours ago, Judson Yaggy said: I would grind and weld that anvil. Using the proper methods. My position clearly goes against the popular opinion here, but as one of the rare professional smiths who still post on IFI I would like to point out that efficient forging on every edge and face is the bread and butter of shaping a work piece. I agree. Furthermore that anvil, besides looking like the skin of a dehydrated Rhino, seems to me to be damaged by more than just hammer. and chisel. Someone messed with heat on that anvil. Then again I may be wrong and it is just lack of water
December 21, 20196 yr Yup, they're right. That's a fixer upper for sure. But, it ought to be worth the work and all to get it back into shape.
December 21, 20196 yr Author I'm not averse to work, nor trying hard to do things the right way. If it comes down to doing the repair process, I have the means grind/undercut, to preheat, to weld (the monster Miller at work is I believe a 600amp unit, so plenty of overhead room for clean power) and plenty of empty oil drums that could be cut down to house vermiculite and a toasty anvil. Not to mention chainfalls, overhead cranes, forklifts, etc to manipulate it hot. The bit of questioning room is in the rod choices- I have no issue with the combo suggested (outside of price) but am curious about alternatives. For example, would any of the aforementioned rods sub out for either of the Stoody rods. That may be a call for the welding rep. Dry as a dehydrated rhino skin? Lack of water? Color me confused haha The dull-iron-grey sections got gently hit with the sandblaster at work, I wanted to better assess the surface and such. I then rubbed a light layer of MMO just to stave off corrosion unit a direction is went in. Anyway, I am enjoying the discussion- always room to grow and learn. Hitting the highway for CO, long day!
December 21, 20196 yr I once took the rod description to the welding supplies nearby to see the equivalent in Australia only to get blank looks ... you know the one that say ... whaaaat? Post some pictures of the progression on that repair. You have most that is needed to do it. I say most, only because you have never done it before. The anvil is toast as it is, may as well try to resurrect it ... and $75? bargain. If you are going to name it consider Lazarus. If you are not religious then Rhino.
December 21, 20196 yr I would name it Chipper. I believe there is a discussion here about substitute rods for the Stoody rods. Reading up on welding wrought iron will help too.
December 31, 20196 yr Author 20191231_173820_1.mp4 (Son was in mid-stream about police cars and fire trucks when I took this) Well then, a Merry Christmas indeed! My father-in-law, Peter, decided to pay for 3/4 of what I found in an antique thrift store up in Colorado A Peter W. from Peter! Completely unexpected to say the very least! Has a beautiful ring, picked up some 5/8" ball bearings on the way home, will rebound it sometime in the next 24. (Done! Very nice rebound on the 124- the 150 is maybe 30% haha) Also snagged some rough tongs from the neighboring antique thrift store for $4, some cleaning up and adjusting and they will be totally serviceable! Now to work on that forge! Note: I still would like to fix up the 150lb- that blessing seemed to open up doors haha
January 2, 20206 yr Author Started in on some cleanup last night to see how far back the delamination goes- its deep. No wonder the rebound is so markedly less than the 124. Ground the mushrooming back and knocked free some of the cracked out pieces- there is more delam to peel back still. Oiled her lightly until I have time to do more cleanup. This will be a long process as life is rather busy right now, but I'll try to keep things updated.
Join the conversation
You can post now and register later. If you have an account, sign in now to post with your account.