July 12, 20179 yr I have a question for you fine craftsmen: My main material, for now anyway, is railroad spikes. Now, before you all start in on me!!! Lol. I can get tons of them for free. (My neighbor is a rail cop so I guess if he's the one giving me buckets of them at a time then there is no need for me to ask legal questions. Lol) But, anyway, I see a lot of neat items made from these. Fire pokers, shovels, Joey Van Der Steeg (TechnicusJoe) makes tongs out of them. My question is, and not just pertaining to railroad spikes, what are some good techniques for drawing out metal? Temperatures ranges? I mean, I see some of this stuff appears to be several feet long, coal rakes, pokers, claimed to be drawn out of one piece, not faggot welded or anything of that nature. How do you do that especially with spikes because I couldn't get one foot out of the last spike I drew out? Thanks fellas!
July 12, 20179 yr You have an awful lot of spike left there to draw out! I have a decent collection of spikes but haven't touched them simply because I don't feel like drawing that much out for a rein or handle when stock in suitable dimensions already exists. Granted, there is much to learn from the sweat of it. I suggest that, since you have access to so many of them, go ahead and practice drawing some out. Maybe make some tongs like Joey does. You don't need massive long reins on a pair of tongs most of the time anyway. You can calculate the volume of the spike and then use that number to determine the theoretical lengths to which you can draw it out. But I think the best thing would be to grab the narrowed end, plunge it in the fire, and start working on the rest of it just to find out. You keep that want to deal with the thicker head on it first. The hotter it is the easier it will be to work, of course. Dull red will get net you sore arms.
July 12, 20179 yr If your hammer control is okay you should consider drawing out with the ball pein of your hammer aswel; smaller surface area moves metal quicker! This video pretty much sums up drawing out;
July 12, 20179 yr 3 hours ago, Thief_Of_Navarre said: If your hammer control is okay you should consider drawing out with the ball pein of your hammer aswel; smaller surface area moves metal quicker! On top of this, use the cross pein/diagonal pein/straight pein end as well. Use that end to create little hills and valleys in the steel, then use the flat end of your hammer to even it all out again. Rotate workpiece 90° and repeat. I've found this to be a pretty fast way to draw out. Oh, yeah, and KEEP IT HOT!!!
July 12, 20179 yr Alec Steele also has a video that's an excellent introduction to drawing out (especially tapers). I'm not going to link directly to it, as it has some language that's just over the edge of IFI's community standards, but you can find it by putting "Alec Steele" and "how to forge tapers" into the search engine of your choice.
July 12, 20179 yr How Hot? As hot as it will take! How to draw out long tapers---a lot you see will have been done with a power hammer for obvious reasons. I used to teach people to use a powerhammer by having them make long tent stakes from RR spikes, two heats per spike with a smallish power hammer.
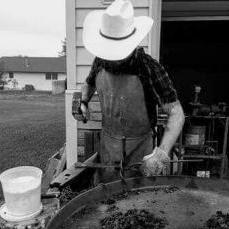
July 13, 20179 yr Author 8 hours ago, ThomasPowers said: How Hot? As hot as it will take! How to draw out long tapers---a lot you see will have been done with a power hammer for obvious reasons. I used to teach people to use a powerhammer by having them make long tent stakes from RR spikes, two heats per spike with a smallish power hammer. This is my power hammer. Mediumish. Lmao
July 13, 20179 yr 9 hours ago, ThomasPowers said: How Hot? As hot as it will take! How to draw out long tapers---a lot you see will have been done with a power hammer for obvious reasons. I used to teach people to use a powerhammer by having them make long tent stakes from RR spikes, two heats per spike with a smallish power hammer. I'm not sure of 19Braden86's experience so for a bit of clarification... Heat it to bright white (to my eye) just below sparking or welding level. Also as well as the previously mentioned methods, use the edge of your anvil as a lower cross peen. Basically look at the pattern of movement you want the metal to take and then apply the appropriate directional tool. First stage once heated, I draw it by using the cross peen directly across the anvil from me at a comfortable angle working the whole length of the spike starting with 10-12 strikes adding a few more as the spike lengthens. Both the cross peen and anvil edge draw the steel longer and thinner and a little wider with each hit. Rotate 90 degrees and work the areas you didn't spread the first time. Reheat and repeat always working the area between your last set of strikes. Once you achieve the desired length switch to a lighter faster hammer and tap it to the square or round shape you wanted. One thing to keep in mind is that you do not have to heat or work the whole spike all in one go while you are learning, fewer heats comes with experience (so the tell me). Controlling your heat, your hammer, and your next step seem to be the most important from my newbie perspective.
July 13, 20179 yr You can use the far edge of the anvil, or the edge of the hammer's face. Depending on your hammer control, you can use BOTH - "pinch" the iron between the two edges. Extremely effective, but if you miss the aligment of the edges, you risk bending or tearing your piece. Do NOT use flat hammer blows to strech. It's the instinctive aproach, but very inefficient.
July 13, 20179 yr I like to use a straight peen hammer and the horn of my large anvil. Both have a shallow curve to them and so do not leave sharp indentations in the metal. I do rotate the piece 180 deg every time I put it back in the forge so the difference in curves gets worked out continuously.
July 13, 20179 yr 16 minutes ago, ThomasPowers said: I do rotate the piece 180 deg every time I put it back in the forge so the difference in curves gets worked out continuously. And one of the nice things about RR spikes is that they have a built-in directional indicator!
July 13, 20179 yr Why I have a process down and just rotate the piece every time it goes into the forge. That way I don't have to think. If I'm doing a rectangular cross section taper I can rotate it 90 deg each heat.
July 14, 20179 yr I've seen the odd snippet of videos showing drawing out methods using either quite drastic hammer angles or the corners of anvils, but I wouldn't advise using this method if you're relatively new. It's hard enough as it is to produce a smoothe surfaced and even taper using the flat face of a hammer with on a flat area of an anvil, and to my mind these above mentioned drawing out techniques complicate it by creating many hard lumps and bumps that you have to then very accurately level out. My opinion probably isn't the popular one. In your picture your taper isn't particularly even, there's narrow areas and you can see from the reflective surface that the surface isn't flat. I would just focus on getting the fire and metal up to a nice working temperature (bright yellow) so that it's easier to draw out, and go from there. If you want to reduce surface contact then maybe move over to the bick and use a rounded hammer face (farrier's hammer), then smoothe out any softer lumps and bumps on the flat of the anvil with your flat hammer face. It's taking his advice out of context so he might not thank me for it, but @Alan Evans passed on a great pearl to me via the site a while ago - "do a little to a lot rather than a lot to a little". I find it's far easier to correct mistakes and produce smoothe forgings that way. Once you're completely comfortable with drawing out, then I'd learn the more aggressive methods.
July 14, 20179 yr 6 hours ago, Joel OF said: I've seen the odd snippet of videos showing drawing out methods using either quite drastic hammer angles or the corners of anvils, but I wouldn't advise using this method if you're relatively new. These methods do require a fair degree of hammer control. Then again, they are also a great way to develop hammer control, as you get immediate feedback on what's working and what's not. 6 hours ago, Joel OF said: "do a little to a lot rather than a lot to a little" Excellent advice.
Join the conversation
You can post now and register later. If you have an account, sign in now to post with your account.