
Lou L
Members
-
Joined
-
Last visited
-
Well, it could be the handle but it could be your grip as well. I know that when I’ve had too long a break from slamming steel I tend to grip the handle too tightly and beat up my hands something fierce. Truth is, I looser grip with a little flexibility in the wrist can get you more power and a more comfortable grip. Before you blame the hammer check to see if you aren’t squeezing the handle tightly. I’d suggest you don’t wrap your thumb around the handle and, instead, run it along the length of the handle. I do that and it forces me to keep a loose grip. When my hands start to hurt I always check my grip and every time I find my thumb has snuck around the handle! Lou
-
Another freebie: Don't put a hot piece of metal near where you usually keep your coal rake! (I did this while forging outside at night without good lighting.) In fact, always have a designated space for hot items that is a known "no touch" zone.
-
I will be getting firebrick tomorrow. I could likely lay one brick on the side in front of the opening and it would be high enough to act like a sill. If not I'll be placing a brick in front anyway in an upright position that will allow it to cover the entire opening if needed (but not needed). I intend to cover the small back opening unless it is needed. I purposely created a shelf for supporting a brick in the back. Would that cause a back pressure issue do you think? I know I will need to do it for welding but I haven't welded in the forge yet. I'm hoping to be able to weld at ridiculous low pressures. I am going to try it at 7 PSI (what you saw above) but with the openings covered. Either way, I'm so far quite happy with my burner. I'm ready to start making some more of them with the mold I made for this one. I want to see if I can get repeatability. Thanks! Lou
-
Ok, I took some pictures as prescribed. First I took apart the burner and cleaned out the jet. Of course I ran a tiny piece of wire through it BEFORE holding it to the light and checking for obstruction because I'm not smart. I DID blow through it to see if it was impinged and it may be my imagination but it "seemed" looser after the clean out...but this is one of those feel things where high hopes can change perceptions. I lit the forge up, set it at my usual 7 PSI to get started and whipped out the camera. Here it is: This is the rather ugly forge right after lighting it up (fair warning: I'm not a "paint her up pretty" type of guy, I'm too impatient to get using the things I make to bother with aesthetics.) This is the side view of the dragon's breath right at light up. It is hardly visible. I took two photos of the forge running at forging temps: one with the camera exposing for the flames so everything is darker and the flames can be seen, and one with a regular exposure so you can see the visible color of the hot forge. And now the dragon's breath when running at forging temps: While doing the photos I also shined up a piece of scrap and popped it in to see if it would rust while in the forge. I saw nothing remarkable until I forged the end relatively thin. The scaling wasn't terrible though. Some blackish soot did build up at the edges where it didn't reach forging temperature but it came off easily when I wire brushed. This color impaired fool is looking forward to everyone's insights. If the colors and flames look right then I have another working theory. Is there as chance that, when the thinner sections were bent and closer to the burner, that I simply got them too hot and burned the steel? I don't remember ever getting the steel white but, because I was working on four pieces at the same time, they did spend some time in the forge waiting for me to get to them. The only oddity is that the last time I did this exact same project I followed the same exact process, made four at once, and ran the forge at the same pressures. Here are links to some short videos I made of the thing running: https://drive.google.com/file/d/1OY23Y30UtUccwl1YMUbK-LgXVVjQv4hx/view?usp=sharing https://drive.google.com/file/d/1OQbb9bi-BmG9QCfFbvK9lBMO_BMAhkOl/view?usp=sharing As usual, thank you all for your time. Lou
.thumb.JPG.de8ee32b3fba54c2403d635b8e473daf.JPG)
.thumb.JPG.8ffebb752263c2fea5c3c03933f44347.JPG)
.thumb.JPG.7465e82347c366c5502d9844fb3c076a.JPG)
.thumb.JPG.72ea2d1a6cbe9b2ecf67405d7f7c61cc.JPG)
.thumb.JPG.cd45b36d7dbb4a265ade4956eac108c7.JPG)
.thumb.JPG.cd951ac18071c6a5160ea6c9d896ef0c.JPG)
-
I believe there is a lot of discussion on the topic spread around in a number of threads. I remember a discussion on the topic in the thread on Frosty's NARB and I'm certain it was discussed at length in the Forges 101 thread in the "Gas Forges" section. Mikey is well-versed on the topic along with a number of people. In the end, however, it has turned out that there is no ONE angle to set you burner. There are too many variables to be able to calculate "perfect". The type of burner, the diameter of the forge, the "drag" created by the flame face (kaowool would inhibit a vortex more than castable refractory for example)....all of these will affect the "best" angle for the burner. The BEST option you have is to design your forge with the ability to adjust in mind. First set the burner at something close to a tangent to the inside diameter of the forge and then make the burner port slightly larger than the diameter of the burner nozzle and use set screws on four sides so you can adjust the tilt slightly. You will likely never design it perfectly unless you hire an R&D department. Instead just build it with a good angle in mind (your drawing looks great to me) and then engineer it with the ability to adjust a little bit. I did that with my NARB forge and used metal shims to get the exact angle that induced a beautiful vortex. It is a sight to behold! I fully intended to then make a bracket on the outside of the forge that holds the burner just so....but I'm still using those shims! Lou
-
I'll check the easy thing first tomorrow. Sorry for following "unblacksmithy" advice Frosty, but I'm lazy! I'm seriously annoyed by this development and would like to find schmootz in my jet to account for it. I already used it for at least four hours and destroyed four wine glass holders in the process (the neighbors think they just look like weather Fall leaves but they disgust me). I would think that the aforementioned bugs would be ashes already...but the jet is suspect. I will admit that I use the forge without using firebrick to cover the front opening but I've used it that way since the start and had no issues. I have firebrick on the way as another test variable. I'll send along pictures if things are still haywire. Seriously, has anyone ever had a bad batch of propane? It sounds ridiculous but it's the biggest variable in the equation. I used the forge recently without those issues and then changed to another cylinder. The one difference I did notice is that the last time I used it it was much colder out and I had the cavitation sound upon first starting the forge. This time it didn't do that but I chalked it up to the fact the weather warmed significantly in the two weeks. Lou
-
Hello all! Apologies for my disappearance (unless, of course, it was a refreshing change for you), but I just gave up on "interneting" for a while to focus on other things. I've still been in the shop but not as much as I want to be until recently. This winter I used my forge a number of times with no problems, but recently I've had an issue. I fired it up to make my annual wine glass holders for my kids' teachers and had a new issue. The stock is seriously oxidizing in the forge. The section that is not red at the opening of the forge gets a black soot on it. The oxidation was so bad on the smaller sections like the leaf and stem that it cracked and corroded terribly. This forge has a decent number of hours on it and it has never done this before. I have made no changes to the forge or burner since it lasted worked perfectly. I even did some searching to find out if it was possible to get a bad batch of LP (maybe condensation in it or something) because I can't account for what caused the change in performance. Anyway, I have already been on here lurking for a day or two reading to catch up on what I've missed (a LOT) and trying to find an answer specific to a NARB. I failed so here we are! I wanted some advice on other people's experience with this and suggestions for best steps in problem solving. I was thinking of a few first steps: bigger diameter mig tip, mig tip moved closer to the mixing tube, covering one air intake (a big No-NO in Frosty world), or new LP cylinder.... I just can't get over the fact that this problem would arise randomly without a cause but I have not changed the setup...so I'm stumped... I'm sincerely glad to be back reading and learning here....Once I logged back in I felt like I was missing close friends and family for a long time, Lou
-
Love it! I’m glad you had a good time in my “shop”. You picked up little bits of instruction well and had good hammer control. You are on your way. Let’s try to schedule more meet-ups. Nevan was annoyed he missed the best part. Lou
-
Very cool. I’d love to see the outcome of her grinding and finishing. That’s the real grueling work of bladesmithing.
-
Sorry, Jennifer, our little hammer-in was missing you. If I invite the young ones over in a couple weeks I’ll be sure to beg your attendance! Seriously, I love watching you teach.
-
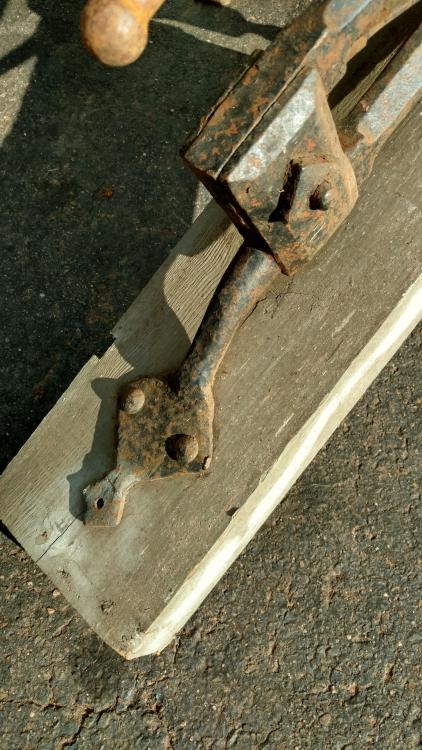
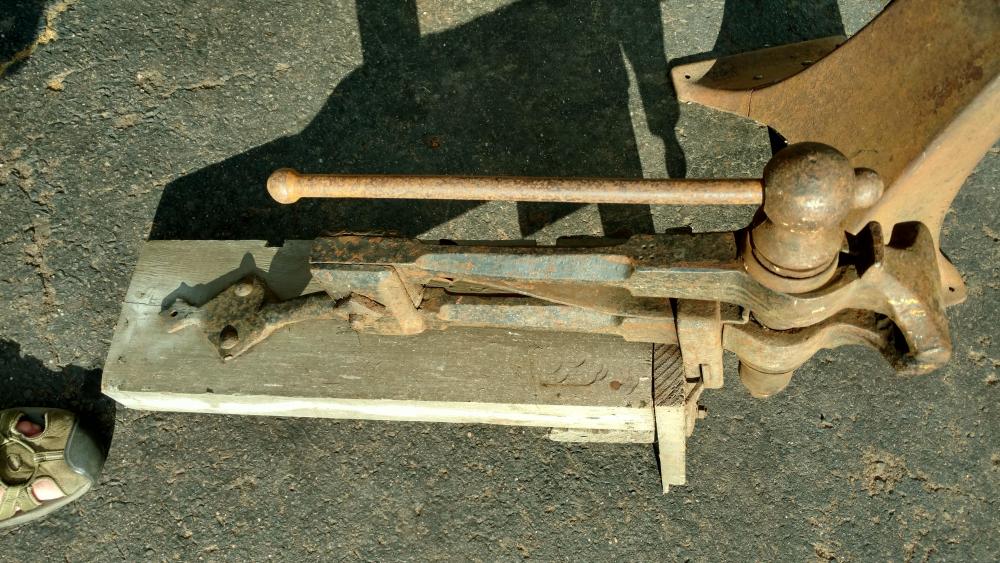
I met a guy who loves post vises and collects them. He has some beauties but this one stood out to me. I want to find out if others have seen this before and if they think it was modified this way. You can see the weld line at the base of the post.
-
I just find myself impressed when some of you gurus see a picture of a burner someone posts and point out, “..oh, that looks to be running a little rich,” or, “that’s a reducing flame you have right there.” It feels like every gasser here seems to be able to figure it out pretty handily. I know I could put stock in the forge and watch for scale buildup, but that’s the limit of my knowledge. Even then I would be guessing. I guess I’m looking for the fast route toward learning how to tune a burner. If, in the end, it’s just about feel I’m okay with waiting for experience to guide me. Edited to add: after writing this I went ahead and tried some other search terms and found this. https://weldguru.com/OLDSITE/welding-flames.html This is the basic concept I was looking for. I’ll keep reading and I’ll use a picture guide as a reference until my experience surpasses that need. Lou
-
Well, I believe my new ribbon block is adding a lot of color into the flames at the moment, so I can’t be sure what is going on right now. I’ve run it with a .023 and a .030 mig tip and the difference in output at 7 psi is clear. I get the full swirl in the chamber with the larger jet. But the swirling flames appear to be reddish/orangish. I know I had similar colors the last time the ribbon burner was freshly cast. I’m going to wait until I get some time using the burner and then get some comparison photos. I know the color of the dragon’s death is telling. Could I get a little primer on determining the qualities of the flame by color? Seriously, that would make for a great sticky thread in the section. I’ve looked for it online but no one seems to have consolidated all that info in one place. Lou
-
That was as much as I needed to hear, thanks! I just wanted to know if my conceptual framework was accurate enough. I'd like to understand how the additional mixing (and I'll assume slight pressure increase) caused by the plenum and ribbon ports affects the air fuel ratio. Unfortunately, being colorblind AND inexperienced, I'm terrible at judging the qualities of a burn. But I shall try Thanks again, Lou
-
Okay, so today I test fired the new ribbon block and the burner was fitted with a .023 mig tip. It was super quiet and it did have that feedback resonance whistle thing going on. At lower pressures it burns smoothly but the flames are quite short. At 10 psi the flames engine the entire forge chamber. Here's my point for posting:. I'm wondering about efficiency. If I put the .035 mig tip in would the burner consume the same amount of fuel at lower pressures than the .023 at higher? Furthermore, would it run noticably richer with the wider jet or does the Venturi draw increase in a straight line on a graph? I fully intend to experiment with this but it will be hard to gauge fuel consumption. Plus I would like to go into this with some wisdom in my back pocket. Thanks for your continued input, Lou

.JPG.133bddcc67418679c1f2c96807eef0c4.JPG)
.JPG.7549468f9ae0c247685b80552eb7ed2f.JPG)
.JPG.c65d26c35a563f6c300cee6de7dcd8fc.JPG)
.JPG.437545cfdecfc73cae43dc00f11c83ef.JPG)
.JPG.3b19071d7c48223f3f9ae79a060bd67b.JPG)
.JPG.1e6233a39ba1ab2fea227936e3869238.JPG)

