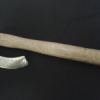
Krown Kustoms Posted March 26, 2014 Share Posted March 26, 2014 A friend gave me an old axle. I shaved a sliver off it and hardened it. I think the metal will do fine. I decided to make a small straight peen for starters. Its the only simple one I dont have yet. Im not sure the order of steps in forging a head (shape, punch, drift, etc.) so I just went ahead and started on the peen side first. Then upset the head end and work it a little. Today Im going to fuller (I think this is the right term) just behind the head to define it from the body. I found I should have tapered peen a little because it made a taco shape in the end. Ill have to cut it off when finishing. The peen took about an hour to hammer. This is tough stuff. Constructive critisism welcome :) Quote Link to comment Share on other sites More sharing options...
jeremy k Posted March 26, 2014 Share Posted March 26, 2014 You may find it easier to punch the hole first next time. Quote Link to comment Share on other sites More sharing options...
Krown Kustoms Posted March 26, 2014 Author Share Posted March 26, 2014 I was hoping I wouldnt hear that. Thanks. I was worried I would punch hole then get the peen crooked. Quote Link to comment Share on other sites More sharing options...
ThomasPowers Posted March 26, 2014 Share Posted March 26, 2014 Punching the hole is the place where you most likely can go wrong and have to discard the workpiece; as such doing it first means you don't have to throw away your time spent working the peen. Pre drilling the *annealed* piece to guide the slitter through can help you get it right. Quote Link to comment Share on other sites More sharing options...
Krown Kustoms Posted March 26, 2014 Author Share Posted March 26, 2014 Im not too good at finding center with a punch yet. I am going to put it in the mill and pre drill it. BTW...was fuller the right word/term? Quote Link to comment Share on other sites More sharing options...
ThomasPowers Posted March 26, 2014 Share Posted March 26, 2014 If you use a fuller to do it then fullering is the correct term... My favorite straight peen has the peen about the diameter of a 1" rod; I'm *happy* to hear that you plan to trim some off that sharp peen! I do have sharper peens to texture with but sharp is not good for moving the metal as in drawing down a piece on the horn of the anvil using the peen on the top. Quote Link to comment Share on other sites More sharing options...
Nobody Special Posted March 26, 2014 Share Posted March 26, 2014 Hey, how'd you steal my first pair of tongs?!!! That pattern on the side of them looks familiar...... :D Quote Link to comment Share on other sites More sharing options...
Frosty Posted March 26, 2014 Share Posted March 26, 2014 to find center first using a flatter and (hopefully) striker flatten opposing sides of the blank. This only needs to be a little flat line down the length 1/4" is more than enough. Now you have well registered faces so you can use a pair of dividers to find center. making flat sides really helps keep everything in place when you slit or punch and drift. Oh yeah, slit/punch and drift first. Frosty The Lucky. Quote Link to comment Share on other sites More sharing options...
Dogsoldat Posted March 26, 2014 Share Posted March 26, 2014 Thanks for that tip for finding center Frosty. I'll have to try and burn that into my brain and not forget something else. Quote Link to comment Share on other sites More sharing options...
Krown Kustoms Posted March 27, 2014 Author Share Posted March 27, 2014 to find center first using a flatter and (hopefully) striker flatten opposing sides of the blank. This only needs to be a little flat line down the length 1/4" is more than enough. Now you have well registered faces so you can use a pair of dividers to find center. making flat sides really helps keep everything in place when you slit or punch and drift. Oh yeah, slit/punch and drift first. Frosty The Lucky. Got it. Ill definatly make the hole first on the next one. The flat is a good idea. Put it in the mill and centered it and the phone rang. Everyone always needs something when Im busy. Will have to wait till tomorow now. Hey, how'd you steal my first pair of tongs?!!! That pattern on the side of them looks familiar...... :D They are my first pair of bolt tongs. Definatly not made for that size. good ole rebar. I have a few rebar pairs now. Made a pair the other day to hold 5/16 round to make leaf keychains. Seem to be a hit with everyone around here. Quote Link to comment Share on other sites More sharing options...
Krown Kustoms Posted March 29, 2014 Author Share Posted March 29, 2014 Got a 3/8 hole punched through today. Definatly harder to do than I thought. I hope to drift it tomorow. I had to clean up an old hammer to help. Ive had it for years and never used it. Put a handle in it and smoothed some old scars. Quote Link to comment Share on other sites More sharing options...
Krown Kustoms Posted April 15, 2014 Author Share Posted April 15, 2014 Finally got back to the hammer. Drifted the hole. As predicted it a little off. The center of the eye dosent match centers from the peen and head. Guess I have to do a little grinding. Im sure I can find a use for a little hammer. Already have another peice cut and waiting on the eye punched out. Quote Link to comment Share on other sites More sharing options...
metalmangeler Posted April 15, 2014 Share Posted April 15, 2014 You might be able to draw the thick side down to match the thin side by heating the thick side more by strategicly placing it to the side of your fire then put your mandrel in place and forge the thick side while supporting the thin side on a flat. You will likely need to work to get everything straight again after you draw down the thick side, and your eye will be larger than before. A fuller is the term you wanted earlier. Quote Link to comment Share on other sites More sharing options...
Krown Kustoms Posted April 21, 2014 Author Share Posted April 21, 2014 Thanks. Ill give it a go. Ill post pics soon. Quote Link to comment Share on other sites More sharing options...
swedefiddle Posted April 21, 2014 Share Posted April 21, 2014 Good Morning, The trick Tom Clark showed me was to drill 3 - 1/4" holes about 1/4" between them, then punch the hole with a slitting chisel. The Handle hole is ALWAYS on center. If you have the hole punched slightly off center, heat the whole hammer head and quickly quench the skinny side cheek, quickly continue to punch your hole, the hole will move sideways. I teach hammer making in my Course, it is quite entertaining to watch the unbelievers see the handle hole move sideways. Just Magic. Neil Quote Link to comment Share on other sites More sharing options...
Krown Kustoms Posted April 29, 2014 Author Share Posted April 29, 2014 Thanks for the tip. I got the hole straightened out as good as I can. I think it will work out. I need to take some more pics before I get it too far. I keep forgetting. I got sidetracked and made a little double bit hatchet for camping. Ill start a new thread for that one. It was a lot of fun to make. Back to the hammer now. Ill post pics soon. Quote Link to comment Share on other sites More sharing options...
rthibeau Posted May 1, 2014 Share Posted May 1, 2014 if the eye hole ain't quite right, don't ya just use it in the opposite hand ??........just askin'.... Quote Link to comment Share on other sites More sharing options...
Dodge Posted May 2, 2014 Share Posted May 2, 2014 I just use my cock-eyed hammer with a little more *side-english* :ph34r: Quote Link to comment Share on other sites More sharing options...
Recommended Posts
Join the conversation
You can post now and register later. If you have an account, sign in now to post with your account.