Krown Kustoms
Members
-
Joined
-
Last visited
-
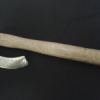
Here is what I came up with. I decided to try my hand at salt water etching too. Then put same pattern on handle while staining it. Its not too usable due to the eye being so thin. I probably going to put it in a shaddow box and hang it in the office.
-
Hardening and tempering. I went to 600 before hardening. I Hardened and tempered yesterday and did waste a lot of time. I had to go back to a 120 grit belt then hand sanded up to a 600. I tempered to a dark straw at blade and bluish at base then sanded with a fine grit sponge then hand sanded all the way to 1000. I guess I answered my question of it being a waste of time but I was wondering what everyone sands to before hardening. next one I will go to 120 then heat treat far less elbow work. The last hatchet I didnt sand much before heat treat but took a lot of sanding to look good. Went too far on this one. trial and error I guess Thanks
-
At what point (grit) do you guys stop polishing at before final tempering? I have been working on a little keltic style axe and think I went too far and wasted some time. I didnt plan on a perfect finish but I want a reflection on this one. I am at 600 grit now. Thanks
-
Welcome. I say give it a go.
-
I definatly plan to make a larger one. It dosent weigh much...maybe 10 oz. or so. Ill weigh it when i find my scales...kinda got lost when I moved. I started on a little bearded viking style axe/hatchet today. Not sure if I should start a thread on it or not. Kind of simple. I dont wanna bore anyone with my off the wall hammered projects. Chinobi recomended langets (thanks)....I wasnt sure what that was so I googled....I have got to build something like that. I love the keltic/viking style and the langets just finish the whole project. more to come soon.
-
Very nice I like it.
-
Thanks... I am going to use a bigger piece of stock for the next one to try to get more weight. Ill see what I can do with it. After using a stanley blade as a small draw knife and slicing myself all up I think Im going to make a good one and try for better handles. I have a few planer blades that need a new shape.
-
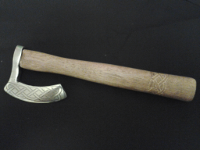
I was working on a straight peen hammer and got it a little off so I took a little break from it. I Decided to make a hatchet. I have always liked the double bit axe so I figured Id give it a shot. A friend gave me a Ford F-250 leaf spring so I decided to use that. After a few failed attempts I think it turned out pretty well for a first one. First try was looking good and I accidently droped it in water bucket. It broke like glass. Moved bucket and tried again. Second I was slitting eye and cooled too much and tore the side of eye. Third times a charm for everyone but me....Drifted hole too far back so it wouldnt be center so I put it on shelf for a single bit hatchet later. Fourth turned out well but took forever to do cause I was scared to damage it. Many heats later and light hammering I had it. Time to sand polish and heat treat. Everything turned out par for me so I started on a handle. I found I am no handle maker but managed one out. Its a little crooked but is comfortable to use both ways and feels sturdy. I tried it out on 2.5 - 3 inch piece of oak branch and cut through ok sideways and split the rest into kindling. Works for me. Being as light as it is I had to chop in a wide angle and swing hard but thats what I was going for. Something light to throw in camp pack. relocated to a more sensible section
-
Thanks for the tip. I got the hole straightened out as good as I can. I think it will work out. I need to take some more pics before I get it too far. I keep forgetting. I got sidetracked and made a little double bit hatchet for camping. Ill start a new thread for that one. It was a lot of fun to make. Back to the hammer now. Ill post pics soon.
-
Thanks. Ill give it a go. Ill post pics soon.
-
Finally got back to the hammer. Drifted the hole. As predicted it a little off. The center of the eye dosent match centers from the peen and head. Guess I have to do a little grinding. Im sure I can find a use for a little hammer. Already have another peice cut and waiting on the eye punched out.
-
Got a 3/8 hole punched through today. Definatly harder to do than I thought. I hope to drift it tomorow. I had to clean up an old hammer to help. Ive had it for years and never used it. Put a handle in it and smoothed some old scars.
-
Got it. Ill definatly make the hole first on the next one. The flat is a good idea. Put it in the mill and centered it and the phone rang. Everyone always needs something when Im busy. Will have to wait till tomorow now. They are my first pair of bolt tongs. Definatly not made for that size. good ole rebar. I have a few rebar pairs now. Made a pair the other day to hold 5/16 round to make leaf keychains. Seem to be a hit with everyone around here.
-
Im not too good at finding center with a punch yet. I am going to put it in the mill and pre drill it. BTW...was fuller the right word/term?
-
I was hoping I wouldnt hear that. Thanks. I was worried I would punch hole then get the peen crooked.