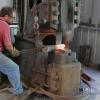
June 9, 201313 yr I have a project to form 3/16" thick 655 bronze into a flame shape, three pieces approximately 6' tall 10" wide. I have a friend with a 25 LG that I could borrow or use my 100 ton press. I will have to make dies either way, any advice? Picture is of the model.
June 9, 201313 yr Form cold in your big fly press with a big oval ball in the ram and rubber or wood bottom dies. Use hand hammers to finish to form over stakes. All tooling nicely polished. Anneal as needed.
June 9, 201313 yr You migth be amaized at the quality of finish that you can get if you finish off with an english wheel Ian
June 9, 201313 yr In general move it as far as you can in the first breakdown or two. It will work harden pretty abruptly so pay attention and anneal when it starts to work harden and it'll make you happy. Push it too far and it'll break. Frosty The Lucky.
June 9, 201313 yr To start the shape you could try putting two "leaves" together and solder the edge. Then "inflate"by putting some water between the sheets and warm with a torch, the steam will make it into a "seed-pod" shape. Then manipulate with your hammer. Ian Do you get Gilders metal over there it would be great stuff to do this job with! Once patenated you can't tell the difference but it's real nice to work with. Ian
June 9, 201313 yr Are you going to tell me you don't have a small enough hammer now! I can load up my little 50lb hammer in a trailer and pull it to your shop if your in need. Looks like it will be a fun project. I am trying to talk a potential client into some small silicon bronze ornaments for a job right now.
June 9, 201313 yr Greetings Heat me, If the thickest part of the flame is 3/16 preform the flames on a band saw. Do as Tim said with your press to form the dish be sure to anneal first... You can finish on the same ball die that you use in your press with some planishing hammers . Sounds like a fun project... Have fun and make beautiful things Jim
June 10, 201313 yr Author Thanks fellas, I may have to take another look at the impact press I thought it a bit brutish for the material. I did use my hydraulic press with the limit switches to form 1/4" steel plate with good results but it was a bit slow. Control would be key, the high cost of the material is weighing heavy on my decision to pick the process. Ian, I liked the idea of inflating the forms but they are all a different shape. What is this Gilders metal?
June 10, 201313 yr Is casting out of the question? I worked on a lot of pieces at the foundry in this style. 1/4" wall castings, refine surface as necessary.
June 10, 201313 yr Guilders Paste = Dutch money ground up :) :) Guilders Paste comes in many shades and colours. Don't be shy with experimenting. It is easy to wash off or mix like paint. Dorothy Steigler sometimes puts a drop of perfume in her flowers to make them SMELL like flowers as well as looks like flowers. Don't be shy about giving them 'a ladies touch'. Let the ladies pick the perfume or you will never hear the end of it!! :wacko: Neil
June 10, 201313 yr Technically guilders metal is a brass as it is 95%copper and 5% zink (not tin so not bronze) it looks like pure copper but is very mallable. I usually hade mine cast in in a foundry that can roll it for me too. sadly i'm obligad to duy about 1.2 tons at a time- I use it mostly for roofing etc. the product is used mostly by the munitions industry to make full metal jacket ammo(think of how well it deforms to cover a bullet) It took me years to find this product and now I swear by it. I ever air freight coils(500kg each) to our shop in Abu Dhabi. For the Expanded pod Iwould hace gone for using a sheet of galv. sheet metal (sacrificial) and a sheet of bronze sandwedge. if you use s7 or s8 solder(made for radiator industry ) you will have no problem soldering these two together. At a point add in a small piece of small dia copper pipe(get off cut from your local A/C guy. tho add water if you add a small conex type valve you can use to fill with water and to regulate steam. using a blowtorch heat sections of the bronzecreating "soft spots" and these will strech more than the rest and therefore you can manipulate the shape. In my shop I would first "tack" the edges and then put the edge through a bead roller to create a shaped seamwhich would give it more strength! Good luck on this it looks like fun Ian
June 11, 201313 yr My old school books describe Gilding Metal as being a brass (copper and zinc) with a copper content of 80% and over. Nice to work and warmer colour than 60/40 brass and more golden than the red of copper. I noticed that the bullet manufacturers are now doing lead replacement soft nose solid bullets in 95/5 alloys. As far as forming the gutter section of the flames I would do much as Timothy described under a press. Ian, could you cope with 3/16" under an English wheel? (if that is the same as a wheeling machine as I know it, a pair of crowned wheels) I posted a couple of videos, and the general discussion in the two threads by Kurgan on Bowl Tools in the 'Tools, general discussion' forum which may be useful. My little 12 tonne press copes with 12mm (1/2") steel plate dishing quite comfortably, cold without annealing... Using a male/top tool close to the final radii and corresponding female forms with one closed end to help form your concave/convex transition point, and one open gutter end...think one end of a ship or barge hull. You would be able to form the basic vessel shapes without annealing because you would not have been over-bending and then having to straighten which is where the time goes when sinking with a small hammer or male tool. Small male tools can be a real problem...so I've heard. Your refining and surfacing could then be by planishing. Essential to polish all contact surfaces of the tooling obviously...if you want to end up with a polished article. Alan
June 11, 201313 yr Alan the guilders metal that I buy 95/5 looks like 100% copper but patinates like bronze, it does not have the "stickyness" of copper on the tools. I none the less smear everything with handcleaner when cutting and drilling. I'm led to believe that vitually all manufacturers of millitary ammo clad the rounds in 95/5 as per a requirement of the Geniva convention(I speak under correction here) my foundry is an Armscor subsidiary. The English wheel I was refering to is the crowned wheel type and I was sugesting it as a final finish item and not for forming I think it would smooth/pannish the material nicely. we "work harden" our end products by thermal cycling them through a freezer room (in a mates resturant all wrapped up in clingfilm) and putting it into the sun a pouple of times. Ian
June 11, 201313 yr Alan , BTW your tooling = manufacture of = genius. I have similar top tools that we made up in a cnc lathe =a mission. One could probably play with that and make some deep draw pots. In copper they could be nice! Ian
June 11, 201313 yr Funny old world isn't it with the idea of making non toxic military bullets. The solid ones I was thinking of are Hornady GMXes but they are hunting specific expanding with a ballistic tip. The most forgiving and ductile of the copper alloys, especially for hot forging, that I have found is the ColdurA silicon bronze from Columbia Metals. That has a good warm colour, well warmer at least than 60/40 brass. I am fascinated by your thermal cycling process. How did you discover that? Alan
June 11, 201313 yr Funny old world isn't it with the idea of making non toxic military bullets. The solid ones I was thinking of are Hornady GMXes but they are hunting specific expanding with a ballistic tip. The most forgiving and ductile of the copper alloys, especially for hot forging, that I have found is the ColdurA silicon bronze from Columcia metals. That has a good warm colour, well warmer at least than 60/40 brass. I am fascinated by your thermal cycling process. How did you discover that? Alan
June 11, 201313 yr Author Thanks again, the videos were very helpful I'm amazed you could bend the 12mm with 12 ton! Wondering what 100 may do with that set up :ph34r: Ian not sure where to find the alloy you mentioned but I will look into it. I enjoy working the 655 when forging, welding and machining, I have cussed out the zinc when welding the architectural bronze several times. So I get the idea it is wise to form first then finish the surface after?
June 11, 201313 yr Starting off with a barbell profile I have somewhere around an almost complete sphere had to jiggle it a bit to get the top tool out! Alan
June 11, 201313 yr My old school metalwork teacher had this phrase "the best way to get marks out of metal is not to put them in" so all your forming tooling should reflect (pun?) the final surface you want to achieve. Coupled with the elegant mantra from Freddy Habermann "every hammer blow should be eloquent" which I extrapolate to mean every part of the process should contribute to / support / define the spirit of the piece. Between those two concepts I have bumbled along most of my life! So the short answer is:- if you want to end with a refined form and surface, refine it. If your piece calls for a "live" or articulated surface leave it from your (either polished or matted) forming tools! Let the piece decide. Sorry for such an unhelpful answer! Alan
June 11, 201313 yr The nice thing about my little 12 tonne press is that it is single acting / spring return and cycles really fast as you could see. You can just keep tapping away on the treadle. When I first made those tools it was for the fly press and in order to get the same speed I took the weights off to reduce the inertia, the spring back of the metal was like the bounce of a hand hammer on the anvil, did most of the lifting for you. The reason it can cope with the heavy metal is because (as I keep banging on) by moving a lot of metal a little you do not waste time or annealing cycles flattening out the dimples made by a small radius male tool face. To make a bowl form you do not need to move the metal around that much provided you can do it efficiently and preferably all in one go. This is my theory and I am sticking to it! :) Alan
June 11, 201313 yr Alan, how do you make a small but long coil in a small dia copper tube? Answer= fill with water, freeze and then roll the tube anound a suitable size pipe of course! should be the same with copper alloys you would think? with the copper you can make a mistake and still fix it easily , with bronze tube(admitedly I had 2 or 3 goes it getting it perfect) you get microscopic cracks! I only dicovered this "WTF." feature after I had airfreighted waterfeature components to the middle east. Moral of that story= even if it looks ok!,you should still test & comission prior to shipping!Twit.
June 11, 201313 yr I see. Well I am very happy that on this occasion you are "A wise man that learns by his mistakes" and we readers can all be "The lucky men that learn from the mistakes of others". :) How did you overcome it? Would filling the tube with candle wax instead of ice, and so removing the low temperature from the equation help? Alan
Join the conversation
You can post now and register later. If you have an account, sign in now to post with your account.