

Frosty
-
Posts
47,008 -
Joined
-
Last visited
Content Type
Profiles
Forums
Articles
Gallery
Downloads
Events
Everything posted by Frosty
-
A shear doesn't need nor want any more bevel than gives it a little relief. Just enough it doesn't sit flat on the blades is plenty. IIRC 83-85* was a good bevel for metal shears, placed high edges facing of course. If you can sharpen grader edge it's the cheap stuff but probably good enough. I've found just cleaning up a good smooth torch cut tends to go through grinding disks at an alarming rate unless done at red heat. Then again I salvaged Vascowear from work and the stuff has a lot of tungsten carbide in the 150pt. high alloy steel matrix so it wouldn't just grind off on pavement. For most things it's more trouble than it's worth. Frosty The Lucky.
-
Oooooh! Let the bidding begin. Step back innocent bystanders don't get caught in the crush! Seriously though I think $18.99 is a fair price though I wouldn't haul it off for less. Frosty The Lucky.
-
One thing I've learned some time ago is, people who say you CAN'T do a thing, like weld with . . . really mean THEY can't or more probably just don't know how and are embarrassed to admit it. You CAN weld with charcoal briquettes but it's not as easy. You have to break them up to peanut size or too much air gets past them and oxidizes the joint. The binder used makes a difference: coal is fine, as is "polymer" or wood pulp or another is white (Elmer's) glue. Clay binder isn't good and tends to make clinker. Briquettes are made from the powdered remains from making wood alcohol so Henry Ford discovered if it's compressed with a binder it comes out little bricks you can cook with. This was IIRC around WWI when fuel was getting to be hard to find and torpedoes needed something that didn't need as much oxy as gasoline. Anyway, there are a lot of better solid fuels than briquettes but they WILL work if needs must. Forge welding is simple if you follow the steps. Match the join, Clean clean clean, (the shinier the better) flux lightly and bring to temp. Solid but NOT hard blows to set the weld. We can talk about pattern later if you're welding wide joints. After the setting weld test by laying one side against the anvil for 15-20 seconds to cool and examine the joint. If one side is a different color than the other with a sharp divide the weld didn't set. Brush, reflux, reheat and set again. After it passes the test, brush flux, reheat and "refine" the weld. Repeat the refine weld and try forging across the joint to see if it'll shear. If it doesn't shear it's good to go. Frosty The Lucky.
-
I can see you're going to fit in here famously well Tony. Next time you get around a welding supply ask them for the: Lincoln, Miller, Hobart, etc. welding manual they used to be give away texts though I don't know about now. Get connected to your local blacksmithing organization, I'd be very surprised if there aren't a number of professional welders who'd be willing to give you some tips if not just teach you the basics. Whatever you do, don't be a stranger around here. Frosty The Lucky.
-
One last little mistake to remark about there Tony, none of this went for nothing. I used to have all my "designs" saved in notebooks. You just never know when something that's a terrible idea for task A will work treat for task W or I was getting too confident in my ability to outsmart the laws of physics. Information is information and believe it or not some of the most valuable are the "don't do it THAT way!!!" ones. You also got practice cutting, welding, bolting, etc.ing etc.ing. It's all good, skills you'll use your whole life. Mechanical drawing is a very valuable craft, not only can you make a living at it but with a little experience doing things you'll be able to make most of the build mistakes on paper first. I'm never without a tablet of graph paper to brainstorm ideas on. It's also good for transferring drawings from the CAD to the workbench or sitting at a coffee shop table making a potential customer's ideas into something that'll work. Frosty The Lucky.
-
Oh that is just DIRTY mean Matei! I wonder where I can find some cork. <evil grin> Frosty The Lucky.
-
I have to second Arftist, scrap that design and start over. This one has too many design flaws to fix and they're catastrophic failures on short fuses. I THINK that's a dead horse but let me know if it needs more beating. The easiest tilt bed ATV trailer I know if uses the axel as the bed pivot. The tongue is basically a straight bar from the hitch to the axle. The trailer frame and bed use the wheels as the hinge so there is NO hinge weak point. As the frame drops to horizontal or haul position it slots over the tow bar and pins providing the hips that prevent it torquing sideways. Well, okay there IS a hinge pin but it's at the end of the tow bar and consists of a single heavy pin at the center of the axle and is only under stress when towing. The bed's weight and any side motions are all riding on the wheels as it dumps so the hinge pin can wobble and not be stressed. This will cut the weight of the trailer better than in half. Remove the bed hinge as a weak point. Make it EASY to dump and seat to haul. Safer still, the pinch point is under the center of the trailer, a person would have to TRY to get pinched and seeing as the easiest way to dump it is to stand on the rear corner you ain't going to be under a loaded trailer. If you get yourself pinched laying the empty down you need to find safer things to do. Oh yeah, the unladen balance point is less than 1' forward of the axle to provide adequate tongue weight without squatting the ATV down. Frosty The Lucky.
-

Looking for scrap supplier near Pasadena, CA
Frosty replied to hexonraid's topic in Blacksmithing, General Discussion
Welcome aboard Will, glad to have you. If you'll put your general location in the header you might be surprised how many of the IFI gang live within visiting distance. Wish I could help with your question but I left So.Cal 43 years ago and I hear a thing or two changed without even asking me. Frosty The Lucky. -
I don't know about the interior Bryan but try asking a heating and mechanical company. They usually have a good handle on who supplies what, sheet metal wise. Failing that call Greer tank. Frosty The Lucky.
-
Welcome aboard Bass, glad to have you. If you'll put your general location in the header you might be surprised how many of the IFI gang live within visiting distance. Nice old bridge anvil, good to get started with and after you get connected with the local blacksmithing org. you might find someone willing to trade a more appropriate general blacksmith's anvil for it. All you need for now though is a HOT fire, a smooth faced hammer and something to heat and beat. Frosty The Lucky.
-
Sorry I probably came on too strongly . . . again. I only wanted to point out that in your eagerness to help someone you were only slightly more knowledgeable yourself. Don't sweat it and don't let me stop you from helping people however you can. I know I've opened my mouth when I should've kept quiet too many times to count. I post so much because I LIKE helping where I can but have made the mistake of offering advice when I wasn't that much advanced over the person asking. I've stopped offering any non-forge welding advice since discovering things have change more than I thought since I practiced the craft regularly. I find myself starting to type and realize I may not know what I'm talking about anymore. Frosty The Lucky.
-
The trick or should I say A trick for getting the twists where you want them in a bent project like this is twist it AFTER you bend it. Hanging the ringer like that will damp the ring. Of course you should be holding the ringer so it probably doesn't matter. Looks good Jesse. Frosty The Lucky.
-
Wow, I get done with some chores and check to find a perfect example of a new guy trying to be helpful but not really knowing enough to actually be a lot of help. Charcoal briquettes aren't terribly good forge fuel, lots of guys will tell you they're worthless. However they CAN be made to work, even weld but they're more hassle than they're really worth. If possible use "lump" charcoal this can be bought in the grocery store and is light little chunks. I can't recall a brand name at the moment, maybe before I finish. What makes heat in a fire isn't the fuel, it's the air. To get good forging heat, you can indeed use the coals in a camp fire, that'll be in the 1600f range +/-. If however, you're working genuine wrought iron you need to get it into the 2,300f+ range or mid yellow heat. For that the fire needs an air blast and some form of containment to prevent the fire from just spreading all over the place or being blown out of the hearth. The forge is just that a fire place or hearth, it can be simply a hole or trench in mineral soil, organic soils can burn so be very careful it's mineral soil. Or, you can use an old hibachi or bbq. A cast iron hibachi is a better bet being cast iron they have a much longer life than a sheet metal bbq. An old BBQ on the other hand has a lot more room so lining it with a little rammed clay and maintenance it'll last till you're tired of using it. Something to hold the coals themselves is a good thing, I favor fire brick arranged around an air grate though fire brick arranged in front of a side blast works a treat too. Do some reading in the solid fuel forge section of Iforgeiron and you'll see everything from antique rivet forges using a "duck's nest" arrangement to "proper" fire pots to fire pots made from brake drums and disk rotors. A fire pot or brick over a duck's nest is to contain and control the heart of the fire. You air source can be anything from a paper bag bellows and a little pipe up to an expensive brand spanking new electric or crank blower, let's not forget all manner of bellows old, new, commercial home made. Probably one of the best entry level air sources is a garage sale blow drier and a little 2" pipe to get it away from the fire, say 18"-24" is more than far enough away. Exhaust pipe works a treat and is light weight. however twisting together some black iron plumbing pipe works a treat and you don't have to weld anything. For a bottom blast collect a 6" long x 2" dia. nipple(that's the last time I say that, it's ALL 2" dia.) a floor flange, a 2"x2"x2" T another 6" nipple and a longer nipple, say 8" or maybe 12" nipple. The long nipple is the horizontal and forms the base or leg of a "T" the short nippes screw into the "arms" of the T fitting. got it so far? Now, screw the floor flange to one "arm", this will bolt or screw to the bottom of your fire pot. The other "arm" is aimed straight down and this is your ash dump. An exhaust stack flap cap makes a darned near perfect dump door. The long leg of the "T" is sticking out horizontally almost to the edge of your forge table, duct tape or wire a couple pieces of rod, sticks or coat hanger to it so the blow drier can lay aimed at the end of the pipe. Tape or wire the blow drier to your mount and plug it in turn it on and you're making a fire you can melt iron in if you're not paying attention. Easy peasy. Now, pull up a comfy chair, pack a lunch and something to drink and start reading through the sections on the IFI home page. You too Mr. Cochran, it's a good thing to want to help but if you don't know what's up, CAN you actually be helping? Hmmmmm? Think about it. <wink> Frosty The lucky.
-
Goodness Charles I know you don't like to work harder than you have to but buying a basket case post vise? Is it really that much easier to load? Maybe fits in the trunk of the wife's car so she doesn't notice more rusty iron coming home? The screw looks pretty good from here, if the box thread is good too I'm thinking it's a home run. Frosty The Lucky.
-
Welcome aboard Thomas, glad to have you. If you'll put your general location in the header you might be surprised how many IFI folk live within visiting distance. A hair drier won't get hot enough to melt for a couple reasons. First, put it a little ways away on a short length of pipe, 18"-24" is plenty. Second it has cool air blowing through it so unless burning coals fall into it it'll stay cool. A box bellows is really easy to make from a cardboard box and duck tape. There are a lot of options from home made from bicycle parts, setting up in a prevailing wind with a funnel to collect wind. (I've done the last and it worked a treat but a prevailing wind is hard to find) A sack and a piece of pipe makes a fine bellows. Under $100.00 shouldn't be a problem but will take patience. Just don't get your heart set on one type, being adaptable is a prime ability in this craft. Frosty The Lucky.
-
Spencer Inline Vs Swing-arm
Frosty replied to kubiack's topic in Power Hammers, Treadle Hammers, Olivers
Efficiency is ore a matter of friction. A swing arm only has a limited area of friction where a guided inline has the swing arms and the guides so loses a LOT more energy to friction. In my opinion the main benefit of inline hammers is being able to use top and bottom dies at the same time. Frosty The Lucky. -
Another keeper Rockstar. The pig in the dog show pic reminds me of one of Deb's favorite stories about winning 3rd. place in a dog show with a pygmy goat kid. Frosty The Lucky.
-
I have a cast steel Soderfors anvil that is loud enough to do damage if it's on a wood stand. I built it a steel stand very much like yours without anything between it and the stand. It quietened it down significantly. Anvils ring because the shock wave can rebound between the air transition at the face and foot. If it's sitting something that doesn't inhibit resonance it will ring like a bell. However being in contact with something with a different resonant frequency the two become self damping. My anvil now clanks rather than make y ears ring through plugs or muffs. Give removing the rubber from your stand a try and see how it works. Can't cost a thing. Frosty The Lucky.
-
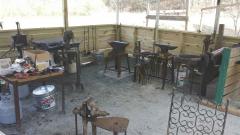 Yeah, Ian's right it's too clean! Don't worry that's a self correcting problem, we won't hold it against you. How many stations are you planning on? Working with anvils that close together I like pointing the horns at each other it keeps folk from running into one moving around. Sometimes you need to move quickly and pocking your leg into a horn can leave you limping. Hanging a couple pull blinds so you can make a shaded corner might be handy too. Beautiful place you have there, I like it. Frosty The Lucky.
 -
Welcome aboard, glad to have you. Have you checked the regional organizations near the bottom of the IFI opening page? It'll show you what clubs are closest to you so you can hook up with experienced smiths. You'll learn more in an afternoon with an experienced smith than many times as long on your own, they'll also be able to help you find tools, material, etc. Frosty The Lucky.
-
Looking for help near Sioux Falls SD
Frosty replied to Ch1nzo's topic in Blacksmithing, General Discussion
Welcome aboard, glad to have you. If you put your general location in the header you might be surprised how many of the IFI gang live within visiting distance. Near the bottom of the IFI opening page you will find the regional association pages/links so you can find one closest to you and hook up with a club. There you will also find different subjects for your reading pleasure. Sure you'll need a comfy chair, lunch and something to drink to keep your strength up for all the days worth of reading available but you'll probably find every question you have has already been answered any number of times. It'll also gain you a basic vocabulary and knowledge so you can ask good questions and understand the answers . . . Well, hopefully, sometimes we don't understand our answers even if we wrote them. <grin> Frosty The Lucky. -
Buy pigment. The stuff used to be pretty common even in auto parts stores. The same stuff used for polyester resin works for epoxy though I'd experiment before committing to something important. Try an auto paint or boat supply, surfboard suppliers are probably not so common in your neighborhood. Frosty The Lucky.
-
Ugly tongs, where? Those sure look better than my first few pairs and I'm happy to say I don't need to make tongs very often, not at all. Frosty The Lucky.
-
Nice looking gates Joel. Well done. Frosty The Lucky.
-
Bondo: If you really must have a like new anvil there is only one way. Buy a new anvil and put it in a display case. What you're wanting to do to that lady WILL shorten her useful life just for what amounts to looks. If you believe a flat face is important then you need to develop your skills and knowledge before you start modifying the tools and equipment or you'll be damaging them instead of "repairing" them. Perhaps an analogy will help. Suppose I bought a hopped up 1969 Camaro with a 450hp 327cid engine but was asking the guys on a hot car forum how to get it to idle smoothly. I'm not taking a shot at you, it's common for people to want to start a new craft with good, even perfect tools. Unfortunately as new comers none of us knew what was good let alone perfect. Nobody was born knowing this stuff, we've all been there. Frosty The Lucky.