Frazer
2021 Donor
-
Joined
-
Last visited
Everything posted by Frazer
-
Based on my experience with anthracite it is possible to consume all of the oxygen by the time the air reaches your piece. The difficult part is maintaining your neutral/reducing fire given anthracite's tendency to come apart when disturbed.
-
Are you talking about the holder that you put in the vise while making them? I believe John from Black Bear Forge has a video on making them IIRC.. Maybe it was Mark A.
-
Regarding the blade profile, good points by all. I can see how having an up swept tip might help if you have a tendency to over rotate slightly and can't (or don't want to) step forward a bit more. I saw a lot of cleaver style axes with a straight edge, sometimes bearded, and a more or less rectangular blade profile. Still, there were many different shapes being used. Like you say, technique and the individuals comfort with his/her particular axe seem to be the deciding factor. Those are some mighty fine looking axes Jennifer. Throwing aside and looking at the 3 tomahawks, from an esthetic perspective my favorite is the 3rd; it looks like it's a big'n. From a use perspective I imagine the first would be the best. You bring up a good point about weight also. When I was there they had 3 different weights for the axe heads at each station. They teach everyone to throw with 2 hands at first, but I found that throwing the lightest axe one handed stuck most often and most accurately for me. I'm not positive what the weight was, but it was in the ballpark of 1.5 lbs. I probably could have gone a bit lighter with mine and it may have been better if I had. However, with the stock a had on hand (0.75x2" ) going much lighter would have been tricky for me. I should check the drops section for something a touch lighter if I make more. One other factor that makes a difference in how well the blade sticks which has not been mentioned is the blade thickness. Generally you want to go as thin as possible while keeping in mind that these axes are going to get thrown around and may take a few bad tumbles while doing to. While I was there the guy was telling me that some of the blades intended for experienced throwers are particularly thin. However, some less experienced people would buy them and bend the blades by throwing way too hard, missing, etc.. Mine isn't thick, but it isn't particularly thin either. If I wanted to go really thin with the blade it would probably be better to do the whole body of the axe in with ~1060 or another other suitable alloy rather than mild steel with a HC steel edge. I'm sure there is a pretty substantial amount of carbon migration from the ~1% carbon bit back into the mild steel blade, but how much and how far is going to be an important unknown variable.
-
Agreed, there might be one or 2 who are willing to spend a little extra, but in talking to the guy there a lot of the people in the league use the ones they have for sale there (imports, available on Amazon, etc.) I think tomahawks would need to be wedged to meet their rules. I'm not sure if a slip fit classifies as "easily removed".
-
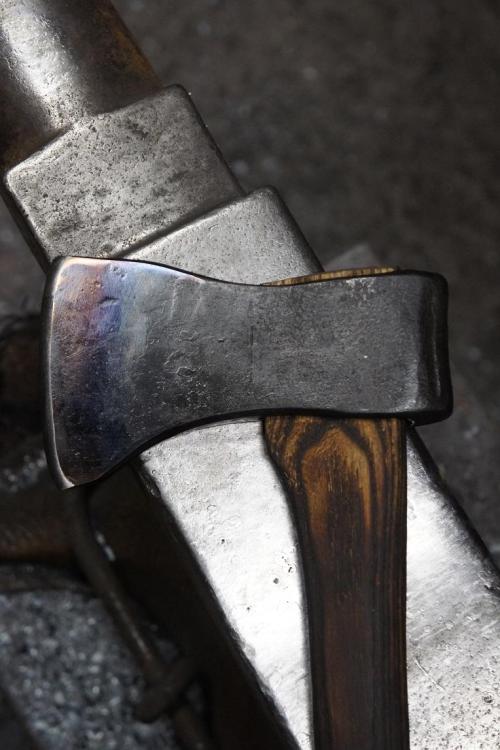
I can't necessarily say I'm hooked, but it was fun. After I heard you could bring your own axe I figured I should make one in case I go back. There are quite a few folks over there who are very into their axes and making them might be a marketable skill in that circle. I went with more of a forward swept toe this time. Sort of like your bowtie axe, minus the central ridge you added in. I figure since the point of these axes is to stick -- and more often than not it's the top half of the blade that sinks in -- keeping the material up there might help. Not sure if that logic will hold, but I guess we'll find out. Latticino, he taught you, you taught me and so the line continues. It does work quite well to clean up that area.
-
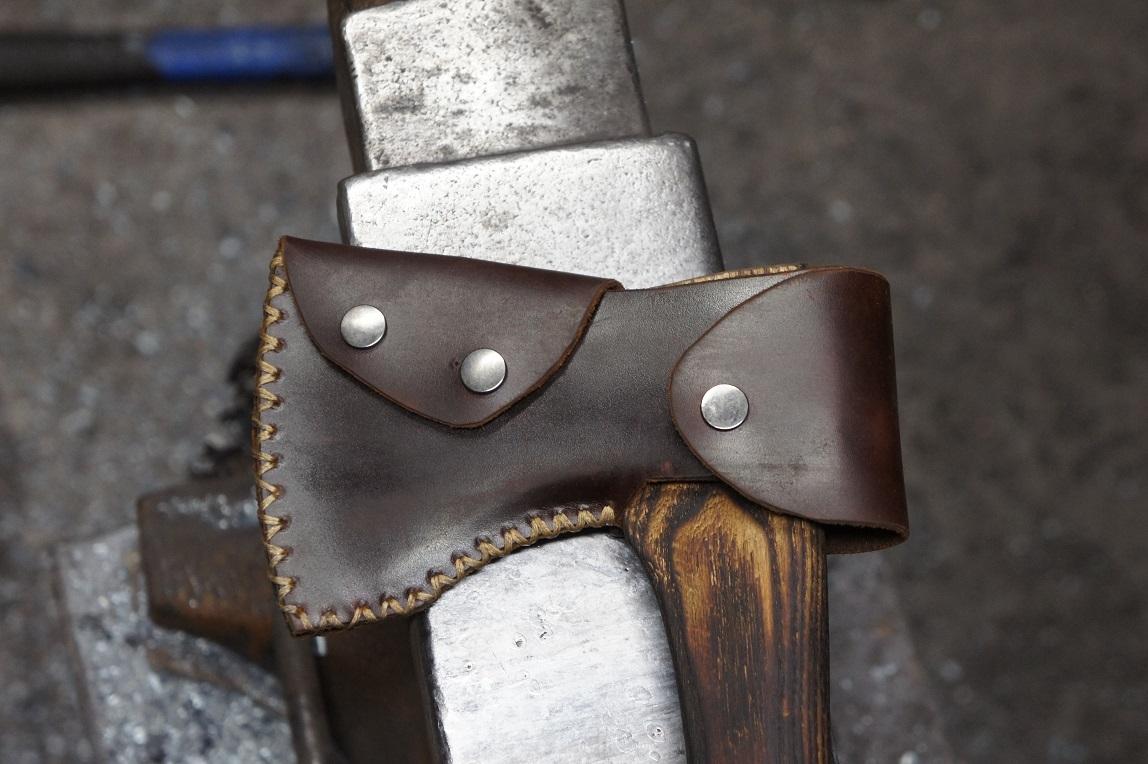
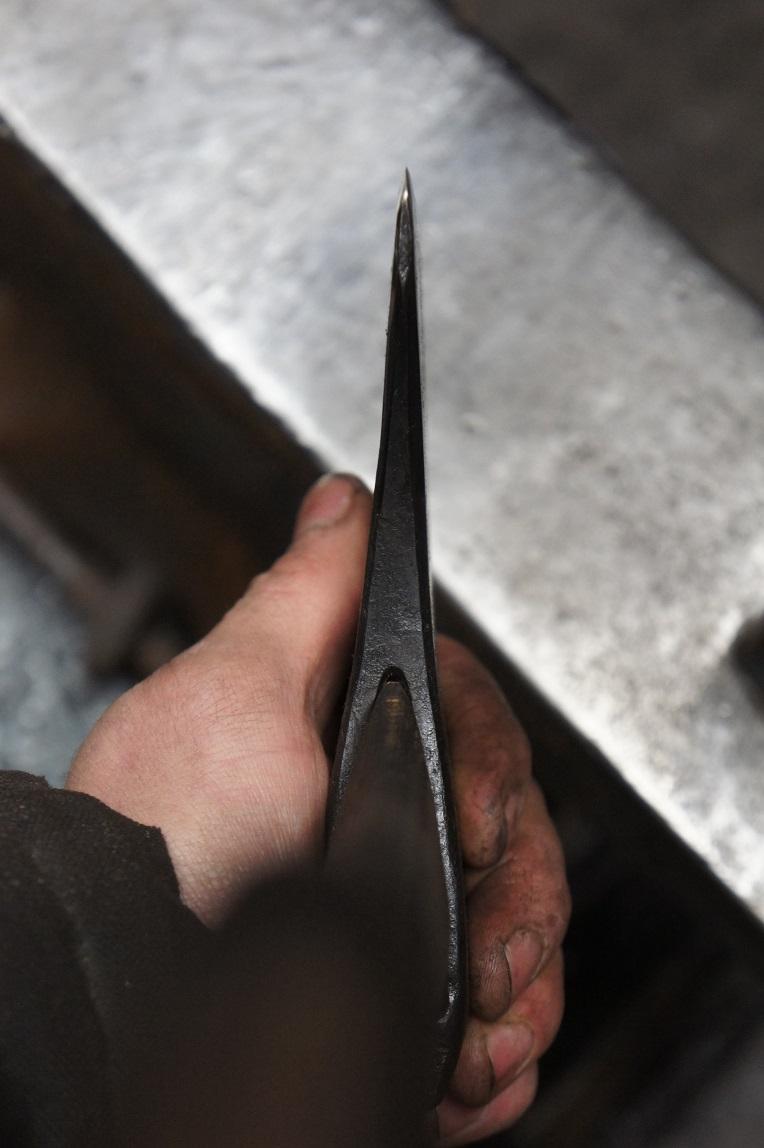
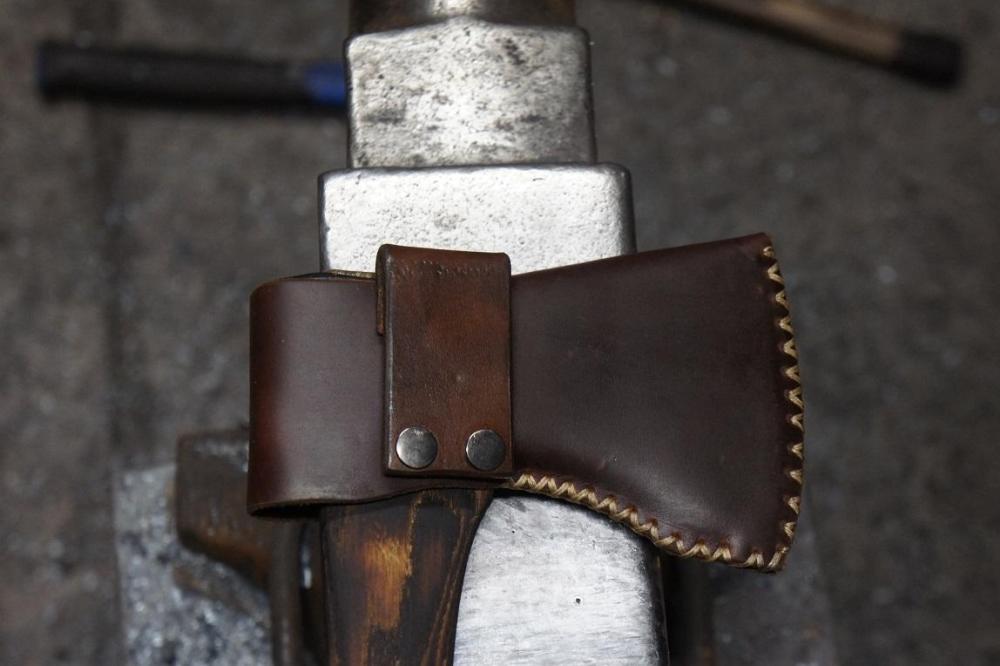
I went to one of those axe throwing bars a little while back and after talking to the employee working our lane I decided to make a throwing axe per the World Axe Throwing League specs. The head weighs 1lb 9oz, blade width 3.5", overall length ~14". Wrapped and welded, mild steel body HC steel bit. Tempered at 475F, then differentially tempered for the colors Naturally it needs a case with a belt loop. And last, but not least, eye pics for Jennifer. I had to use Latticino's round chisel trick (mentioned on page 10) on this one. It works a treat!


-
I'm no metallurgist, nor am I really bladesmith, but the normalization temperature makes a big difference, so does the cooling rate. Usually air cooling is fine, but in the winter here in NY air cooling might be too fast when it's ~10F in the shop. So I put the blade on top of my bucket of vermiculite. Not buried, just right on top. I'm still not sure about the whole discoloration thing, I'd be interested to hear if that's still there after you tinker with your normalization cycles.
-
Judging temperatures by eye is difficult to do. Ambient lighting can make a big difference in what you see. When I normalize I shoot for three temperatures: slightly past non-magnetic, then non-magnetic, then just barely non-magnetic (in that order). It's not an exact science, but I have gotten the grain structure down to about the same size as an old hand file that I snapped to serve as a reference. The tip is the most common to overheat accidentally. Sometimes I use the draw of the chimney to cool the tip slightly while the rest of the blade is coming up to temperature. If you use a gas forge there might be some other tips people can share.
-
I cant speak to the discoloration. As for the apparent layering, might I direct you to the following image gleaned from the internet. As far as the grain structure goes that is pretty coarse. Are you using a magnet at all or are you just judging temperature by eye?
-
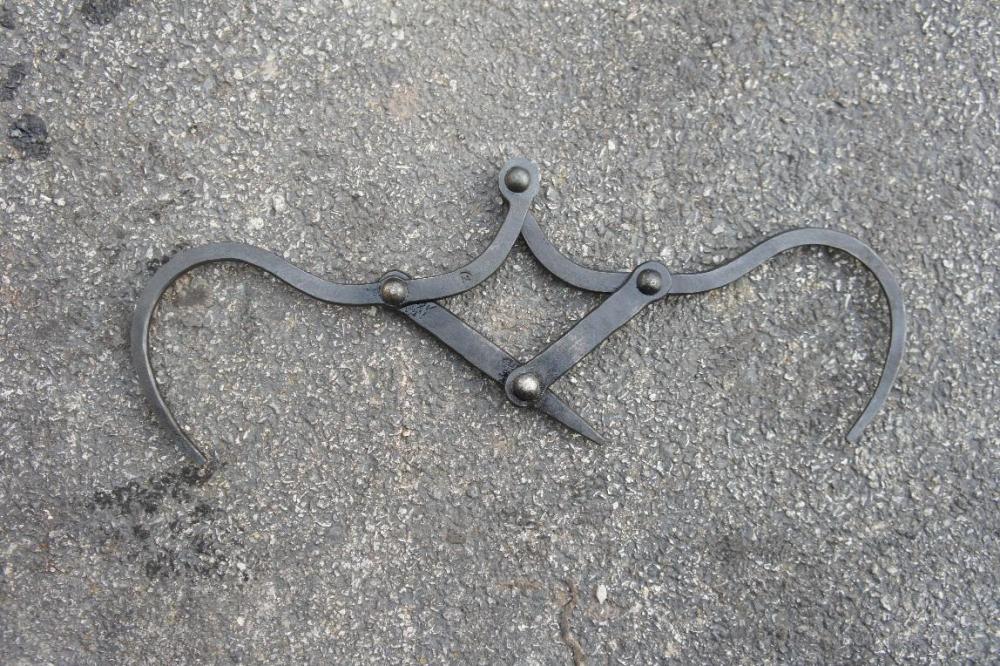
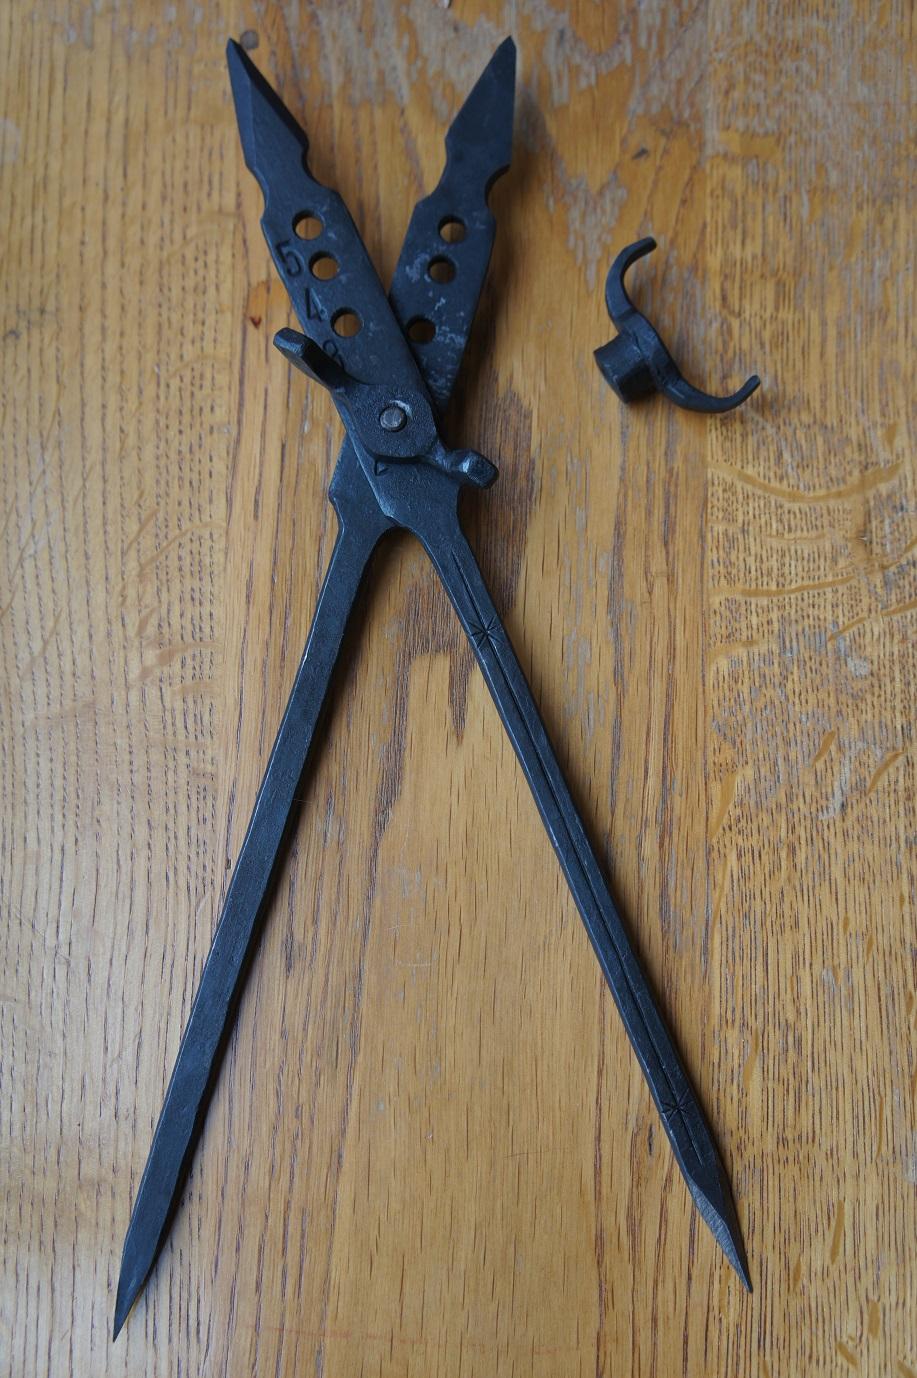
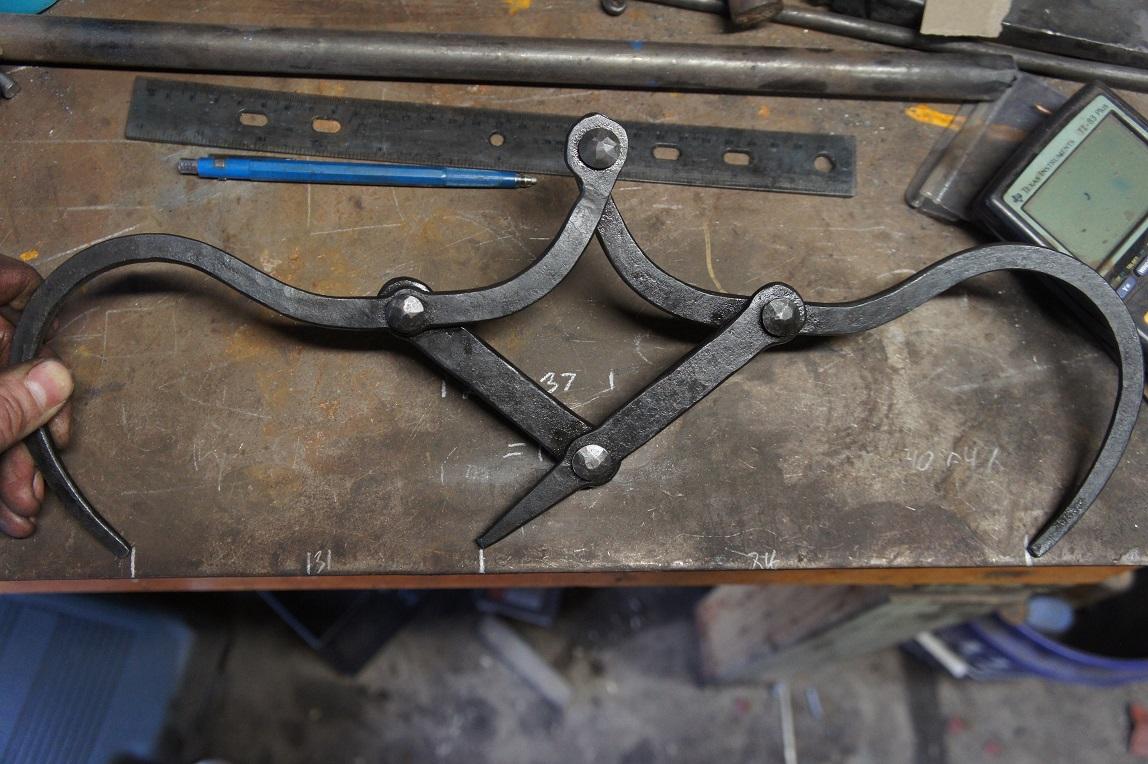
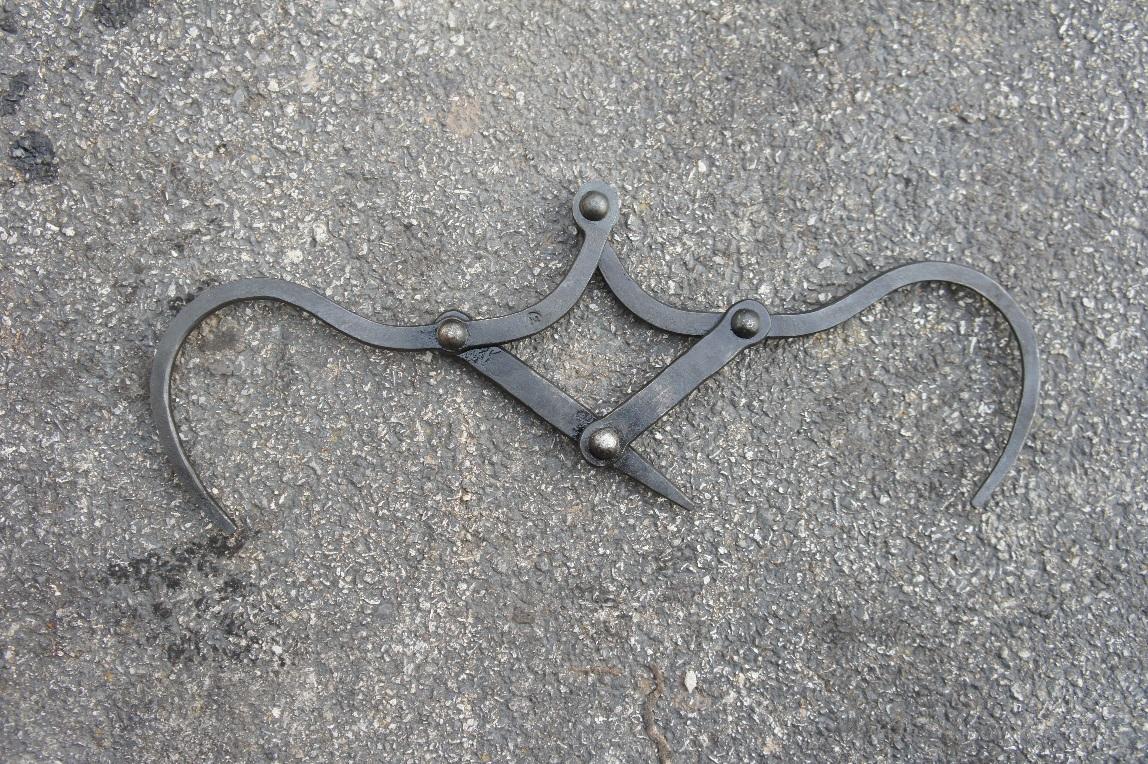
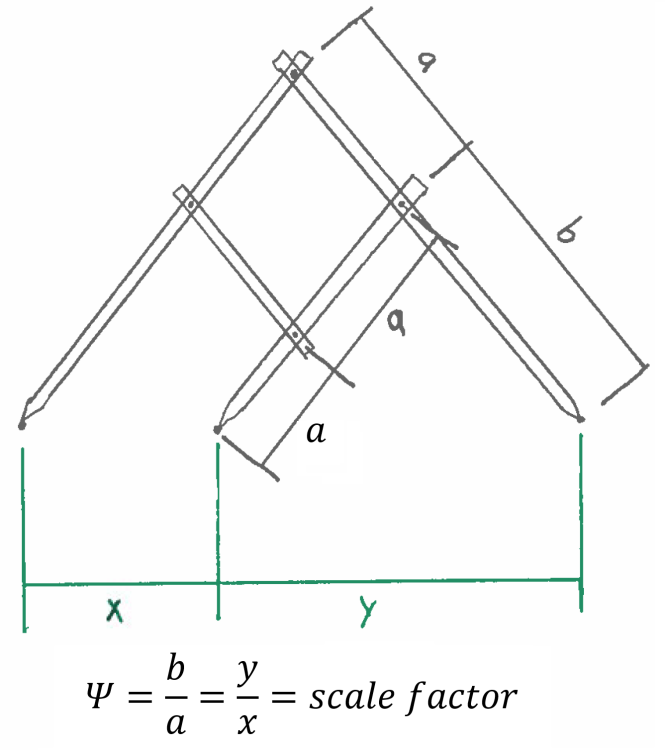
Not quite as fancy as yours John, but here's a set of home brewed dividers. They're limited to 2, 3, 4 and 5 to 1.

-
I had a pet California king snake when I was in 9th grade. He escaped from his terrarium so I found a garter snake out in the yard and put him in there. He became pet snake #2... Well, it turns out he was actually a she and I came back to 20+ baby snakes slithering all over the tank. My dad did not find them very cute and I had to let them go in the woods. After that I wasn't allowed to have snakes in the house anymore..
-
The tool they are describing seems to find the center of the width of a piece of steel. Not the length. Perhaps I too am misunderstanding. I suppose it could do the length as well, but that's were you run into sizing issues.
-
Price-wise that's not too bad all things considered ($4.38 and $5.82/lb). However, like JHCC (and you) say there is more to an anvil than just that. Again, I don't think you can go wrong either way. I've seen people put wheels on the side of the stand then tip the stand/anvil onto the wheels and roll it around. Like a hand truck. That way you aren't relying on the wheels during normal use. I wouldn't worry about the pitting that much, but that's me. There is still a lot of smooth area to either side of the sweet spot and it will slowly become less pronounced with use.
-
*Wipes drool from keyboard* Honestly, both! If that's not an option.... You really can't go wrong wither way... Hm... I guess I would go with the 315#er since the price/lb is better. The double horn is pretty though... What are the prices, if I may ask? P.S. I have a 151# Soderfors and I love it. The first thing you'll need to do is quiet the ring, but there are worse problems to have.
-
I'd be interested to hear if the rivet tightens up over time and locks up the movement. Regardless: 1. Even if it does that's an easy fix 2. I really like the idea and 3. That's some very clean forge work.
-
Yes. That is a big part of it IMO. The margins make up for loss-leaders, marketing, etc. They still sell the kits for some models in some places, but there are more options for the bare tool in most stores. I guess they also want you to have all your tools be their brand so they figure you won't not need 5 different chargers for all your batteries. I'll admit to a certain bias against Stanley Black and Decker as a whole, including Dewalt. *Edit: Actually I take that back, some of the stuff from Irwin isn't bad.
-
Yea Makita really takes their battery safety stuff seriously. I have heard that the CPU on the batteries remembers when/if the battery drops below a certain voltage. If this happens often enough it shuts down the battery and makes it useless. This is an issue particularly if they are run close to empty then left in the cold. Plus they charge a small fortune for them, ~$100 a piece last I looked. Pricey considering what's in there. I guess they all do though since that is where the real money is.
-
If you already have other cordless tools then I would stick with that brand so you have extra batteries. Therefore, I would probably go with a Makita... but the model without that infernal X-lock system. Tool-less, sure, but then I have to buy those fancy wheels... Anyway, if I were to start over again I would probably go with Milwaukee since their M18 line up is on average slightly less expensive and produces more torque than it's corresponding teal counterpart. Plus Makita is probably going to spend more time/money developing their xgt line (40V) now. Most of the tool brands are owned by a small handful of parent companies and are just different tiers of quality within their lineup targeted at particular types of consumers. There are outliers, but generally tools made by a more affordable brand under the same parent company (i.e. Rigid vs Milwaukee) are less powerful/durable. That way they aren't competing with themselves. The best way to assess which tool is the most durable is to look at what the tool rental places are loaning out. They want to make as much money as they can off that tool so they generally offer the one that breaks the least. Just my 2c.
-
I'm guessing you meant 34 not 44. i.e. 34/21 = 1.619 Now I have Lateralus stuck in my head.
-
I have heard that it slows carbon migration down significantly as well.
-
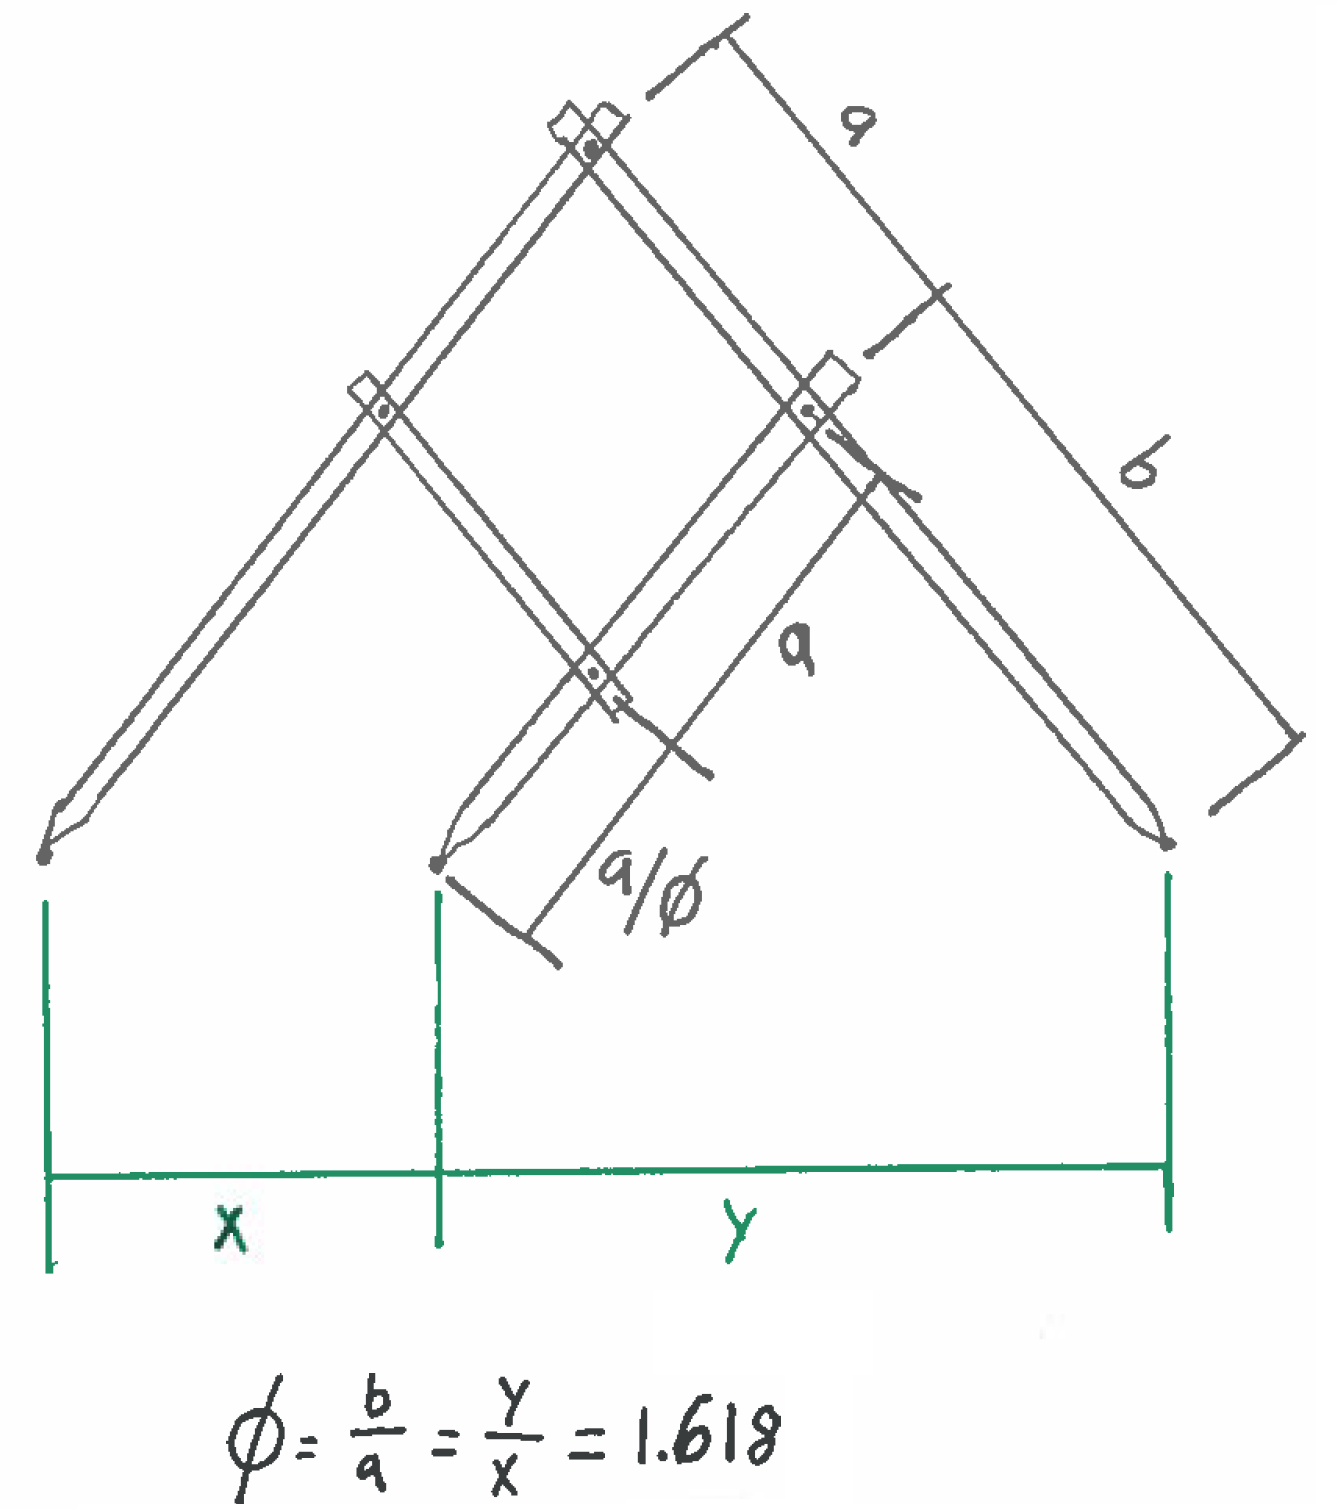
For folks who aren't confident that they can forge this style a pair of golden means calipers, they can be made with flat stock and minimal forging. The measurements given in Josh's picture 7th from the bottom are all you really need and can serve as a reference. They can also be changed as long as you follow the proper ratio. I made a doodle that may help. The ratio can be changed to something else (1:2 for example) as follows: Granted you could also make a set of X shaped proportional dividers if you want to divide into 3rds, quarters, etc. with the same tool... but that's less fun.

-
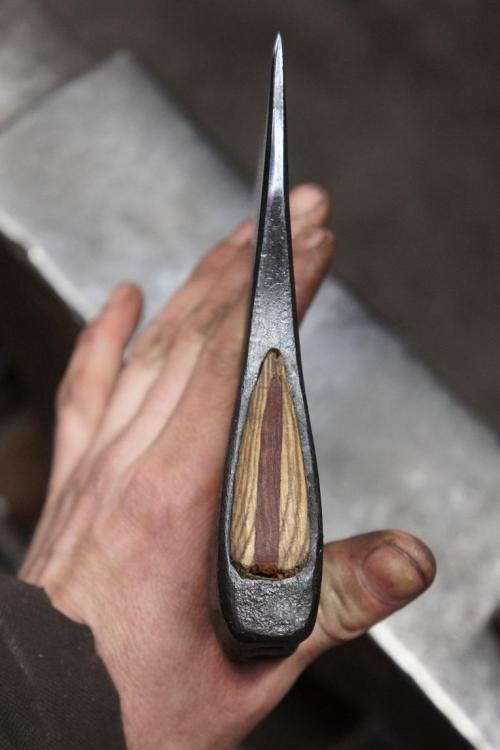
Beautiful work as always. Damascus bush devil has a nice ring to it as well.. One might say the devil is in the details! I love the piece of wood you chose. Thanks for sharing.
-
Pretty. I love the pattern from the wrought. Did you use nickle sheet between the edge material and rest of the blade?
-
I was thinking of changing the ratio to 1:2 and adjusting the long side to the length of the stock then using the short side to find the center.
-
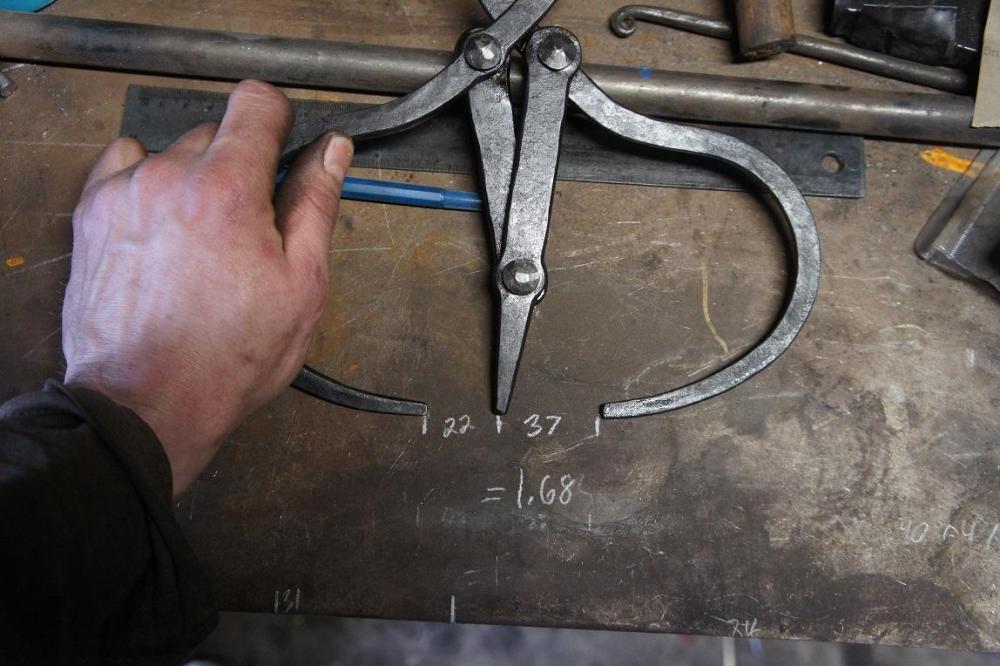
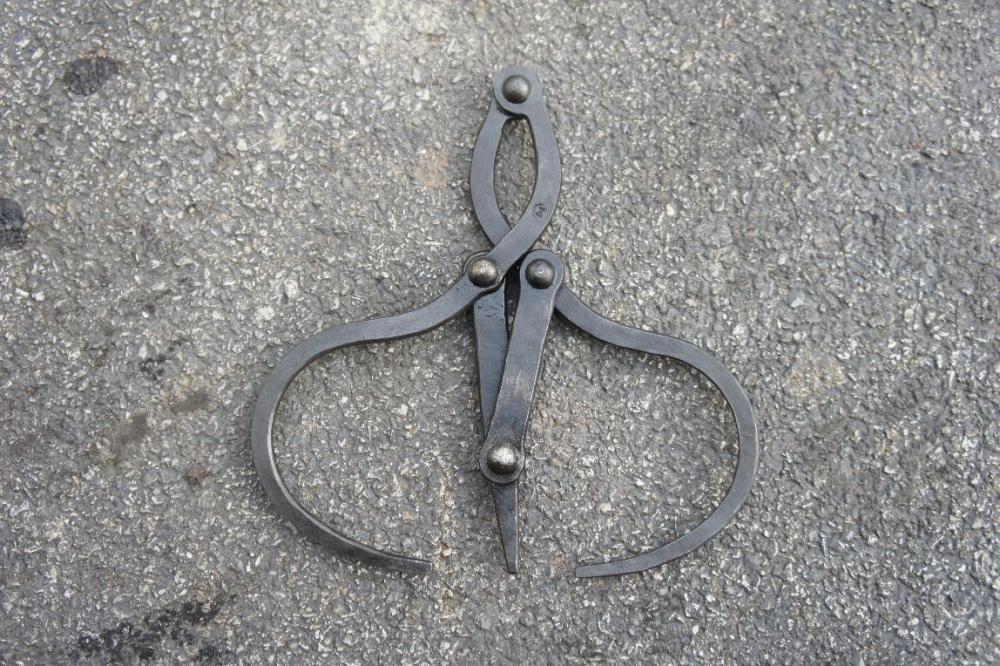
A fun piece. Thanks for sharing Josh. I need to work the rivets a little more to get the full ROM.. Close enough, though slightly off. At fully closed I get a ratio of 1.68. At "fully open", 1.64. I can probably file the tips to clean them up and get a better line. These are as forged.