Frazer
2021 Donor
-
Joined
-
Last visited
Everything posted by Frazer
-
Water quench in thick sections, maybe, but I have never had good luck quenching thin sections of 1095 in water... it certainly won't help with warping. If you can't get it to come out straight, double check your normalization cycle temperatures. Now that it's getting cold out make sure you aren't putting your hot blade on a cold surface to normalize. When it's cold out I will usually put the blade on top of my bucket of vermiculite (not buried, just laying on top), then I put the lid on . If all else fails, take the warp out during tempering cycles with a 3 point bend.
-
H13 is an excellent steel. However, as others have mentioned, it's not an easy one to work with. Opinions will differ on the "correct" working range. Numbers and charts are useful if you can actually translate them into how they apply once you're in the shop, hammer in hand. I generally do all the forging at a yellow heat. As it transitions to orange you can really feel it stiffen up under the hammer. IMO you're not doing your arm or the material any favors by trying to make it move much more. I tend to use orange for planishing more than anything else. It also doesn't like stress risers so add those in last when possible.. or arc weld the shank on at the end I'm no stranger to using overkill steels in unnecessary applications (I made a hammer out of S5 once.... just because). However, H13 is really well suited for things that are going to be sunk into a thick piece of hot steel and (possibly) spend some time in there (i.e. hammer eye punches) or tools that come down to a relatively thin working end (i.e. slitters) that you don't want to bend/mushroom, etc. over time. For something like a hardy, which realistically doesn't get very hot, you really aren't using it to its full potential nor its strengths. H13 also gets surprisingly hard when quenched properly; it can skate a file. Even after tempering - which is done at a higher temperature than you perhaps expect - it's extremely tough. This means you're probably going to cut into your hammer face accidentally.. Personally, I would rather dress a squished edge on my hardy vs redress the face of my hammer because I put a nice slit right down the middle. If I were you, I would make all my tools out of simple steels or, if you're cheap like me, recycled steels* (coil springs, car axles) etc.. Once you have a nice assortment of tools that you've made (and more importantly the experience you've gained making them) go back and remake the ones that you use most often and/or the ones that you think need a more robust material. First get a decent understanding of the process, then repetition (x3) so you can confidently apply that process THEN add the complication of the material fighting you at every step along the way. I think we've all been in your shoes... Can the fancy tool steels make a better tool sometimes? Yes. However, a well forged tool out mild steel will, in many cases, work much better than poorly made (let alone a broken/unfinished) one made of some cool, modern, super alloy... Unfortunately, other than working with someone who is more experienced, there are no shortcuts to building a solid foundation. Crawl, then walk, then run. *I've gone on plenty long enough, but if you haven't already, read about: materials/things to avoid, potential dangers, spark testing, etc. as it relates to recycled materials. In rust we trust
-
Yes, I would address the puckering as you go. It will likely happen on the sides perpendicular to your wedge (cupping/puckering) and on the end that will eventually become your edge (fishmouth). I would only worry about the sides and grind out the fishmouth when you're done. Working it hot and hard (ie with a striker) will minimize the amount of puckering. What's going on is the amount of force being applied is enough to move some of the thickness, but isn't sufficient to act on all of the material, leading to a sort of mushrooming effect. If you have a welder you can run a couple of beads down the shank to make the fit in the hardy hole a little tighter.
-
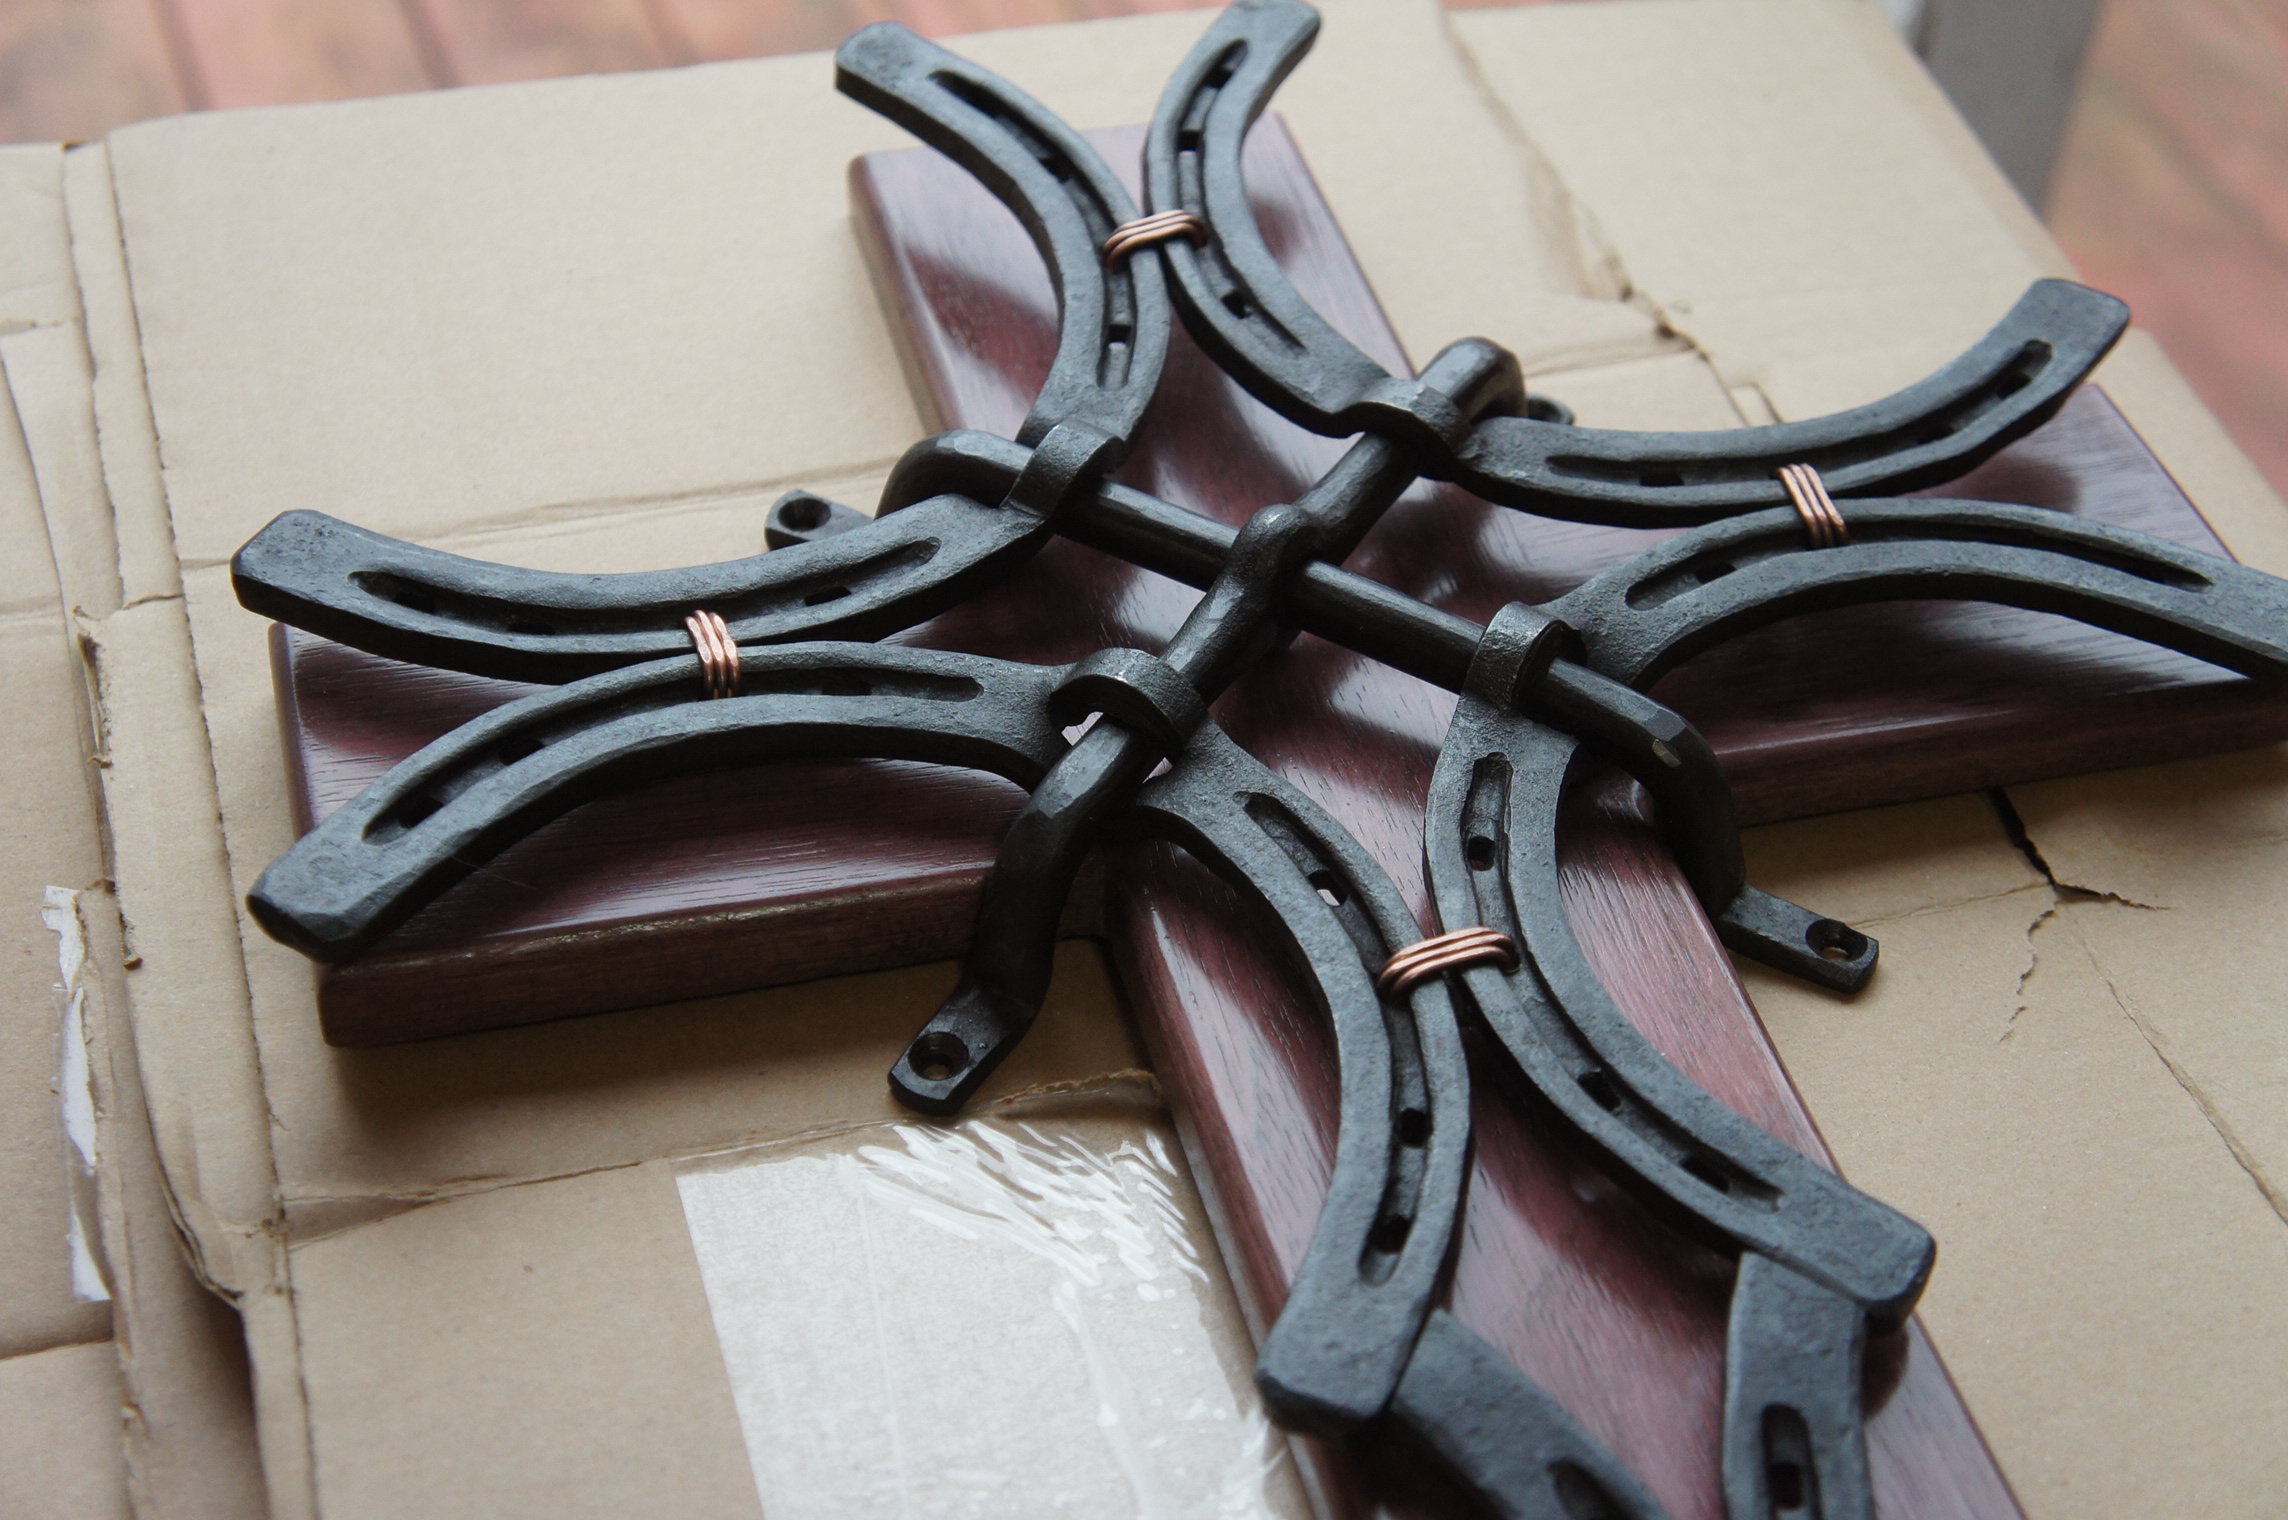
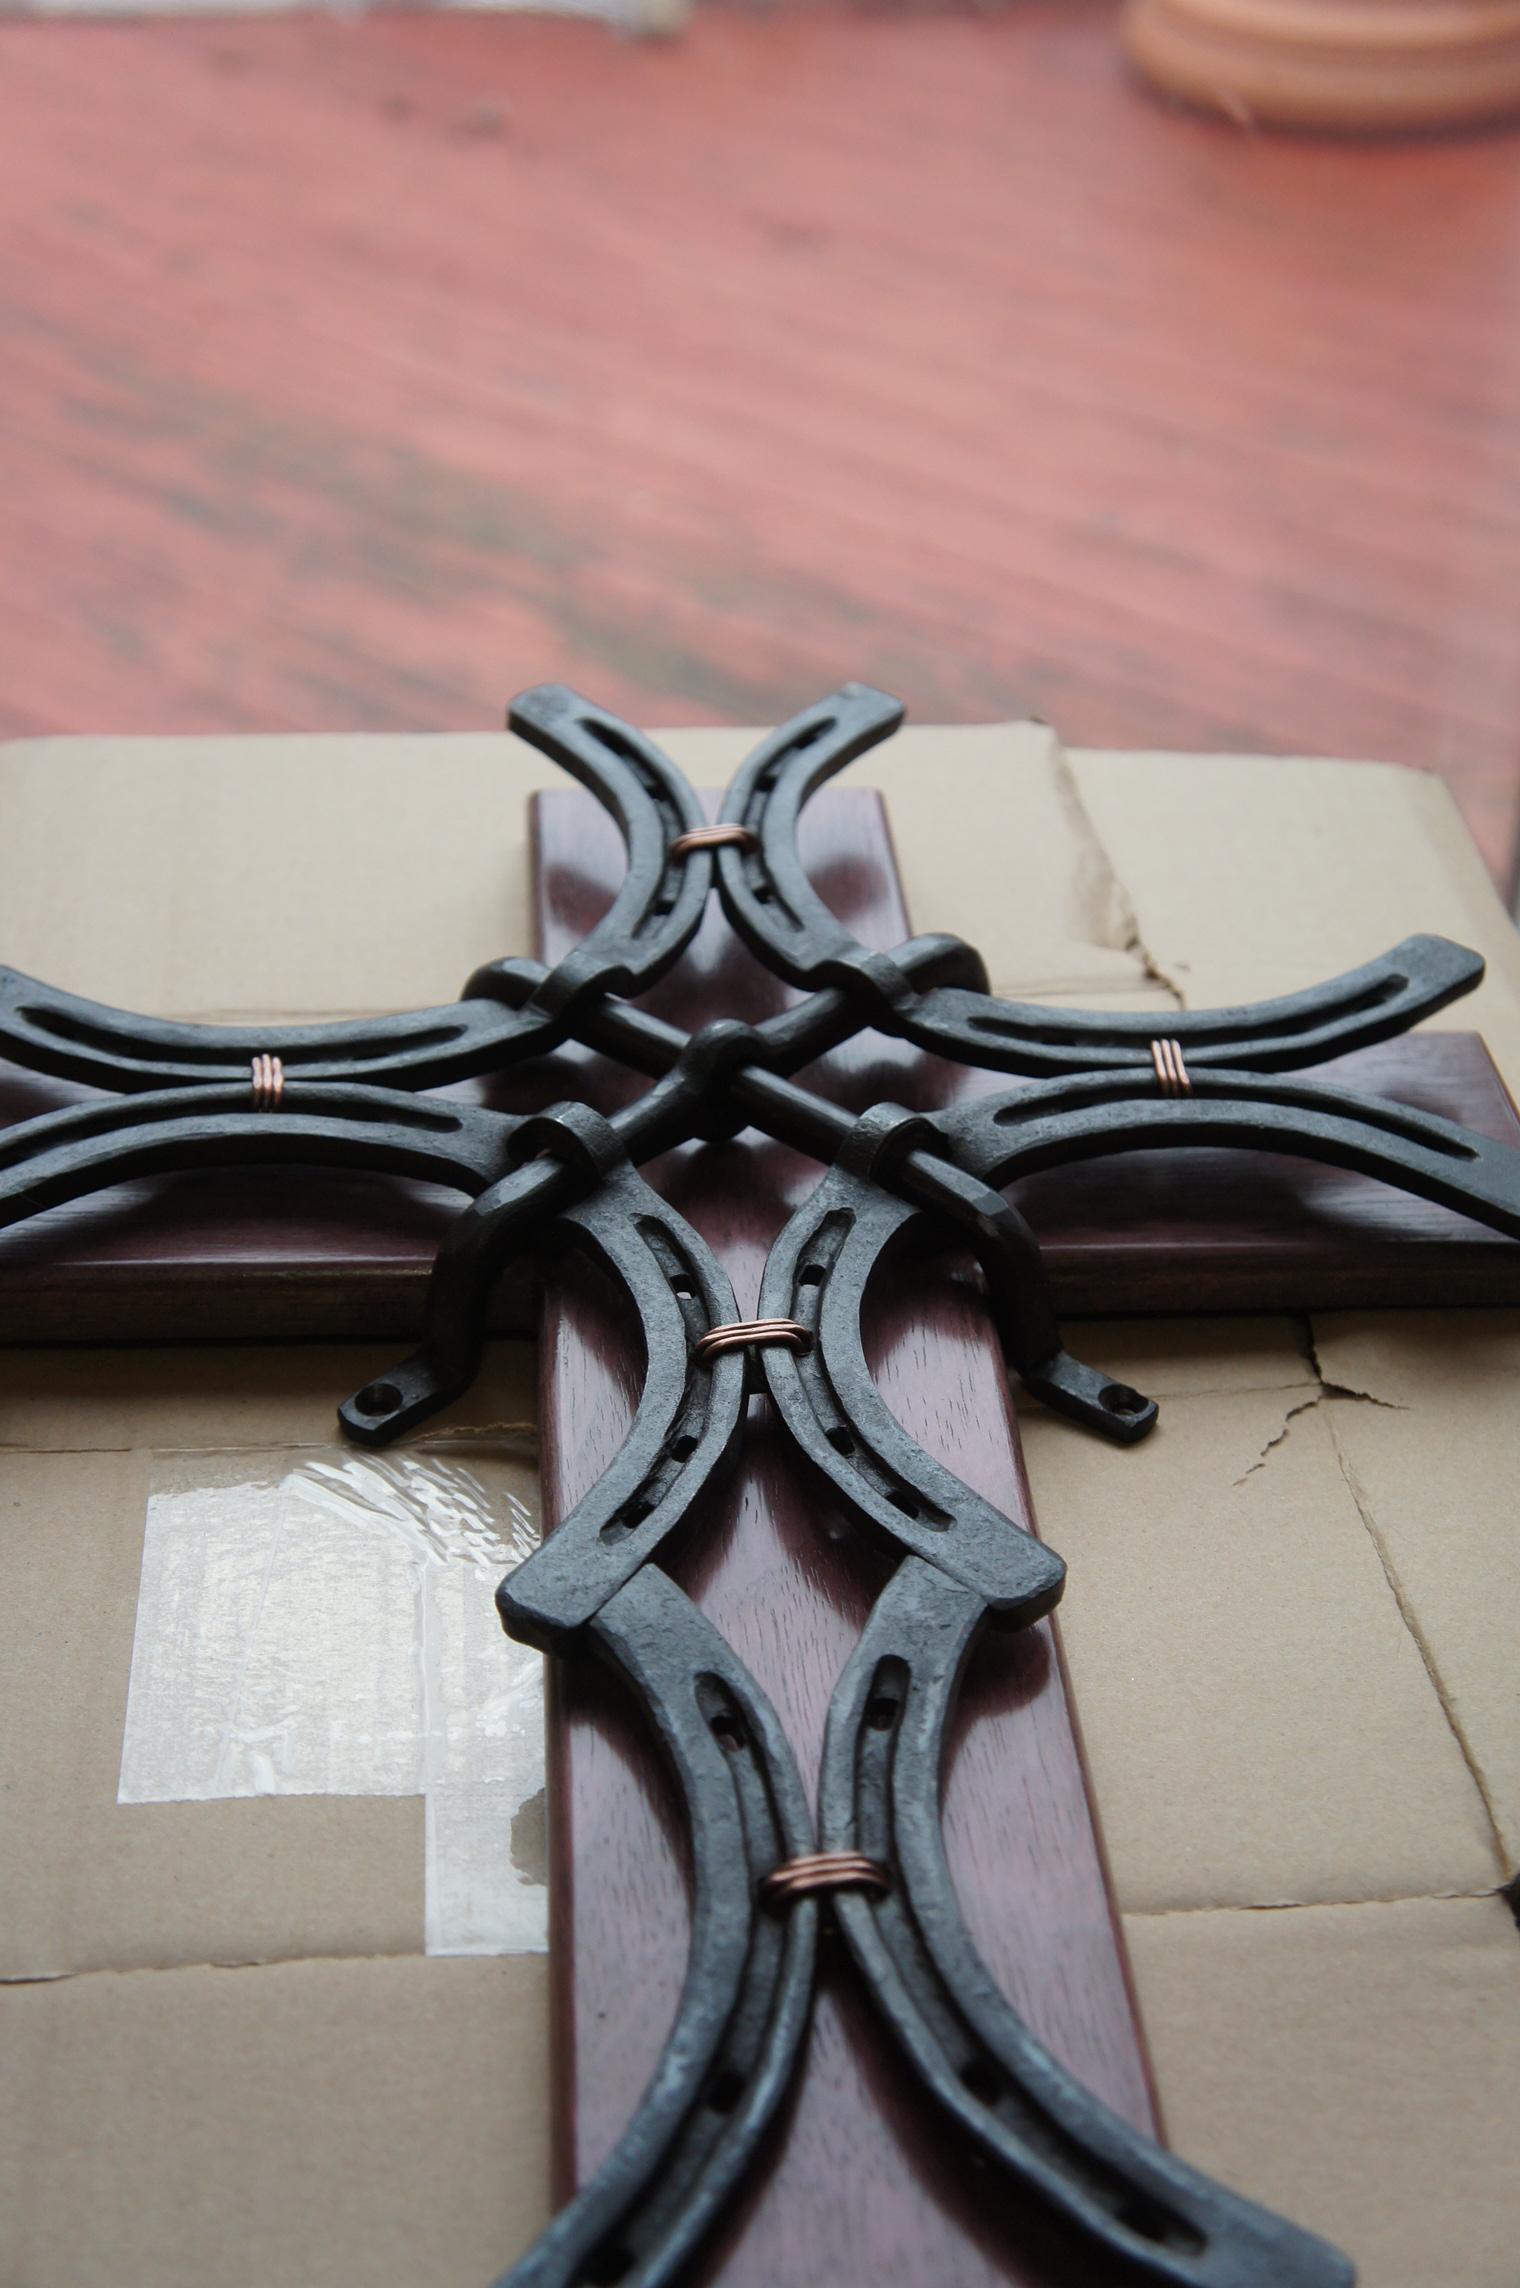
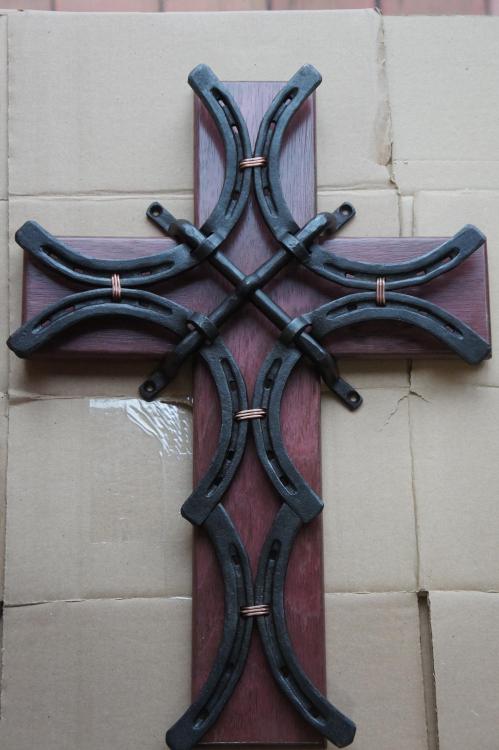
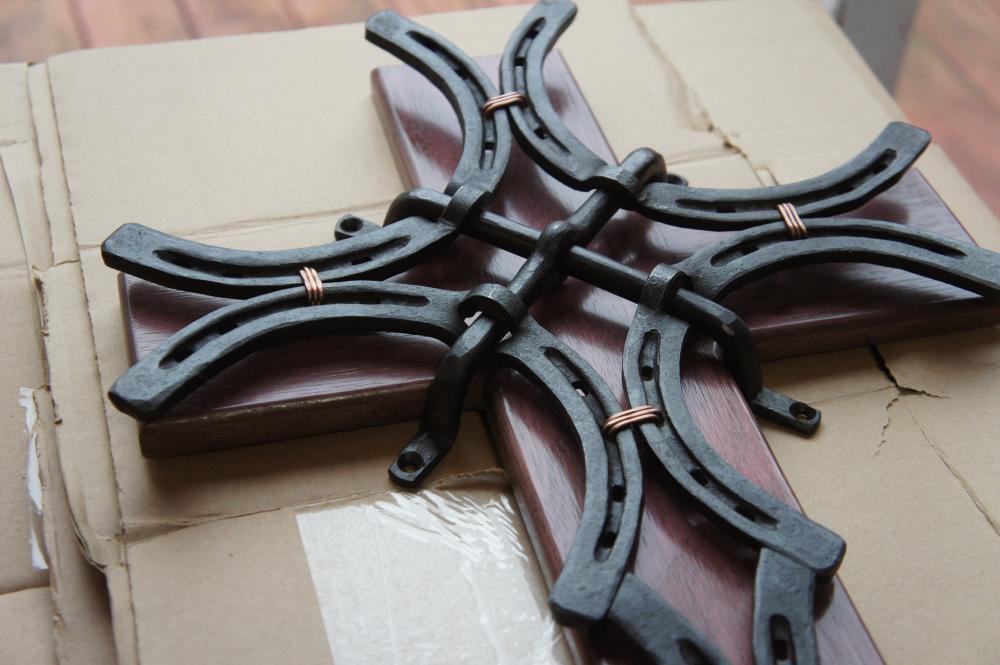
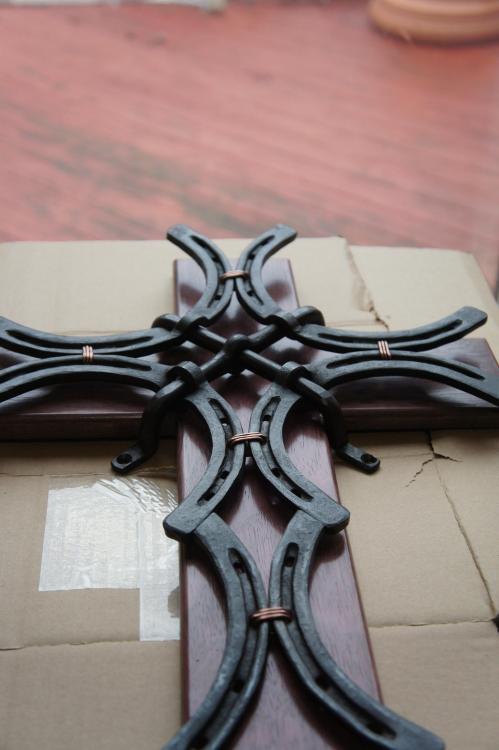
The horseshoe cross isn't my idea, but I did come up with the central joinery and mounting scheme... Well, insofar as anyone really comes up with anything.. The horizontal pierce through the shoes came from a book (Decorative Ironwork: Some Aspects of Design and Technique). One thing that's maybe not immediately apparent is that it's not 5 horseshoes that are identical in size. The one that gets split is longer and has a slightly different curve to it. I had done 5 that were all exactly the same, but when placing it all together for a dry fit up it didn't look proportionate. I really like the copper windings to break up the colors. For that I did 3 wraps, twisted it tight in the back, snipped off the excess, brazed the twist and filed flat in the back. There are many variations one could do on this idea. I wanted the center to be visually interesting, but not so complicated that it distracts from the overall cross... I could probably write a short essay on tips and things to avoid while making this, but that might rob folks of the fun of experimenting For the record making a decent horseshoe is harder than I thought it would be!
-
Thank you. One thing I learned pretty quickly (admittedly not quickly enough) is order of operations is key.
-
More of an interior decoration, but this one grew out of a request for a horseshoe... Might have gotten carried away
-
I will keep him and his family in my thoughts. Thank you for letting us know Billy.
-
Tell that to the pigs! Unfortunately my NINJA blender is quite small.
-
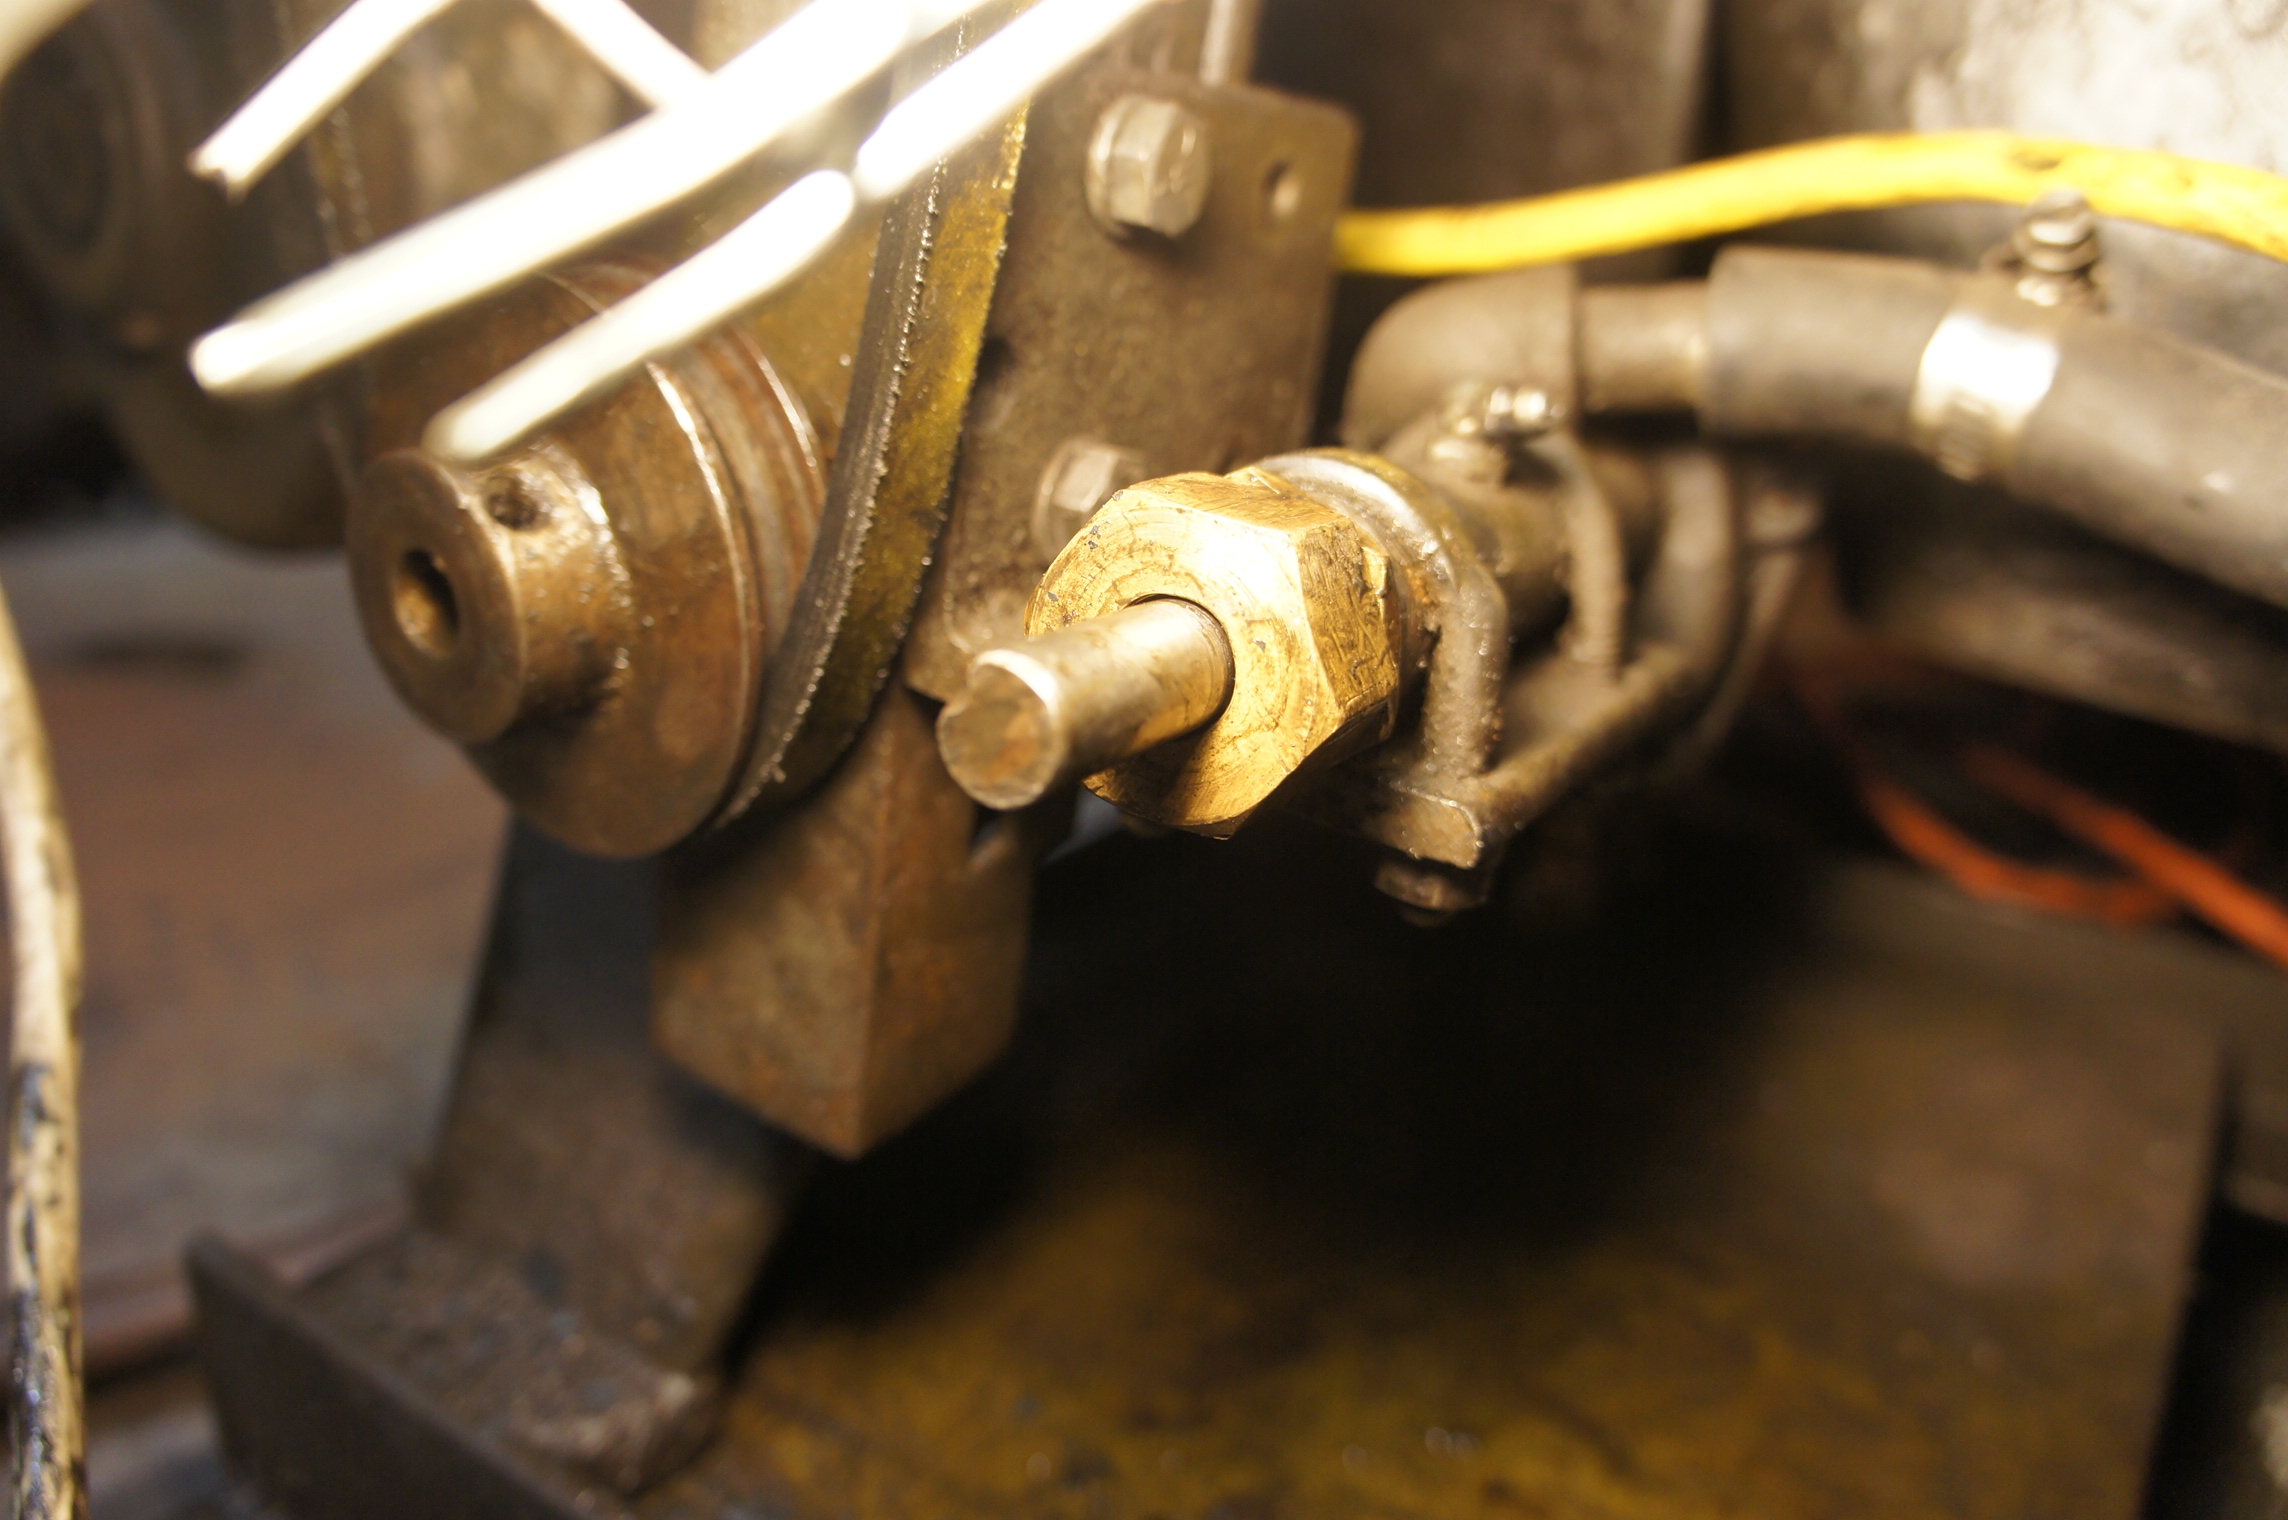
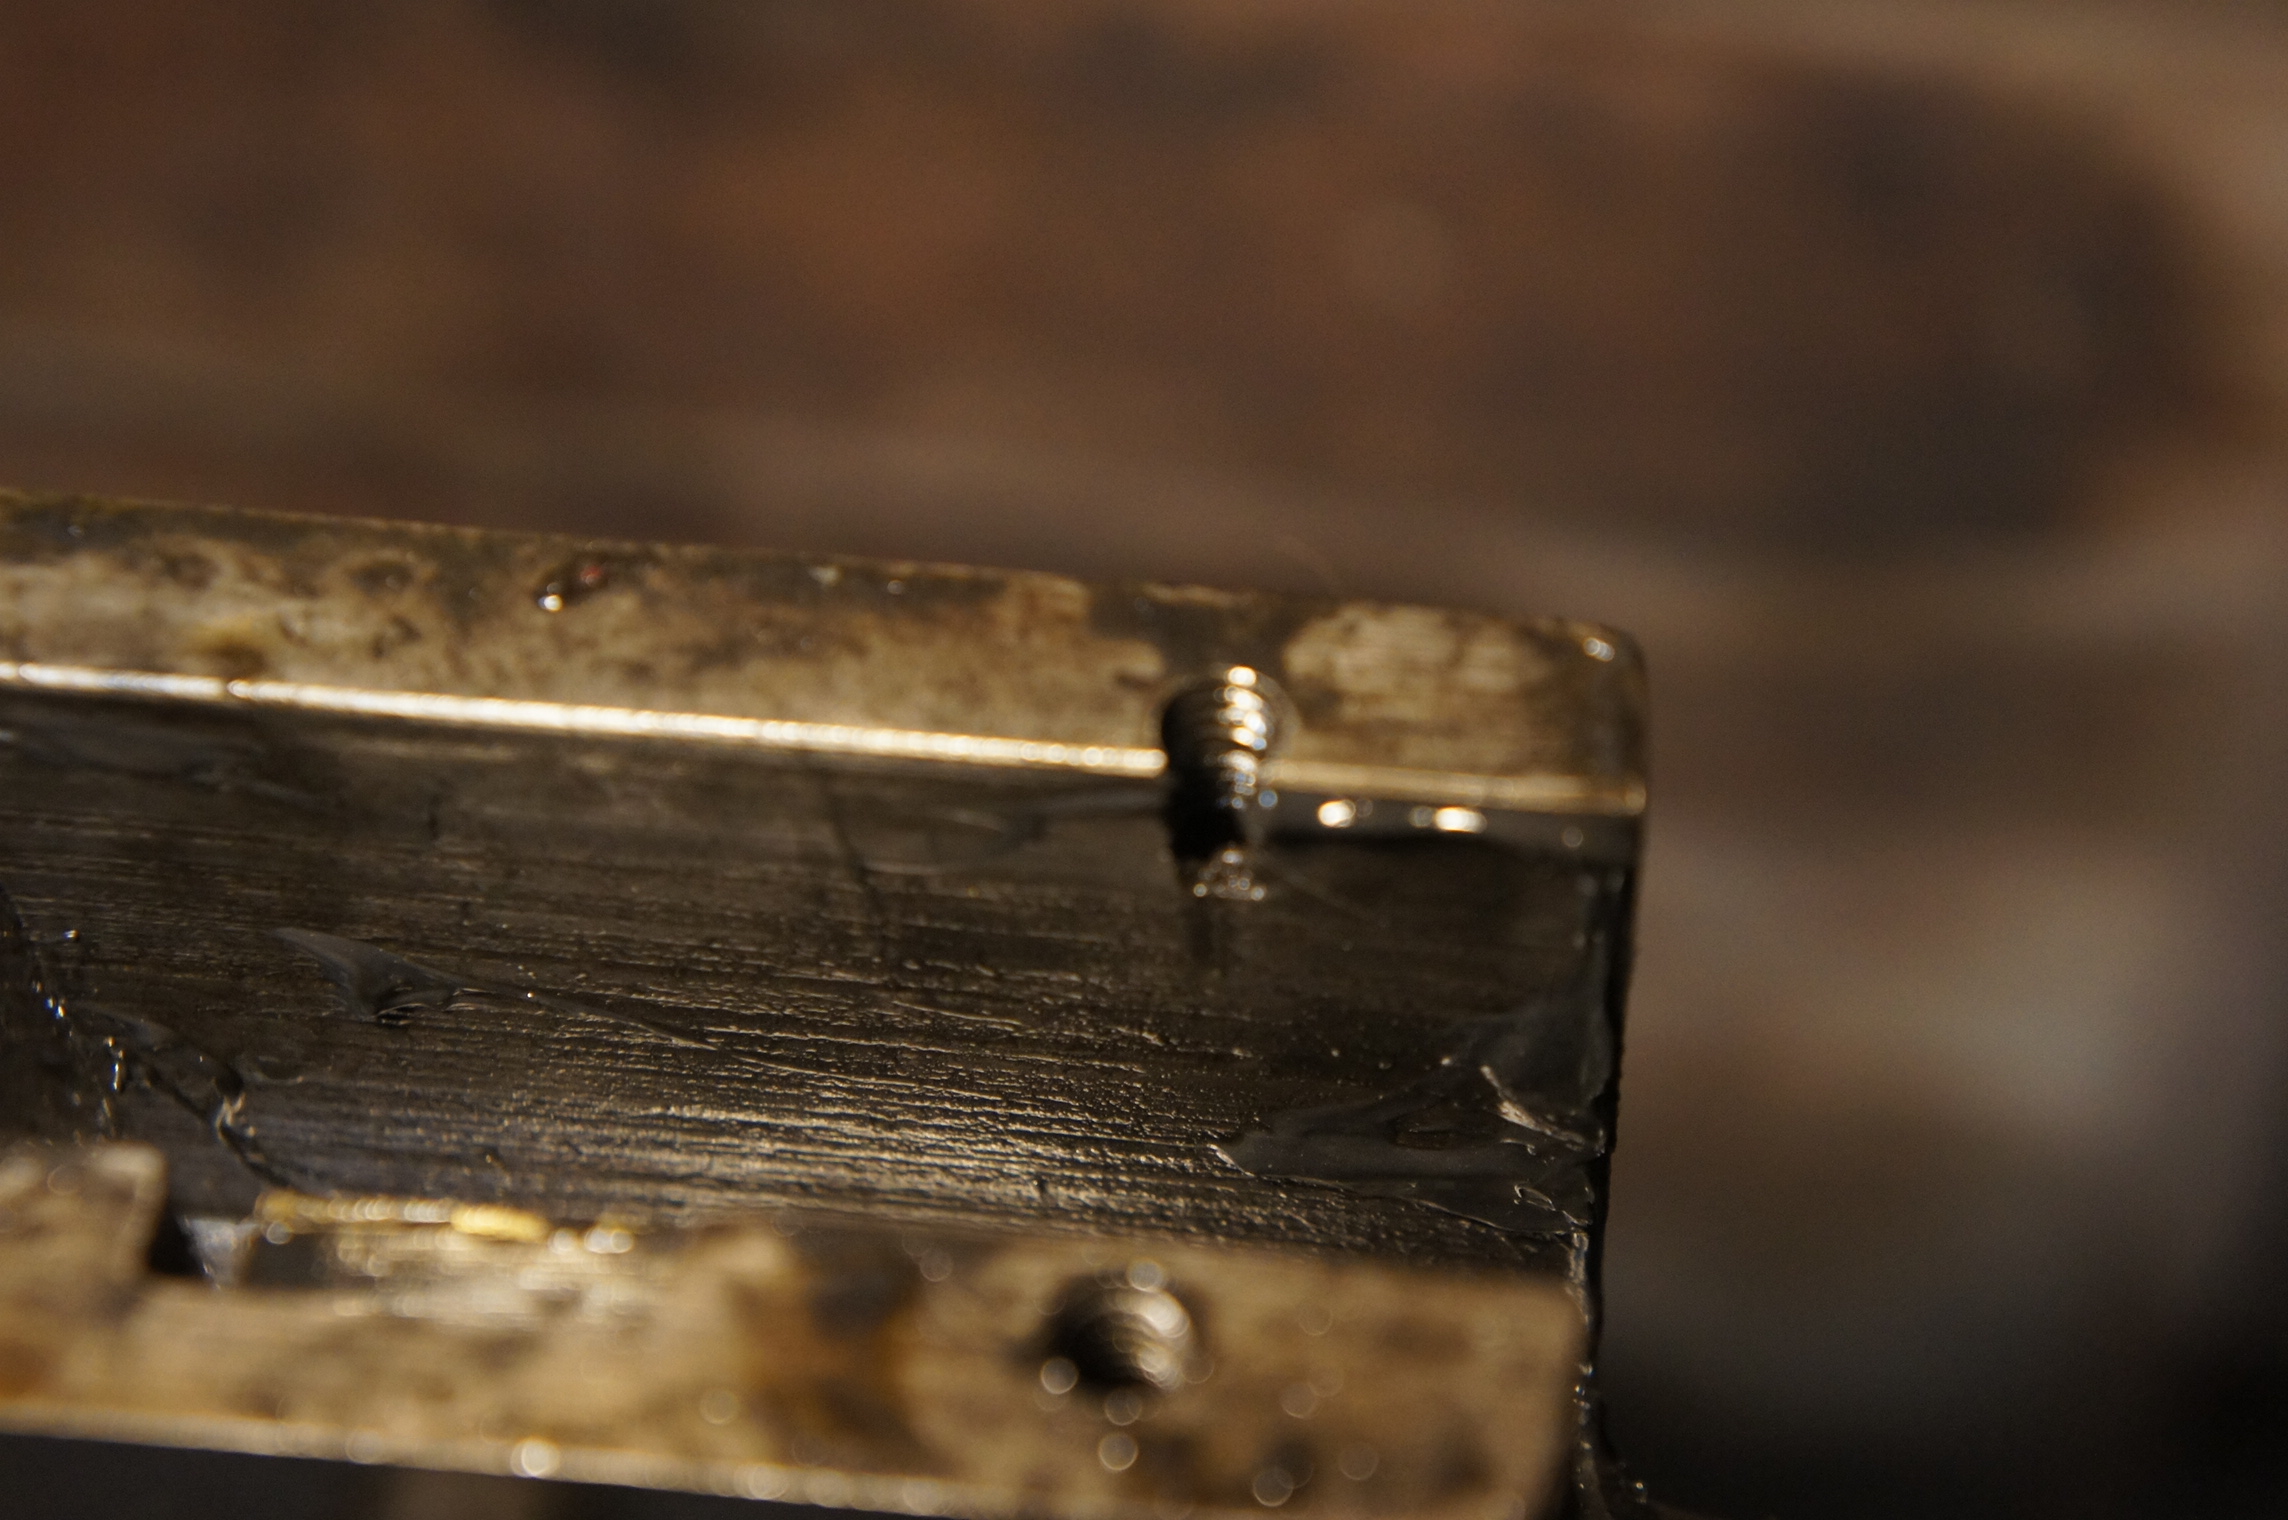
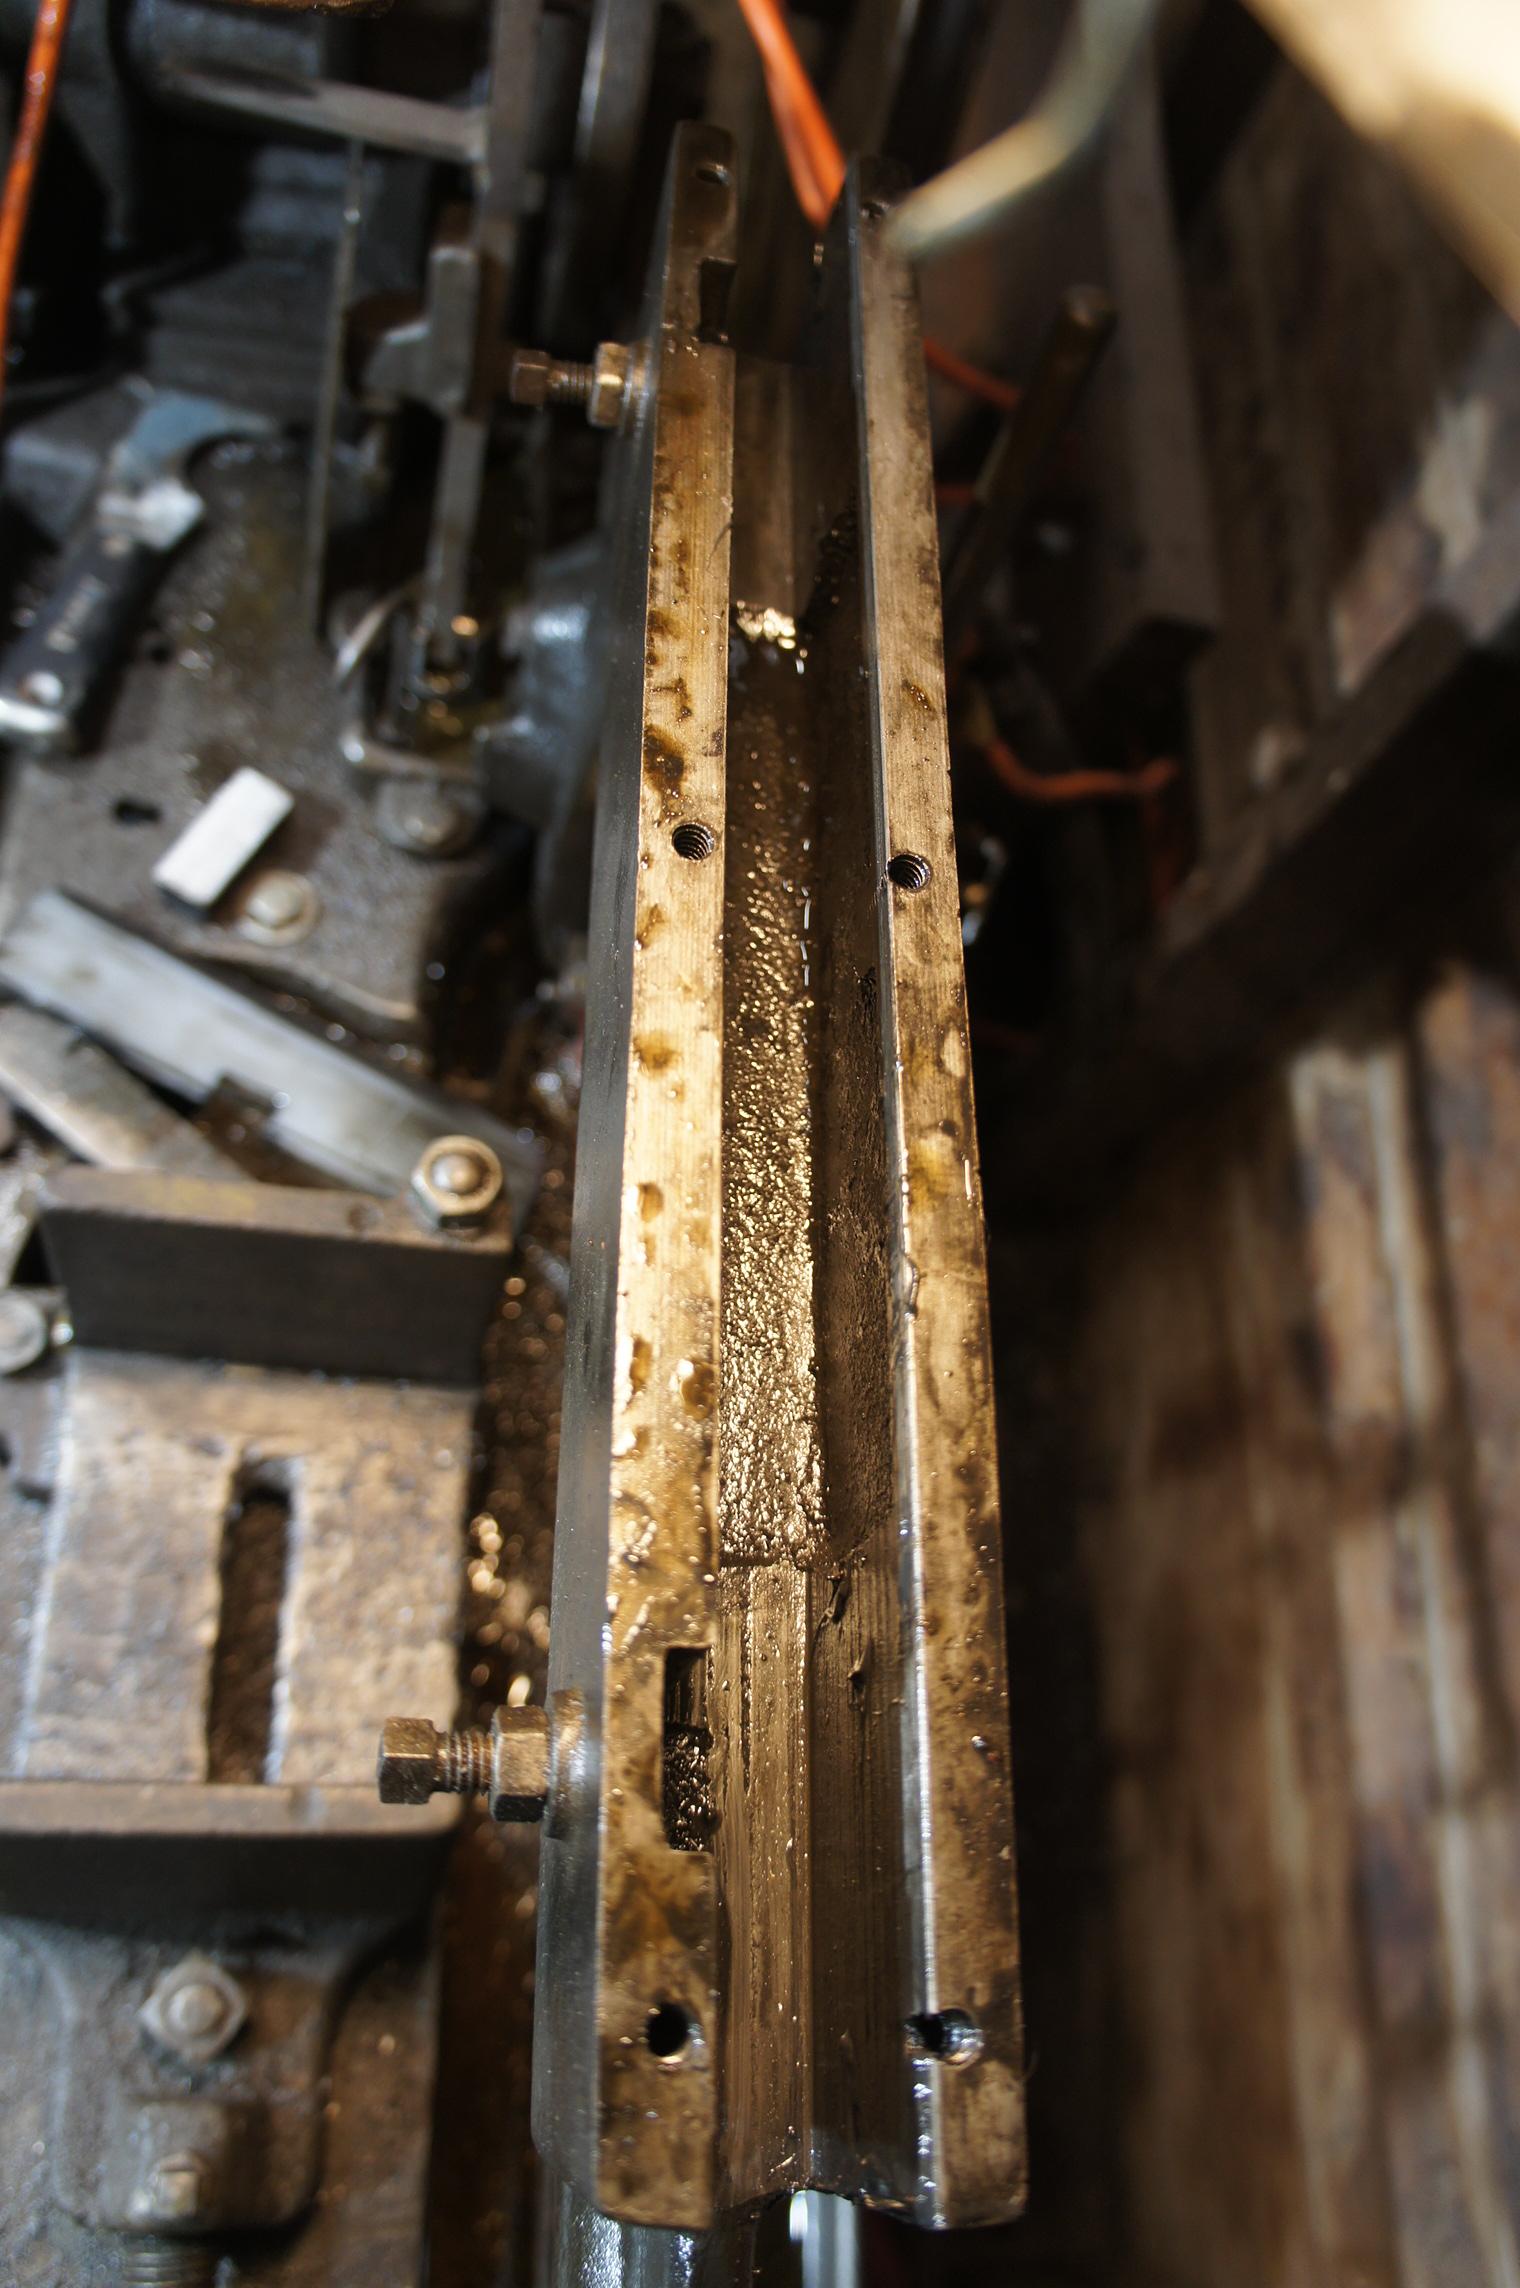
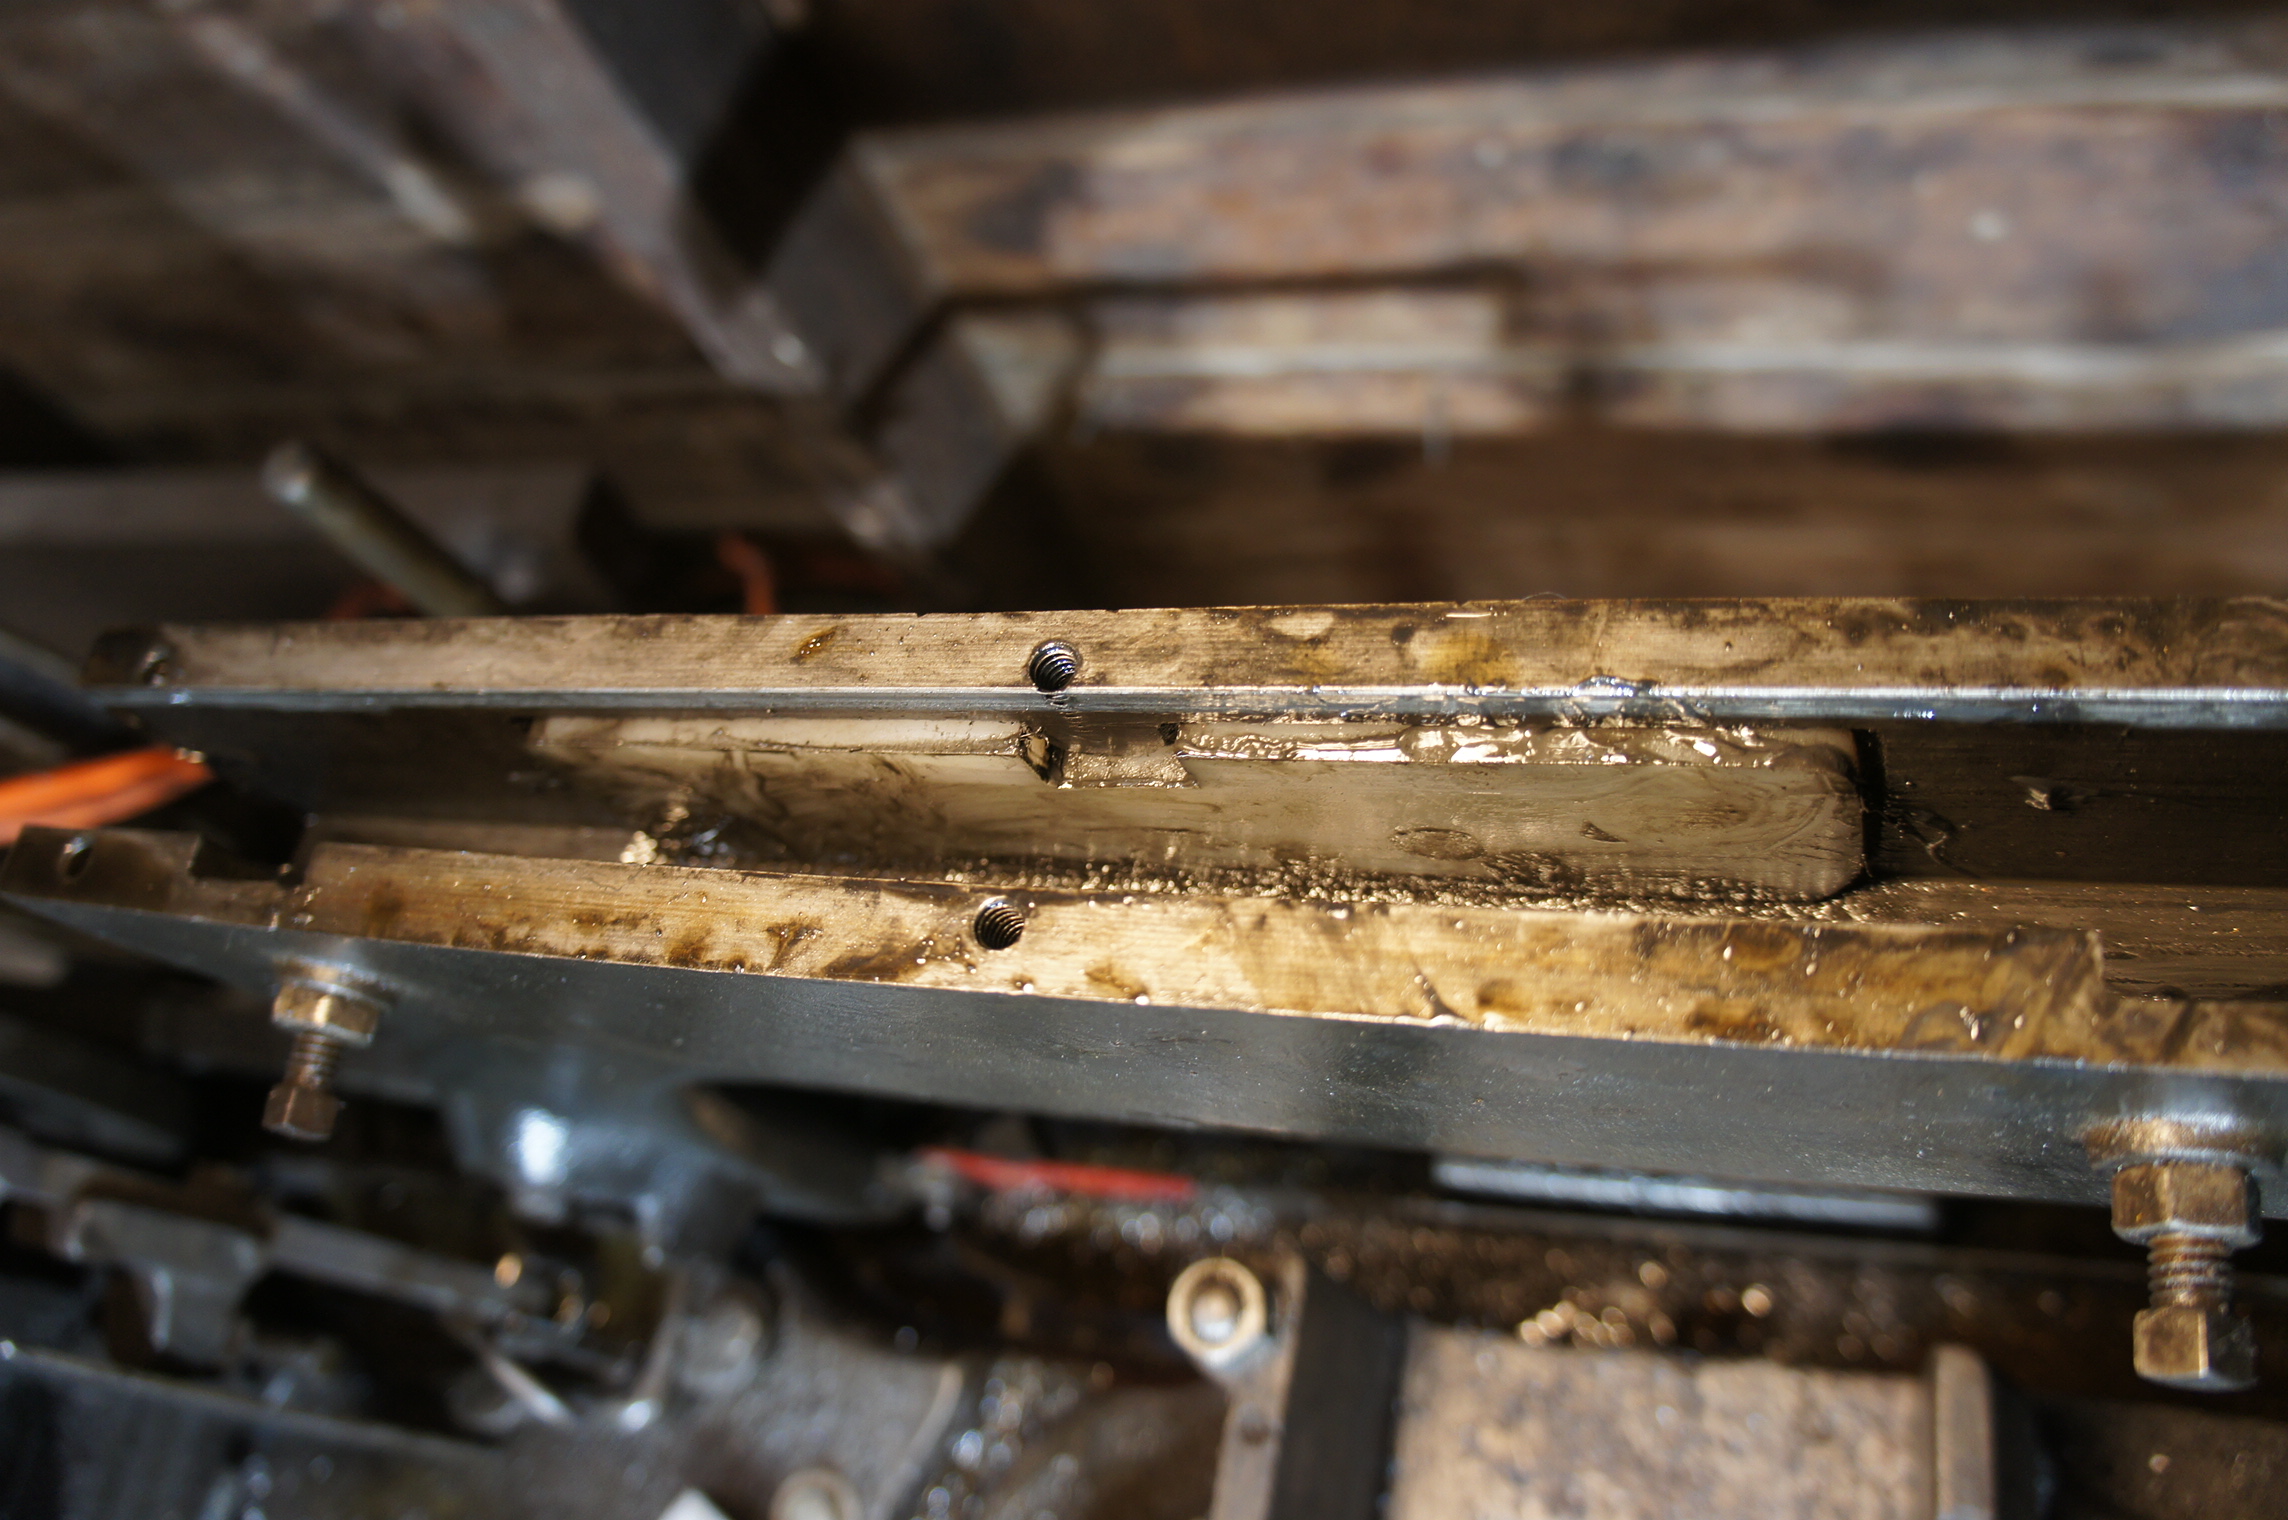
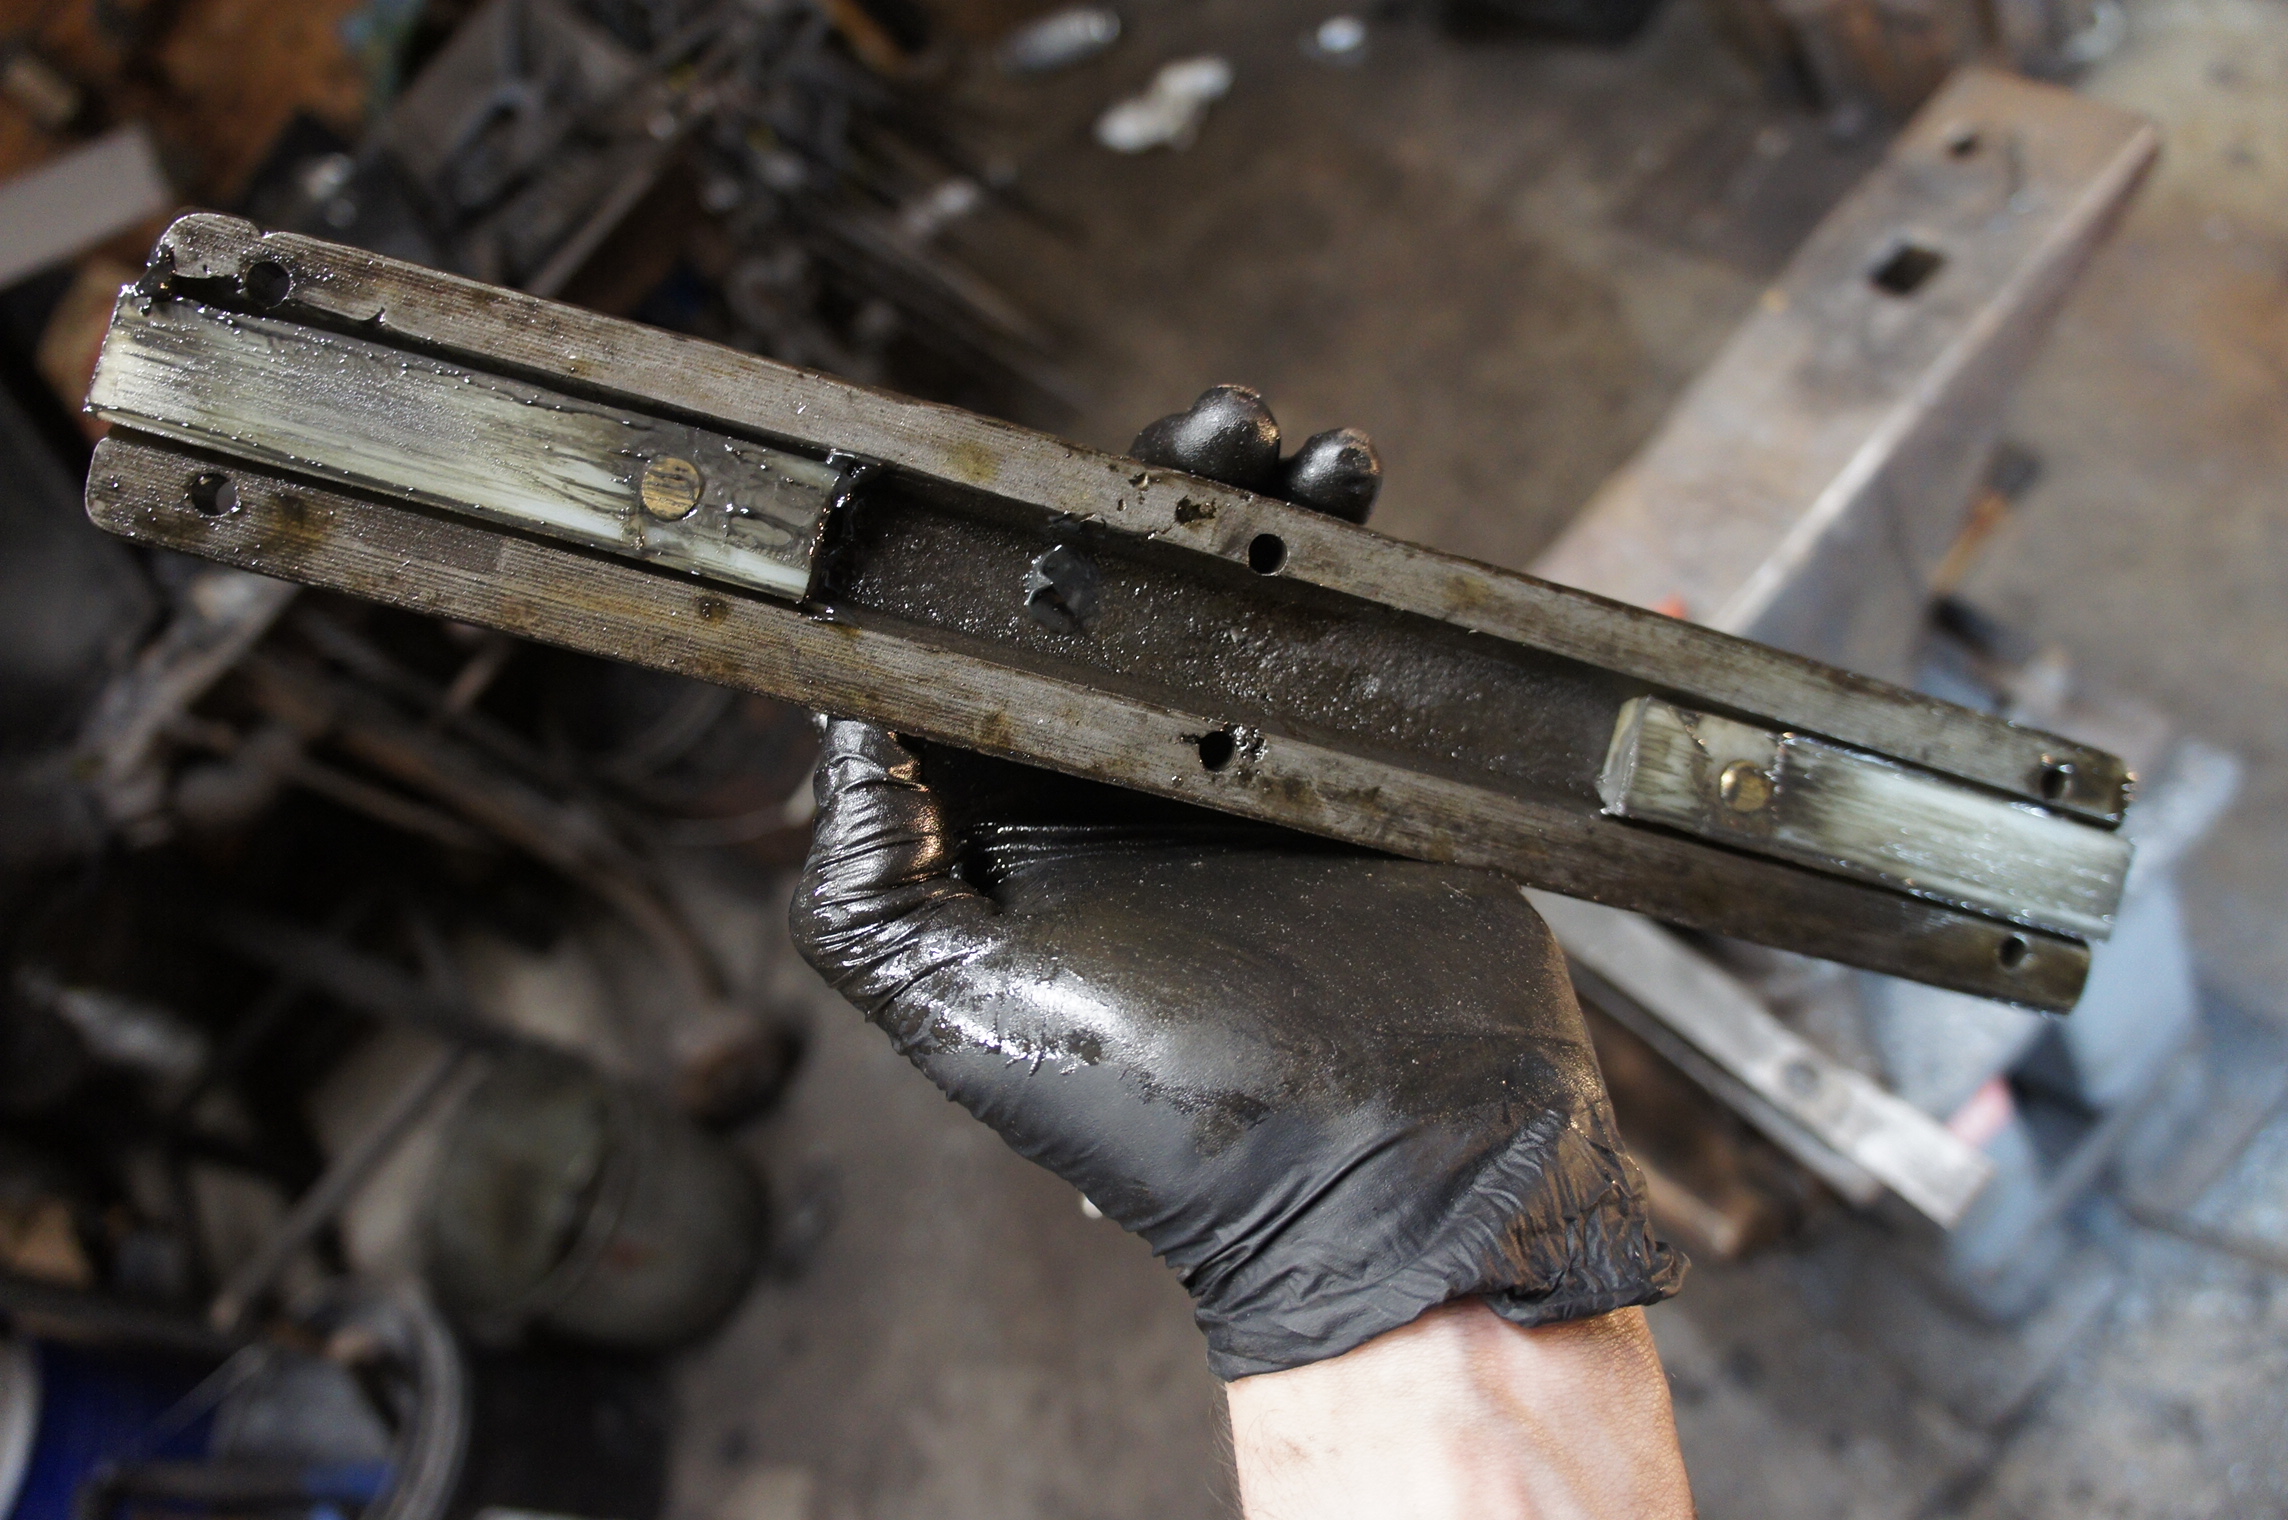
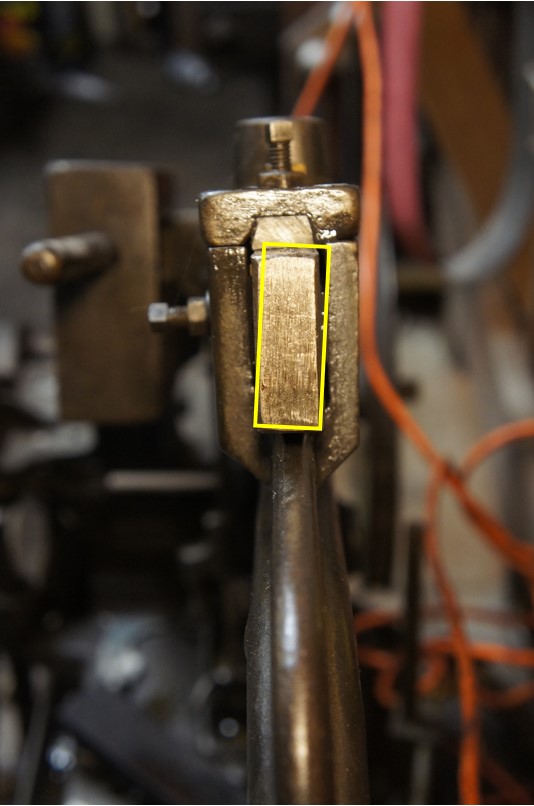
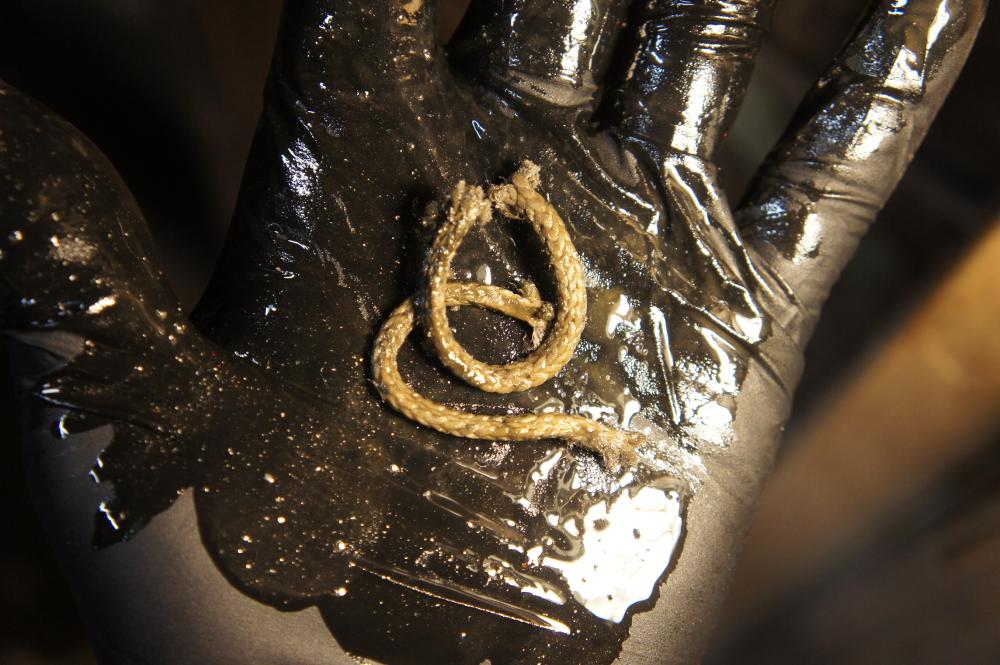
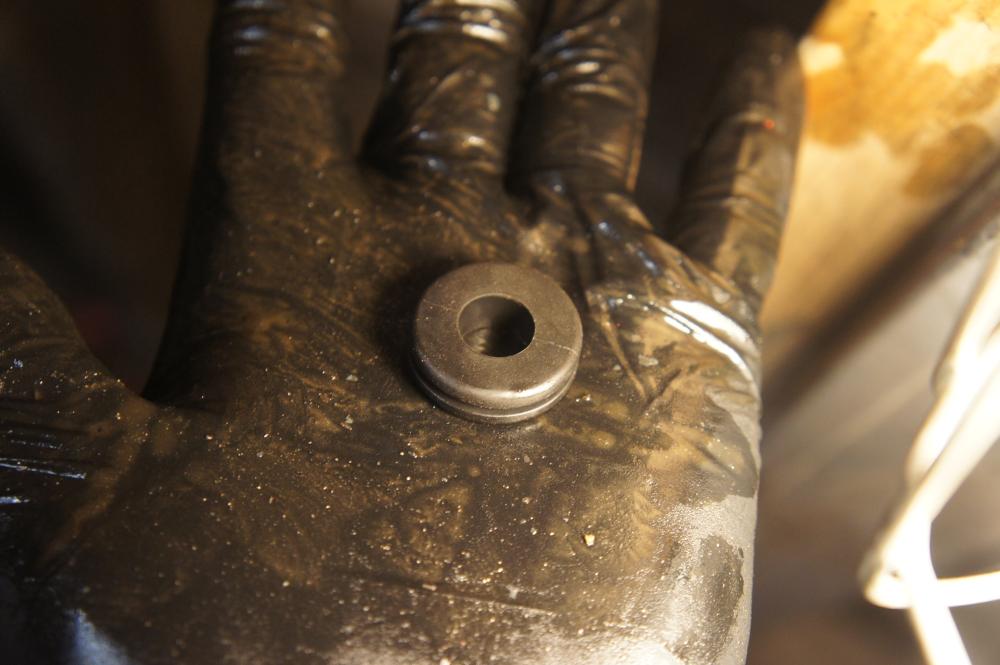
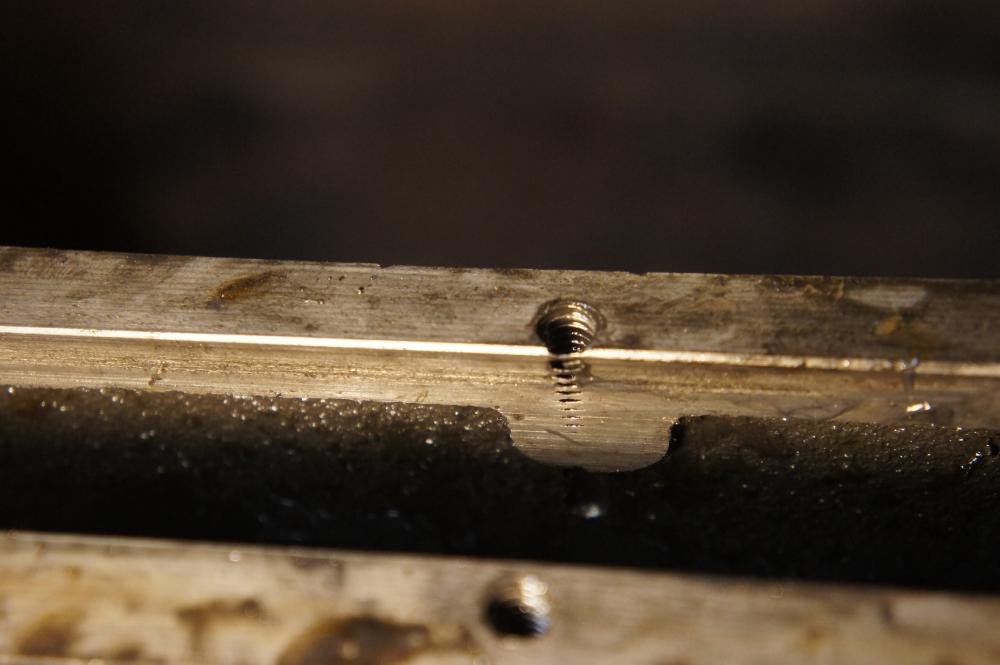
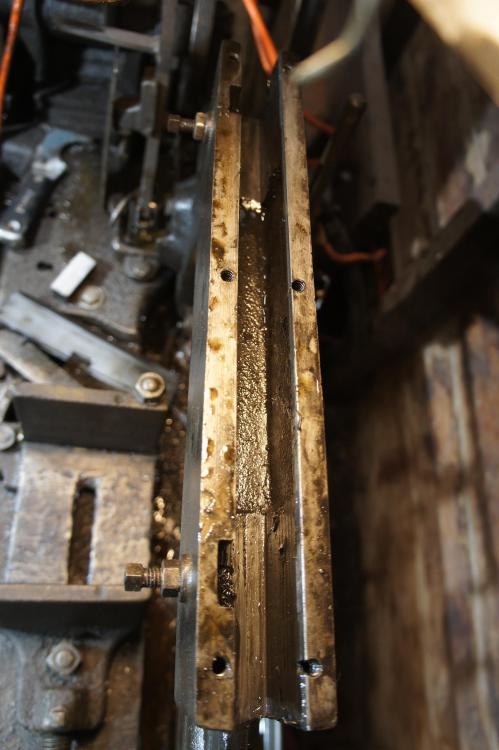
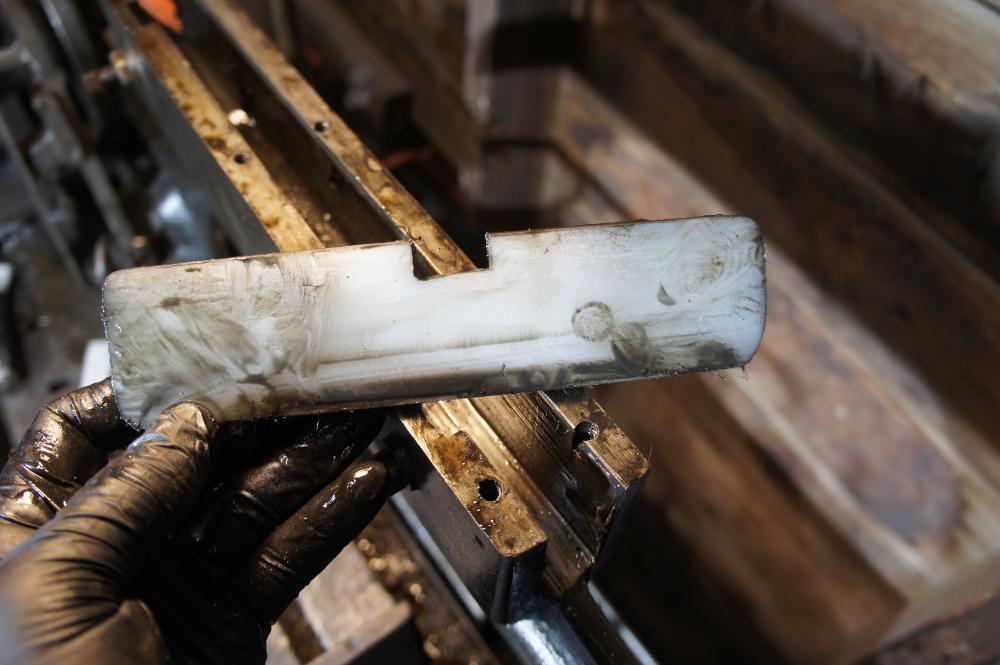
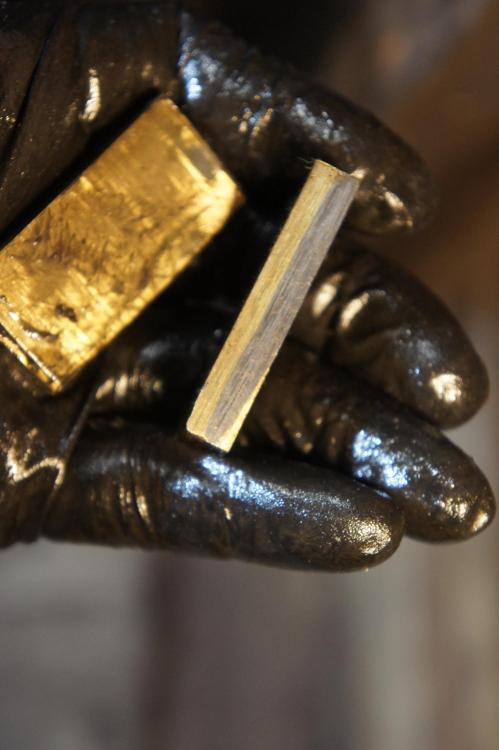
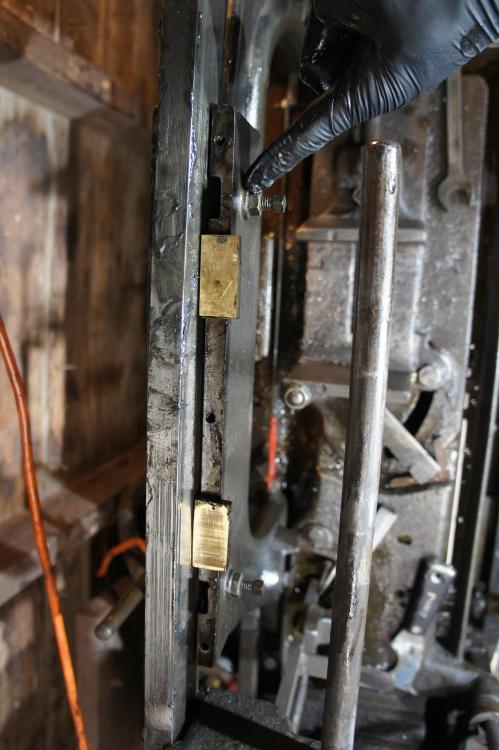
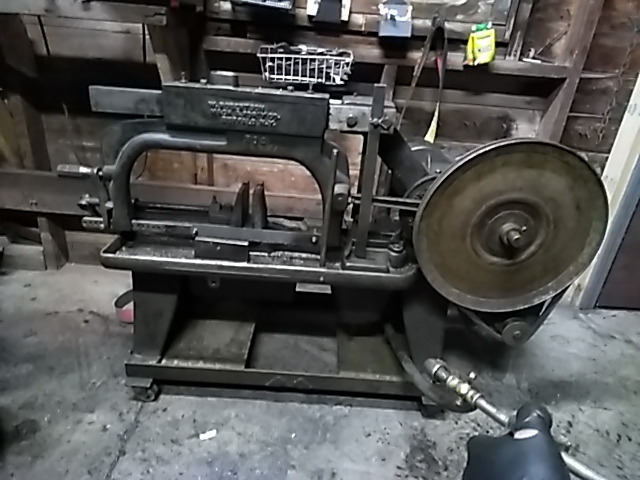
Full disclosure, PHOTO HEAVY. I know you all have been on the edge of your seats. Some of these repairs were done weeks ago, but I neglected to take pictures at the time. Figured it was time to take it apart again and take some pictures/see how things are wearing in. Most important thing first. When I first got it the bar that hacksaw arm slides along was noticeably tilted when looking down the length of the ways. I don't have a before picture, but here it is after I fixed the problem. The yellow rectangle is about what it looked like initially. The bar itself was straight, but the hacksaw arm was tilted, leading to wandering cuts. Over time this misalignment had led to some very uneven wear in the ways, so much so that the casting had worn away to the front 2 screw holes on the left side. The wear surfaces on top appear to be UHMW polyethylene (or something similar) so I bought a sheet of that and cut it to fit the hollow area in the casting on the side with the excess wear. Now the bar glides along the polyethylene rather than the casting and there is about 3/16" of wear surface before any additional damage is done to the hacksaw. The cuts are square again. Assuming it stays well lubricated I figure that ought to last another 100 years of use. Note: The dark stuff is moly grease, not worn metallic bits. I cleaned and greased all the parts before reassembling. On the opposing side there are 2 slots for inserts. There were 2 cast iron inserts in there before, but I replaced them with mild steel with ~0.080" of brass braised on the wear face. Now everything is running true and the hacksaw is no longer eating itself while it runs. The next item, which was really more of an annoyance than anything, was the oil leak coming from the driveshaft for the oil pump. The guy I bought it from said he tried to fix it, but couldn't get it to stop. After I took apart the brass fittings I found that he (or someone) used a shoelace as an oil seal... Fortunately, I had a kit of automotive grommets and one of them fit nicely. So far the new seal has held up well, no more drips. I found one zerk, so I greased that up as well. I love this thing. It's super simple and every part is comically overbuilt. It may be a little loose in the hips, but it chuggs right along. Given a little time it will cut pretty much anything you put in there without much fuss.


-
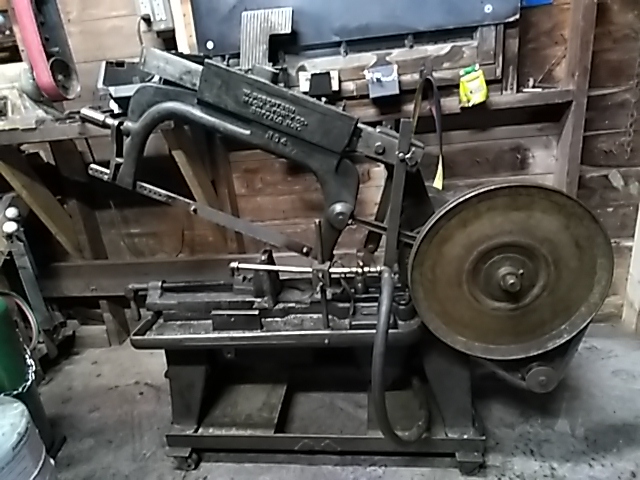
This is where I shall post any work I do to extend the lifespan of this reciprocating cutting device. In the meantime, here's a video if it chugging along through a jackhammer bit. First order of business, replace the light switch with a proper 20A switch.
-
They're certainly cool, relatively simple, machines. I even got 20 or so 17", 6tpi blades with it so I should be all set on blades for a while.. Assuming it never cuts anything smaller than 1", which is fine. I have my Evolution carbide "cold cut" saw for smaller stuff and tubing. Just for fun I cut a jackhammer bit with it yesterday. I certainly couldn't do that with the Evo saw.
-
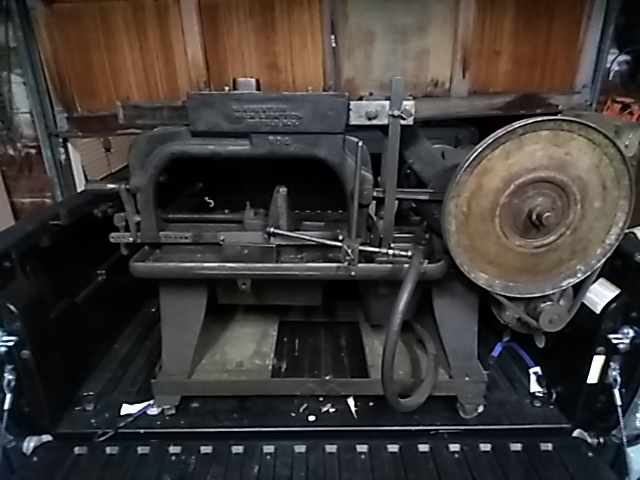
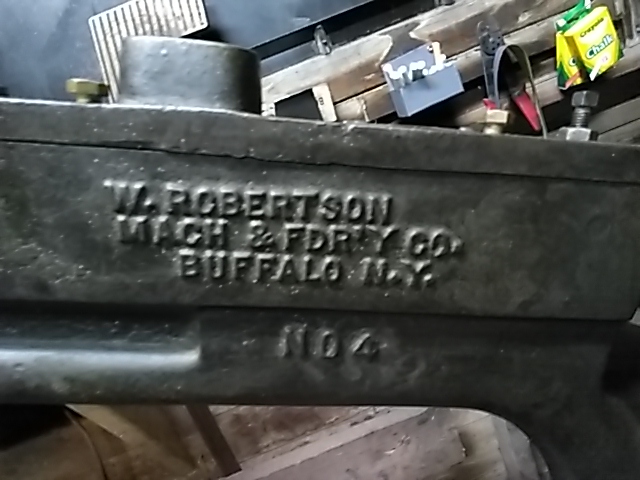
I'm a weak man.. At our Fall All Hands event someone was auctioning off a beautiful W. Robertson Mach & Foundry Co. Number 4 Power hacksaw. I've always thought these power hacksaws were cool and at the price ($130) I couldn't afford not to buy it! Shes a big'n. 400+ lbs and will cut up to 8" solid. There's no date on it, but from what I've seen online it's 1910s or so. It runs great as is, but I took apart some of the moving components and they show some pretty significant wear. I should be able to add a couple of wear surfaces, replace a few seals and it will probably run for another 100 years.. In this case they sure don't make them like they used to! ... Now I just need more space to put it.
-
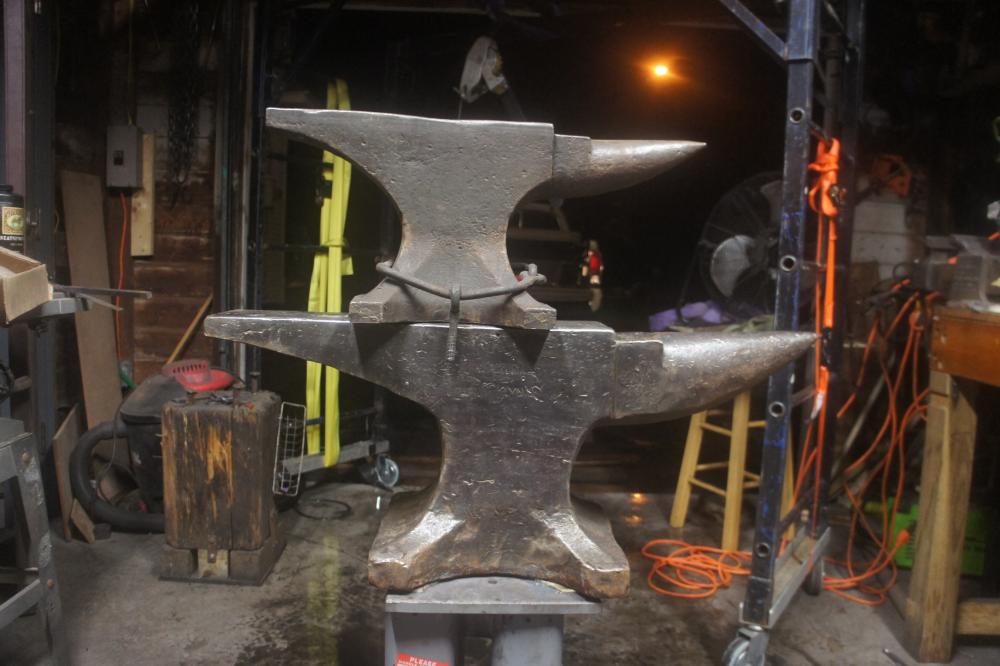
It will certainly get used, but I don't think it's going to replace my Soderfors as my main shop anvil. It's (arguably) too big for the majority of the work I do and the layout of my relatively small/narrow shop. I'm going to set it up on it's own stand -- which is almost done -- a few steps further from the forge where I have a little more space. I'll leave 360° access to my main anvil and the HB will be set up behind it. We will see how that goes. It's just about time to play around with the layout of the shop.... I think things could be shuffled, consolidated and, perhaps, removed... And by that I mean hidden out of the way for an undetermined period of time and most assuredly not forgotten about...
-
Thanks everyone. As far as buying a lottery ticket goes I may have used up all my luck for a little while.
-
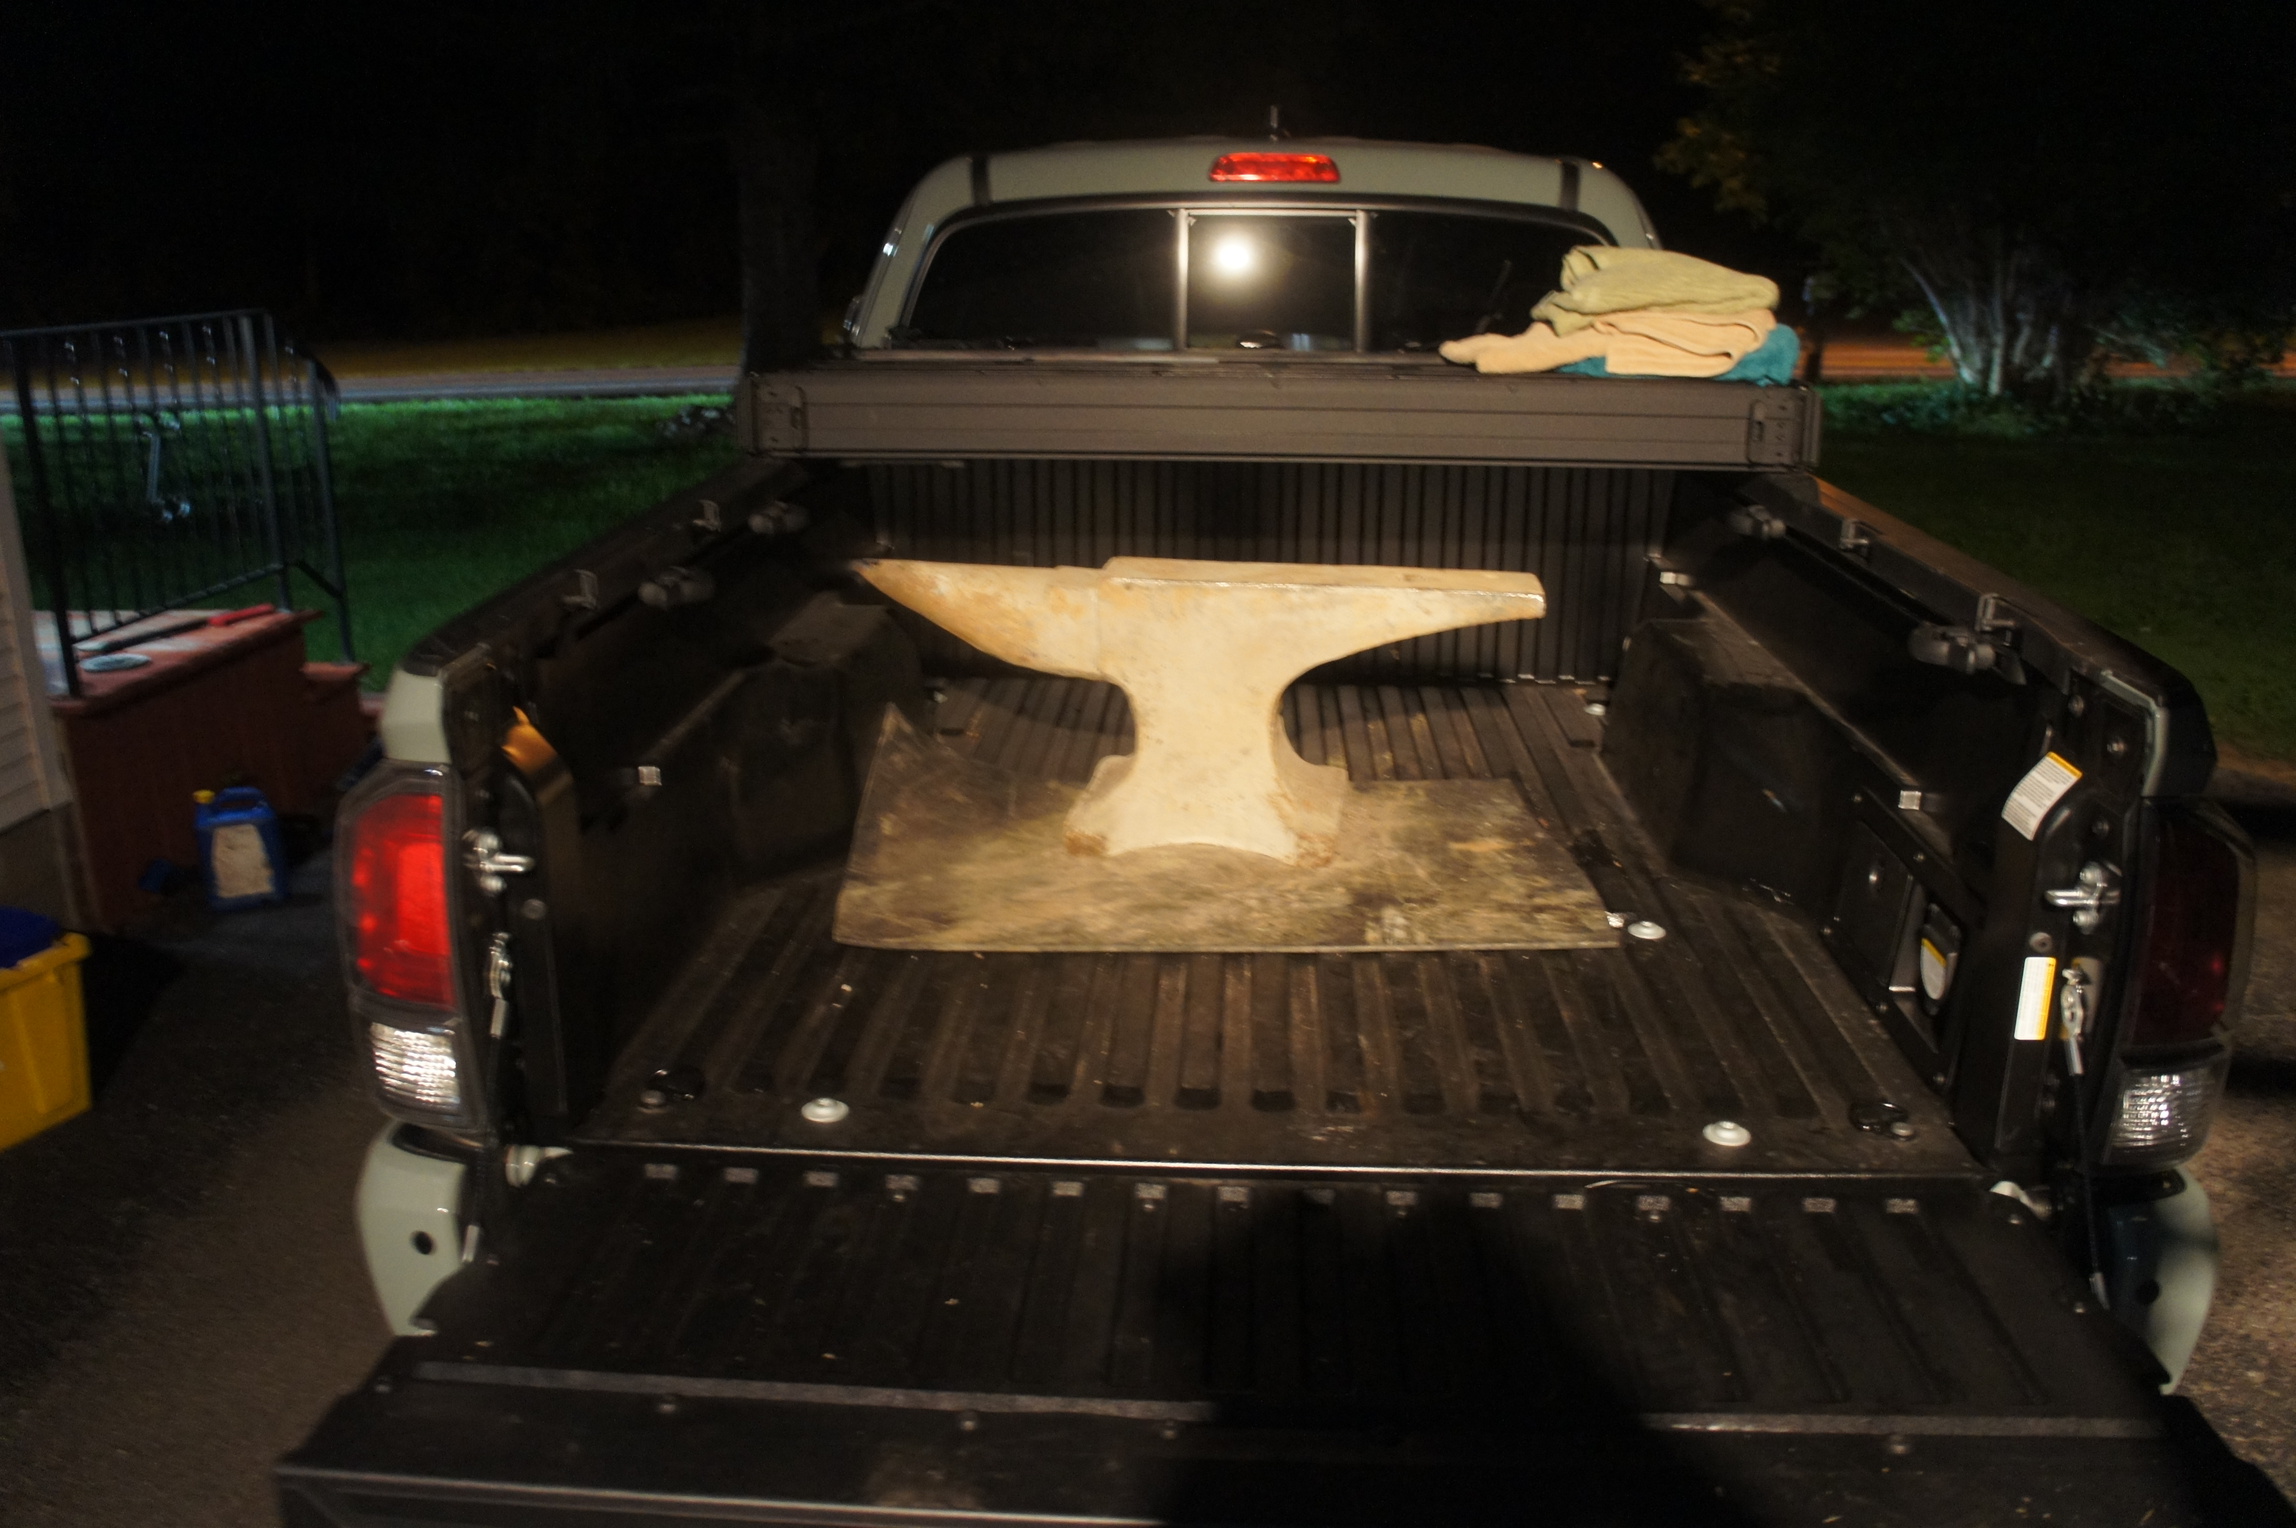
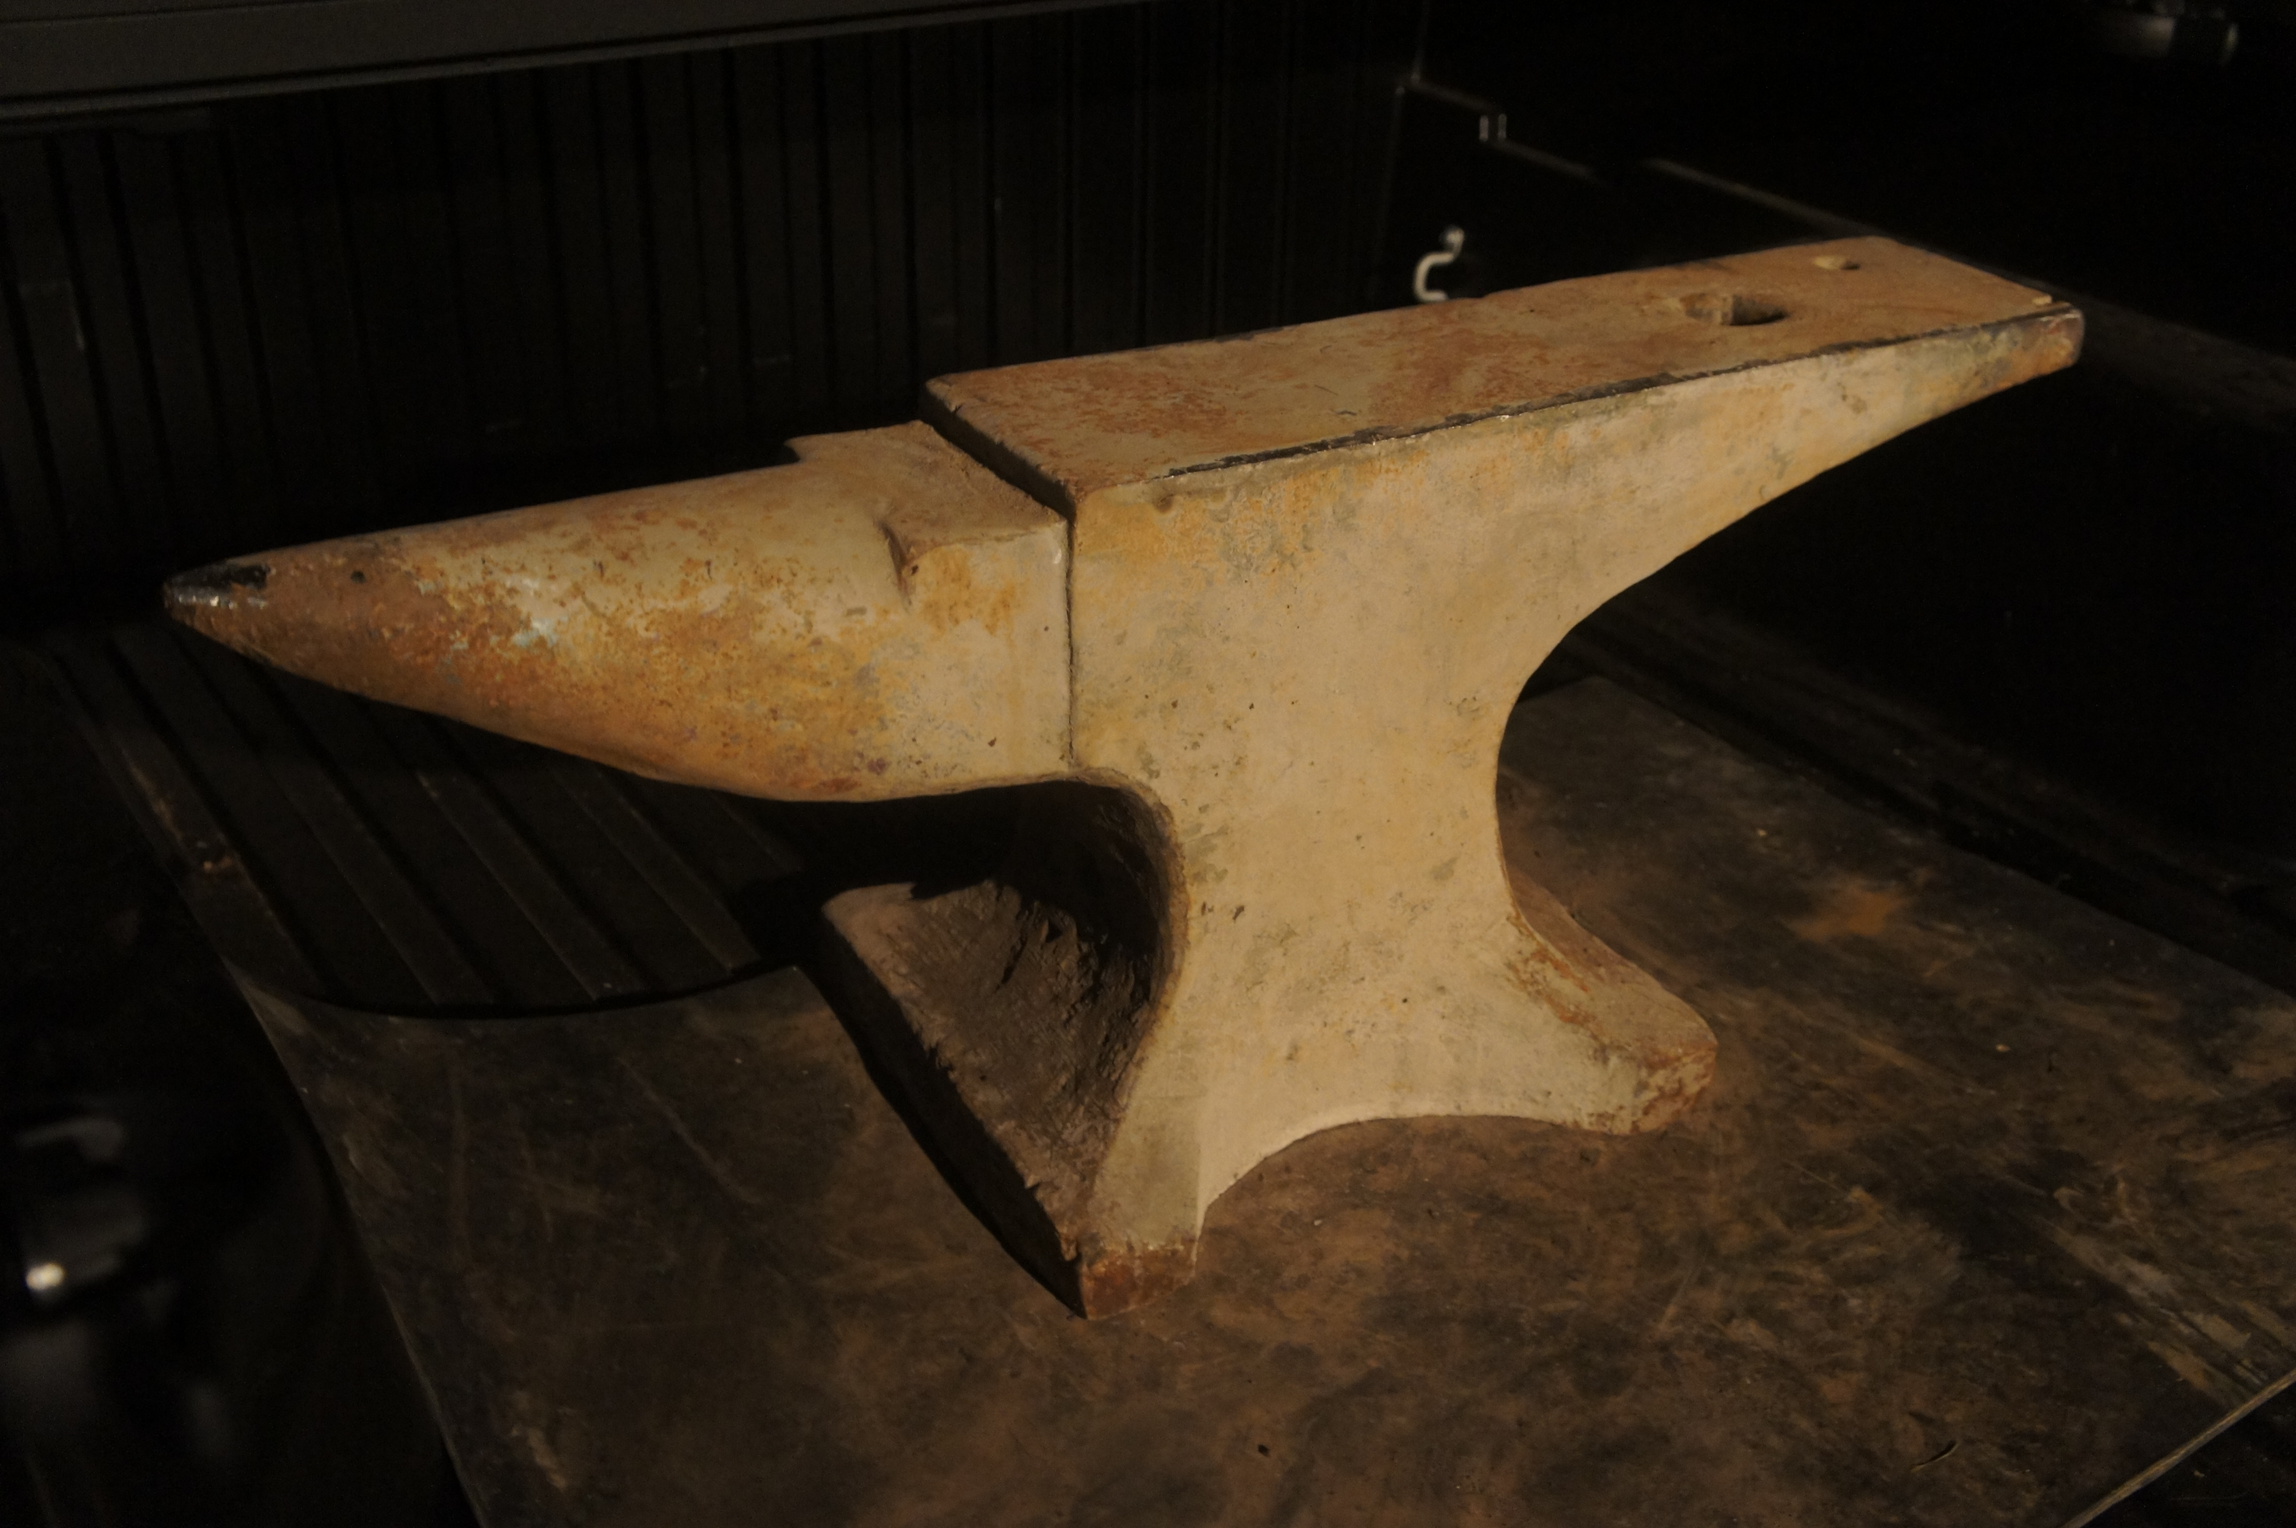
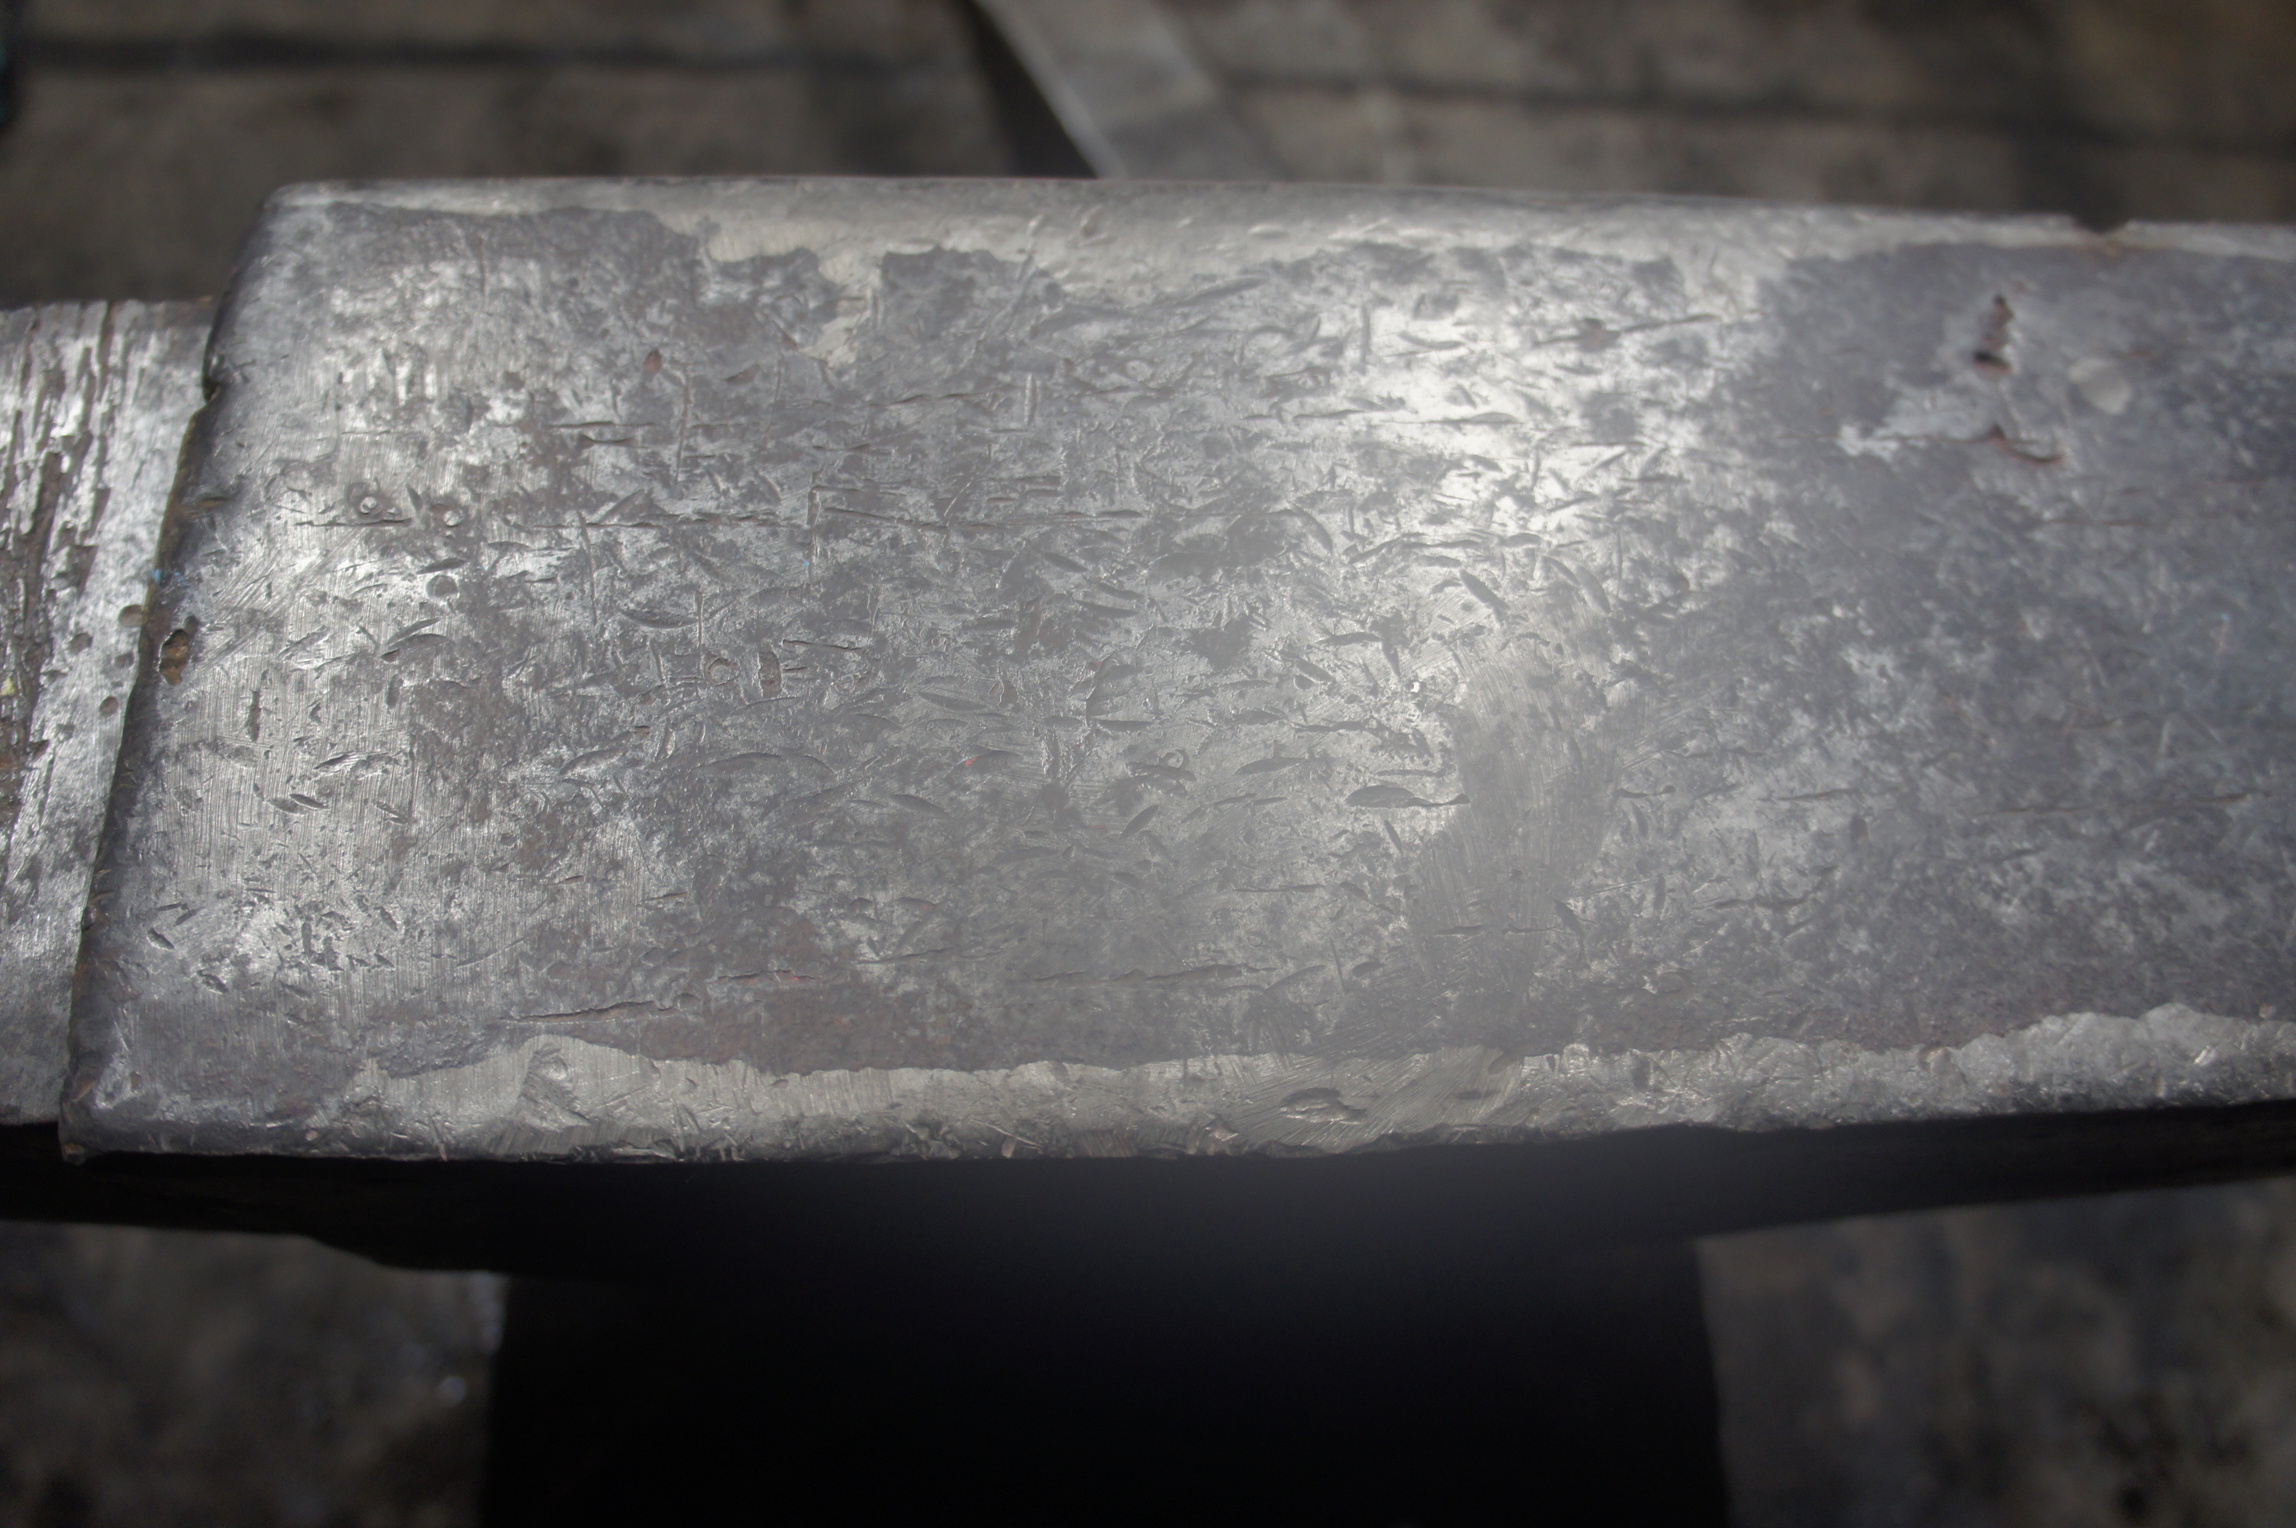
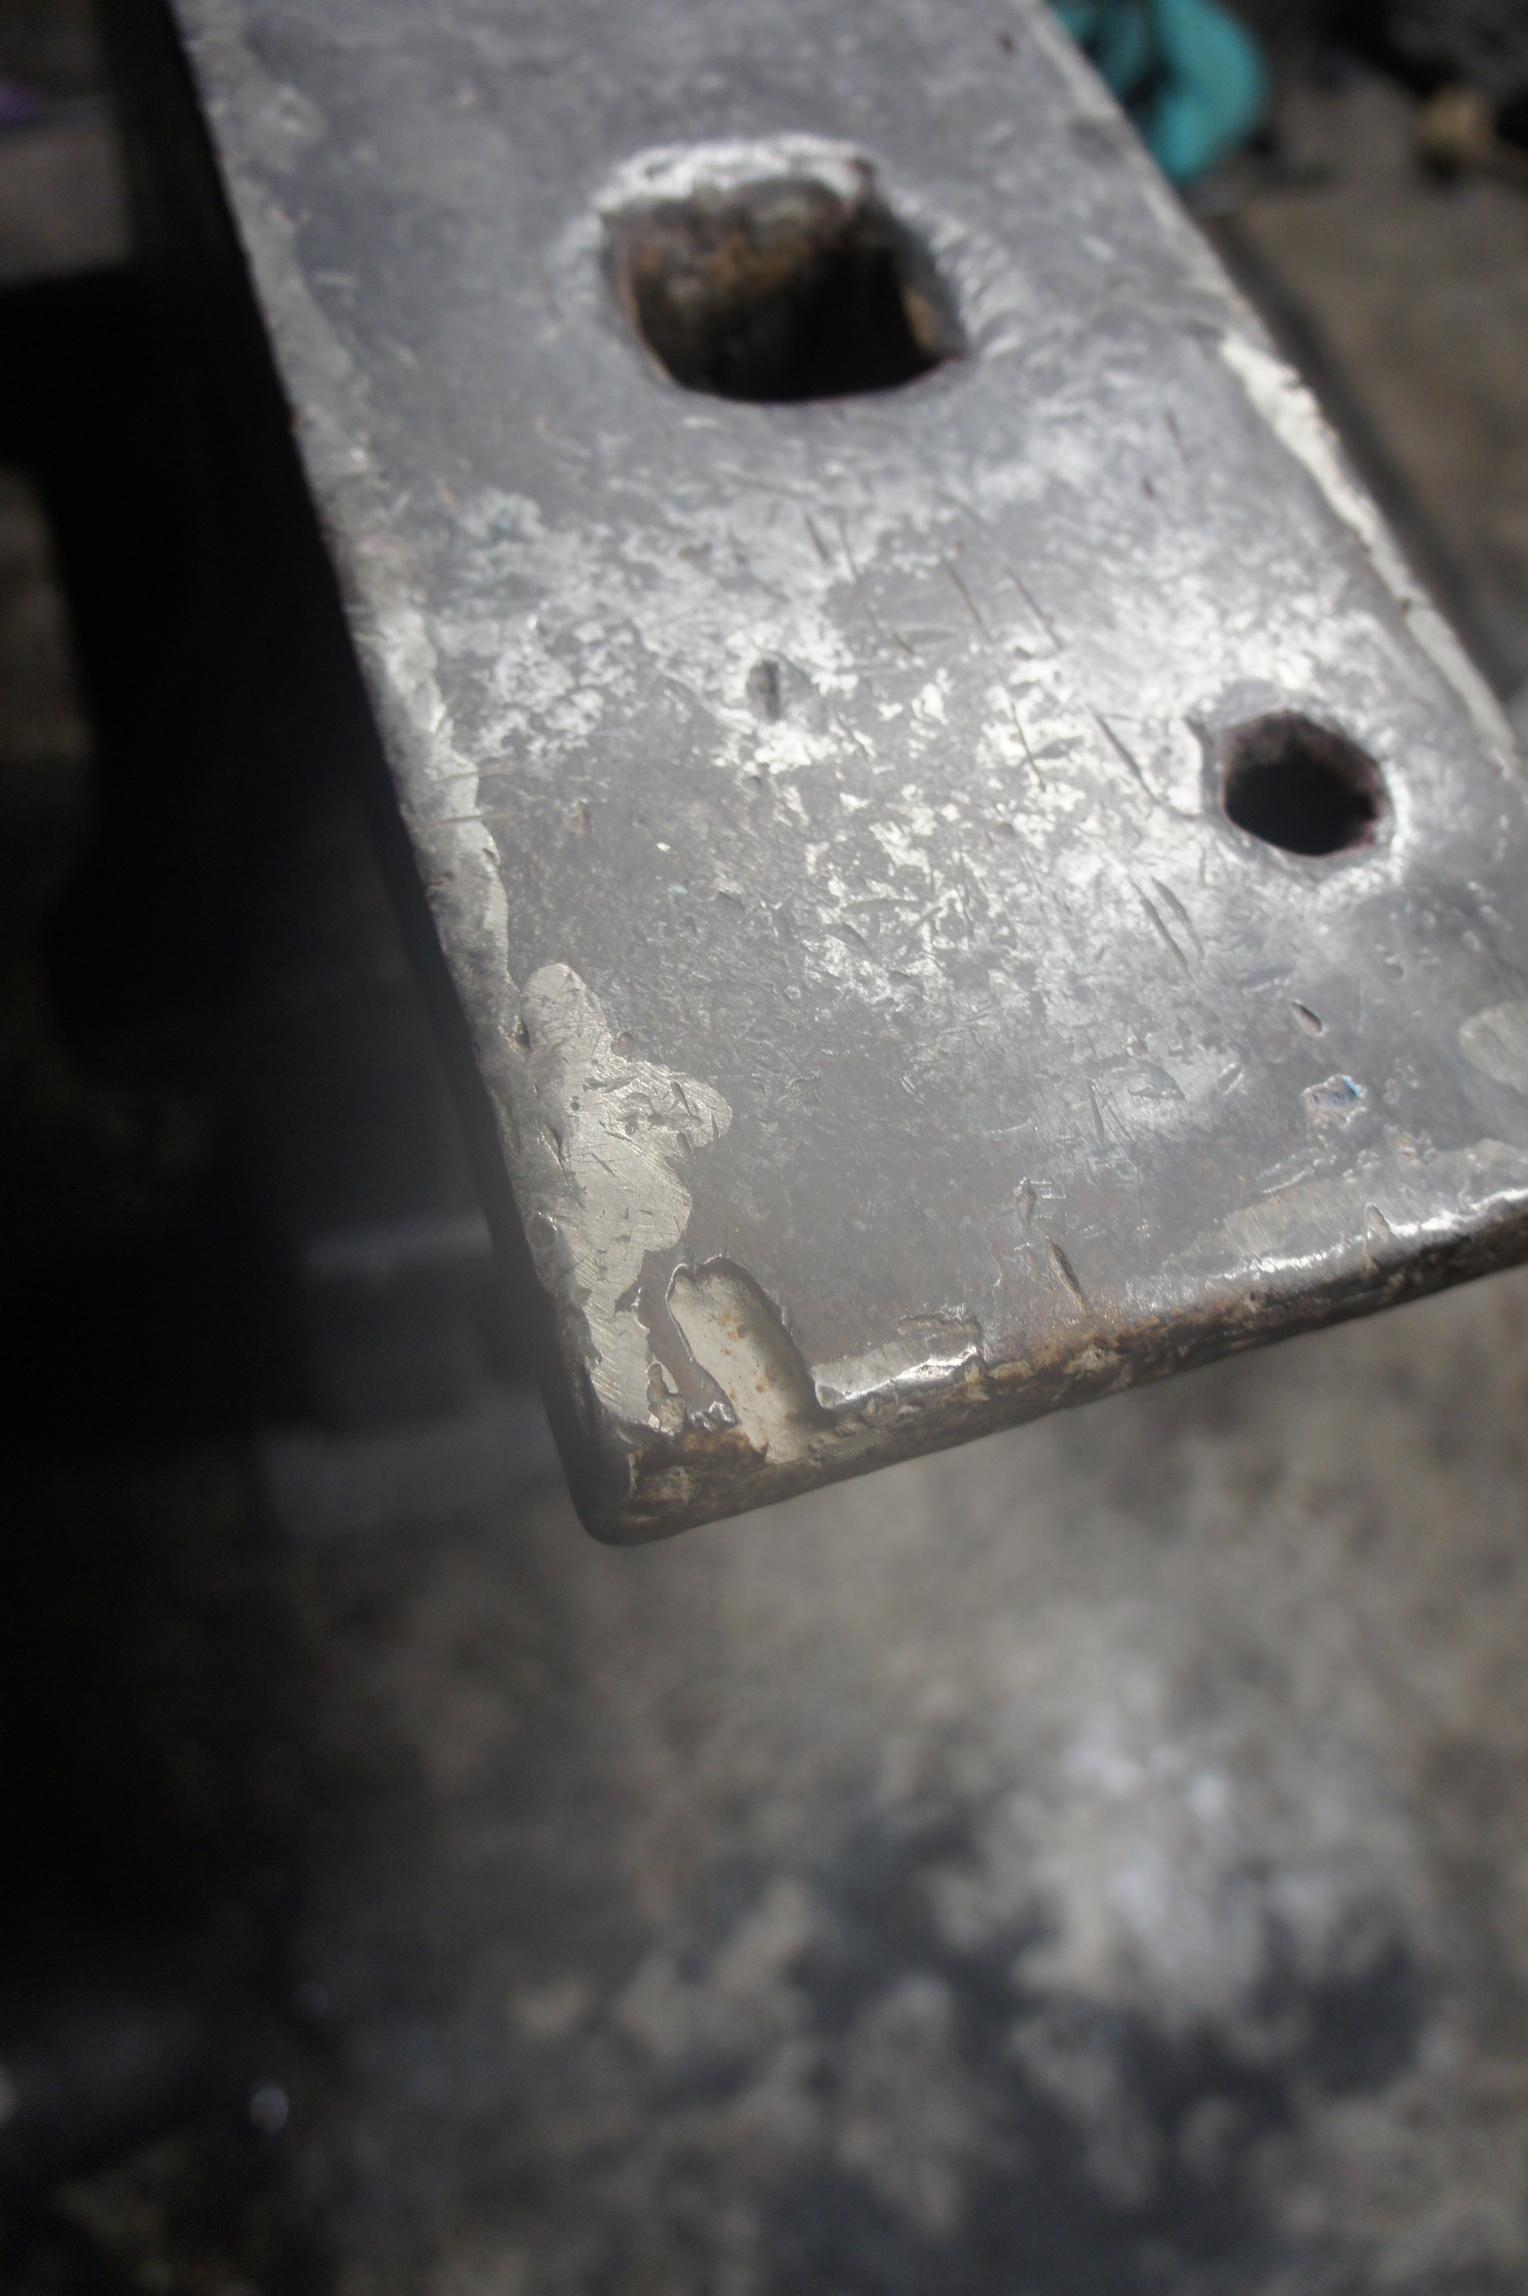
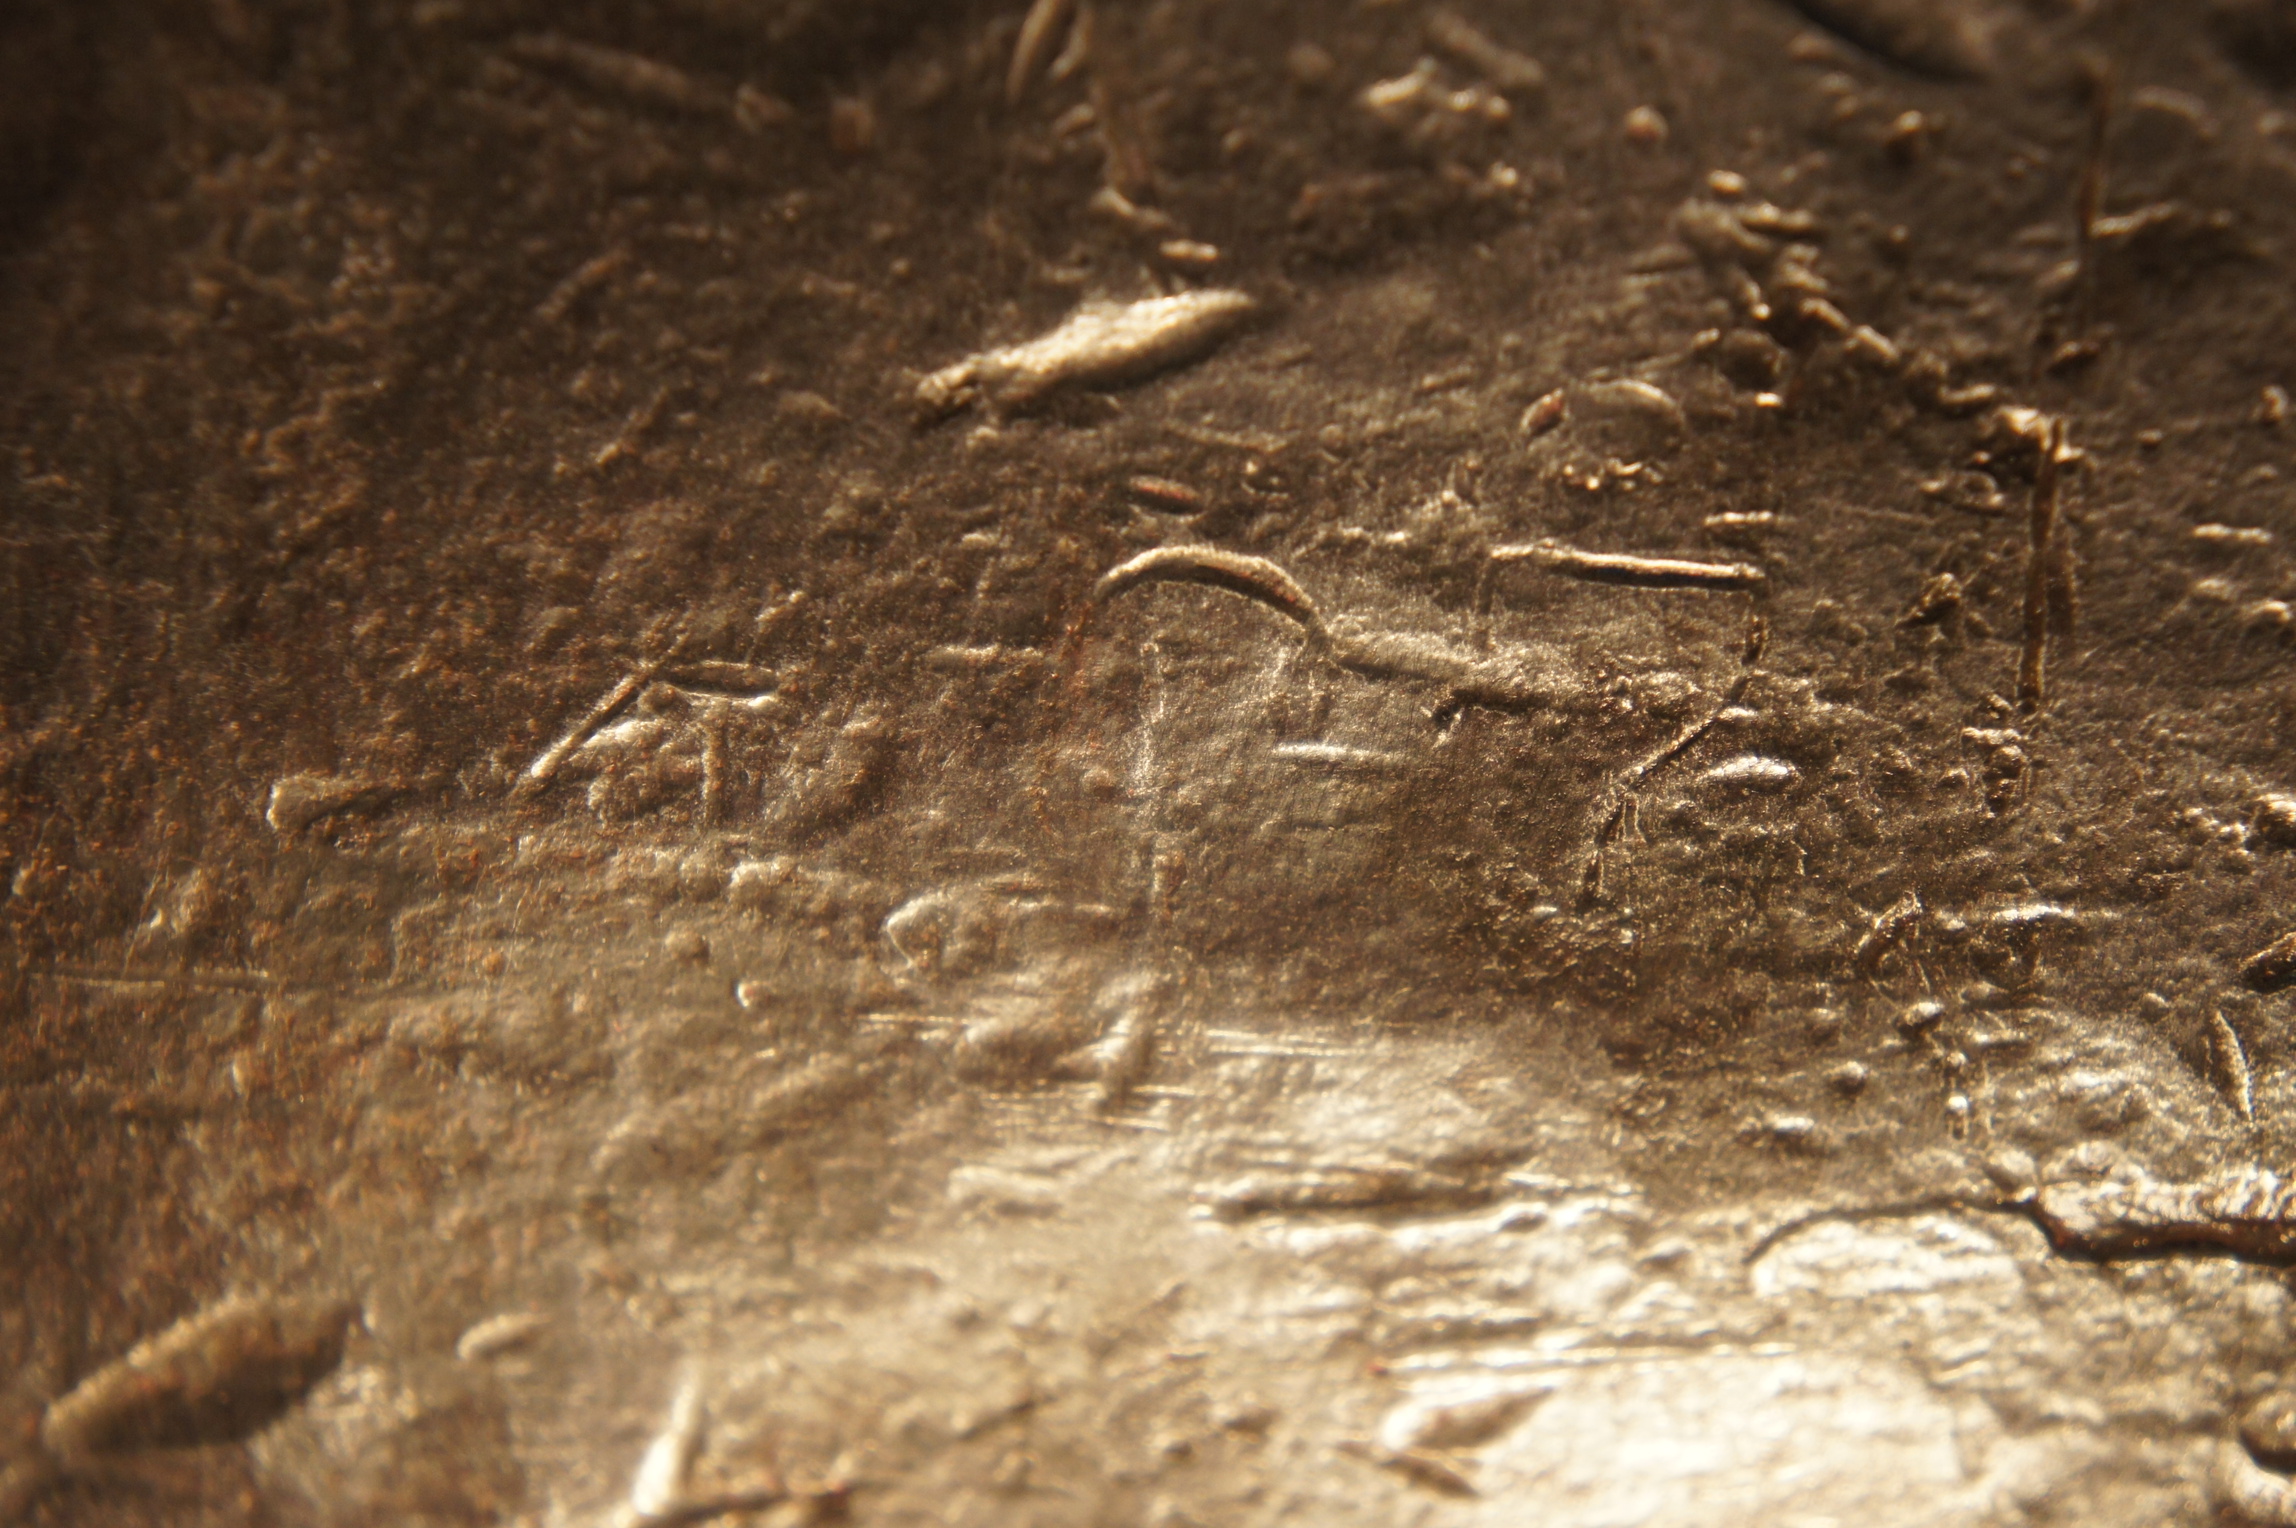
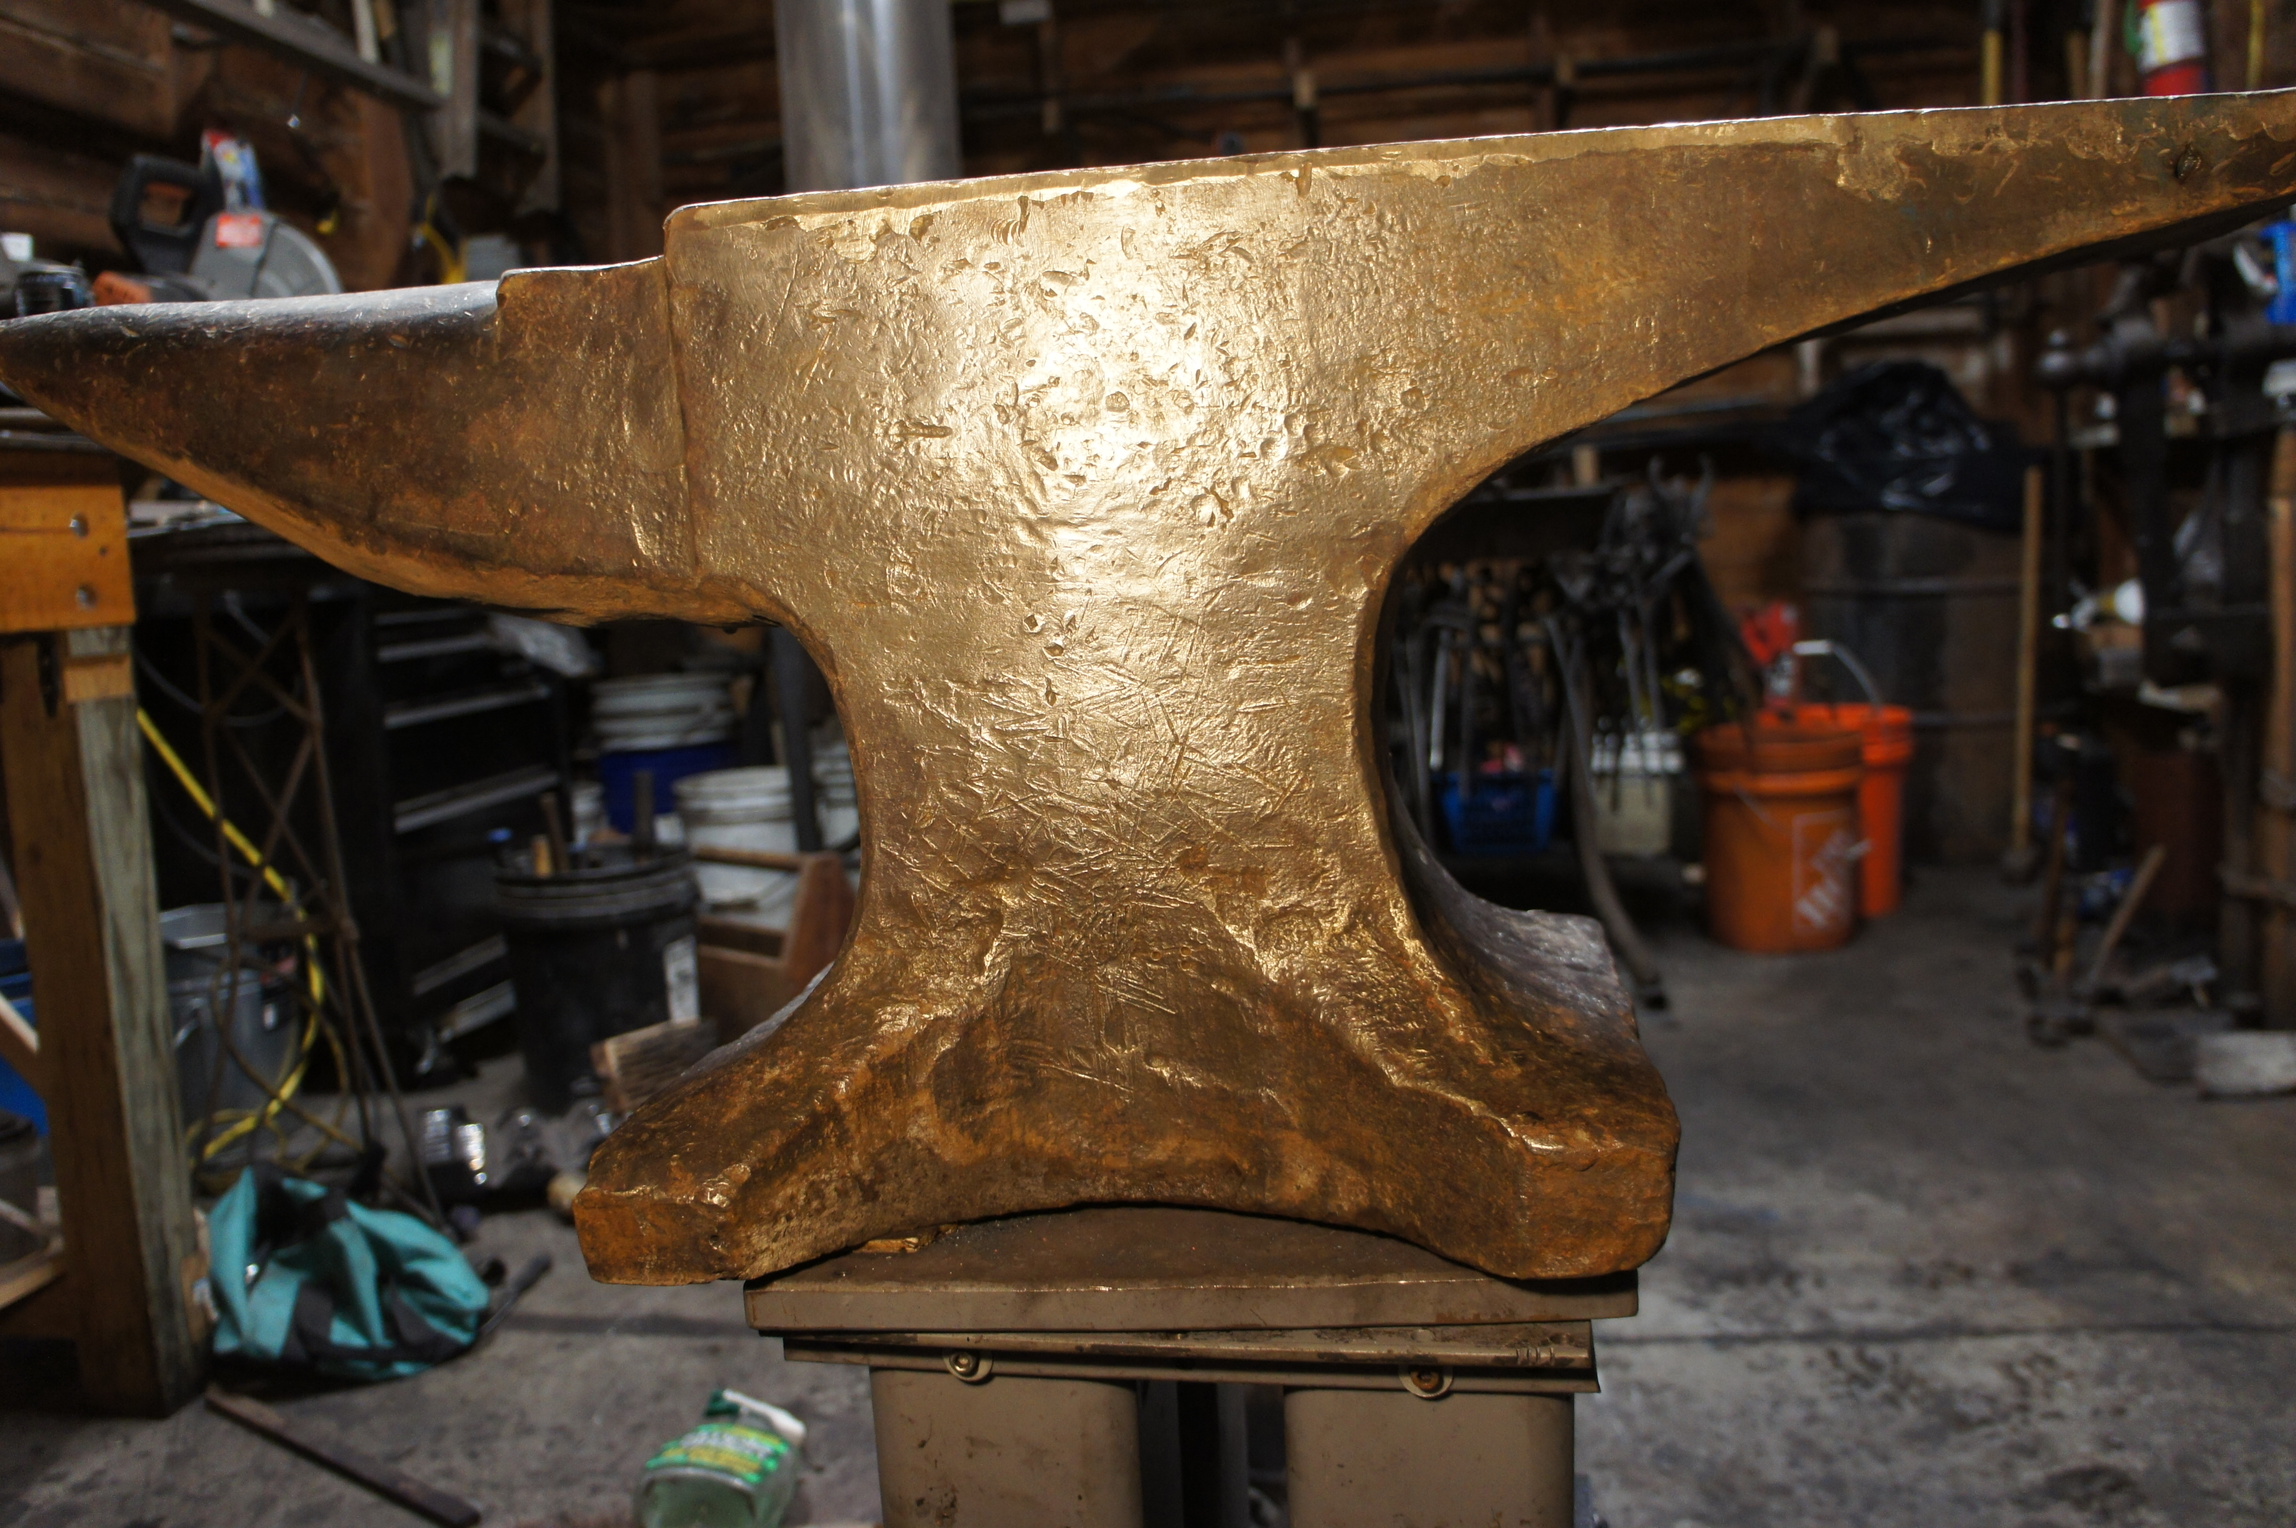
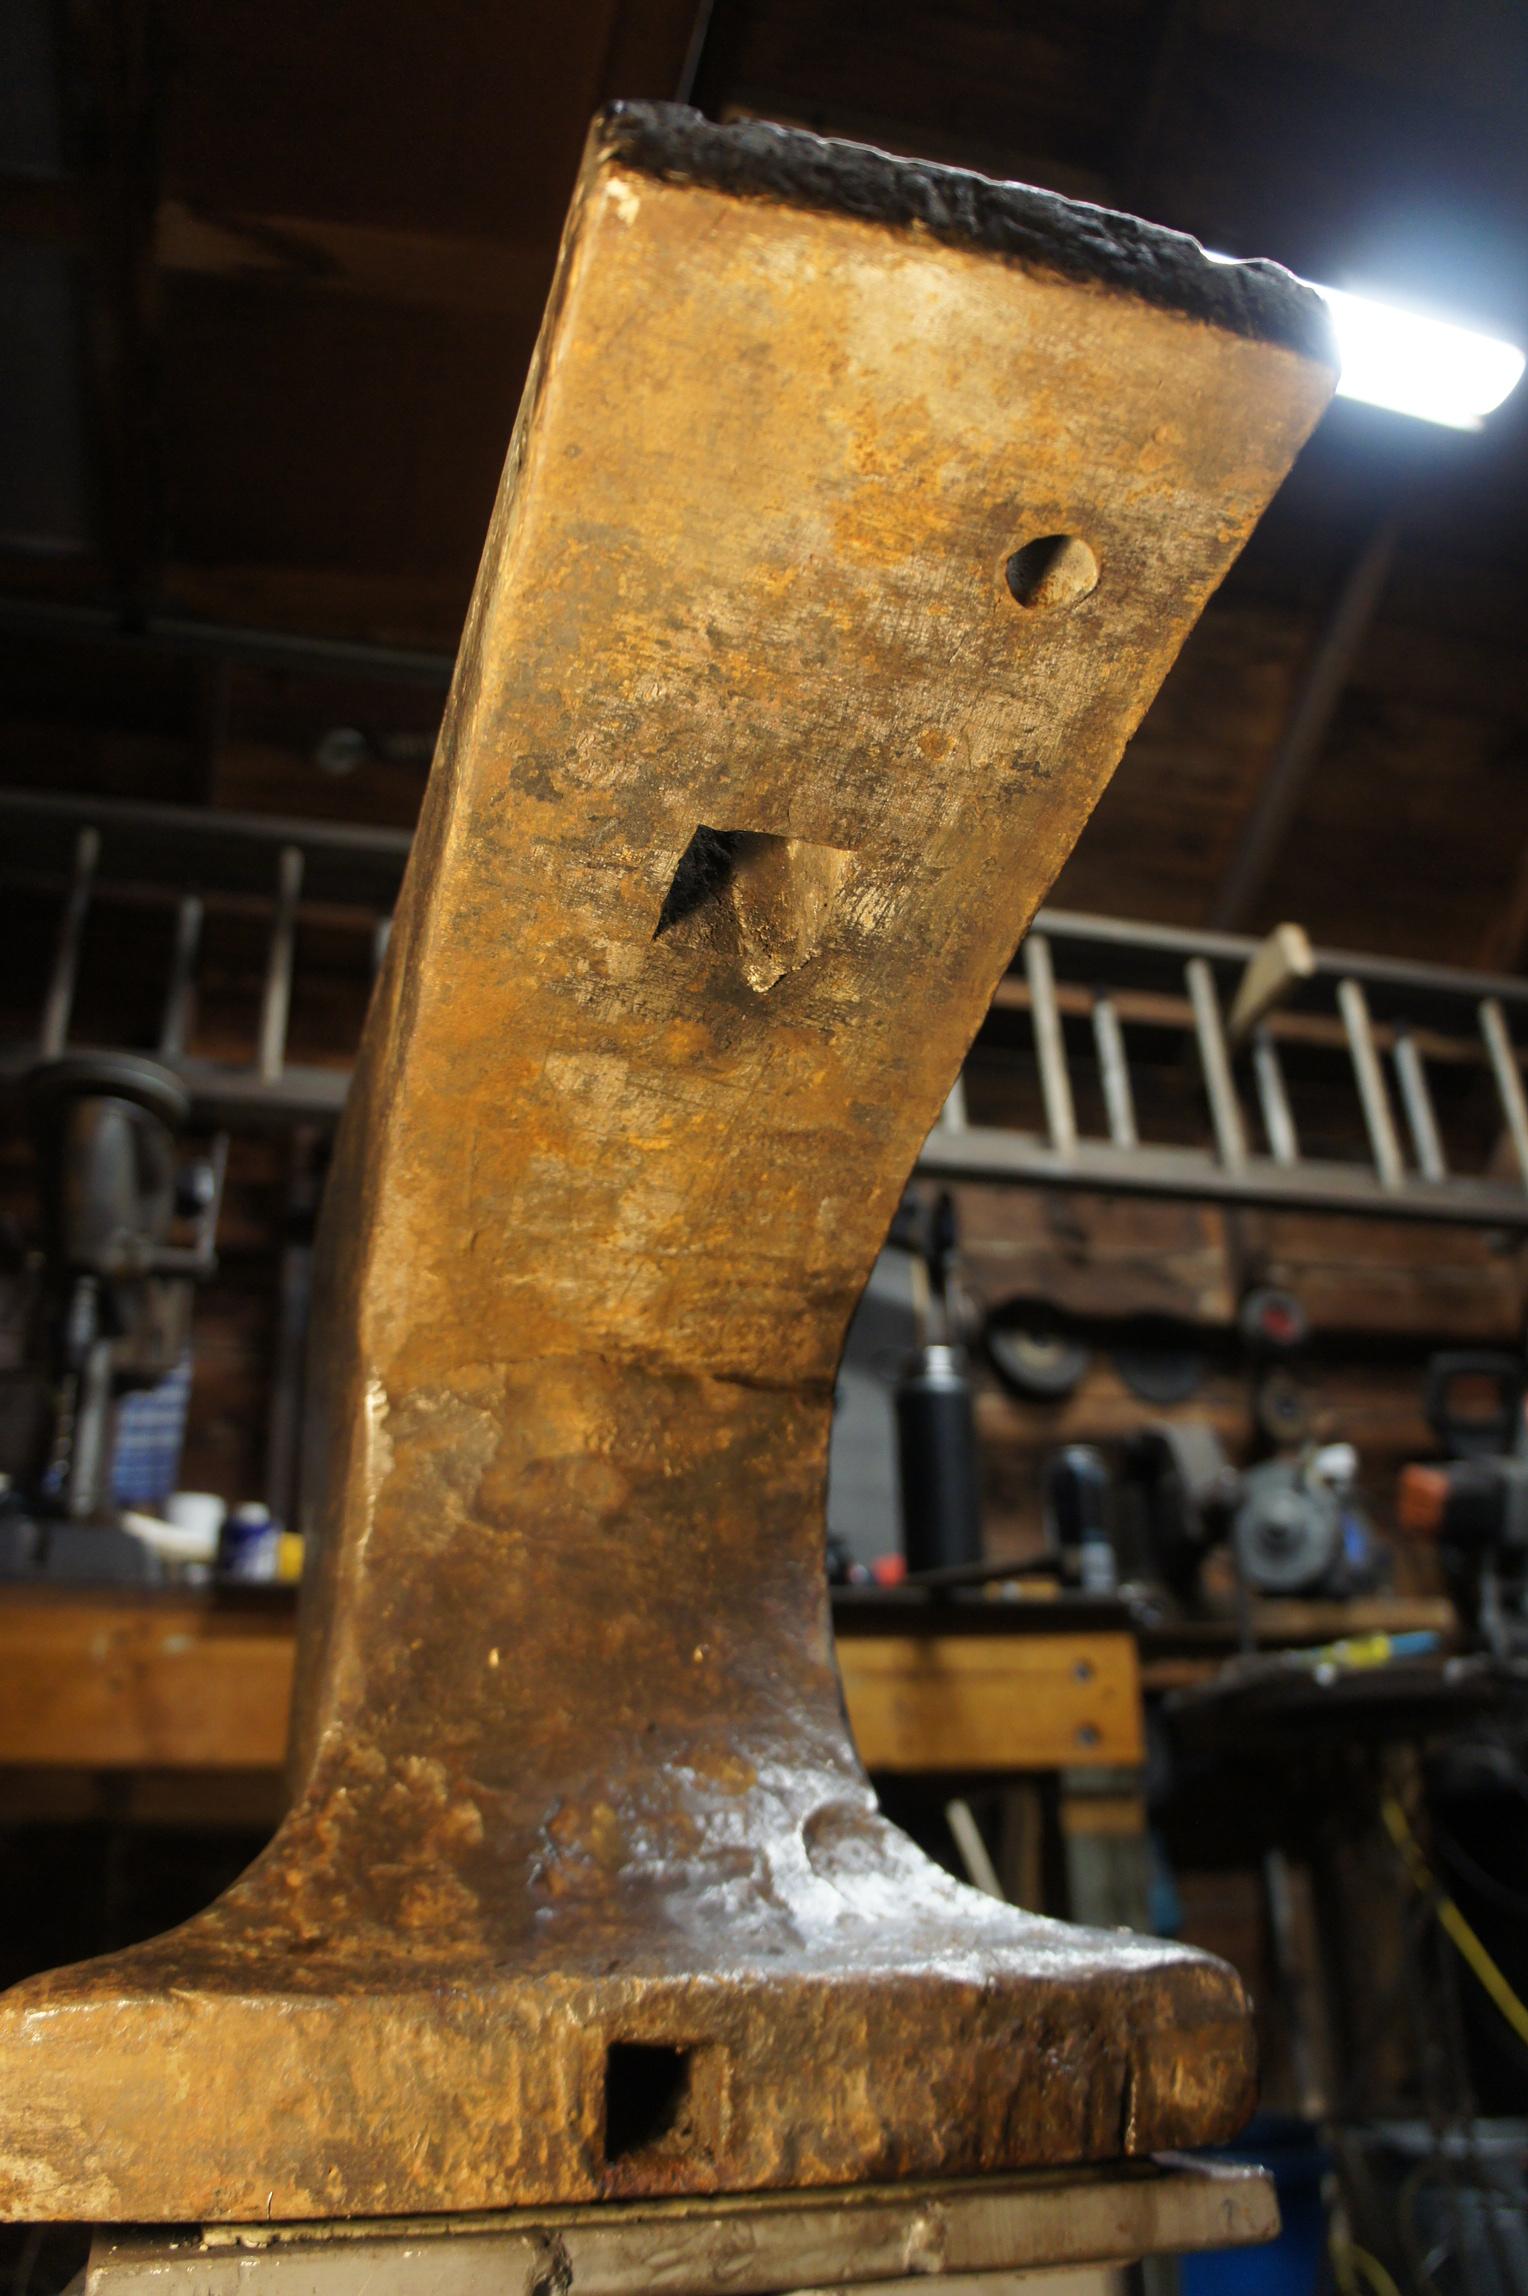
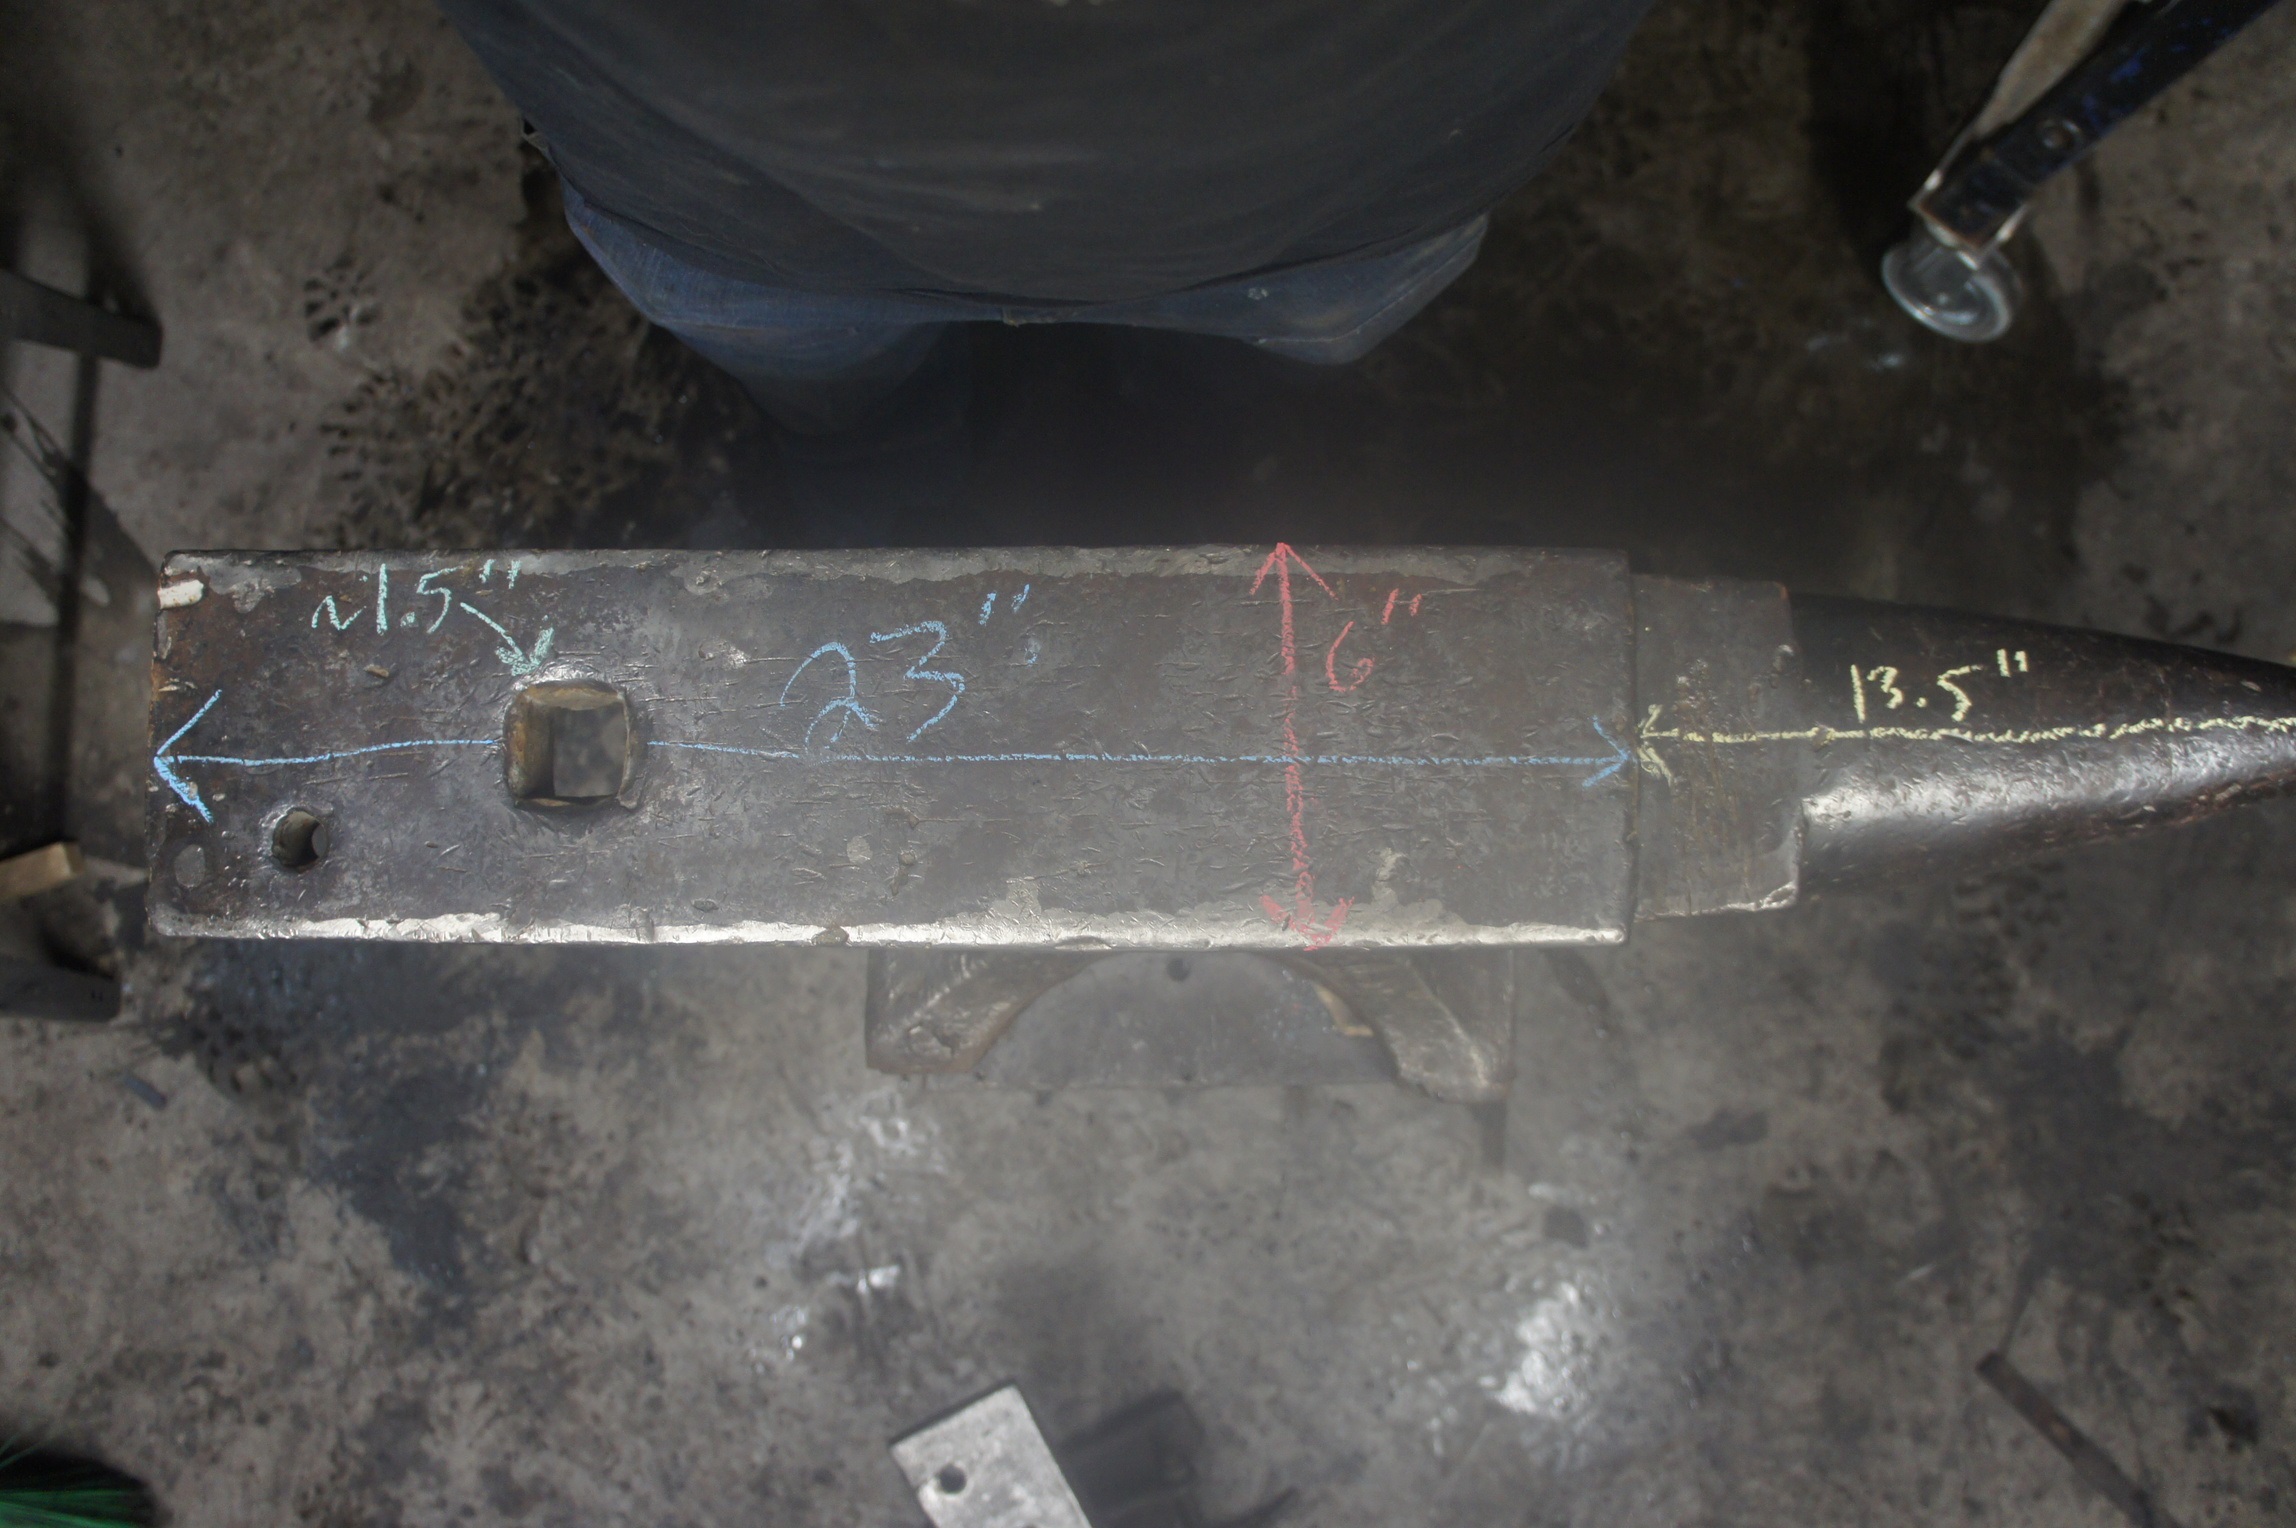
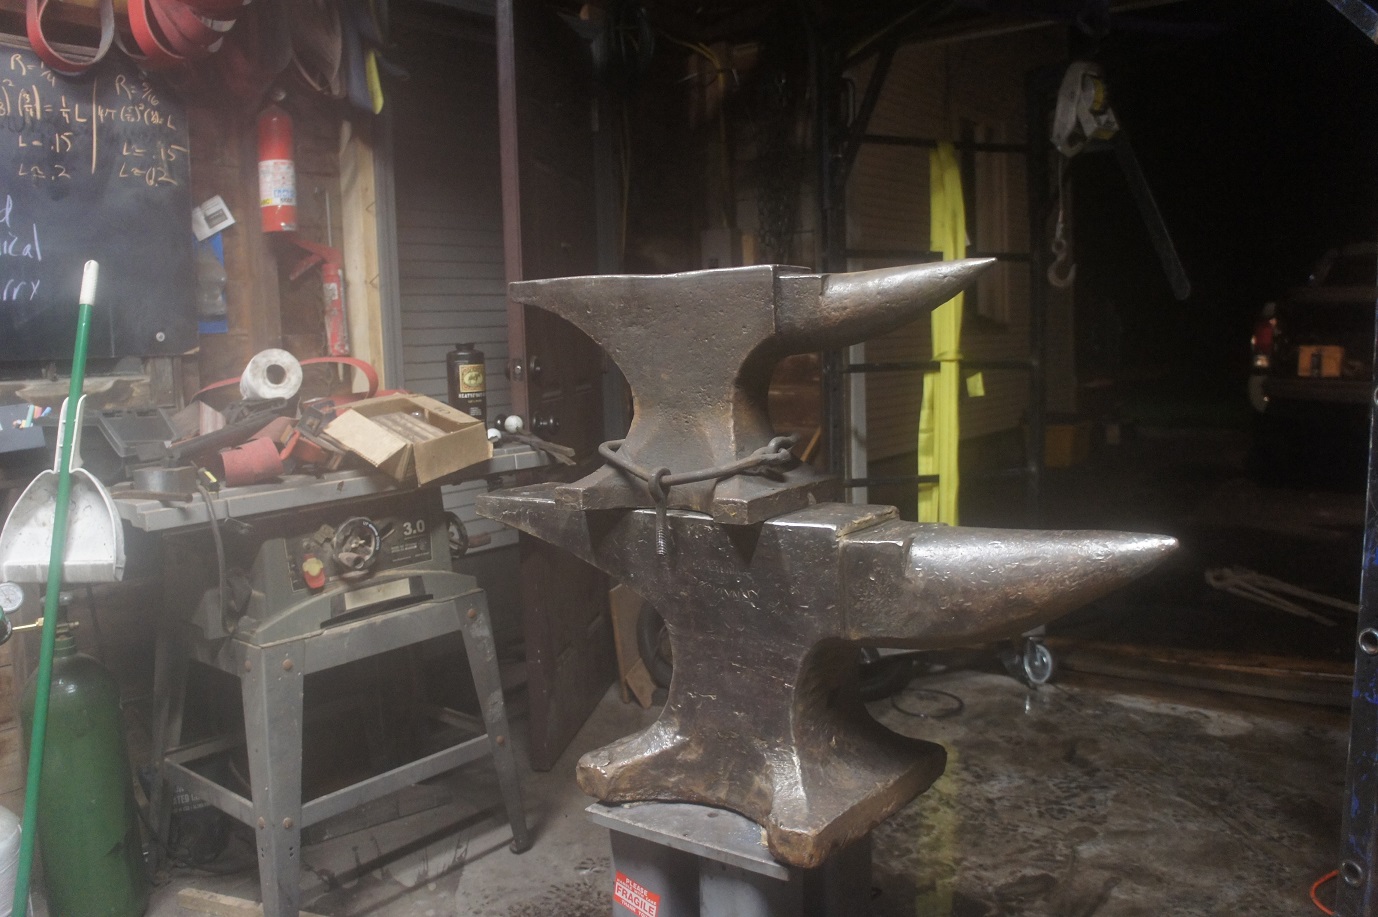
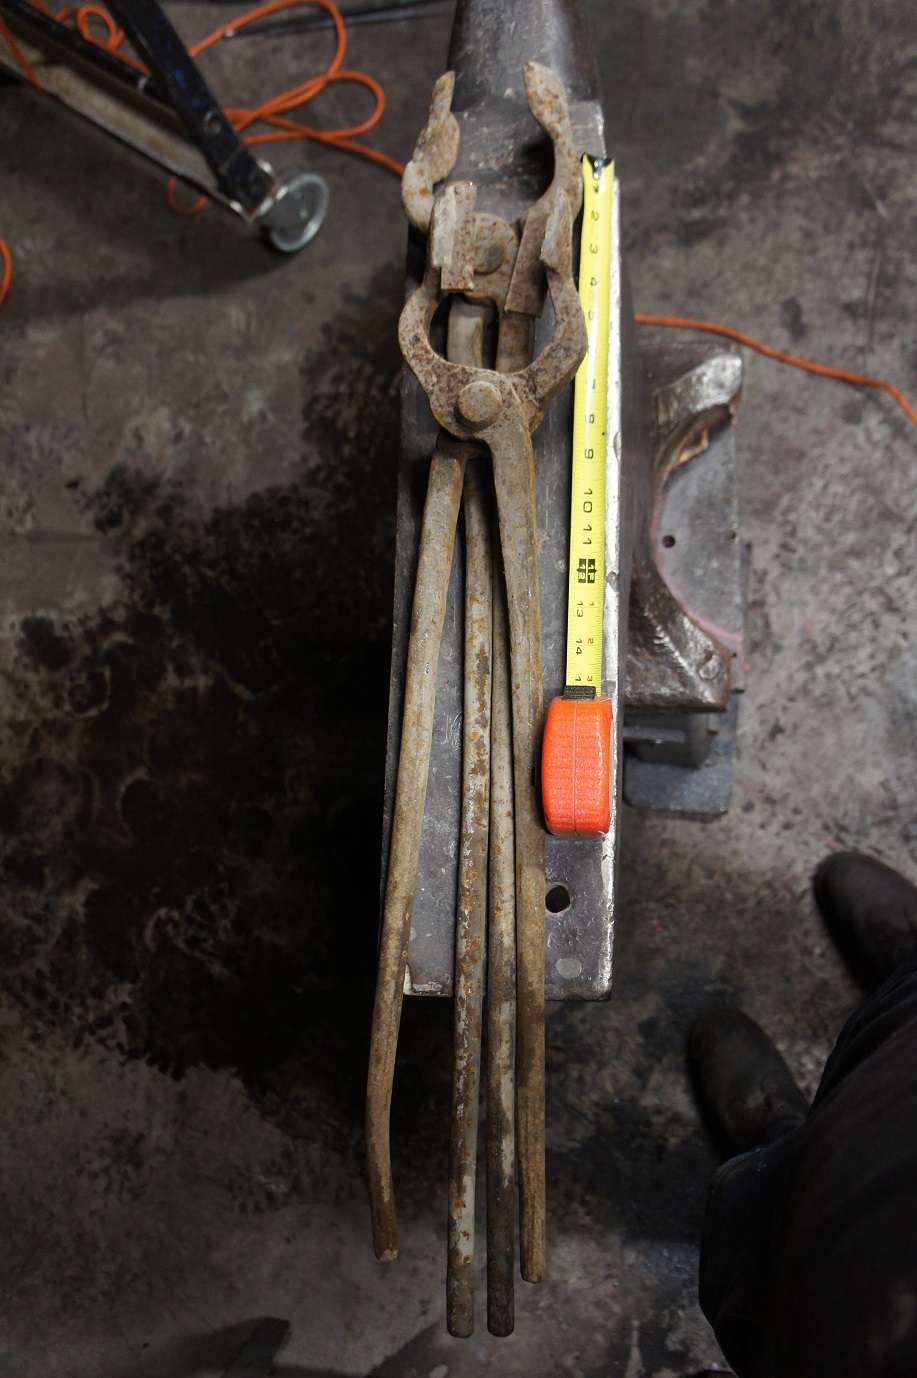
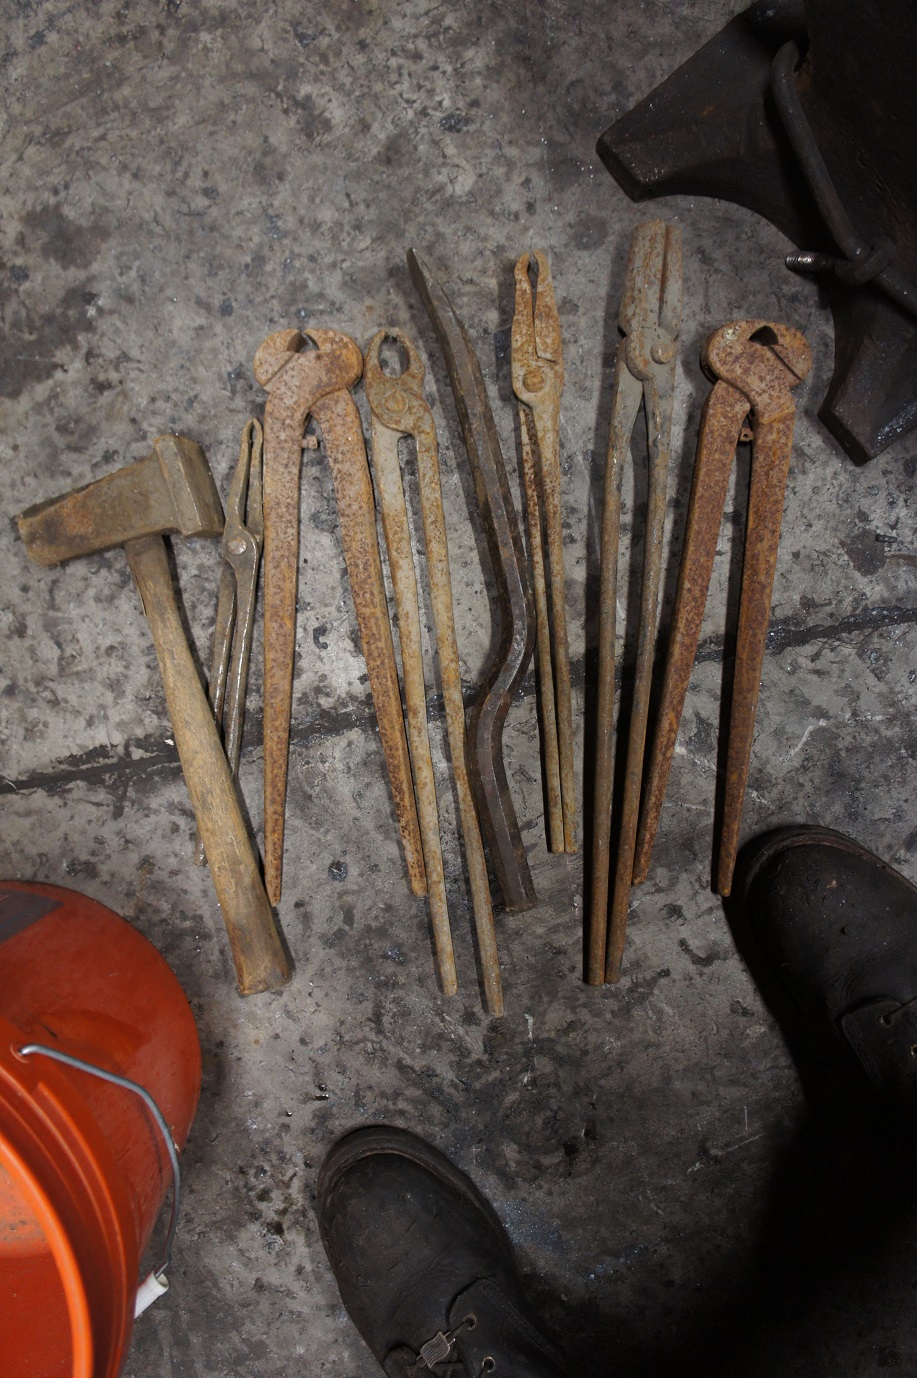
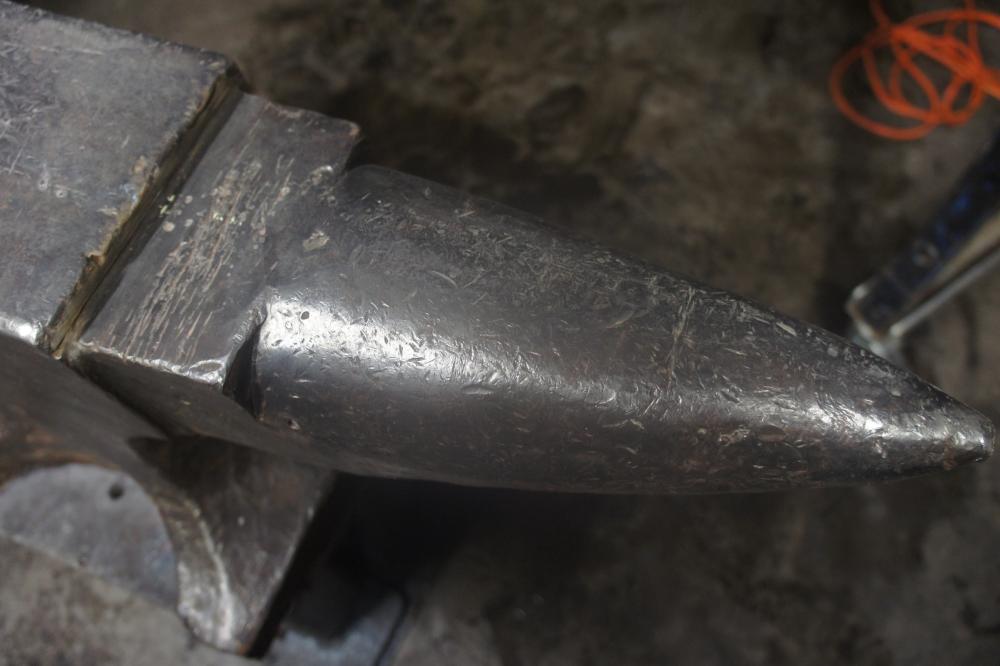
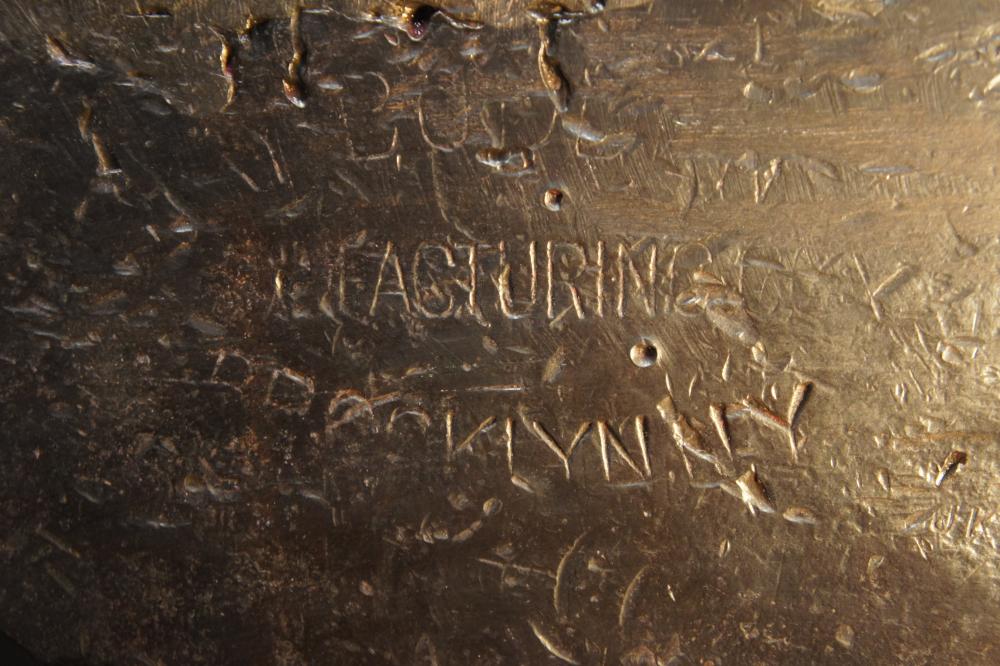
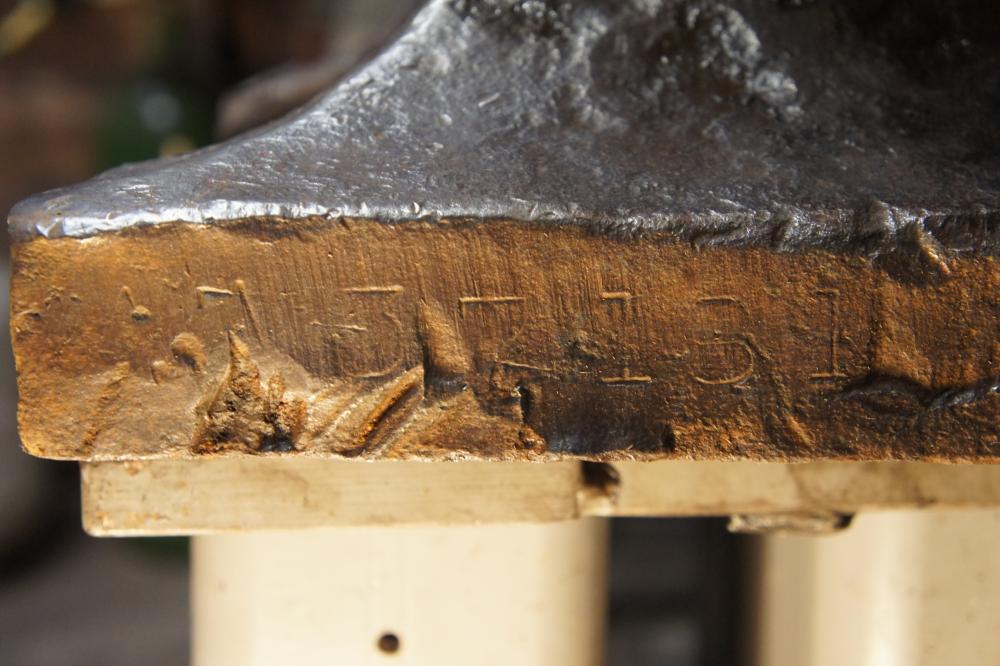
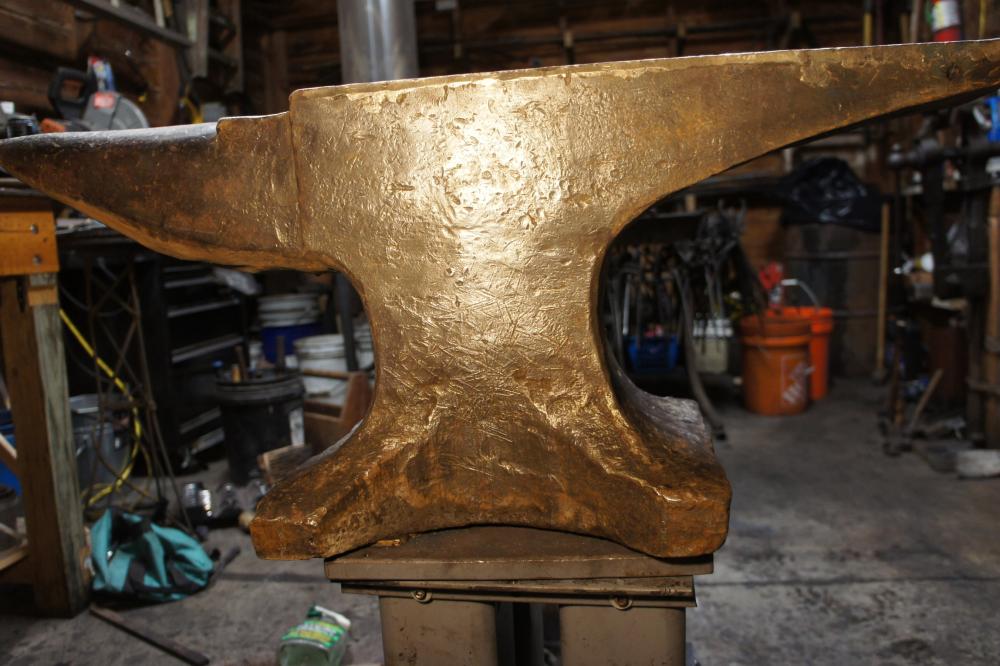
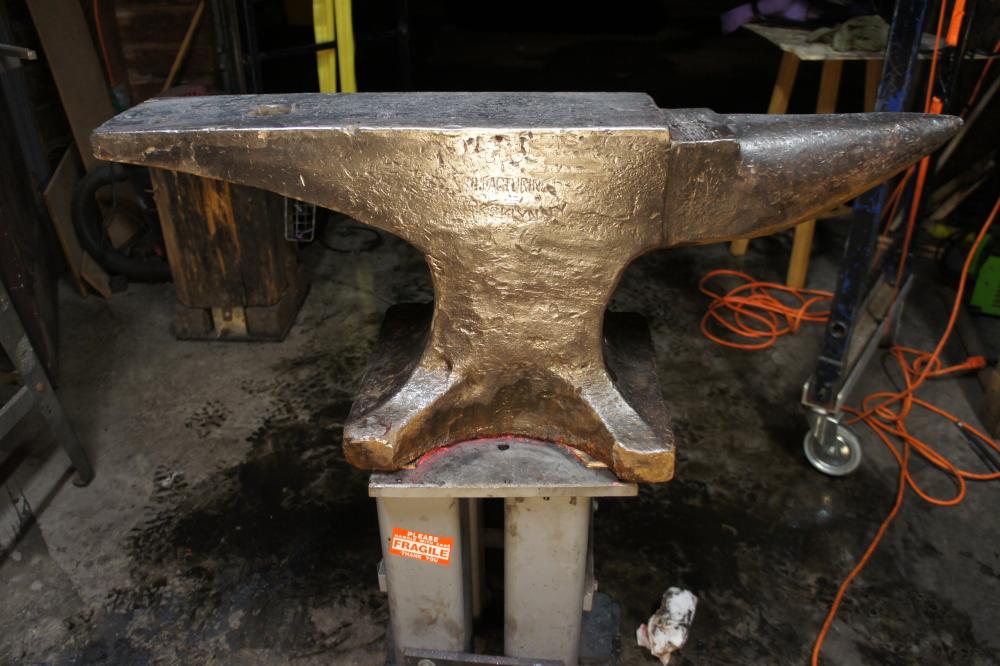
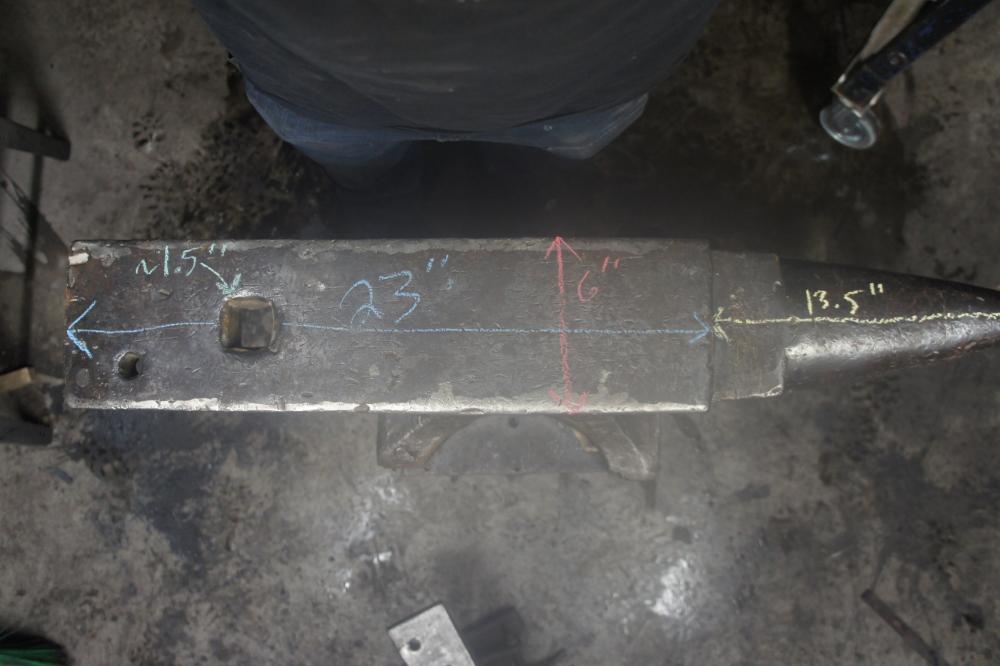
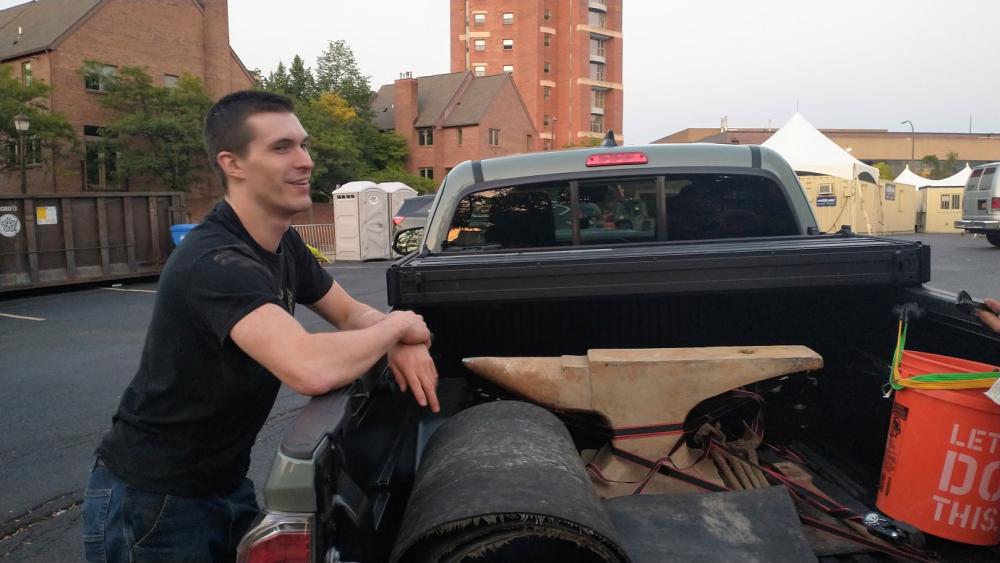
I've heard stories of this happening, but I never thought I'd experience it myself... Okay, okay, let's back up a bit. G'day folks! Long time no write! I was demonstrating at the NYS fair on Labor Day and I got to talking to a gentleman who works in the agricultural museum next to the blacksmith's shop every year. He used to work at Allied Chemical Quarry in Jamesville, NY where, once upon a time, they had a functioning blacksmith shop complete with a large air hammer and quite the collection of heavy mining equipment... In the late 1980s the quarry was sold to another company and they were sending a lot of items off to be scrapped. He happened on an anvil which was destined to be included in that pile. He was not (nor has he been since) a blacksmith, but he felt that such a tool should be preserved rather than sold at scrap rate and melted down. So he asked to keep it and the company gave it to him, free of charge. It's been sitting in his barn ever since... At the fair he asked if I wanted to take a look at it so, naturally, I made the trip there this afternoon and oh. my. goodness.... what a surprise. This anvil is massive. What's incredible is he didn't even let me pay him for it... He said he got it for free and just wants it to be used for it's original purpose rather than hidden away in a barn... truly a once in a lifetime right place - right time meeting and I'm absolutely humbled. There are some incredible people out there and you never know when you might meet one... It's been a while since my last post but I expect you folks still like pictures so let them commence! --- Here she is just coming out of the truck and in need of a wash and some wire brushing. No visible markings (yet) due to the healthy layer of dirt and rust. Boy, I just love pictures. Can't you tell? So what's under there? Hay Budden Manufacturing Brooklyn NY... It looks like 407lbs. Which I believe. It's definitely been used in a quarry. The edges look like they were repaired at some point, but they are still hard enough to make hand filing difficult. The face has quite a few tool marks and has (possibly) been hit with a torch in one spot and on the heel. Rebound remains quite good across the face, ranging from 60-80ish%; it rings like a church bell. Nice weld seams under the heel/horn, as you might expect. Did I mention this thing is big? Here's my 151lb Soderfors for comparison.. but even the pictures don't do it justice. The face alone on the HB is almost as long as the Soderfors. The hardy hole is 1.25" so I'll have to make an adapter... And modify my stand to hold it properly. She's a beauty. A little rough around the edges, but still . I'm not sure what I'm going to do with the face. Obviously I wont be grinding/milling it and at this point the plan is to do nothing. I'll make a couple of anvil blocks that I can use when I need to planish.. so pretty often. With a face that's 6" wide an anvil block is pretty much a necessity anyway, but I digress. I will just round off the edges a bit with a file..... maybe a few passes down the edges with a flap wheel (*gasp* blasphemy!) as they are too sharp for my taste. A little BLO for the non working faces and, last but not least, giving her a long overdue dose of hot steel. The less prominent dings should polish up over time. I have a partial(?) SN. If one of you kind folks with a copy of AIA can find any information on it (i.e. approximate age), I would be much obliged. I think it's A737181... Other possible combinations would be (A or 4) (7 or 4 or A) 371 (8 or 3) 1.... but the first option is my best guess. The first 2 characters sort of look like a different font and the 2nd character (either 7 or 4 or A) looks like a double stamp. The bottom is flat with a square handling hole. He also included some giant tongs, a double peen hammer, a flatter, some tongs for regular sized humans and a couple of nippers. For folks who are still reading -- particularly the new folks who stumble across this through the magic of the internet -- pardon my hopping on a soapbox for a moment and I'll leave you with this: Get out there! Shop time is great and undoubtedly useful/necessary, but shop time out there in the community, if you will, is equally important. Get involved with your local ABANA affiliate if you can. If you don't have one nearby, perhaps you could try to start your own informal group! If you have the chance to do a demonstration somewhere, take it. They don't always go as planned but that's half the fun .


-
I'll need that in writing. The job sounds a bit manilla for exciting candidates, but we might be able to seal the deal. Will they need to post-age?
-
Do you need anyone to post on guard? Should they be mail or femail?
-
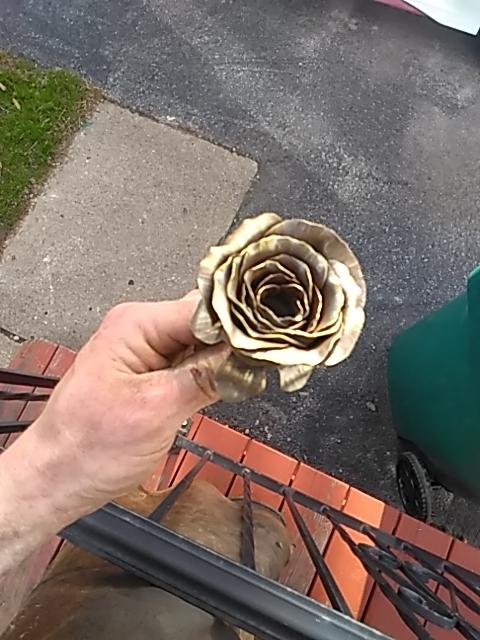
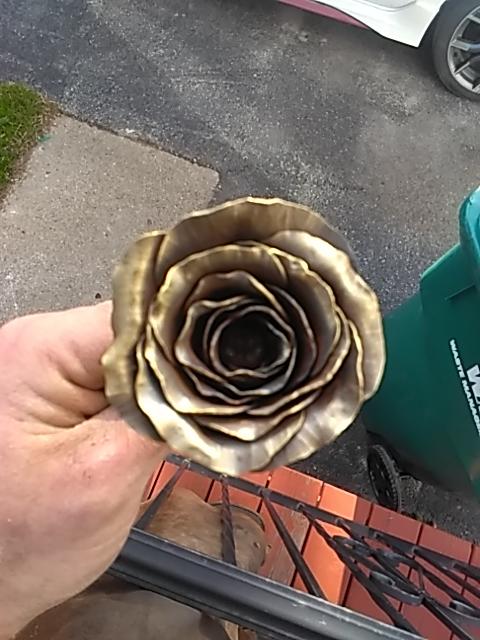
MacLeod, texturing the top faces and thinning out the tips of each pedal with a cross peen adds some more character to the rose and makes the tips easier to flare out. Texturing can be done cold.
-
Jennifer, the thickness behind the edge was certainly not doing me any favors. It never stuck, but the penetration was a little lackluster. The center swell also makes more sense to me now. Fortunately, the edge held up well even after many, many full force strikes. Anvil, most definitely. However, that tree was dead long before it became my tree. On the bright side it's already seasoned . I saved some smallish stuff that doesn't need to be split to be burned and a couple of stumps. The rest is on the side of the road and destined for the chipper. I have plenty of firewood.
-
Today I used an axe I made (see page 10) to fell a 13" tree. It was very satisfying... However, it was much more difficult than I anticipated.. The tree was very dead, but it looked WAY more dead on the outside vs the inside... That thing would've stood another 50 years.. I'm not sure what kind of tree, possibly walnut.. Beautiful stumps though. I'm only partially insane so chainsaws were used once it was on the ground.
-
Fancy that, mine just arrived last Friday.
-
They are very handy. Thanks John, that is the blueprint I used to make it. Also, the bevels on the sides of the chisel should line up with the cutting edge. The are used for sight alignment of the tool.
-
If you bring them on a plane and leave them full of ink they just may! The story wont be as explosive as the one you shared about the whale though.
-
I don't mean to idealize them. At the end of the day it is just a slightly more fiddly pen that may or may not like cheap paper and has an increased likelihood of leaking at inconvenient times. They also fall into the category of goods (straight razors are another example) where price and quality don't always align. There is a lot of expensive, fancy, pocket jewlery out there that was made for gazing upon rather than actually using. If you feel inclined to use such an object for its supposed purpose then white gloves are (obviously) required and only the finest of baby bottom soft paper, hand pressed from virgin tree pulp which has been blessed by monks can grace it's mighty nib. I should be a pen salesman.. Jordan Belfort might hire me!
-
There are too many different inks out there.. Lol.... which one....? I have a Twisbi Precision, a carbon fiber Monteverde and a Pilot Metropolitan. All with extra fine nibs. My handwriting (printed) is on the smaller side so the wider calligraphy nibs are not for me.. My favorite is the Twisbi. The Monteverde is okay, but I've had some trouble with hard starts. Probably a mixture of a bad nib and the cap not sealing well enough. The pilot is inexpensive, but works well. IIRC you need to buy a separate converter (also inexpensive) to use your own inks, but don't quote me on that.