Frazer
2021 Donor
-
Joined
-
Last visited
Everything posted by Frazer
-
It is a bit large. That's mostly due to the starting stock size I had at the moment. Since it was intended to be a display piece (still functional, but for people to look at in a class setting) I didn't take the time to make it smaller. That being said, I don't scribe very deep regardless of the size of the scribe itself. When I need a scribe, generally a scratch will do or I'll use dykem along with a scribe. I'll add that the point is still reasonably thin and it has a chisel grind so the point is on the same plane as the back face of the scribe. That way it will run directly across a straightedge etc..
-
Lary, the scribe was an example piece I made for 2 day hammer making class that I helped with. I added the lines to show how even simple things can make a tool more visually appealing (if you're in to that sort of thing). We made the tools to make the tools to make a hammer. I use a different scribe that I made from an old chainsaw file since it now has a pocket clip. The bending fork is made from a Unit V RR anchor. TP, that's a good story. USPS must dislike blacksmiths.
-
I was able to find this thread. Tinkertim might also be a good person to ask since he has made reference to a DIY wash (it might be the same zircopax/benonite mix given by MonkeyForge and others on the site, not sure). I don't know if a pile of brick forge is useless (for lack of a better term) without some sort of kiln wash applied, but expect not. If you plan to use flux, chances are it will eat SuperWool just like Kaowool so you'll still want to line it with a more durable castable refractory. Just my 2c, I'm no gas forge expert.
-
TW, not a bad idea... I'll think of something in the next couple days/weeks (unless someone beats me to it). Depends on how quickly I get through my current project list. Lary, it's a flat rate box! It seemed like a waste to just put one item in there. Glad it made it to you. Fortunately, blacksmith tools are unlikely to be damaged in shipping
-
Even if it won't "fail catastrophically" I like to keep my firsts. Not all of them, but the notable ones. That way you can go back someday and see where you started.
-
I suppose we shall see!
-
Generally I would anneal then normalize, harden, temper. Depending on the alloy and whether or not I need to do any file work I'll drop the annealing step in vermiculite and will just normalize. Checking the grain structure is a good idea. If you have an old worn out file you can break that too to compare your grain structure to a factory HT (this only works if the file is through hardened). As far as the tempering temp goes, it depends on the use. On my kiridashi for cutting leather I tempered twice at 375 since I was more interested in edge retention than toughness. I also only quenched the end that would become the edge; the rest of it is just normalized. For a harder use knife toughness might indeed be more important than hardness, so a higher tempering temperature or differential tempering might be more appropriate.
-
Very well, I half expected him to pop in soon after I called the contest. Best not to keep the people waiting! Congrats to Lary and his trivet! *queue confetti*
-
I usually call it drawing back the spine or differential tempering, but bluebacking works too. The idea is to make the blade tougher and/or more flexible by tempering part or most of it back further (usually to a blue) while maintaining the hard edge. For something like a hunting knife that you might baton through a tree or something along those lines you wouldn't want to strike hard steel since it may break/chip. As far as the cons... I suppose it's one extra step that's not always necessary. I'm sure there are others. This topic has certainly been discussed here before so I'm sure you can find a more detailed explanation if you try looking it up with other names.
-
That table/stand looks like cast iron which doesn't do well with shock loading. I know some some companies, Fisher for example, made cast iron stands for their anvils so you might be fine... However, those were designed and cast with anvils in mind... Hm.. I'll defer to others opinions. She's certainly a purty anvil.
-
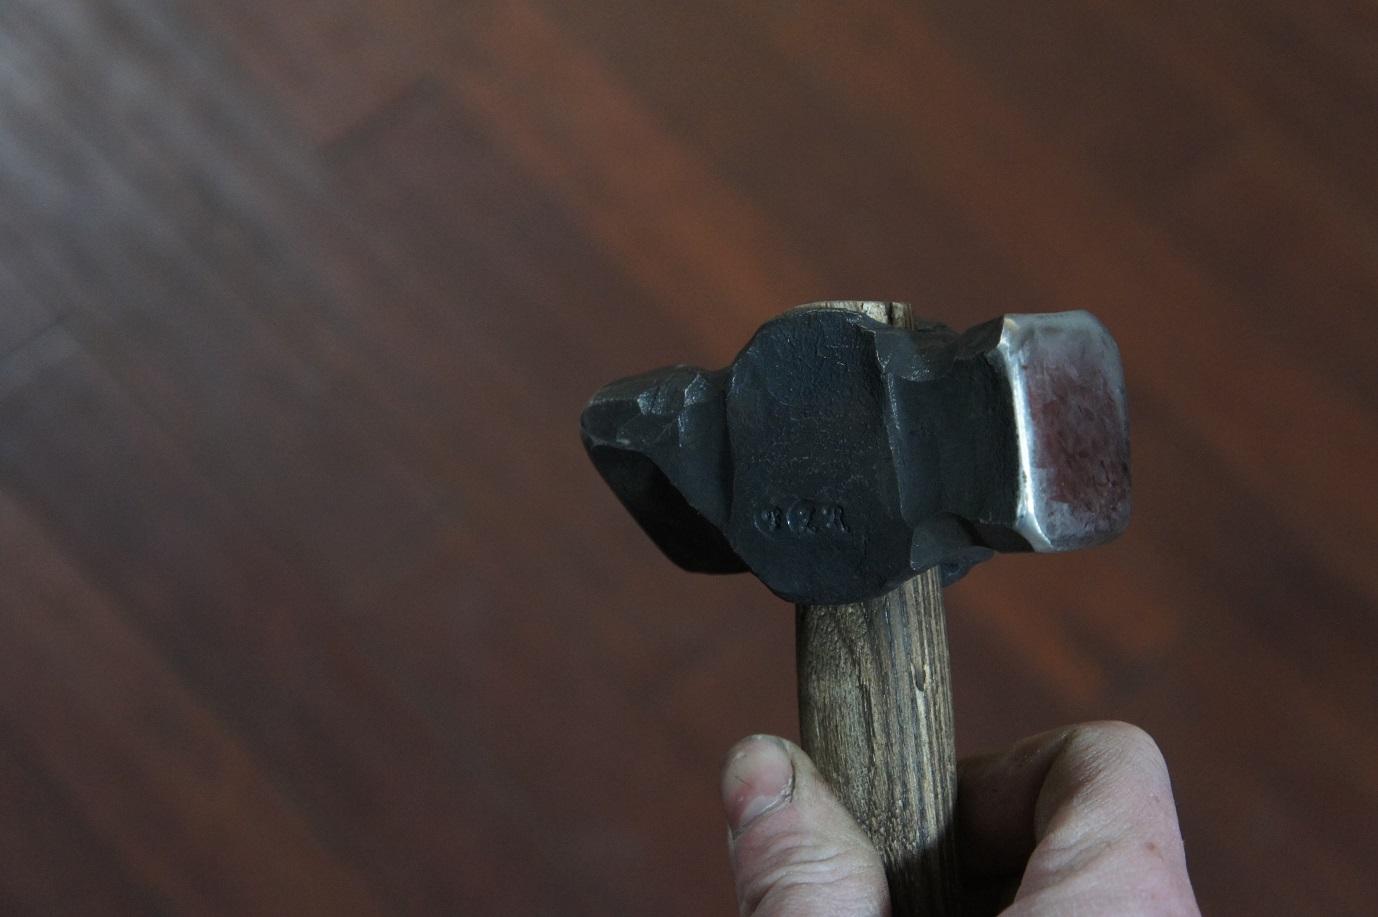
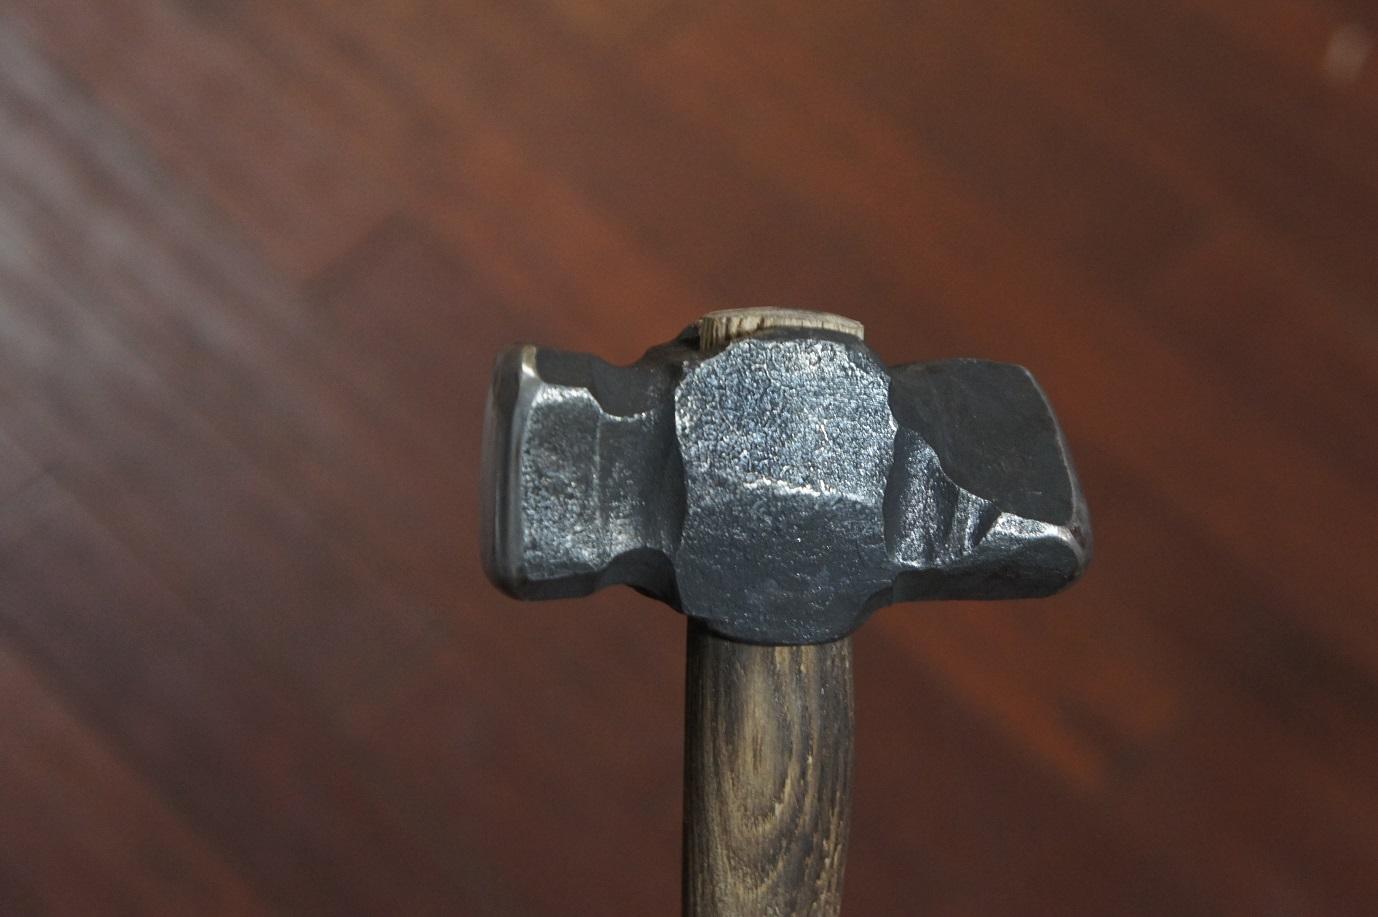
I tend to use my 3# rounding hammer most often, but sometimes 3# is overkill. I've been using this one quite a bit since it's new.
-
A winner has been selected. He can come forth if he wishes. To those of you who participated, thank you for sharing the versatility of 1/2" stock.
-
I finally finished up a hammer that has been sitting on the bench for a few weeks waiting for a handle. I tend to use the edges of the hammer rather than a pein, but because I've never used one I decided to go with a diagonal pein. A 2#er made of 4140. I used it today and so far I like it. Granted I haven't used the pein yet, but I'm sure I will at some point.


-
I have several sitting on my bench right now. My feeling on those is there is a fine line between keep fiddling away until it's "good enough" and taking what you learned from the first (or second, etc) attempt and starting over. The more complicated the project, the harder it is to take the latter course. I like what you have there! I also like the handle on your forge rake and love your line of blowers in the background. One might say you have a few vises. *grin* What's that piece of ~1.5" x ~0.75" going to be?
-
It is from 2015, but I'm not getting the page removed error. Here's the link. I'll also attach the PDF just in case. Surely Frosty can speak for himself, but I think his recommendation to follow the directions to a T (ha) is for those who are unfamiliar with building burners. Like myself The ability to reach a forge welding temperature with a single burner is going to depend on the volume of the forge. His recommendation for 1.25" pipe might be for the forge dimensions specified in that thread. T Burner Directions finished.pdf
-
Ahh, I see. I have one of those insulators as well, but I don't know how I would cut a hole in it to turn it into a lamp... While I probably wouldn't use 1/2" stock I would probably take 3 or four separate pieces, collar them together in a couple of places (maybe with a tack weld underneath) and forge weld the end to be wrapped around the insulator... Though, now that I think about, I would be afraid that wrapping hot steel around glass might shatter it.. If you wanted a wired light rather than solar it would be cool if you could surround a piece of pipe with multiple strands and collar the bundle together. That way you would have a place to run wires. I'm not sure how you would connect the insulator to the stand... maybe leave the strands long and curl them out, thread the end of the pipe and use a nut from inside the insulator.... I don't know, there are lots of challenges there. I'm just thinking out loud.
-
TW, your crosses have improved a lot since last I saw them! Very nice. Now you have me curious about this lamp... Can we see? If not the creation itself, perhaps a concept doodle?
-
Do you have a picture of said hole by chance?
-
If that hair dryer has a "Cool Shot" button that turns off the heating elements I would recommend using some electrical tape to keep that pressed down. Running it with the heat going will burn out the little motor in short order. I used a hair dryer for quite a while when I was starting out. One without the cool button lasted a week or two and the other survived about a year before it eventually gave up the ghost. I ended up switching to a squirrel cage furnace blower with a speed controller and finally to a hand crank. Volume of air aside, hair dryers are loud.
-
I keep a bucket under mine to collect the oil that drips out of the bushing (I assume its an oilite bushing or sintered bronze or something along those lines, but I've never taken the gearbox apart). Did you recently switch oils to something a little thinner? I've noticed the gear oil I use now leaks less than the ATF I used to use. They are supposed to leak so I wouldn't try to seal it up. ChiefLittleBair types faster.
-
Biggun, my best answer at this point is so far so good. However, I don't think I have used it enough to say anything definitive about edge retention. Leather can be tough on edges, but the amount of cutting required to turn a couple of 1.5" vegtan strips into 1.5" belts isn't much of a test. The blade I used did not have carbide teeth and was 0.050" thick. It sparked like the lower end of high carbon steel, but it was new enough were I wouldn't be surprised if it was some special purpose alloy that would be hard to ID by a spark test alone. My test piece hardened in oil (McMaster 11 sec, preheated) and had a tight grain structure after a break test. I'll add that it while it skated a file it was slightly more flexible than some other common blacksmithing alloys before it snapped. I suppose that makes sense since you really don't want a saw blade shattering at ~3k RPM... The thickness of the blade and my decision to use the arbor hole where it is turned it into a banana after my first attempt at hardening. I reheated to a normalization temp, flattened it out, let it cool, reheated, quenched and clamped the blade in the vise between 2 pieces of wide angle iron (pretty common practice). That left everything nice and flat. Tempered once at 375F and again at 350F. Sharpening wasn't all too bad. I roughed in the bevel (holding at a ~10 degree angle) with a 200 and 400 grit belt, then I went to an 800 grit stone, then 5000 grit stone, then a ceramic rod and finished with a steel hone. The arc on the blade made it a bit of a challenge, but it was manageable. Certainly not the sharpest edge I've ever done, but it did what it needed to do without fuss. Of course, different blades, unknown steel, YMMV. MJ, it's not my idea by any means. These are pretty much a copy from Torbjörn Åhman's (Tubbe here on IFI) video. From a forging perspective they are pretty straight forward. My best advise is don't skip the filing steps and do a test fit before you sew everything together. It took me a couple of tries to get the length/bend of the prong right it so releases when you want it to. Then again you said homemade belt so maybe yours snaps together rather than sewing... either way just keep in mind the prong may need a little fiddling to work properly.
-
No worries. Posts in the Introduce Yourself section are always welcome! I'm glad you found some useful information nonetheless. I suggest adding your general location to your profile for folks like myself who may forget after leaving this thread.
-
It's funny, I almost wrote, "like a scarf for leather". After a quick search one of the synonyms for skiving is scarfing! Thank you for the term!
-
General cutting, cutting curves (by rocking the blade) and using push strokes to shave down the leather. You shave down the thickness so in areas where two layers overlap (i.e. the belt loop; and the underside of the belt, buckle-side, where the D shaped stitches are) you have a gradual change in thickness rather than a sudden drop off.
-
One might call them.... a thorn in your side?