
Mike Ameling
-
Posts
473 -
Joined
-
Last visited
Content Type
Profiles
Forums
Articles
Gallery
Downloads
Events
Everything posted by Mike Ameling
-
Yes, scrap steel is always a crapshoot. Just way too many variables - between original machinery/vehicle manufacturers and years when made. The various lists from ABANA, BAM, AFC, etc. are a good ... start. But if it is very important to really know, then buy known new steel. That way you know for sure. I like to go to the local farm/implement store and buy "agricultural steel" - like bolt-on plow shares, cultivator points, disc blades, hayrake teeth. They are generally made from 1080 carbon steel - especially those made by the Weiss Corp. And you can generally buy the new "part" for less than the price of buying the same amount of tool steel from a steel distributer. Just price out 30 inches of 1/4 round 1080 "drill stock". At the local Farm Fleet they are selling for $1.31 each as replacement hayrake teeth. Most knife makers quickly learn to buy new steel. That steel is the cheapest part of their whole knife making process. Far better to start with a known steel than to put 40 to 80 hours into making a knife only to end up betrayed by the "scrap" steel you started with. Mikey
-

2 fails heat treating crow bar
Mike Ameling replied to Blood Groove's topic in Heat Treating Knives, Blades etc
It also depends upon how GOOD of a knife edge you want. Too many people want/expect to sharpen a knife today, use it hard, and still retain a razor edge a year from next Tuesday! Totally unrealistic expectations. The softer the cutting edge is, the more often you have to touch up the edge to sharpen it. With a "working knife", you touch up the edge most every time you use it. That way you know how the edge is. And it is much easier to maintain. (Try re-sharpening a Buck knife!) Yes, it sounds like the quench was way too quick. But if you really want to use the handle on that knife as a pry bar, consider just letting it air-cool. Let the quality of the steel itself work in that pry bar function. Plus the "soft" knife edge will need more frequent attention. When you try to modify an existing tool to a new function, you will often run into problems with the original material. It was designed and heat-treated for the original purpose. Changing that purpose can get ... tricky. And COMBO tools are always a problem. Very often the different parts need to be heat-treated differently. And you end up with "shear lines" within the steel itself where the steel transitions from one heat-treat to another. In the end, you are better off getting two separate tools designed for their specific tasks. Just a few humble thoughts to share. Take them as such. Mikey - that grumpy ol' German blacksmith out in the Hinterlands -
Gee you ... young pups ... are spoiled! I've USED anvils in worse shape! I suspect this particular anvil was used in an old plumbing shop. That hardy hole appears to have been specifically opened out and enlarged for use with large round stock or pipe. It is too even to have been from "abuse". Plus the depression in front of that hardy hole shows specific heavy use - as in bending a right-angle in thick round stock or thick pipe. The rest of the marks show consistent use as a cutting chisel plate. The "tool" marks on anvils will often ... tell you the tale. Like a slight depression on the heel next to the pritchel hole from long time use when setting rivets. Or the "off side" rounded or chipped edges indicating which way the anvil was orientated for use. Yes, that is a well used anvil. But that hardy hole looks to me to have been a specific ... modification. And the "trough" depression running forward from it also then points to heavy right-angle bending of large round stock. Just my opinion. And Yes, I've USED anvils in worse shape. It's not how nice it looks, it is what you can do with it that counts. This one just has much more of ... a story to tell! Mikey - that grumpy ol' German blacksmith out in the Hinterlands p.s. An OLD plumbing shop. Back when pipe was "formed" to shape instead of just cut/threaded and screwed into a cast pipe joint/fitting.
-
Simplest method is to forge it out FLAT and round. Then "sink" it down into a bowl form. I hammer down into a hollowed out spot on the end of an oak log. It does scorch/burn the wood, but that just evens out the bowl shape in the wood. And end-grain doesn't burn too much. The deeper your bowl depression in the wood, the easier it can be to dish your dipper more. Or hammer down into an iron ring laying on your anvil. The ring supports the outside while your hammer pushes the metal down into it. The old Vikings and Romans used a section of square bar bent into a circle as a "sinking" block. I've made a number of small bullet melting dippers from simple sheet iron - like 18 to 12 gauge. I cut out a "keyhole" shape, then hammer it cold down into that depression in a wood block. And the flared bottom end I hammer into a tapered cone for a handle, or to put a wood stick in to use it over a fire. 18 gauge works very well for cold forming, but 12 gauge goes faster/easier when hot. Yes, a ... flex point ... even in hot iron will get brittle and crack/break if you flex it enough times. If your bowl snaps off, then you can salvage it by forging up a separate handle and then attach it to the bowl - either by riveting it onto that bowl, or weld it on. Just another "character building experience" along the way. And another way that the "scrap pile" gets added to! Mikey - that grumpy ol' German blacksmith out in the Hinterlands
-
Just more ... Feel Good Politics. And it only helps selected vehicle manufacturers/dealers and banks making loans. For some people it will be a good deal. More of that MAGICAL FREE MONEY the government seems to have tons of to give out to ... buy ... future votes. Most of the sales contracts on those shiny new cars have a clause written down in the fine print. It says that IF the fed gov doesn't come up with that $4500, then YOU have to cough it up or lose your shiny new vehicle! And your old vehicle is already long gone so you can't get it back - ever. Will the Bank loan you that extra $4500? Plus most States are charging sales tax on the FULL VALUE of that new vehicle - including on the $4500 the Fed's chipped in! Yeah, taxed on money you never had, but did "benefit" from. And vehicle registration/license fees are also based on the FULL VALUE of the vehicle - including that stimulus money. Ditto the full insurance coverage you need on it - especially if you have a loan on it. Just more ... messy little "details" ... of this program that sooooooo many people are calling a MIRACLE!!!!! Yes, lots of the college crowd are calling it a MIRACLE - from the Chosen One. In the end, it's just more MAGICAL FREE MONEY assistance to selected individuals and companies in the auto industry and banking industry. And people are swapping paid-off vehicles for new car payments. And how many will end up losing that shiny new car when they can't make the future payments? And bought more car than they could afford? This feels a lot like the housing boom/bust - where people bought houses they could not afford and then started losing them. And the "clunkers" are supposed to be scrapped - with the engines destroyed/blown so they can never run again. But many dealers are now saying that the old vehicles will be stripped of "parts" before the crusher gets them. So there must be some "technicality" written into that law that allows the car dealers to strip out ... spare parts ... as long as the total vehicle never runs again. Just more FEEL GOOD politics -- to buy future votes. And government manipulation of a private sector marketplace. Mikey - that grumpy ol' German blacksmith out in the Hinterlands p.s. For SOME people this is a good deal. People who needed a newer vehicle and have the resources to afford one. But soooo many are falling for the ... smoke and mirrors. Or, as the old Romans stated it: Bread and Circuses!
-
A number of people have done this. Lots of time for a little bit of wrought iron. A BLOOMERY is what you need to search for when looking for info. Darrell Markewitz of Wareham Forge has a CD-ROM of info on some Viking/Norse era iron smelts that he and friends did. Lots and lots of info, pictures, and time/data studies. I've only read through part of the whole info. Colonial Williamsburg published a couple books about this. Volume 1 of their Historic Trades has part on a Bloomery asbn 0897-7216. They also did The Geddy Foundry isbn 0-87933-086-5 -- but most of that is casting brass/bronze. Mikey
-
Jay Hisel over at Big River Forge makes garden bells by welding together three tall triangles cut from different thicknesses of iron plate. He only welds about 1 to 2 inches of the tops of the sides, leaving the rest open and not touching. And the heaviest triangle he has the top extended a bit with a hole drilled in. This he bends over and welds to seal the top. They do well for garden bells. With a length of chain connected to an eye-bolt inside, an iron disk attached to the chain near the bottom of the sides, and another animal-shaped plate attached at the bottom, the wind will catch and "clank" the bell. The only "complaint" Jay ever received was that one RANG TOO MUCH when the breeze was blowing! Large fire extinguisher bottles make great bells. Just cut off the end you don't want to use. The longer the bottle, the lower the tone. And an old scrap CO2 cylinder will make a great GONG for the garden/patio! A deep low tone like those Japanese bells. The creative part is then figuring out how to hang it. Jay might have some pics of the one design on his site Big River Companies In the end, it is all a matter of how large a bell you want to make. A quick/simple bell can be made by cutting about 6 inches of well pipe or sewer pipe. Then cut it in half from top to bottom. Now forge up a U shaped hanger for it. Rivet or weld it to the top of each half of that pipe. Adjust the bend in the hanger until the two halves are close to touching, but not quite. And there is your bell. Thick plate steel can be forged half-round and hung the same way. Thicker, larger, and better quality steel can give you better tone. Even an old wooden wagon wheel rim makes a pretty good garden bell as is. Just hang it with rope or leather to allow it to vibrate when struck. One other option to neck down that pipe would be to cut slots on the top, bend in the "tabs" formed, and then weld them up. Crude, but it all depends upon what you are trying to achieve. Hope these rambling thoughts help. Mikey - that grumpy ol' German blacksmith out in the Hinterlands
-
Fund it? That's just the starting point! You dig and cast in you cement base. Then move the hammer onto it. And then you BUILD a shop around it!!!!! There are very few "shops" set up to move such a big hammer into them. Everybody I have known has ended up building the shop around the hammer. But it sure would be nice to have something more than a 25# or 50#. But that also means working larger stock and projects to justify it. And booming up the business accordingly. And another ... hobby ... becomes a business. A tricky cycle of ADDICTION, this blacksmithing! Mikey
-
Nail headers ... break or wear in ... over time. The edges get smoothed up in use and will work a little better. It sometimes helps a little bit to have a small straight section at the very top of the hole, then the tapered/flared out bottom of the hole. And having a double ended heading tool also helps. You make a nail on one end, then let it "air cool" on that end while making another nail on the other end. It sometimes works a little better than quenching the nail to "shrink" it so that it will tap back out of the header. (A tip from one of the ABANA conferences.) Hope this helps. Mikey
-
what are some uses for old horseshoes?
Mike Ameling replied to BIGGUNDOCTOR's topic in Blacksmithing, General Discussion
Those studs in the horse shoes are called Caulks. They are for added traction - often used on "winter" shoes. Western Horseman magazine compiled a book called Horseman's Scrapbook by Randy Steffen isbn 0-911647-07-4. It has a LOT of ideas for using old horse shoes. My copy says The Revised at the top, and was published in 1986. I've got a couple "cowboy" sculptures made from horse shoes that another farrier made up years ago. I will see if I can get some pics of them and post them. Two tacked together at the heels and at a 90 degree angle become book ends for the shelf. Two with a short length of pipe welded between the ends and a rod passed through both becomes a door hinge. One welded on its side to an iron plate so that it sticks out works as a coat hook, or hanger for tack. A pair of them become a gun rack (with a little leather wrapping to protect the gun). Also --- frames for pictures like snapshots of the family. A series of shoes welded by their heels and at 90 degrees to a pair of iron bars turns them into a CD or DVD rack - either setting on a shelf or bolted upright to the wall (just get the "flat" sides all facing up). A slight tilt for the wall mount helps hold the cd's or dvd's in - kind of like a magazine rack. And the options can go on and on and on ... Mikey -
general questions about a forge
Mike Ameling replied to dizzylamb's topic in Blacksmithing, General Discussion
Plus all of it ... can ... affect your home owners or renters insurance. Many people have found this out afterwards - either in declined claims or canceled policies. And there is also that "liability" insurance - on things you make/do. Just a few more things to consider when starting a new "business". Mikey -
Yes, the eye on most hammer heads tapers in from BOTH sides. So when you tap in the wedge on top, it flares out the handle a bit to hold tight in the eye. NEVER soak a hammer in water to ... tighten up the handle! The water soaks into the wood and expands the fibers - which does tighten it up in the eye. But it also CRUSHES more wood cells/fibers when doing that. So when it dries back out it will be looser that before! And each time you "soak" that handle and let it dry back out increases the cycle. Tom Clark down in Missouri would fit his hammer handles properly, then mix up JB Weld and slather that all over the handle/eye when he put the handle in. And then he wedged them and let them set up. It worked for him. But he also would saw the wood wedge slot in the handle much farther down the handle - an inch or two past the eye area. He said it helped cut down on the vibration transmitted through the handle to your hand. He also recommended slightly squaring up the handle where your grip it instead of leaving it as a rounded oval. Just flatten the sides a bit while leaving the corners rounded. This helps you grip the handle better, and keeps it orientated right in your hand. And be sure to remove that "varnish" coating. That slick coating hurts your gripping of the handle. Mikey - who needs to re-handle a couple hammers that I have been putting off for too long
-
If the top of your nail header is level, then it is just a matter of hammer control. The first big hit sinks the metal down, but after that each blow starts to refine the head. So hitting on the off side tends to drive the metal towards you. And any sideways movement of your hammer as it hits also moves the metal a bit in the direction of the blow. The rest is just practice ... practice ... and more practice. Years ago Colonial Williamsburg decided to build a new blacksmith shop. And they wanted to do the whole project on-site with tools and methods of that early time period - 1770's. Well, they sent an order for nails to their current blacksmith shop. Peter Ross was running it at that time. He said they got an order for 13,000 nails! After the initial shock wore off, they realized that they just needed to keep ahead of the carpenters. So every day a couple of the apprentices would start the day making a couple hundred nails. He said 2 got very good at it. And it also was a good warm-up for the day's work. A number of years ago, a cache of early Roman era nails was discovered over in Britain. They had been stockpiled to build a new fort, but never got used. There were 875,000 nails in that cache/stockpile! And each size of the nails was remarkably similar to all the others - length, diameter, taper, and head. Practice, lots and lots of practice. Mikey
-
And the ... addiction ... has firmly taken hold! Hello. My name is Mike, and I'm a blacksmith. Welcome, Mike. Tell us your story. Mikey - that grumpy ol' German blacksmith out in the Hinterlands
-
Where to buy blacksmith coal west of Chicago
Mike Ameling replied to ichudov's topic in Blacksmithing, General Discussion
There is Centaur Forge up to Burlington WI. And UMBA (Upper Midwest Blacksmith Association) has several members around Beloit and Rockford. The Mobius brothers have their shop in Chicago somewhere. So check out a couple of their web sites. Also check the supplier list here on iforgeiron. Mikey -
What did I do yesterday and today?
Mike Ameling replied to Frosty's topic in Blacksmithing, General Discussion
I've got several of those hanging about. But the last logs I needed to drag about were TOO LARGE - 4 to 6 foot in diameter oak and walnut! The tongs just wouldn't open wide enough. I ended up wrapping chain around them. (And these were just the culls and ends of the logs!) Nice job on the forging. With the right size logs, they can work great. I made up separate tongs for hauling ice blocks - thinner/lighter with more point to them. Works better on ice. But I also watch for those one-handed ice tongs at sales. The top ends are shorter past the pivot point, and they have a short bar/handle between them connected to the arms with a chain link. In use you grab that handle, slip the points down around an ice block, then lift up. The weight on the handle pushes the points into the ice block. Same principle as your logging tongs - just a whole lot lighter/smaller. Well, those one-handed ice tongs also work great on blocks of firewood! When you have to carry those blocks a bit, just slip a set of ice tongs down over a block and carry back to the truck. Two of them helps balance out the load. Otherwise you would have to use both hands to pick up and carry one chunk. It speeds things up a bit, and is less taxing on the arms/legs. There is a company that makes an all metal bar linkage version of log grabber/carrier. But those small ice tongs are cheaper - even at antique prices. Hmmm ... that reminds me. I need to re-do the wood on my one cant hook before I really need to use it. Mikey -
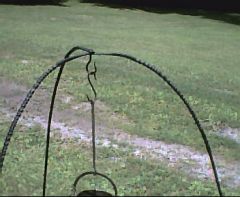
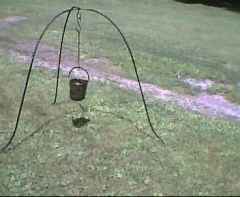
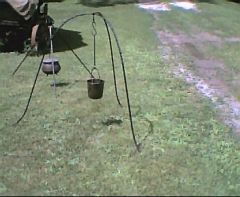
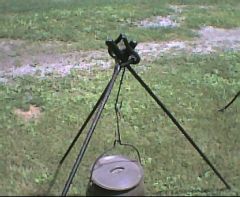
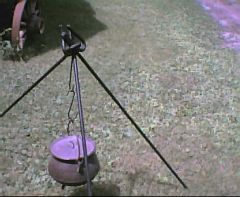
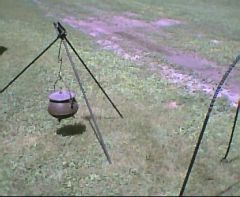
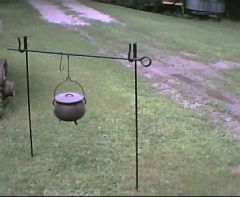
Aaaah, campfire beans -- with a little fresh cornbread for soppin! How to do that top of the tripod is always a tricky choice. Most people make an eye loop on each leg, but leave the eye on one open a bit to loop through the other two. Some people use a separate hook or chain to lock all three together. And a lot also depends upon how tall you need it to be. I had to make on a few years go that stood 7 feet tall when set up - to hang their "kettle" from at the right height. And had to use 3/4 square for the strength needed. Their "kettle" held 8 gallons! So each leg of that tripod started out at 10 feet long!!!!! With the eye loop at the end, and 1+ foot stuck in the ground, and spread out around their "firepit", it just turned out right. Here's a couple picks of a Chuckwagon campfire iron set I made based on pictures of originals from the 1870's to 1890's. It can be set up as a tripod, but usually gets set up as a crossbar with uprights. It is from 5/8's round stock. And then herer are a couple pics of a Viking era tripod. The original was found on the one burial ship - the Ausberg. It is made from 1/2 square stock. The feet are split into three, and bent out like the claws of a bird. And the twists were done in 6 to 8 inch sections - like the original. A limitation on their forge sizes. One knife maker from Norway that has seen the original in the Museum saw one of these I made a few years ago. He said it looked "... dead on..." compared to the original. R-bar can be nice to work with. And occasionally you can find some of the really old stuff. Instead of those lines/ridges formed into it, it has little raised X's down the sides. That little "touch" of decoration really sets your work off. But it is hard to find. I've only found a few feet over the years. Three pieces of 4 foot long that were already made into stakes for tying a rope around, and one twisted up chunk about 8 foot long. The really hard part is keeping my buddies from chopping it up to make fire pokers! One was very upset when I stopped him. He thought it was the PERFECT piece of "scrap iron" to make a 2 foot long fire poker! But rebar can also give you problems working it. It usually is made from remelted scrap. And so it can contain most any metal alloy in it. A friend once found a whole large ballbearing in a piece - unmelted and not mixed in! He went through two hacksaw blades before he found out why in wouldn't cut! Nice work Yance. Keep them beans warm, and get that cornbread made! Mikey p.s. more pics in my Historic Ironwork album
-
From the album: Historic Iron Work
-
The claw feet on the Viking era campfire tripod
Mike Ameling posted a gallery image in Members Gallery
From the album: Historic Iron Work
-
From the album: Historic Iron Work
Based on an original from the Augsberg burial ship. The feet are split into three points bent like a bird's claws. The top swivels on a removable hook. The twists were done in 6 to 8 inch long sections - per the original. A person who has seen the original over in the Museum said my copy was "... dead on ...". That was nice to hear. -
Campfire tripod variations - Viking and Chuckwagon
Mike Ameling posted a gallery image in Members Gallery
From the album: Historic Iron Work
-
From the album: Historic Iron Work
-
From the album: Historic Iron Work
-
From the album: Historic Iron Work
A campfire iron set based on original chuckwagon pictures from the 1870's to 1890's. Made from 5/8 round stock to hold several gallons of coffee and several more of beans and even some hot water for dishes - without sagging. The round eye on the cross bar locks down around the two upright ends. -
From the album: Historic Iron Work
A campfire iron set based on original chuckwagon pictures from the 1870's to 1890's. Made from 5/8 round stock to hold several gallons of coffee and several more of beans and even some hot water for dishes - without sagging.