
Mike Ameling
-
Posts
473 -
Joined
-
Last visited
Content Type
Profiles
Forums
Articles
Gallery
Downloads
Events
Everything posted by Mike Ameling
-

Dad or moms first project
Mike Ameling replied to tatertatum's topic in Blacksmithing, General Discussion
I grew up on a small farm. We never did any blacksmithing. And we never had a torch or electric welder. But we did ... tinker ... a bunch. And we were always repairing/fixing things. Occasionally we even made something new. I was in my 20's when I saw a blacksmith working (not counting all the welding shop stuff I saw in town) at a historical reenactment. That got me interested (hooked). Then the search for tools really started. My one grandpa was a carpenter and home builder. But he did run a sawmill on the side out on the farm. The "blacksmith" in town was not related, and most of what he did was welding/repair. But I did end up with the one great uncle's anvil. It was just his "shop" anvil for the farm. (72# Haybudden) So I became ... self taught. The blacksmiths I did get to watch and occasionally help out were working at various historical gatherings. And then I got to know more people who did blacksmithing work, and got to go to various gatherings (Hammer-Ins and Demo's). I started with the usual smaller stuff - S and J hooks, fire pokers, campfire irons. And things progressed from there. As my skill and experience grew, I tried more things. Now I primarily make flint strikers from all the 2500+ years they were originally used in, and North American fur trade iron work (muskrat spears, ice chisels, fish hooks, fish spears). And the learning goes on ... and on ... and on ... and on ... Mikey - that grumpy ol' German blacksmith out in the Hinterlands -
The State sales tax number I received allows me to "collect" state sales tax from the buyer of an item I sell. The actual tax has to be paid one way or another, but that tax # allows me to collect it from the client. In practice I just mark my price for a finished item at a set dollar amount - and then I pay the sales tax out of that. So the tax is not added in. If I sell a flint striker for $15, the person pays just that $15. I then calculate out the 7% state sales tax on that whole amount, and send that in. If anybody asks about sales tax, I tell them that I will cover that, and that they are then getting a 7% discount on the final price. So calculations are simple. Just total up whatever I sell for that day, multiply by 7%, and that is the sales tax I need to turn over to the State. So I mark my items to the whole dollar amount I want to sell them for. And I always tell the client/customer that I will cover the sales tax - giving them that small discount. It does cut my "profit" a bit, but the savings in headache and paperwork are worth it. Large items and commission pieces are a different matter - sort of. There you have to do all that time/labor/materials/profit calculations to come up with the base pricing, and then figure out how you might want to handle the sales tax. When I worked with Jay Hisel at the retail portion of his Big River Forge, we did all the normal calculations of sales tax, and added it onto the final retail price. That was the way he wanted to keep his bookwork. And the receipt then reflected it on each sale for the bookkeeper. Now a sales tax HORROR story! The State of Iowa changed its rules a few years ago. If you do retail in the State, you must collect and report sales tax based upon where the customer/client lives! If I sell in Winneshiek County, and the client/customer lives in Black Hawk County, I have to know and charge them sales tax as if he were buying it in Black Hawk County! And the quarterly/yearly tax report must break down the sales by the County the item was sold into! What a nightmare! It is supposed to even out the differences between catalog/internet sales and brick/mortar store fronts by geographical location. The County governments got behind this scheme because they were losing out on sales tax to other counties when people didn't "buy local". In "theory" this sales tax scheme even applies to in-person sales, but nobody pays attention to that and doesn't bother to ask people where they live. Just what works for me. Mikey - that grumpy ol' German blacksmith out in the Hinterlands p.s. And, of course, cross-state selling via mail/internet have their own complications.
-
Problem making Flint Striker
Mike Ameling replied to czbohunk's topic in Heat Treating, general discussion
How do I make those Kid Proof strikers and get them case-hardened? Aaaah, trade secret times! The answer is pretty simple - I use iron that is already case-hardened from the manufacturer. I just make sure that I don't "scale" it too much when forging to shape. Any surface scale removes a bit of the case-hardening on the original steel/iron. So here's the secret .... I start with some hardened chain links. They are the cross-links from truck/tractor chains - the type you put on the tires for extra grip in snow and mud. The side chains are regular soft iron links, but the cross chains are case-hardened to hold up longer in use. And it's a pretty good/thick case hardening. Yes, you do have to clip every other link to get one complete link to make an oval flint striker, but you can use the cut links to make other styles of strikers. The big point is to not create too much scale on the part that will be the striking surface on your flint striker. That is where you want as much of that case-hardening left on as possible. Now, I'm not quite sure what the base metal alloy really is inside. When I cut a link cold on one side and then twist it to clear, it will sometimes break instead of bend/twist. So that internal metal might have some carbon and other alloys mixed in. It just doesn't spark well as a striker if you get through that case-hardened outside layer. So I try to keep the re-shaping of the links to a minimum - on the sections that will be the striking edge. Mostly just flatten it out and true up the edges. But, like a said before, I had to grind in 1/16 to 1/4 inch before I got through enough of that case-hardening to start to affect the number and quality of the sparks I got from the finished oval flint striker. The specific chain I've been picking up at the farm store is from Peerless - part number 3017112 and designated on the tag attached to the bag 7/0LL TW CC HARD B 100' /BA That HARD designation is the indication for case-hardened. This makes into a pretty nice sized oval flint striker in a fairly common original fur trade era size - around 3 x 1 1/2 and around 3/16 inch thick. The larger cross chains make into larger strikers. I've even messed around a bit with some car tire chains, but the small size becomes a problem. I had been getting the bulk chain from the local farm store (cut to your length from a 100 foot bag) for $3.50 to $3.75 per foot. There are around 26 links per yard, which then gives material for 13 oval strikers per yard - or around 4 oval strikers per foot. So materials costs ran less than a buck each. And the cut links can still be used for other styles of flint strikers as well. But last year when steel prices went crazy, the price per foot jumped up to $8.75 per foot! I still bought some chain, but that really cuts into the cash flow. But it's still pretty good, since I make between $15 and $25 for every two links of chain, or $60 to $100 per foot of chain. There's still fuel costs and the labor, but not a bad return. My oval strikers retail for $15 each (either the all high carbon ones or the Kid Proof ones), and the C's and simpler styles for $12 each. There. Now you know ONE of my ... secrets! Am I worried about sharing that? No. I know the work involved, and anyone willing to do that work is welcome to it. Have fun ... torturing iron! Mikey - that grumpy ol' German blacksmith out in the Hinterlands p.s. I had orginally been looking for some chain made from high-carbon steel - to use to make oval flint strikers and skip that "welding" part. But I didn't find any. Although I did keep running into references to "hardened" chain. So I tried some. That's when I found out about using the case-hardened chain links, and how "tough" they end up being in use. Now I just have to find a good use for 35 feet of non-hardened chain. It was being sold for cross links on truck/tractor tire chains, but turns out to not be case-hardened. I never got a chance to spark-test it on a grinder before I bought it. -
Problem making Flint Striker
Mike Ameling replied to czbohunk's topic in Heat Treating, general discussion
There is nothing special about their look - although they do tend to be about twice as thick as my normal oval strikers (close to 3/16 or 1/4 inch thick). They are basically a version of case-hardening. The insides are soft iron with that high-carbon outside that can be heat-treated hard for good sparking. That soft core gives them the strength to resist cracking/breaking. I'll see if I have a pic around somewhere - probably in my Gallery photos. When I first made them, I was concerned about how long that "case hardened" layer would last. So I took one and struck sparks for 1 1/2 hours straight - only stopping long enough to get a new sharp edge on my flint. I didn't see any lessening in the sparks. So I then took it to my bench grinder. I had to grind away almost 1/4 inch of the striking edge before I saw a noticeable decrease in sparks. That equates to YEARS of hard use as a flint striker. But I could still get some sparks from that edge - just less. So I haven't worried about it since. They are great for Kid's Programs. You don't have to worry much about the kids damaging them with miss-use. And one of my next experiments will be to take wrought iron, forge up a striker shape, and see about baking it in a crucible full of bone/leather scraps - to case-harden it in an old traditional manner. Just an experiment to see ... Mikey -
Problem making Flint Striker
Mike Ameling replied to czbohunk's topic in Heat Treating, general discussion
This is ONLY with those KID PROOF strikers that I came up with! Doing that with any normal high carbon and properly heat treated flint striker would shatter it. But those KID PROOF strikers are different - specifically made to NOT break when being abused by people who do not know or have not developed enough skill in using a flint striker. I also made them for a national park - for the use of the kids they hire for the summer as interpreters. Too many of them just don't care about their job - it's just for the summer and to make a few bucks for college. So they are not very concerned about the tools and gear they use in their interpretations to the public. The one regular park employee called them ... poorly trained monkeys. So that specific comment was ONLY about those specific KID PROOF strikers. I hope that clarifies things. Mikey -
Problem making Flint Striker
Mike Ameling replied to czbohunk's topic in Heat Treating, general discussion
A final note. NEVER tap a flint striker with a hammer AFTER you quench it! Do any/all tweaking and straightening BEFORE the heat treat. Even clamping one in the vise to do a little filing/sanding of a sharp edge might crack/break it. You may have "tempered" the ends back a bit, but they still are hardened tool/spring steel. Plus the shock waves from any "tapping" will travel through the rest of the striker. Now, to combat the brittleness problems with normal flint strikers and how hard kids can be on them, I did come up with what I call a "kid proof" oval striker. After all the forging and heat treating and testing, you can lay it down on your anvil and hit it a dozen HARD FORGING BLOWS without it breaking/cracking or chipping. And it will still throw great sparks. I made these up for Boy Scout and Kid's camps - to use when learning to use a flint and steel for fire starting. It amazes people who have made flint strikers before, to see me smack one on their anvil - even standing it up on edge and hitting it HARD with a hammer. The San Diego Council has now gotten around 4 or 5 dozen of them from me for their big summer camps. And they have only had a problem with ONE - it got lost, dropped to become lawn mower bait, or wandered away in somebody's pocket. Mikey -
Problem making Flint Striker
Mike Ameling replied to czbohunk's topic in Heat Treating, general discussion
Several issues here. First is the springs. Garage door springs can and do make good strikers. They have enough carbon content in the steel. But they also can have problems with internal work stress from their former profession. Plus, they can vary in the actual metal alloys in them. They are made to a minimum specification to work as springs, but the alloy mix can run higher. So you can run into sections of a spring that just won't work right - inconsistent on the heat treat. The other part is the heat treat itself. To work well as a flint striker, the steel must be just about as hard as you can get it. That allows the sharp edge on your flint to chip/dig out little bits of the steel. The energy of chipping/digging out those little bits of steel (and breaking some molecular bonds) heats those tiny bits of steel up hot enough that the carbon in them burns. Those are the sparks you see - the carbon burning/twinkling. But when you harden high carbon steel, you also then make it much more brittle. So then you need to take other steps to help reduce that brittleness. The BEST tip I ever got about making flint strikers came from a knife maker friend. He said to Thermal Cycle my striker before the final quench. That Thermal Cycling does several things. First, it removes any internal stress in the steel from all the forging/bending. It also then shrinks/refines the steel grain structure. The finer the grain structure, the less brittle it will be. That simple "tip" was the BEST one I ever got over the years. After I started doing that, I have had almost no strikers break in normal use. Before that "tip", I would forge up a striker, heat treat it, test that it sparked well, and then set it on the workbench to work on something else. I would then often hear a little "tink" behind me. When I looked back the striker would now be in two or three pieces. Or I would drop one on GRASS and it would break. Thermal Cycling cured all of that, while still leaving the striker hard enough to spark well in use. To Thermal Cycle, you forge up your striker as usual. Then you heat it up to Critical Temp (where a magnet will no longer stick to it), and pull it out of the heat. You then let it cool in the air until you don't see any color. Now do that same thing two more times. After that last air cooling, you now heat it back up to critical temp and quench it - in your choice of water or oil. Personally, when I quench my strikers, I quench the WHOLE striker at once. If I have some thin areas, or really drew out the ends a lot, I will selectively heat those thin areas back up to temper some of the hardness. I've tried to quench just the striking edge before, but I usually end up with cracks. So I just quench the whole striker, and selectively heat back up any thin ends to soften them up a bit. This works for me. I make around 500 to 600 flint strikers a year, and have very very few that crack/break in normal use. Plus less than 10% of those strikers are that classic C shape. There are dozens of other shapes/styles to make - from very early Roman times B.C. on up to the present. I am personally pretty fond of the Viking era strikers, and the Scottish style. But most I make are based on originals dating from the 1600's and 1700's. And then there are my little Whale buddies - flint strikers shaped like sperm whales. They date to the late 1700's, but mostly early 1800's. There are pictures of them, and many other striker shapes in my Gallery photos. I hope these rambling thoughts help. Mikey - that grumpy ol' German blacksmith out in the Hinterlands p.s. There are many BAD strikers out there. Ones that you have to POUND your flint against steel just to get a few weak sparks. Those are extremely frustrating. And most are just not heat treated HARD enough. Too many heat treat similar to a knife blade. But that is generally too soft to work well as a flint striker. They need to be HARD, like the cutting edge of a wood chisel. -
Can you make a living Blacksmithing?
Mike Ameling replied to Drako11's topic in Blacksmithing, General Discussion
Years ago I met a guy who did specialty forgings - for sports car restorations. Those old cars were pretty much hand-built anyway, so getting "parts" for them was extremely hard. Most guys ended up buying another "junker" car like theirs for spare parts. Well, he would make new parts for people - using a combination of forging, welding, machining. It made a good living for him and several employees. The same thing applies to restoring antique tractors and old farm machinery. You either find an old replacement part, or you have to have one made up. One good point about people who restore old cars, tractors, and machinery - they generally have the money to pay for what they want done! Yes, they will try to dicker on price. And they might have to schedule things for delivery later. But when they want a part or work done, they will have their finances arranged so you can get paid right away. A friend really enjoys restoring old tractors. It is a part of his business that he really likes. Ditto the Steam Engine repair - even the welding/certifying of boilers. But he also does farm machinery repair as necessary. It's hard for him to turn such work down - because it is what he started with and he knows all the guys stopping in for repair work. But he also knows that payment will have to be on farm/market time - when crops/livestock get sold he will get paid. He does not like the wait, but he understands it and does what he can to accomidate his friends and neighbors. And in turn, they return that kindness, understanding, and assistance when needed. Just a way of doing business in a small/rural community. Last year his repair shop burned down. Several weeks ago all the people in the area got together and held a fund raiser for him - to help with some of all the stuff the insurance did not cover. Just a few more examples of ... specialty work/shops ... and possibilities. Mikey - that grumpy ol' German blacksmith out in the Hinterlands p.s. The tractor repair guy even helped me move a 16x24 wood garage 30 miles to my place. One of those "I can do anything" type of guys. -
Can you make a living Blacksmithing?
Mike Ameling replied to Drako11's topic in Blacksmithing, General Discussion
There are a number of specific blacksmithing schools/classes out there. As well as farrier schools/classes. But a number of colleges/universities also offer blacksmithing classes - usually as part of their ART department. The University of Wisconsin in La Crosse is one of those. Bill Fiorini (the knife maker) kind of really set that section up in the Art Dept. He is retired now, but the program continues. They even offered Adult Ed night classes in blacksmithing. And the State University down in Ames Iowa also has blacksmithing classes as part of their ART department. So a little searching will lead you to college level classes in blacksmithing and other forms of Art. Also keep in mind your future "boss" - yourself. That "boss" will be the BEST and the WORST "boss" out there. When everything hangs on you, YOU have to make it work. YOU are responsible. YOU must run it all. Working with a partner helps and hurts things. You will have help with all the work and responsibilities. But you will also have to share it all as well. And there will be time when you will not agree. Working for somebody else is ... simple. You show up, you do what they tell you, and then you go home. Your life will be simple, theirs will be complicated. Everything has its good points and bad points. And you won't know until you try. Good luck on your .... journey! Mikey - that grumpy ol' German blacksmith out in the Hinterlands -
Can you make a living Blacksmithing?
Mike Ameling replied to Drako11's topic in Blacksmithing, General Discussion
For many years, I dealt with college kids doing "work study" jobs on campus as part of their financial aid package. They generally got paid min wage. Some did their best in whatever job they were assigned. Waaaay too many did a barely functional job. Their "attitude" was that it was something they were "forced" to do, and it was ONLY for Min Wage -- so why bother doing anything more than the minimum required - barely more than physically showing up. I told a number of those students that based upon how they were doing that job I would NEVER hire them for any other job in any field. Most got pretty upset with that! They generally said that IF they got paid better they would do a better job! I could not get most to understand that their bad attitude here would also follow them in whatever job they eventually got. The moment they thought they were not getting paid enough, their commitment would slip dramatically. And that got a few even more p/o'd. Over the years, I have seen a couple of those kids. And some specifically commented on my advice to them - in a very positive manner. The quality of the work you do will always show through in the end. It may not convert into dollars, but it will be noticed. Even if all you are doing is ... sweeping the floor. The Imported Iron Work from China, India, Pakistan have really messed up the market out there. Combining that with the "flea market" or "garage sale" mindset that too many people have means they won't even pay pennies on the dollar for good blacksmith work. It is very hard to counter that mentality. Stick with the pricing you need, and let the quality of your custom work shine through. And don't forget that you are in the business of ... selling yourself ... to your clients. Pay attention to the little details and communication. It means a lot in the end. Mikey -- alleged blacksmith and known iron torturer p.s. And try not to let the bad clients get you down. For some, nothing will ever be good enough - even if you gave it to them for free (they'd complain that it wasn't gold plated!)! There will be times to just walk away from a potential client or sale. With time, you will start to be able to recognize them, although the "learning curve" will be harsh and expensive. It is sometimes better to have a bad review or bad comments than to try to "fix" a problem that doesn't exist except in their minds. One of those ... life's lessons. -
Can you make a living Blacksmithing?
Mike Ameling replied to Drako11's topic in Blacksmithing, General Discussion
I have been supporting myself since the Fall of 2001 with my blacksmithing. Yes it is a ... rough row to hoe. Expect lean times. Plus also remember that for the most part, what we do is a "luxury" item and not a necessity. In hard economic times. the "luxury" items are the first to get dropped from people's budgets. And this applies to all facets of blacksmithing - from functional, to architectural, to artistic, to repair. It takes time to build up your client base - even more so if you are in a ... niche ... market. Get those business classes. Paperwork rules the world, and you will have to work in it. Even such a simple thing as keeping track of how much a client owes you for various small projects over time, and then getting paid for it. I've got one guy that still owes me $1400 for work over the course of 2 years. And he lost his job back in January. So paying me got shoved back by one of those little ... twists in life. But I had to ... adjust ... for that in my business. And more ... paperwork for the bookkeeper. And do see about getting work with an established shop. Many times it might not feel like you are learning anything, but you are. All that ... little daily stuff ... adds up over time. Just seeing how to meet the weekly payroll, keep some materials on hand while ordering supplies for the next big project, dealing with the "overhead" (insurance, taxes, permits, consumable supplies like cutting wheels or welding gas or sanding disks). All the stuff that it takes to run/maintain a business that is best learned while on-the-job. If you can, find a few "production" items that consistently sell and you like making. Those will help keep that cash-flow going. Some under $20 items that people really like. They can often save a weekend craft show, or get you a sale when somebody stops by the shop. And those little items do lead to future projects/sales. And enjoy what you are doing. Too many people turn a hobby they enjoy into a business that then makes them hate it. Don't let that happen. Step back if needed. Just a few humble rambling thoughts to share - from that raggedy edge of modern society Mikey - that grumpy ol' German blacksmith out in the Hinterlands -
I once let a friend get a 50# Little Giant power hammer for 25 bucks! He got the second bid (first being the scrap iron buyer at $10), and I wouldn't bid against him for the hammer. What we do for friends. His brother uses it more than he does now. So it goes ... Mikey
-
Whats the best wood for Charcol
Mike Ameling replied to Hillbilly iron's topic in Blacksmithing, General Discussion
A number of years ago, one of the Japanese Living Treasures came to SE Iowa for a session on making traditional Japanese saws from wrought iron. He only worked with charcoal, and he was very specific about needing charcoal made from Soft Wood. One of the guys organizing it made up a big batch of softwood charcoal after doing a search to find some to buy. But that was years ago before lump charcoal became much more available. His saws sold for between 5 and 20 grand when finished - as National Treasures. The common lump charcoal you can buy around here is made from oak from primarily sawmill waste - slab wood. It works well, but I have had little experience using it. Mikey -
Most any rock that you can get a thin sharp edge on will work for striking sparks with a flint striker. Some types of rock/flint just work better than others. Stay away from obsidian. It is volcanic glass, and is very brittle. The chards/flakes are also very very sharp. Your sharp edge will crumble very fast in use with obsidian. Chert or chirt is a lower grade of flint - often with a rougher surface than flint which usually has a slick surface. It will work, but is not as strong as flint and your sharp edge will crumble fairly fast in use. You can also use granite, agate, slate, quartz, and most any other rock that you can get a thin sharp edge on. The edges just crumble faster in use than with flint. There are lots of people selling flint nodules on evil-bay. Use that "flint knapper" or "flint knapping" term in your search. Then it's just a matter of looking at what people are offering. I often use Musket Flints with my flint strikers - the gun flints made for use with flintlock guns. The size is small, but you do have some good thin/sharp edges, and they generally hold up pretty well before the sharp edges wear/crumble back to dull. And a lot of gun flints were historically sold right along with flint strikers back in the fur trade days - especially around the Great Lakes area. Locally here in NE Iowa I can find grayish and whitish chirt in all the limestone that runs through/under most of this area. Some of it works pretty well. And Rich Pierce down to St. Louis finds white flint around him the works GREAT! He knapps out gun flints from it - as something of a hobby. A friend makes a yearly trip out to Montana to pick up Knife River flint for the arrowheads and knife blades he knapps out. I occasionally get a bucket of his culls/chards. A really nice rootbeer colored flint that holds a sharp edge very well. So check out any flint knappers in your area, or any muzzleloading stores nearby. And ebay (evil-bay) ALWAYS has flint listed - mostly for those flint knappers making arrowheads and spear points. I often surprise people by walking over to the crushed limestone gravel road, search a bit, pick out a white chunk, and then use it to strike sparks with a striker. It amazes many people who think you have to have a specific piece of flint for it to work. Hope this helps. Mikey - that grumpy ol' German blacksmith out in the Hinterlands p.s. Leaverite is a joke term for any unknown rock. It's a shortened version of "leave her right there" and is usually followed by " it ain't worth nothing". I got tons of "leaverite" rock all around here! But if you want some, you can pick up all you want out of the cornfield!
-
There are some projects you just do ... for the love of it. And it's sooooo hard to come up with a price for that work. Jay used a type of powdercoat paint on the bike parts we made. When baked on, it looked like the parts had been Chrome Plated. Interesting stuff. Mikey
-
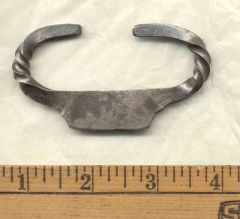 Based on an original in the collection of the Museum of Welsh Life in Wales. This was called a Town or City style flint striker - just a little fancier. It somewhat resembles the shape of an Ox head.
 -
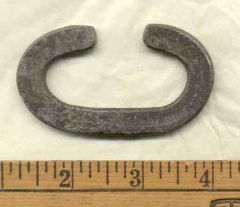 Based on an original in the collection of the Museum of Welsh Life in Wales. A simple basic flint striker called a Country or Rural flint striker.
 -
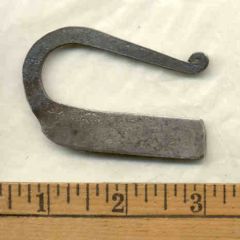 Based on an original in the collection of the Museum of Welsh Life in Wales. A common style flint striker throughout Britain.
 -
Well, I do have a 5# hammer with MITCH chiseled in the side. Was that way when I bought it at the farm auction. But it sure is a ... motivator ... for a simple crosspeen! The one anvil I call ... Jayne ... as in Jayne Cobb from Firefly. The hard bada-- that will do what is necessary to get things done. The other I call Micki ... for Micki Costmier of Equalizer. Someone willing to stick their face in the fan! But that's just the ... sentimental ... side of me. Mikey - that grumpy ol' German blacksmith out in the Hinterlands
-
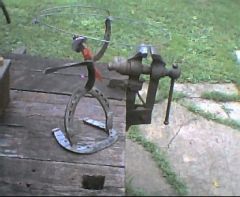
Cowboy sculpture from horse shoes
Mike Ameling replied to Mike Ameling's topic in Blacksmithing, General Discussion
Sorry. I did not make these. A farrier working at the race track down to Des Moines made these a bunch of years ago. In between shoeing the race horses, he would make up "sculptures" from old shoes to pass the time and to make a few bucks on the side. I just took the pics to show an example of something to make with those old horse shoes. Mikey -
Great little project. And that sheet iron pattern for the skull is the really tricky part. It reminds me of the Longhorn Steer head I forged up and Jay Hisel then fabricated/blended into a sissy-bar for the one guy's bike. I was kind of concerned about those SOLID iron horns sticking out the sides, but the owner of the bike didn't care. He loved it. And then there was that larger than life sized deer skull/anters that Jay and I made. I forged up the antler tines from solid bars. Jay worked out a sheet iron pattern to form the skull out of. Then we blended and welded it all together. I had brought in a deer skull to help get the curves and sizing worked out more realistically. After sandblasting to clean, we gave it a baked on powder-coat CLEAR finish. It really catches the eye and light/sun hanging in the peak of the guy's house over the front door/porch. Fun projects. Mikey p.s. And guys love their bikes! We did a number of custom accessories for them - pegs, stands, sissy bars, light brackets, etc. Jay even designed and built a mini-chopper - powered by a 16 horse B/S engine that could do 90+ (before the sweat no longer evaporated from Jay's forehead).
-
There was a question about what to do with horse shoes. Here are a couple pics of that horseshoe "cowboy" sculpture. I did not come up with this idea. This one was made by a farrier down to Des Moines who would shoe the race horses at the track. He would "tinker" around with things like this to pass the time and make a few more bucks. Here he used some LARGE Draft Horse shoes! The "lasso" looks like it was made from some #9 brace wire used for fence repair. And the cowboy is tilted back just a bit - to balance on that bottom shoe and keep from tipping forward too easily. Mikey
-
-
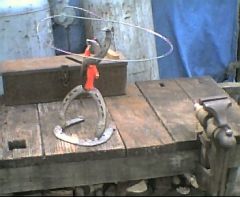 A cowboy sculpture made from horse shoes.
 -
practice tasks for the aspiring?
Mike Ameling replied to double_edge2's topic in Blacksmithing, General Discussion
And treat any project no matter how "simple" it might be as if it were a high quality project. How you do the simple tasks reflects upon how you will do the rest of your work. The "quality" of your work shows through in the end. I've seen too many people who won't bother with quality if they don't think it is worth it on a project. It is considered beneath them and their ability, so they don't care about how it ends up. So put the "quality" into any work you do. It all shows up in the end. And the "simple" projects tend to show the "quality" of the workmanship much faster. Be proud of what you are doing, and let it show in your work - especially the simple things. Ooops, slipped into Soapbox mode. Sorry about that. Mikey - that grumpy ol' German blacksmith out in the Hinterlands p.s. Had too many years dealing with college students doing work/study jobs. Since it was just for min wage, and just part of their financial aid package, it was seen as beneath them and their abilities. So too many barely did more than just show up. To them it just wasn't worth any more effort than that. I told a bunch of them that based upon how I saw them work in that work/study job, that I would never hire them for any job. Because that "who cares" attitude would eventually creep back into their minds no matter what the job was. A few saw the ... lesson. Most just got upset at my "attitude" because they would work harder/better when they were paid more! I just told them that they never would get paid enough to do their best work.