
Another FrankenBurner
-
Posts
616 -
Joined
-
Last visited
Content Type
Profiles
Forums
Articles
Gallery
Downloads
Events
Everything posted by Another FrankenBurner
-
Mr Ron is not too keen on the Mr either. I just keep trying though. How about Sir Frosty?
-
Let me know whenever you are in Boise, I’d love to meet you Mr Frosty. I can let Ron know whenever you’re around. I’m sure he would love to visit. He still says good things about you.
-
I love a good math ratio rule as well but this one is so affected by so many other variables that it won’t ever have a rule of thumb. What thickness is your port block? How many ports are there? What shape are they? What shape and volume is your plenum? What does the transition from mix tube to plenum look like? What static pressure is the plenum running? Etc. These all could change that ratio. Frosty did state that he started at 2x the area of the mix tube on the very first post of the NARB thread. It ended up not being enough for his ribbon. He bracketed what his burner needed. An easy way to figure out what your burner is happy with.
-
It is absolutely possible. I haven’t seen one in that size, that I recall. In the NARB thread there was a narrow ribbon on a ½” Frosty T burner. Are you planning on lots of tiny ports or a few larger ports? 1 ½” seems a tad large for that small of a forge. Is there a reason you want a ribbon burner in a forge that small? I’m not trying to discourage. I hope you do build it and post pictures. In that size, it might be a picky thing to get balanced.
-
I believe it is referring to the area, not the diameter. Either way, I’ve seen one nominal size higher for the air inlets then the mix tube recommended many times.
-
You can also mail stuff.
-
Anyone with a 3D printer could accurately and easily produce my burner, I originally thought. You just need a 3D printer and the skill to use it. Oh and the stainless flasks and investment mix. And casting knowledge to get the vents right. And the ramp controlled kiln to vaporize the print without cracking the mold. And the furnace which requires you already have a burner. And a thermometer and flux to keep the metal happy. So much for that original thought.
-
Where do we find those pictures and descriptions? I’ve been looking but the Internet is a busy place.
-
I thought I was wrong once, but I was mistaken.
-
When I imagine impeller vanes on my burner, I see a rework of the entire top half. Air entering parallel the mix tube instead of perpendicular.
-
I’m confused. Not about what Mike is talking about. Just in general. Things are back to normal.
-
There’s a loop? No wonder I’m always confused.
-
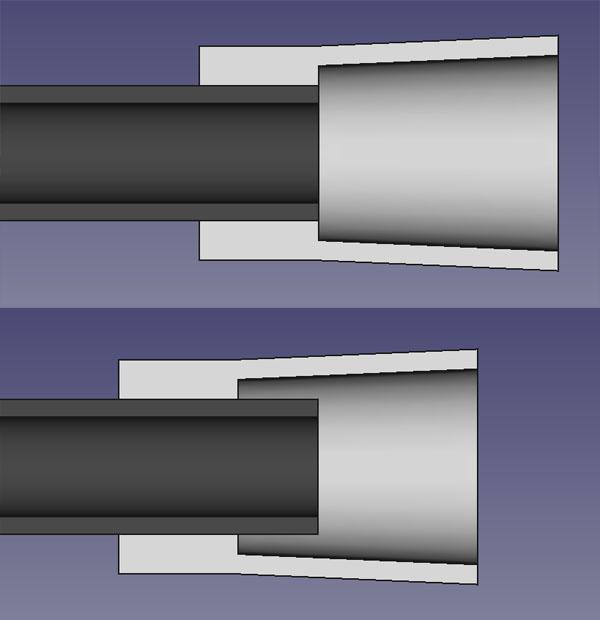
You are being misunderstood, Mr Hefty. Yes, the mold you are thinking of would cast a shape that would be the same as producing a flared steel nozzle. The burner you showed a page or two back, shows a straight stepped nozzle like Mikey uses. If the plan is to use this burner with the cast tapered nozzle, I recommend you test this tapered nozzle shape first. This will let you see how that burner and nozzle combination works, before committing to it in refractory. Either build a steel version or cast on in plaster. Anything that lets you test it first. Or build a form to cast the nozzle shape you are already using. You know that one works.
-
Yes. Exactly. It took a pointy long flame and turned it into a short fat guy.
-
I played with the step to taper nozzles. They are interesting in that as you slide them in, you are decreasing the overhang and also increasing the step distance.
-
That was the order I used. Cast the liner, wrap with layer of blanket, rigidise, wrap second layer, rigidise, skin it all with metal, give it some plistix. If the nozzle is floating, the hole needs to be just smaller than the nozzle OD to act as a shelf. If the nozzle is mounted to the mix tube, the hole can be larger. If you are using a refractory nozzle, it can bump up to the forge liner. If you are using a metal nozzle, it will survive longer if it is further from the heat. If you armor the blanket with refractory in the burner port all the way to the shell, the tip of the metal nozzle can be just inside the shell. Doing so gets it back from the heat and allows ambient air to passively cool the nozzle. It also pulls the flame further back to help prevent direct impingement on your work which is more likely in a mini forge.
-
You can. I have, sort of. I 3d printed a form and cast a nozzle. Then cast the forge liner with it in place. It ended up cracking at the connection point between the nozzle and the liner. I now cast the liner with the right size port for the nozzle to sit flush to the liner but not be cast to it. I use some floating nozzles and some nozzles are cast right to the mix tube. I appreciate my refractory nozzles. I have melted down several stainless nozzles. The only time I use stainless anymore is for my hand torch burners.
-
Now you are asking fun questions. Careful, it's easy to get addicted. Flame speed is dependent on a lot of things. The ratio of fuel velocity to heat energy coming out of the orifice, meaning how fast is the fuel stream vs the btu's it's putting out. The air induction to fuel velocity ratio, how much air is being drawn in vs the velocity of the fuel (which is related to the total heat energy). The ratio of fuel to air. The temperature of the FAM. The amount of forward push vs spin down the mix tube. The length of the mix tube. The ejection area and pressure (nozzle shape). Mikey burners run a smaller orifice at a higher pressure than the Frosty T with a larger orifice at lower pressure. The flame propagation velocity is based largely on the FAM ratio and mixing. At a given FPV, the flame speed has some wiggle room before it becomes so slow that it sucks back or so fast that it lifts off. Slow it down and its edges begin blur (it softens), speed it up and its edges become more defined. At least that's my current understanding of things.
-
 Did the connecting ribs twist out or stay concentric? Do you have a picture? Another idea I entertained but never followed through was air inlets cut on the diagonal. I posted about it a few pages back. I wanted to build the straight slot control burner and the diagonal version to see the differences.
 -
Yep, that’s what I meant. Handy to have around. If you mount the handle to the mix tube at the balance point, it’s easier to wield. I have always thought a swiveling QD would be the bees knees but I have not looked for a propane capable version.
-
Some models I print for a finger press fit. Snug but not stuck. I’ve also printed just a bit tight then used a drill and a hand chuck to open the port. I have found the printer very capable of hitting dimensions so long as you know your smoosh factor. For a little while I was printing functional tapered pipe threads. I’ve also added certain percentages to allow for casting shrinkage to hit a dimension. They are simple machines and I know exactly how they work but it is still magic. Draw a picture on the computer and there it shows up. TIG welding, nice. There is just something about that process that is fun to do. If you want a permanent handle, weld a piece of pipe perpendicular ish to your mix tube and drill a hole in the upper side of the handle. You can then send your copper supply line up the handle, out the side, and into the burner. Mount the QD at the base of the handle. Then it connects to the fuel hose like a pneumatic tool. Much easier to use then when the supply line is sticking out of the back of the burner.
-
Is there a reason you aren’t reprinting the inspirator to fit the orifice tubing you already have? I look forward to seeing your progress. I like a pistol grip and a quick disconnect on my hand burner. I bent a piece of angle and pipe clamped it to the mix tube. This allows me to grab it in the vise, attach a magnet and stick it to stuff, and hold it with dial gauge mag base depending on what I am doing with it.
-
The sizes are nominal pipe sizes for the mix tubes, yep. The 1/4" is an ID 0.364" (9.246 mm) and the 1/8" ID 0.269" (6.833 mm). The 1/8" nominal build was so critical, an 1/8" actual would be something. Now I am trying to picture the forge it would fit. The nozzles are Kast-o-lite 30. Mine have held up well but they are thicker walled and mounted in forges. The burner that I have set up as a hand torch has a stainless nozzle.
-
Here was my ¼ inch. Here was my 1/8 inch. I have not given them enough time.
-
AFB’s twirly monster I always figured a name would come about on its own. Whatever sticks. Until then, that guys 3D printed thingy works. Someone suggested AFB’s AFB but repeating what is stood for would violate the rules.