
Pete Resseguie-Snyder
Members
-
Joined
-
Last visited
-
Thank you for the responses. Sounds it won't be particularly productive to tinker with this stuff within the context of blacksmithing. If anything, it was enlightening to read up on alloy composition a bit. Found the chart this morning but didn't know what I was looking at until I reacclimated with the periodic table. Witches brew indeed. I might play with a piece of it out of curiosity, but more than likely I'll just cast off the majority into seas of eBay. I payed $10 for the lot and it looks like it could fetch enough to trade up to something more useful.
-
At a flea market this morning, I picked up several pieces of a tool steel marked "Firth-Sterling Circle C." 6 of them are 1"x1"x7" and one is 3/4" x 3/4". My understanding is the previous owner was a gun smith. I'd like to try my hand at making a small hatchet and thinking some might be usable as a forge welded cutting edge, but before experimenting with an unfamiliar material, I'm wondering if anyone has had experience working with and heat treating this material? Looking for ideal quench medium/heat treating conditions and any other advice on it's practical uses.
-
They are: 3.75 in/9.525 cm And Steven, that stand (and vise) look fantastic!
-
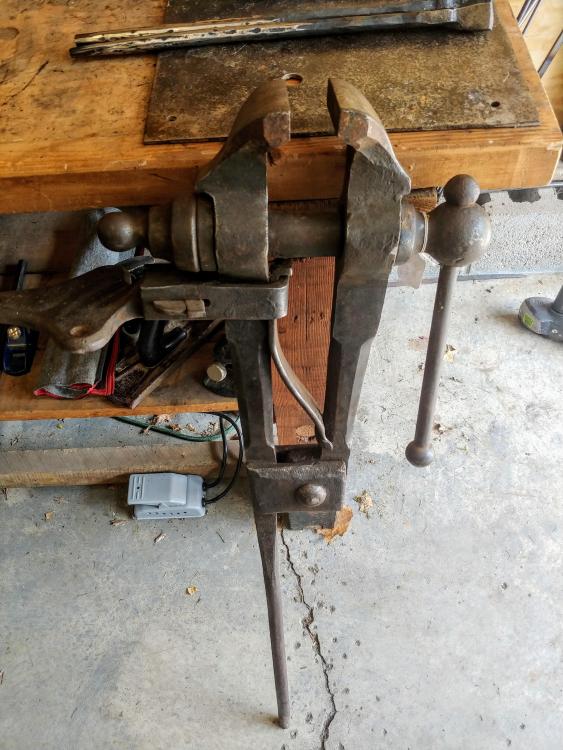
Acquired my first post vice. Found it at our beloved Avon Flea Market. It looks like the foot may have been cut, but aside from that it's in excellent condition. The screw is in beautiful condition, the still a little bit of tooth on the jaw surfaces, the spring is springy, and there are no bends on the handle to indicate abuse. It's a smaller vise but I'm thrilled to have it and excited to get it mounted soon. Can finally stop abusing my bench vise. On one of the jaws I can make out the words in variable degrees of wear in this order: Columbian Cleveland Original Trenton 1903 35 Is 1903 the year it was manufactured, or does that indicate something else?
-
Agreed on the quality of your forge work. Very nice. I'm still new to the practice and aspire to create pieces half as precise and yours. I favor the one on the right as well. I do like the twisted piece and standalone it's very nice, but when paired, the one on the right steals a bit of it's thunder. Nice work all around.
-
Yeah, Arc and Flame is a priceless resource. Did a sculpture/welding class there a few years before the center was officially established, then took a rustic folders class that my wife got me as a gift a little over a year ago. That last class was the catalyst into blacksmithing. Great instructors all around there. Not familiar with NYSDB just yet. Will research, thank you. Thank you Tim for that excellent summary. It's working great (as far as I can tell) now after some adjustments. I did plug the burner port more effectively than before. Used some kaowool for that which I'm a little concerned with; I know it shouldn't get hot enough there to breakdown, but still... Maybe some rigidizer wouldn't hurt? I've figured out the how for constructing the forge and burner. Excited to learn more about why it works (or occasionally doesn't). Thanks again for sharing more detail.
-
I wish. Most that I'm aware of in the periphery of Rochester NY close until spring/summer, though I just remembered there's a massive one in Clarence NY, (near Buffalo) that's open year round. Might put together a one or two sized notched jig akin to your suggestion in the meantime. I'd like to test the waters and attempt to sell a bit this summer. At least enough to fund fuel and steel, and keep the learning going. Thanks again Thomas.
-
That's brilliant and relatively simple. Thanks for sharing. I love idea of it being adjustable on the horizontal axis as well. Seems like a really useful tool. When the flea markets open again I'll nab a few adjustable wrenches and make one of these.
-
Interesting, have not tried this but I can see the benefit. Achieve essentially the same thing in one heat and maybe less finicky if I get my heat right? I can definitely envision the movement needed to achieve what you're describing but have not seen the jig setup. I do have access to an old arc welder and have just enough skill with it to (in the wise(?) words of AvE) fabricobble things together with it. Seems worth a try. I've not quite graduated from the work harder into the work smarter phase so thanks for pointing me in the right direction.
-
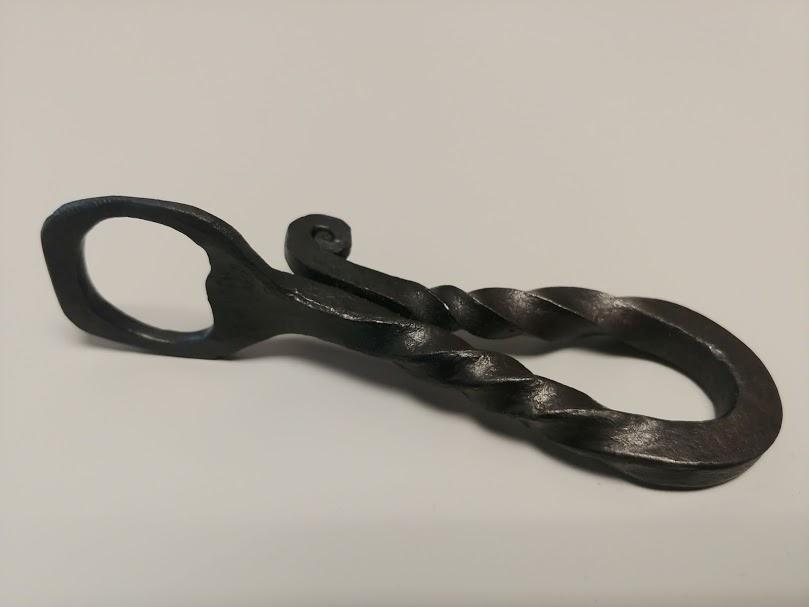
Hey everybody, how's it going? Relatively new here and new to working with steel. Finished up building a forge & burner from David Hammer's design this summer and have been playing around since, seeing what I can do to the material. Enjoying the challenge/skill building associated with working with limited tools. Anyway, I've made a few leaves and a bunch of hooks and now I've cobbled together a bottle opener design that I'm happy to repeat and maybe give as gifts this year. Seems to carry enough basic principals of material movement to be a worthwhile technique builder. I start with about 4 to 5 inches (can't remember, measurement is scribbled on my bench) of mild steel flat stock, 1/4" x 1". Isolate a little over an inch on one end for the opener and draw it out to about 9" in length. Scroll the bottom end, drift the opening for the opener, forge the bottom bend, then lock the bottom in the vise and twist, trying to mirror the twists. Forge the catch, clean up a bit, then finish with Johnson's paste wax. They're a bit rough, and I prefer a more slender taper/scroll than the one pictured, but I'm pretty happy with them in general and having fun. Photos are crappy, shot at my desk at work but you can probably get the idea. I'm a noob and any critiques are always welcome.

-
Ah, thanks for the tip. I've browsed parts of the forum via google search results (mostly on forge construction, and trying to comprehend the basics of combustion) but I have not really done a deep dive yet. Been spending my few spare hours after work trying to figure out technique but I'll be soaking in some time getting to know the forums. Looks like an amazing concentration of knowledge here.
-
If you have the tenacity and will to learn, you'll create something meaningful and beautiful. Considering that she values this approach, and the fact that you have some time, it seems like a worthy journey. I went down a similar path, taking the risk of learning something new to create my wife's engagement gift. In my case, I took a fine metals class, learned lost wax casting and cast a silver setting for a broken moonstone from a pendant I bought for her when we were dating. It turned out great and had more sentimental, memorable impact perhaps than something bought. Not that there's anything inherently wrong with buying from another, more skilled artisan. In my case, the setting was sculpted/cast to fit the odd shaped stone, and supported inside the setting with a bit of epoxy. It's still going strong after close to 15 years of regular wear.
-
Thanks for the welcome, the feedback and thanks for giving it a go with my crap video. I do sincerely appreciate it. Not having enough experience to know what info's valuable and not, I just posted what I shot, hoping maybe the before/after with the sound would be telling. I'll be sure to close the garage door if I ever decide to troubleshoot in the future. And maybe consider applying a bit more production value. I did watch before and after and it seemed pretty visible on my tablet, but I'm a total noob when it comes to making and editing video content. Another thing for the to do list. You may be onto something with jet velocity and cleaning. I did a complete teardown of my burner, cleaned everything and retuned it, moving the flair tube forward a little more than 1/4 inch further than before. I also aimed the burner a little more towards the floor of the forge in case it was catching the refractory lining the burner port. Ran for about 3 hours solid without any hiccups! Not sure what changed over time since the forge remains fairly immobile. I've read quite a bit about forge assembly, but might need to read more about forge maintenance. Regarding the choke, honestly did not initially have/use a choke until these problems started. Don't know if it tells a story, but cutting off the oxygen then cranking it back on kind of "reset" proper combustion, at least some of the time until the forge got really hot. Anyway, thanks again for the assistance! I'm back in business for now. Even with the occasional problems, I'm having blast learning this craft. This forum is an invaluable well of knowledge. Hopefully over time I'll be able to contribute a thing or two.
-
Greetings! I wanted to see if the experts on this forum might catch any red flags that may be causing combustion issues with my forge. I shot a quick video demonstrating the issue. The problem starts 3 mins, 10 secs in: I built this based mostly on the David Hammer Super C Forge and burner design (minus the side access slot). It has been running stable for months, but now after running for around 30 mins, the point of combustion shifts from the interior of the forge, to the end of the flair (about 1 inch inside the refractory). I get less time if I run it hotter. The burner port leaves about 1/4 inch of space around burner flair. Before shooting the video, I has run for a little over 30 mins. I let it cool for about 15 mins to capture the transition. Don't know if I need to tune the burner, if there are issues with my refractory, or something else that I might not have considered. I've been doing this for around 6-7 months so my knowlege is pretty limited. Any thoughts on where I might be going wrong here? Thank you for any input you might have.