jlpservicesinc
-
Posts
5,792 -
Joined
-
Last visited
Content Type
Profiles
Forums
Articles
Gallery
Downloads
Events
Everything posted by jlpservicesinc
-
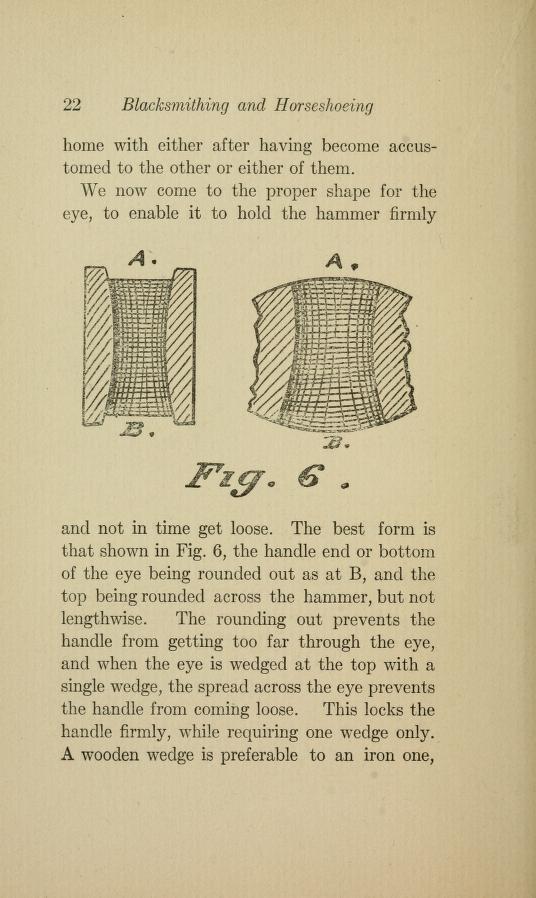
Just flipping through old books on PDF.. Pulled this for hammer eye shape.

-
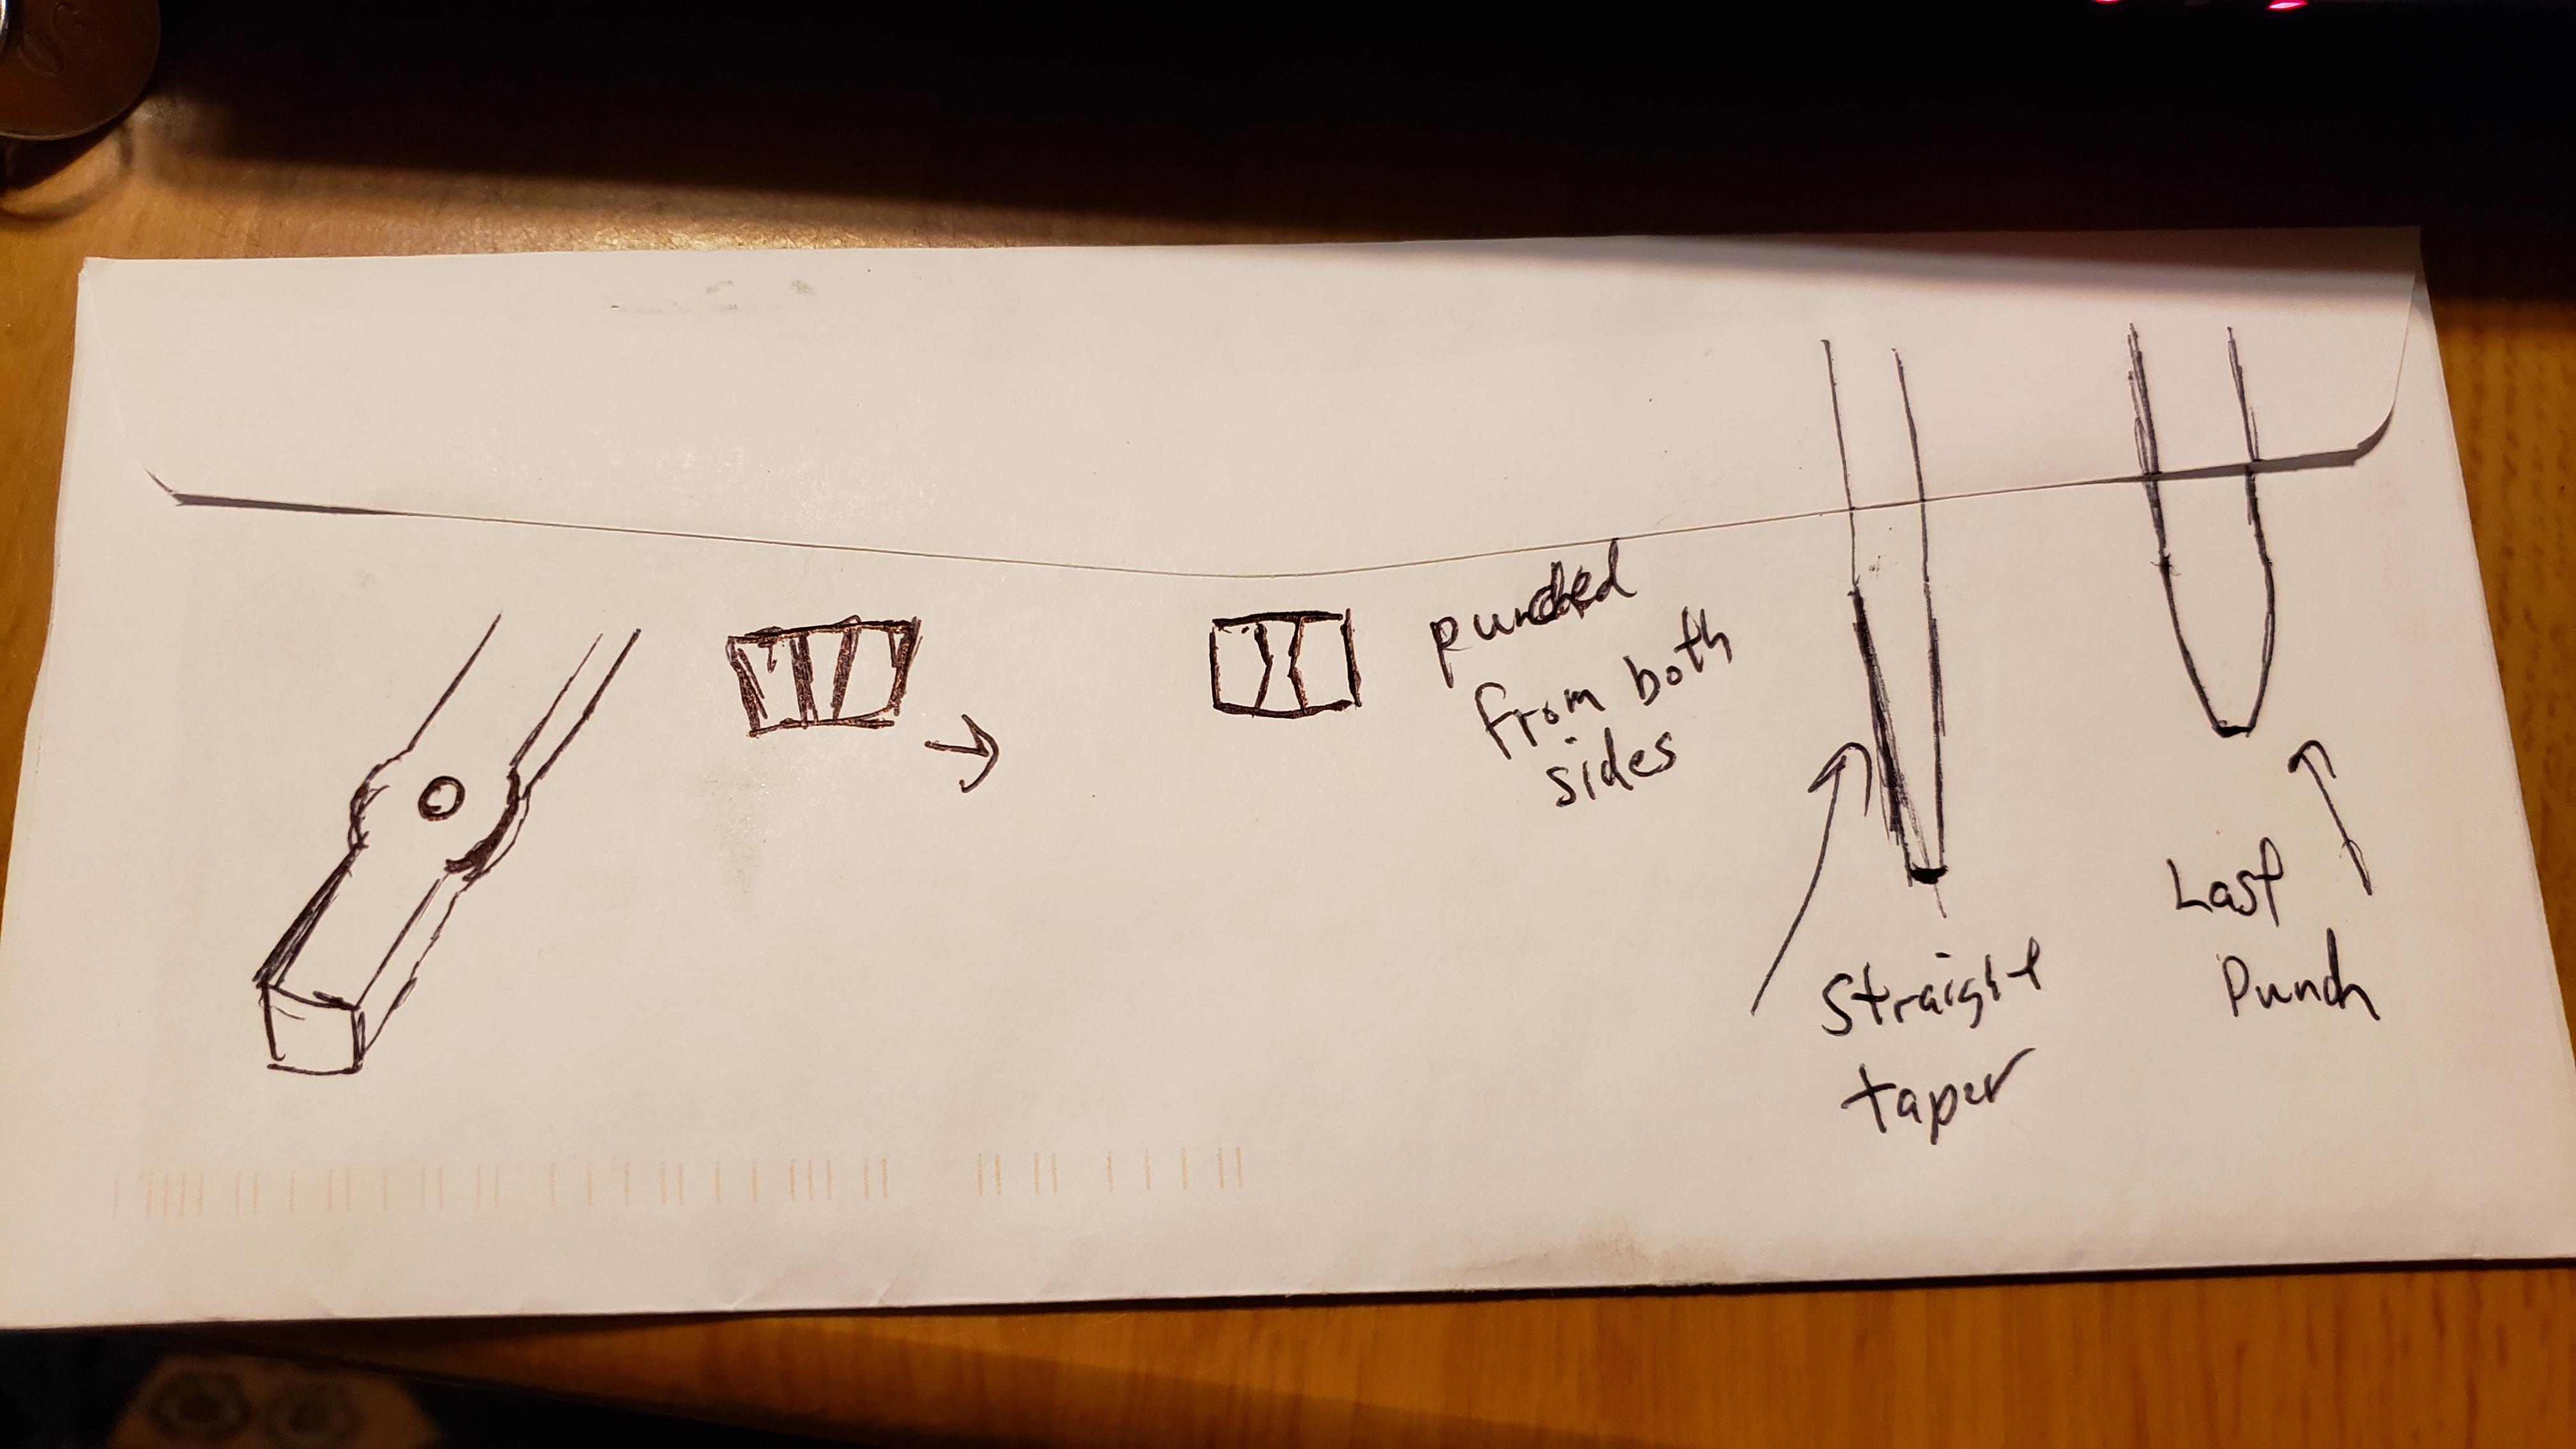
 that is kind.. Its funny how now I work more methodically vs willey nilley. So, here it is. it's a little drawn out.. chuckle, chuckle.
 -
W1 steel cracking under hydraulic press
jlpservicesinc replied to Jegphipps's topic in Problem Solving
Nice photos Thomas.. Thanks.. Much appreciated. -
If this is the case.. Get in some practice on some 3/4 or 1" square stock and punch a hole through it.. You will see a few things of which will be revealed in the Hammer making video, but I will share them now.. Use tapered round punches going from about 3/16 up to about 1.25" Round. The 1.25" will have an obtuse taper or bulbous taper vs straight taper like the smaller sizes.. this last punch sets the hour glass size inside the eye of the hammer.. When you punch, punch the smallest hole you can.. Use a coolant on the punch every 2 or 3 hits, pull the punch, cool it and insert it back in the hole.. Use charcoal or Johnsons punch lube or the like so the punch does not stick. 2 or 3 hits tops.. If done properly it will come out easy.. I usually don't use any lube.. But the charcoal or lube makes it way easier and faster. (USE Sharp punches ) Sharp means with square edges vs a point. You are only going to punch from one side.. Never mind turning it end to end or over.. Just be accurate.. Pay attention to the depth of the punch.. And before you bottom out, cool the punch and stick in back in, NOW, When you get to the other side with the punch you will feel it bottom out, Pull the punch leaving the metal in contact with the anvil. Cool the punch, and now flip the metal over.. You will see a dark spot with a hollow looking area in the center.. Place the cooled punch on top and give it a few good, fast whacks. The slug will come out nice and thin. If done well, the slug wil only be about 1/16" thick.. and there will be no burr at all. Now take a heat and punch threw from the side you just removed the slug from.. You will see the bar go from a side taper to no taper with the side walls straight. Now take another even heat on this area and insert the next size up in punch.. and punch again.. this time 3 or 4 whacks and the harder you hit it the fast it will drive through and get larger.. If the eye is off center.. Cool the side that is off center (long side) and this will drive the punch back to center as the hot side will expand faster and this is how you shift the position of the punch around. once you get up to the largest size.. Now is the time you need to decide how large you want the eye to be.. Also, depending on your hammer handle designs.. You can have a very large opening for the bottom so there is more handle material entering the eye so there is larger contact between the handle and hammer.. this is the method I employ.. But there is a thread on here somewhere that points out the ratios I use with drawings and such. Once you figure out the hammer handle bottom size you will take the last punch and drive it in about 1/4 the way to set this shoulder or hour glass inside design. Now take a good even heat on both sides of the hole and just push these outer bulges back in.. Stop when you get he oval shape you are looking for.. It sounds way more complicated than it is.. but I guess it is time I get out in the trailer and make another video.. Anyhow on a 2" sq piece once it's up to forging temperature is about 30 to 40minutes for the punching and setting of the eye.. The remainder is peen work or any other details I want to include.

-
I understand that.. And oval adds a level of complexity in a punch that is not needed.. What happens to a round hole when punched in metal? It displaces the metal to the outside forming a bulge.. What happens when this bulge is forged or pushed back in.. It forms an oval.. Again, there is no reason for special punches or even mandrels to arrive at the proper eye shape.. the only reason for an eye punch or mandrel is to dress the eye in the case of an eye punch (it's actually designed to finish the shape vs create the shape) and a mandrel is used to maintain the shape while other forging operations are being performed. (cheeks, fullering, etc, etc.) I have explained eye ratios on taper from top to bottom, etc, etc, etc.. Hammers (because they are just punch metal) or better yet punching is a basic skill set.. The Person my be new, but as I said.. "Basic skill set".. So, if he or she works at it, Maybe a week or 2 they would have it down.. If they took a class and could swing a hammer pretty well.. I could have them making hammers in about 4 hrs.. With this knowledge they then can reapply the skill somewhere else and the possibilities become limitless. Classes or working with a skilled professional always ramps up the learning ratio.
-
Jasent.. You don't even need anything other than a round punch.. Again, just basic equipment, forge, anvil, hammer.. Oh and a round punch. Punching is one the first skill sets taught.. If a person can cleanly punch a round hole thru 5/8 or 3/4" Sq then it is the same as doing it on larger stock sizes.. Again, if the person can " Cleanly" punch a round hole all the way through it is exactly the same. . I'll see about making a video this week or maybe in the next few.. it's like a 30 or 40 minute project. I have a few mild steel hammers I need to make.. So, might be a good opportunity to show the method.
-
Making a hammer is a basic skill set.. One does not need a drift, special punch, or the like.. One does not even need special tongs. I teach hammer making as a basic skill set.. it's as easy as punching a hole. Nearly all the information shown today is about making a fullered cheek hammer.. Is there a reason for the fulled cheeks.. Not really other than it's more labor.. I mean sure we can argue the semantics but hammers did without the larger cheeks for thousands of years. It's only since Alec S. came on the seen and populerized the Brian B. Rounding hammer that the good old fashioned rounding hammer took off.. Rounding hammers have been around for centuries.. I have a 1907 Heller welding hammer that has fullered cheeks and guess what.. It was made in a forging press. Today, people think them old folks from 1700, 1800, and early 1900's were all hacks.. far from it.. they were all on the cutting edge if they were looking at producing for a larger audience. The Town smith or the villiage smith was not making for the masses.. they did repairs, made different items but a lot of the stuff was bought in a store.. Or ordered via mail. Blacksmithing publications and trade journals were popular for a reason.. Anyhow, If you can punch a round hole.. You have the skill set to make either a double face, a rounding hammer, a cross peen, a stright peen, a diagonal peen, A round or Square punch, or any other variation. If you can heat a 2" round or square bar and have the ability to punch a hole fairly accurately.. You don't need anything more than this.. I don't remember whether I posted a video on this or not.. I've shown untold folks how to do it.. its really that simple.
-
Wise words.. It isn't until you get to know a little something, something that you can see truth through all the mud.. 20/20 vision and all. It is a difficult path these days with all the Social networking and YT, instagram and the like. Finding a good role model can be tough.
-
Almost finished.. Will be done tomorrow. Its chain so not that exciting. But the conversations are kinda interesting.
-
What did you do in the shop today?
jlpservicesinc replied to Mark Ling's topic in Blacksmithing, General Discussion
punched and drifted? 4140 works pretty good.. What did you temper to? -
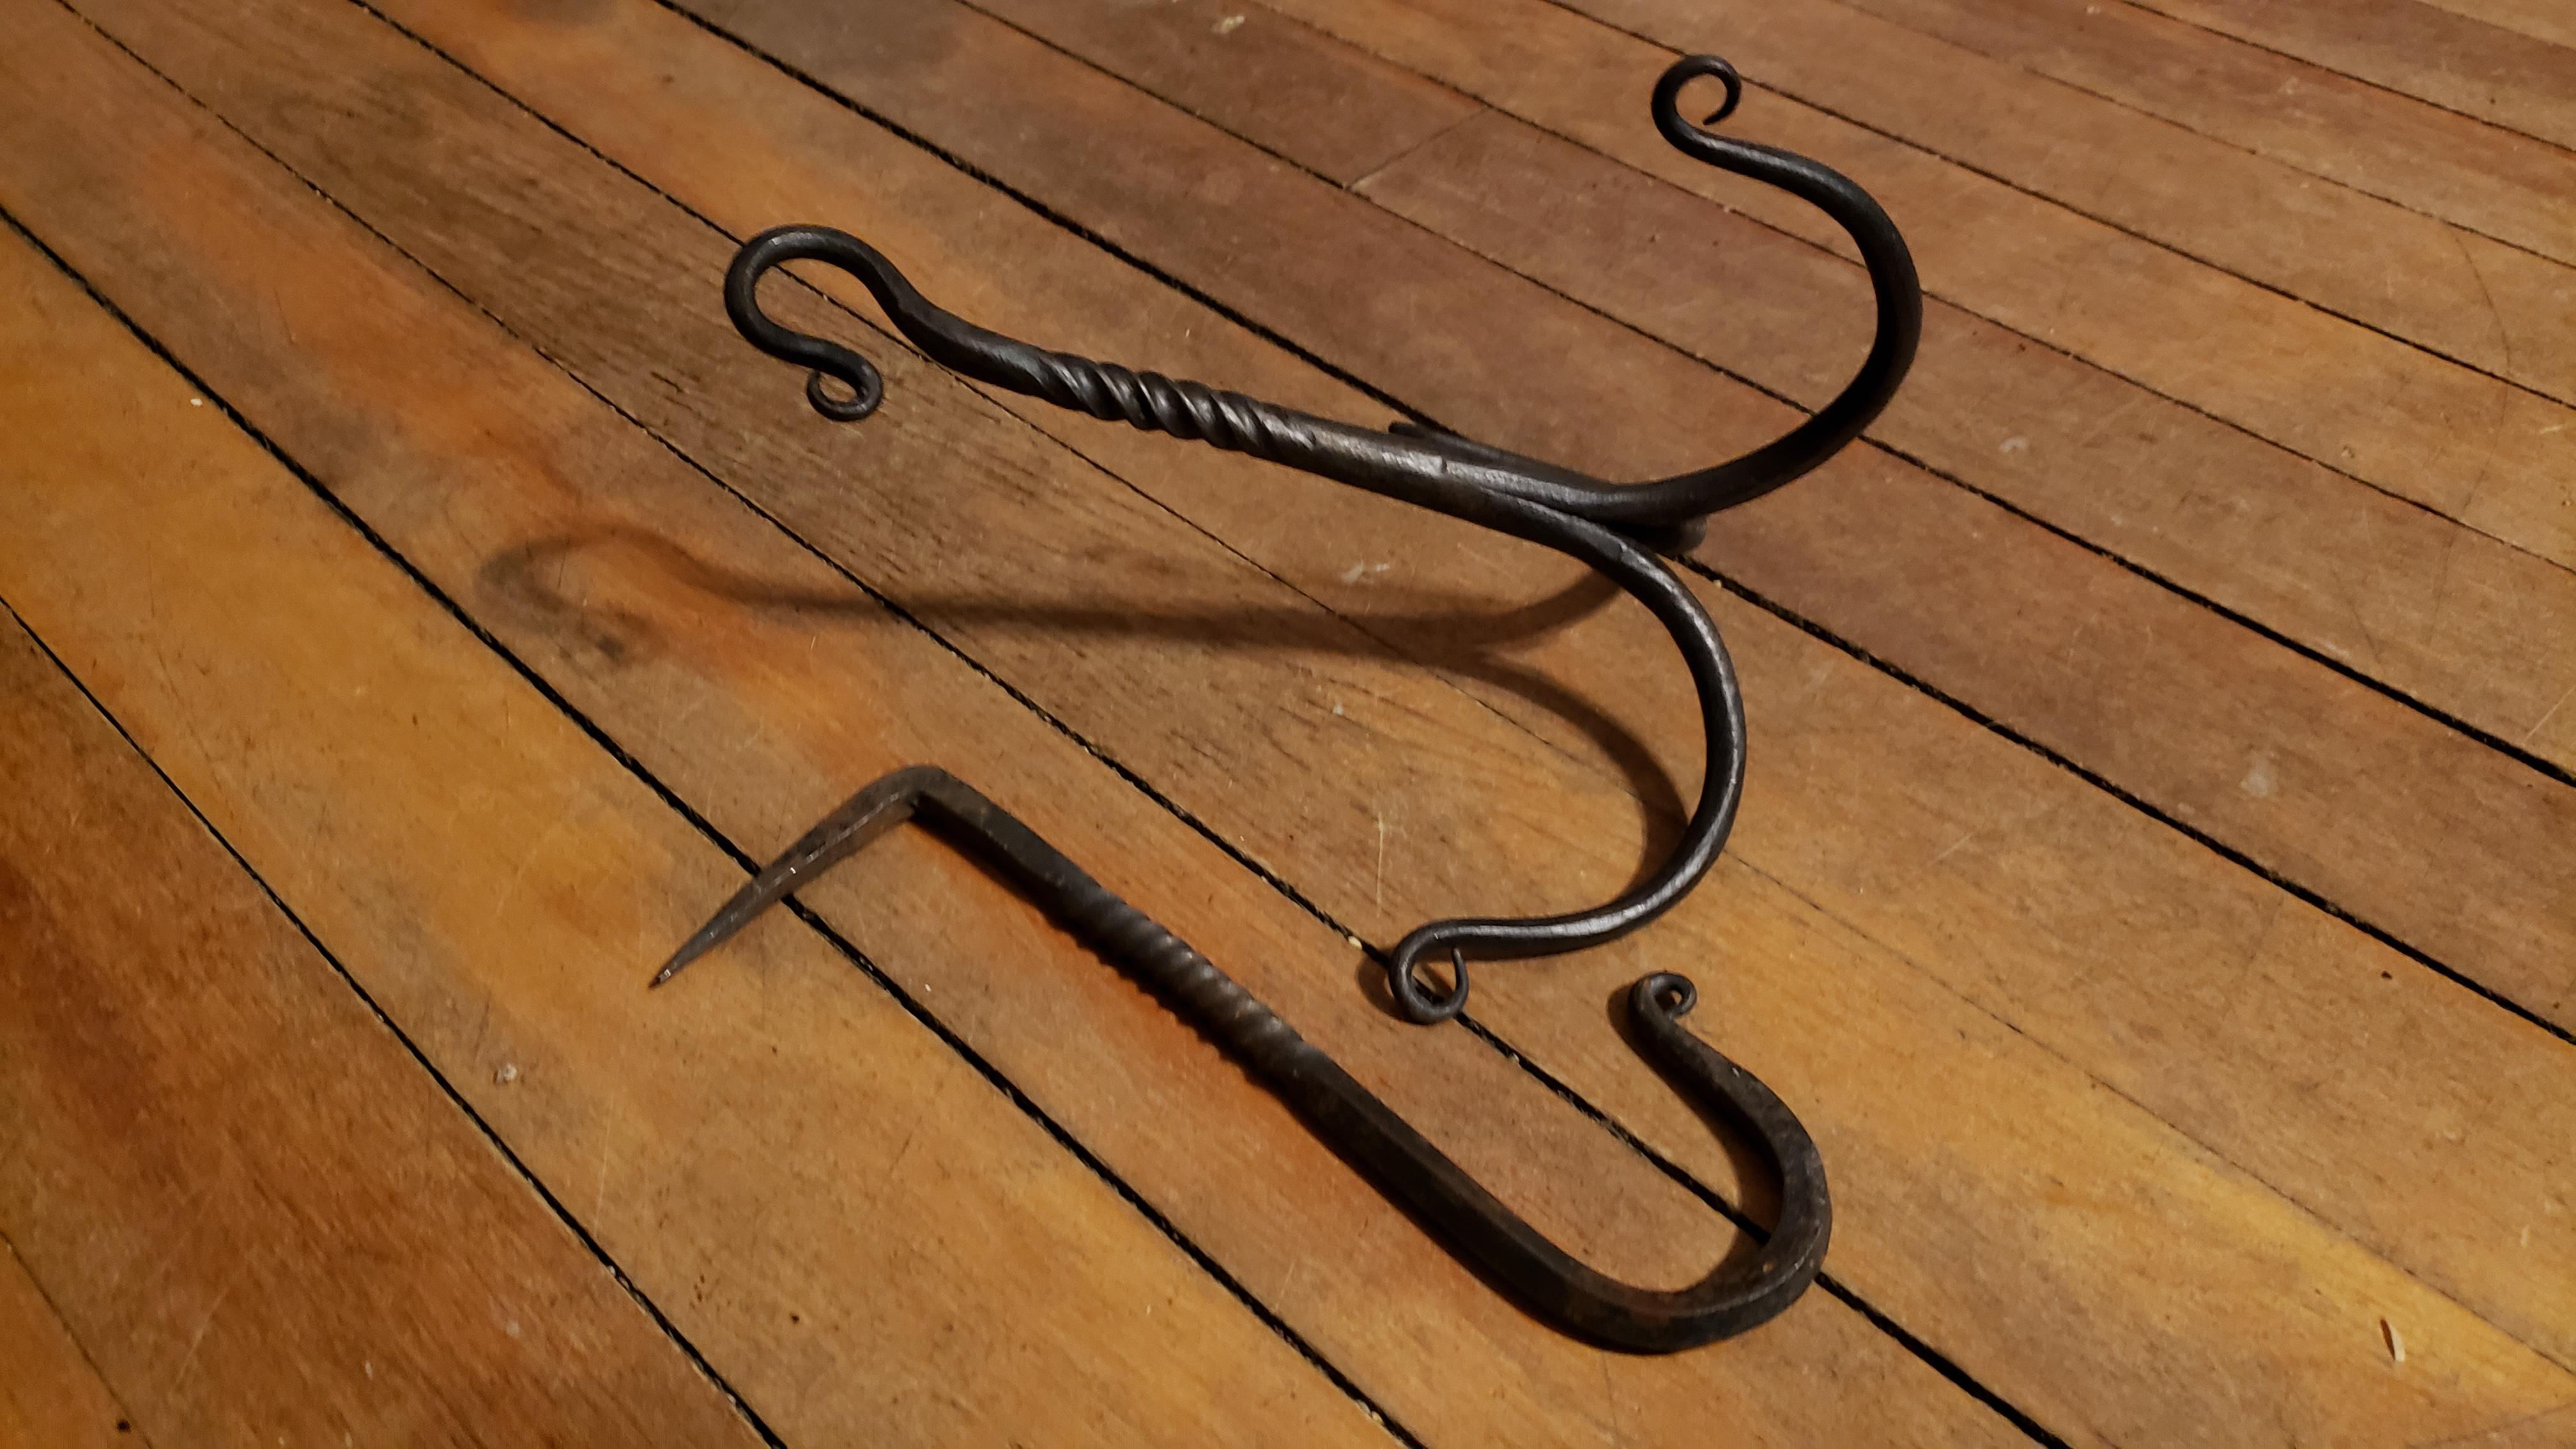
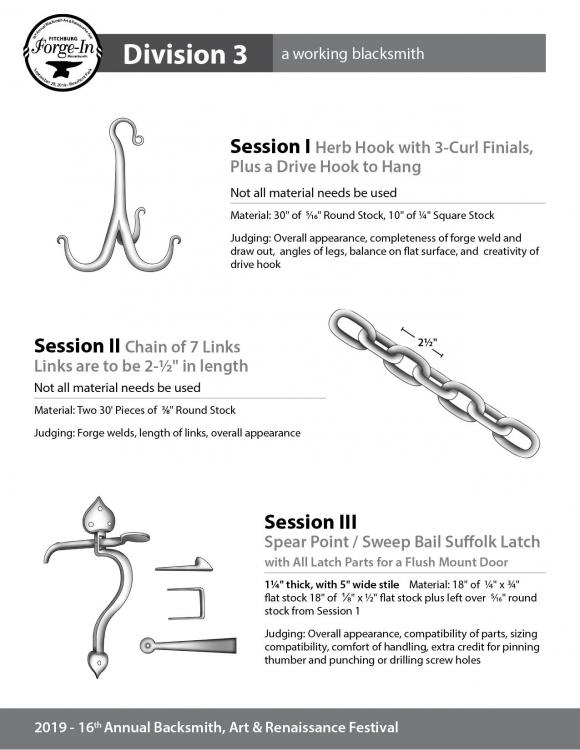
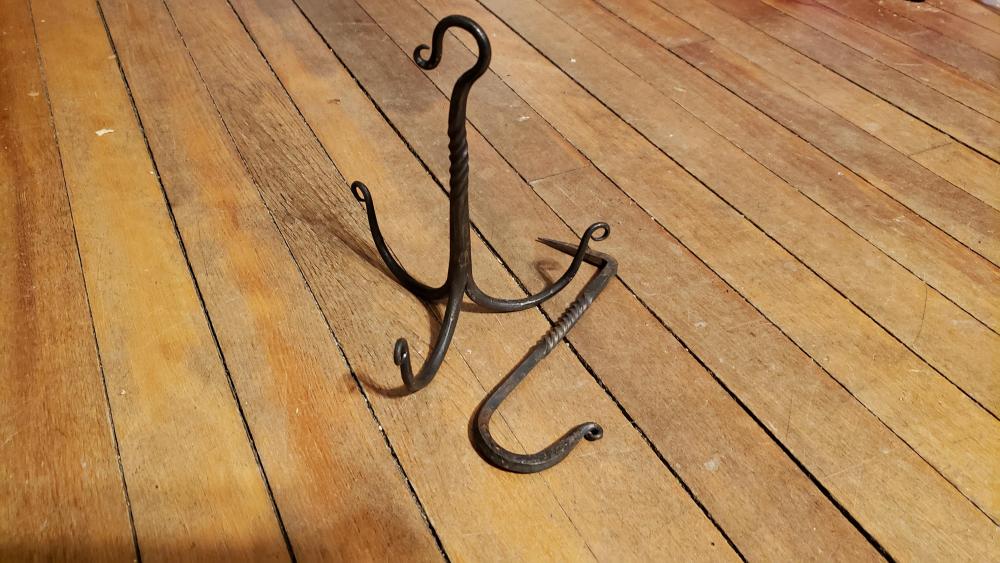
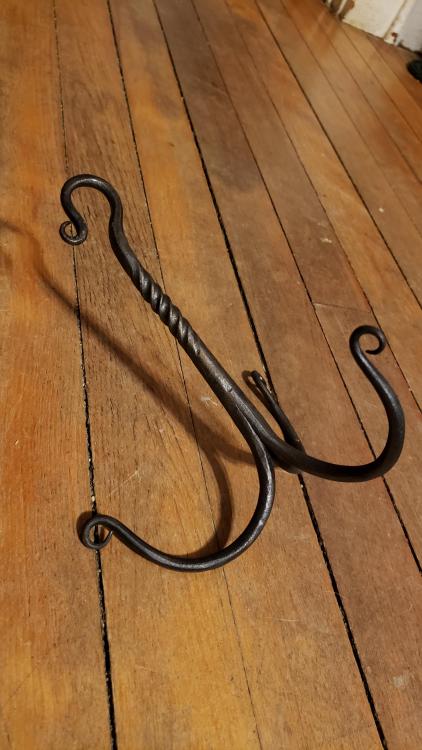
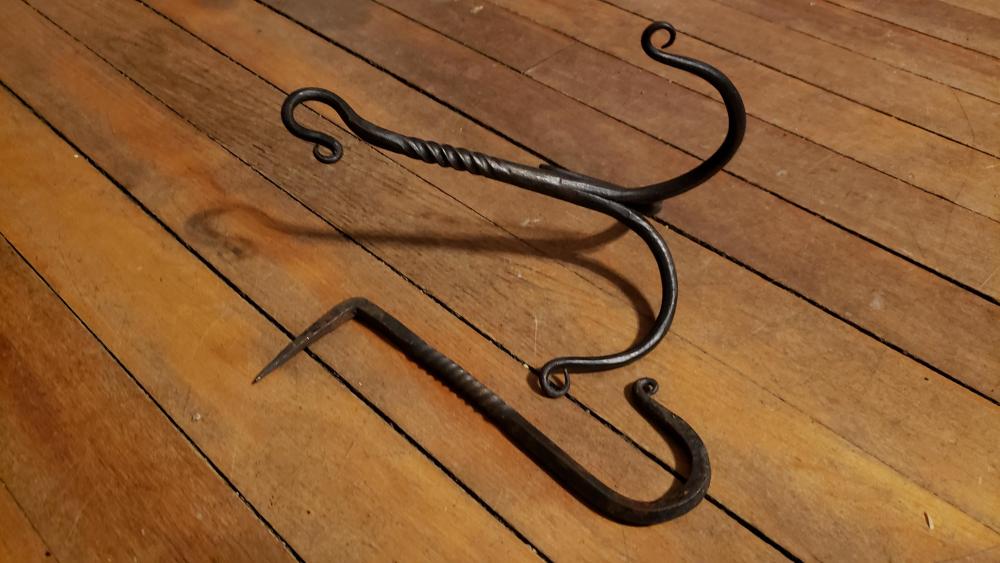
Well after some debate with myself this is where this thread ended up.. I looked at different title or threads here and if this is in the wrong area move it please. I also could not find the original post so my bad if there is a post somewhere.. I did look. there will be 2 videos as the camera died on the thumblatch build. I know people have already commented on the thread on what did you do in the shop today, but for posterity I guess. I was to lazy to go and get the herb hook out of the storage container for the video but today I dug it out.. Session 1 was an Herb Hook with jamb pintel hook. Video 1:
-
Impressions of our demo's and expos in 2019
jlpservicesinc replied to Hans Richter's topic in Everything Else
Very nice. Thank you for sharing. Love all of it. -
Thanks Alex, I love your work.. I also am amazed just how productive you are.. Not in a bad way.. I think it's amazing..
-
There is something that is sexy about the later Fisher's shape.. Has those perfect lines and the sculpting on the waist under the horn and tail.. My only complaints are the hardie hole sizes.. They always put in these monster holes.. When I first started I could barely forge 1/2" never mind 1.25 for a shanked hardie tool in a 250lbs.. (I'm guessing size here.. All I know is that for a given size they were slightly larger. Same with PW and HW anvils. I know the larger sizes is because of the wrought iron but dang.. I was so excited when I found my 175HB and it had a 1" hardie hole.. Now my 3 main anvils all have 1" hardie holes and its is so nice not having to make new tools or shank adapters. With this said, If I ever come into a 300 or 350 Fisher it will find a home with me. I'd love to find a Double horn model.. Really that would be the best.
-
What did you do in the shop today?
jlpservicesinc replied to Mark Ling's topic in Blacksmithing, General Discussion
Thanks.. I love demonstrating and teaching. it was a ton of fun.. thanks it was fun. More fun than i thought it was going to be. Thanks Les. -
Alex, nice and bright.. Is the forge shop a completely different building?
-
What did you do in the shop today?
jlpservicesinc replied to Mark Ling's topic in Blacksmithing, General Discussion
I was able to fit the footage together from this past years Fitchburg forge in.. i used my Action camera (Drift Innovations Ghost S) -
What did you do in the shop today?
jlpservicesinc replied to Mark Ling's topic in Blacksmithing, General Discussion
Thanks Alex.. Benona, did you cut them out with a bandsaw or grinder and cutoff wheel and then forge? -
What did you do in the shop today?
jlpservicesinc replied to Mark Ling's topic in Blacksmithing, General Discussion
Thanks Alex.. Excellent work.. Love the shop. -
Bluerooster.. That is a great anvil.. I'd stand it on end and bury it in a stump too. I'm envious.. Nice find. 4" deep would be a good depth and then wedges could be used if needed.
-
Thanks I had seen the 119 but usually the Fishers are marked on the foot so wasn't sure.. This is the first one i have seen with the inscription just below the face.. I wonder if that was a show room model or something.. Fisher anvil man should be by to help you with info. Thanks You too.
-
That is cool.. Nice job, I didn't see any weight? My only suggestion is to be gentle with it and try not to hit the face with the hammer. A welcomed treasure for sure.
-
What did you do in the shop today?
jlpservicesinc replied to Mark Ling's topic in Blacksmithing, General Discussion
you don't need a drift to make bottle openers.. it can speed up the process but as long as you have a round punch or a slotting or slitting punch you could just open up the hole to get to the correct size.. The making of and enlarging a hole is a basic skill and one well worth understanding. I in 40+ years of smithing have never made a bottle opener.. LOL.. -
Show me your sales or demo booth
jlpservicesinc replied to Glenn's topic in The Business Side of Blacksmithing
I love the artist nature of the forge. Looks like it is out of the Victorian age with the graceful curves. Are the pipes that connect to the forge pan just welded into the plate or is the plate threaded as well? -
Anvil stand made from train track ?
jlpservicesinc replied to BartW's topic in Stands for Anvils, Swage Blocks, etc
Preheat is ideal, also bead matching for thickness.. In other words proper wet in, bead profile and such. if the metal is 1/2" thick, the bead height should be 1/2" thick.. I'm not explaining very well, but ideally the bead toes need to be the same thickness and width as the parent metal as is the varying sizes.. 1/4 is that thick 1/4" but the 1/2" leg is 1/2".. When welding thicker materials the prep and weld bead layouts need more attention anyhow, On my 500amp mig machine I can cover a pretty large variety of metal thicknesses in one pass, but with a smaller unit multi pass welds need be done.