Chris Williams
-
Posts
273 -
Joined
-
Last visited
Content Type
Profiles
Forums
Articles
Gallery
Downloads
Events
Everything posted by Chris Williams
-
That general style is fairly common. I've had a few over the years.
-
Blackening a blade with AC electrolysis?
Chris Williams replied to Gaznazdiak's topic in Finishes for Metal
It's been a while since I did any of this, and I don't remember the Amps I was using. I was also using oxalic acid to etch stainless, so it wouldn't be directly comparable to your setup. All I can say is try it and see. As long as you are getting some etching, then using immersion with a low current would work; you'll just have to determine an appropriate time. You will probably need to rotate the knife 180 degrees halfway through to get an even etch on both sides. If you don't have a large volume of electrolyte, or if you don't agitate it during the etching, then you may not get an even etch rate over time, which would complicate trying to time the process for consistency. -
Blackening a blade with AC electrolysis?
Chris Williams replied to Gaznazdiak's topic in Finishes for Metal
First, the following applies to DC only! You can easily kill yourself mixing AC and a conductive fluid. On that note, DC isn't harmless and I do not know what design you are using; make sure you cannot be part of the circuit. If you want to immerse the workpiece in the solution, place the workpiece (attached as a cathode) in a shallow container with electrolyte and instead of holding a q-tip (or whatever your design uses) with the anode, you would use a nail or similar to "paint" your workpiece. How much etching you get has to do with the current density at a given point and the dwell time. Even though I said "paint," you shouldn't actually touch the workpiece, but rather keep the tip of the anode a fixed distance from the workpiece as you move it. You can make up for slightly uneven anode distance with the time you linger in each place. If you just immerse an anode and cathode (workpiece), the etch won't be even (due to the varying current density of different distances and geometric features), but a flat plate placed parallel to the blade may be a close-enough approximation of your knife blade to serve as a "conformal" anode. You can use nail polish or similar to protect the very edge, as it will have a relatively large current density and etch faster than other places. Agitation of the electrolyte will help to get a more even etch. You could also just use a larger swab and etch the entire surface with the swab and without immersing the workpiece. You will likely need to refresh the electrolyte on the swab a few/several times while etching. -
I've been keeping the sheet SS from a very similar garbage can for when I can eventually make time to make a propane forge. Mine isn't plated with anything. If you aren't confident in identifying stainless steel, then you can verify if yours is by spark testing or by abrading a small area or cutting it and then seeing if the resulting fresh surface rusts readily or not. If you just take it apart and inspect the edges (including of your faster holes), I would expect to see rust there if it were plated stock; the manufacturing process for a relatively low value item is unlikely to include a plating step after the sheet has been rolled into the can form. When I decide what size the first forge will be, I'll cut the sheet to size and rivet it together into my forge shell. I could probably make 2-3 forge shells of different sizes from it. It seems a bit big to me to just cut it in half, but that is for what I want to do; YMMV.
-
Old anvil auction today
Chris Williams replied to MrBojangles's topic in Anvils, Swage Blocks, and Mandrels
-
Justin’s Smithing progression. [PIC heavy]
Chris Williams replied to Justin Topp's topic in Member Projects
Do you need a really tall skinny cone mandrel? Take the drive if so. -
Store bought hammers vs hand forged hammers
Chris Williams replied to JeepinBoon's topic in Hand Hammers
You may have noticed that Frosty and I have quite different perspectives on anvil use. This is an honest difference in opinion, and despite my respect for Frosty's opinions, a difference that remains for now. You may also wish to consider Frosty's decades versus my short years of experience when considering whos advice to take. To Frosty's point, if the MH damage were bad enough, then working on it could also be a problem, either in causing additional damage to the anvil (which I had considered), or by causing damage to you (by releasing pieces when you strike as a result of cracking already present under the face, and which I had not considered). In addition, it may have delamination that would make working on it much less effective. I spent several years performing failure analysis of and developing repairs for NAVY aircraft in my first job out of school, and am quite comfortable evaluating the extent of damage to something in person. Perhaps I miss-attribute that skill set and judgment to others; I certainly cannot judge the soundness of the Mousehole from your picture, but rather had expected for you judge that. Now I've almost talked myself into Frosty's position... Either way, the main point that I came to make is underlined above. -
Store bought hammers vs hand forged hammers
Chris Williams replied to JeepinBoon's topic in Hand Hammers
First, handmade versus store bought... That is too general of a question for the answer to be useful to you. For learning, any cross peen 1.5-2lbs is fine. You'll want to dress the edges -- check out the hammer forum for how. Use the mousehole until you are hitting what you intend to. As for those mushroomed edges, you need to dress those to remove the overhang and any cracks or splits before using so that you do not create projectiles from the shards when they do let go. They can cause you or anyone nearby serious damage! -
What did you do in the shop today?
Chris Williams replied to Mark Ling's topic in Blacksmithing, General Discussion
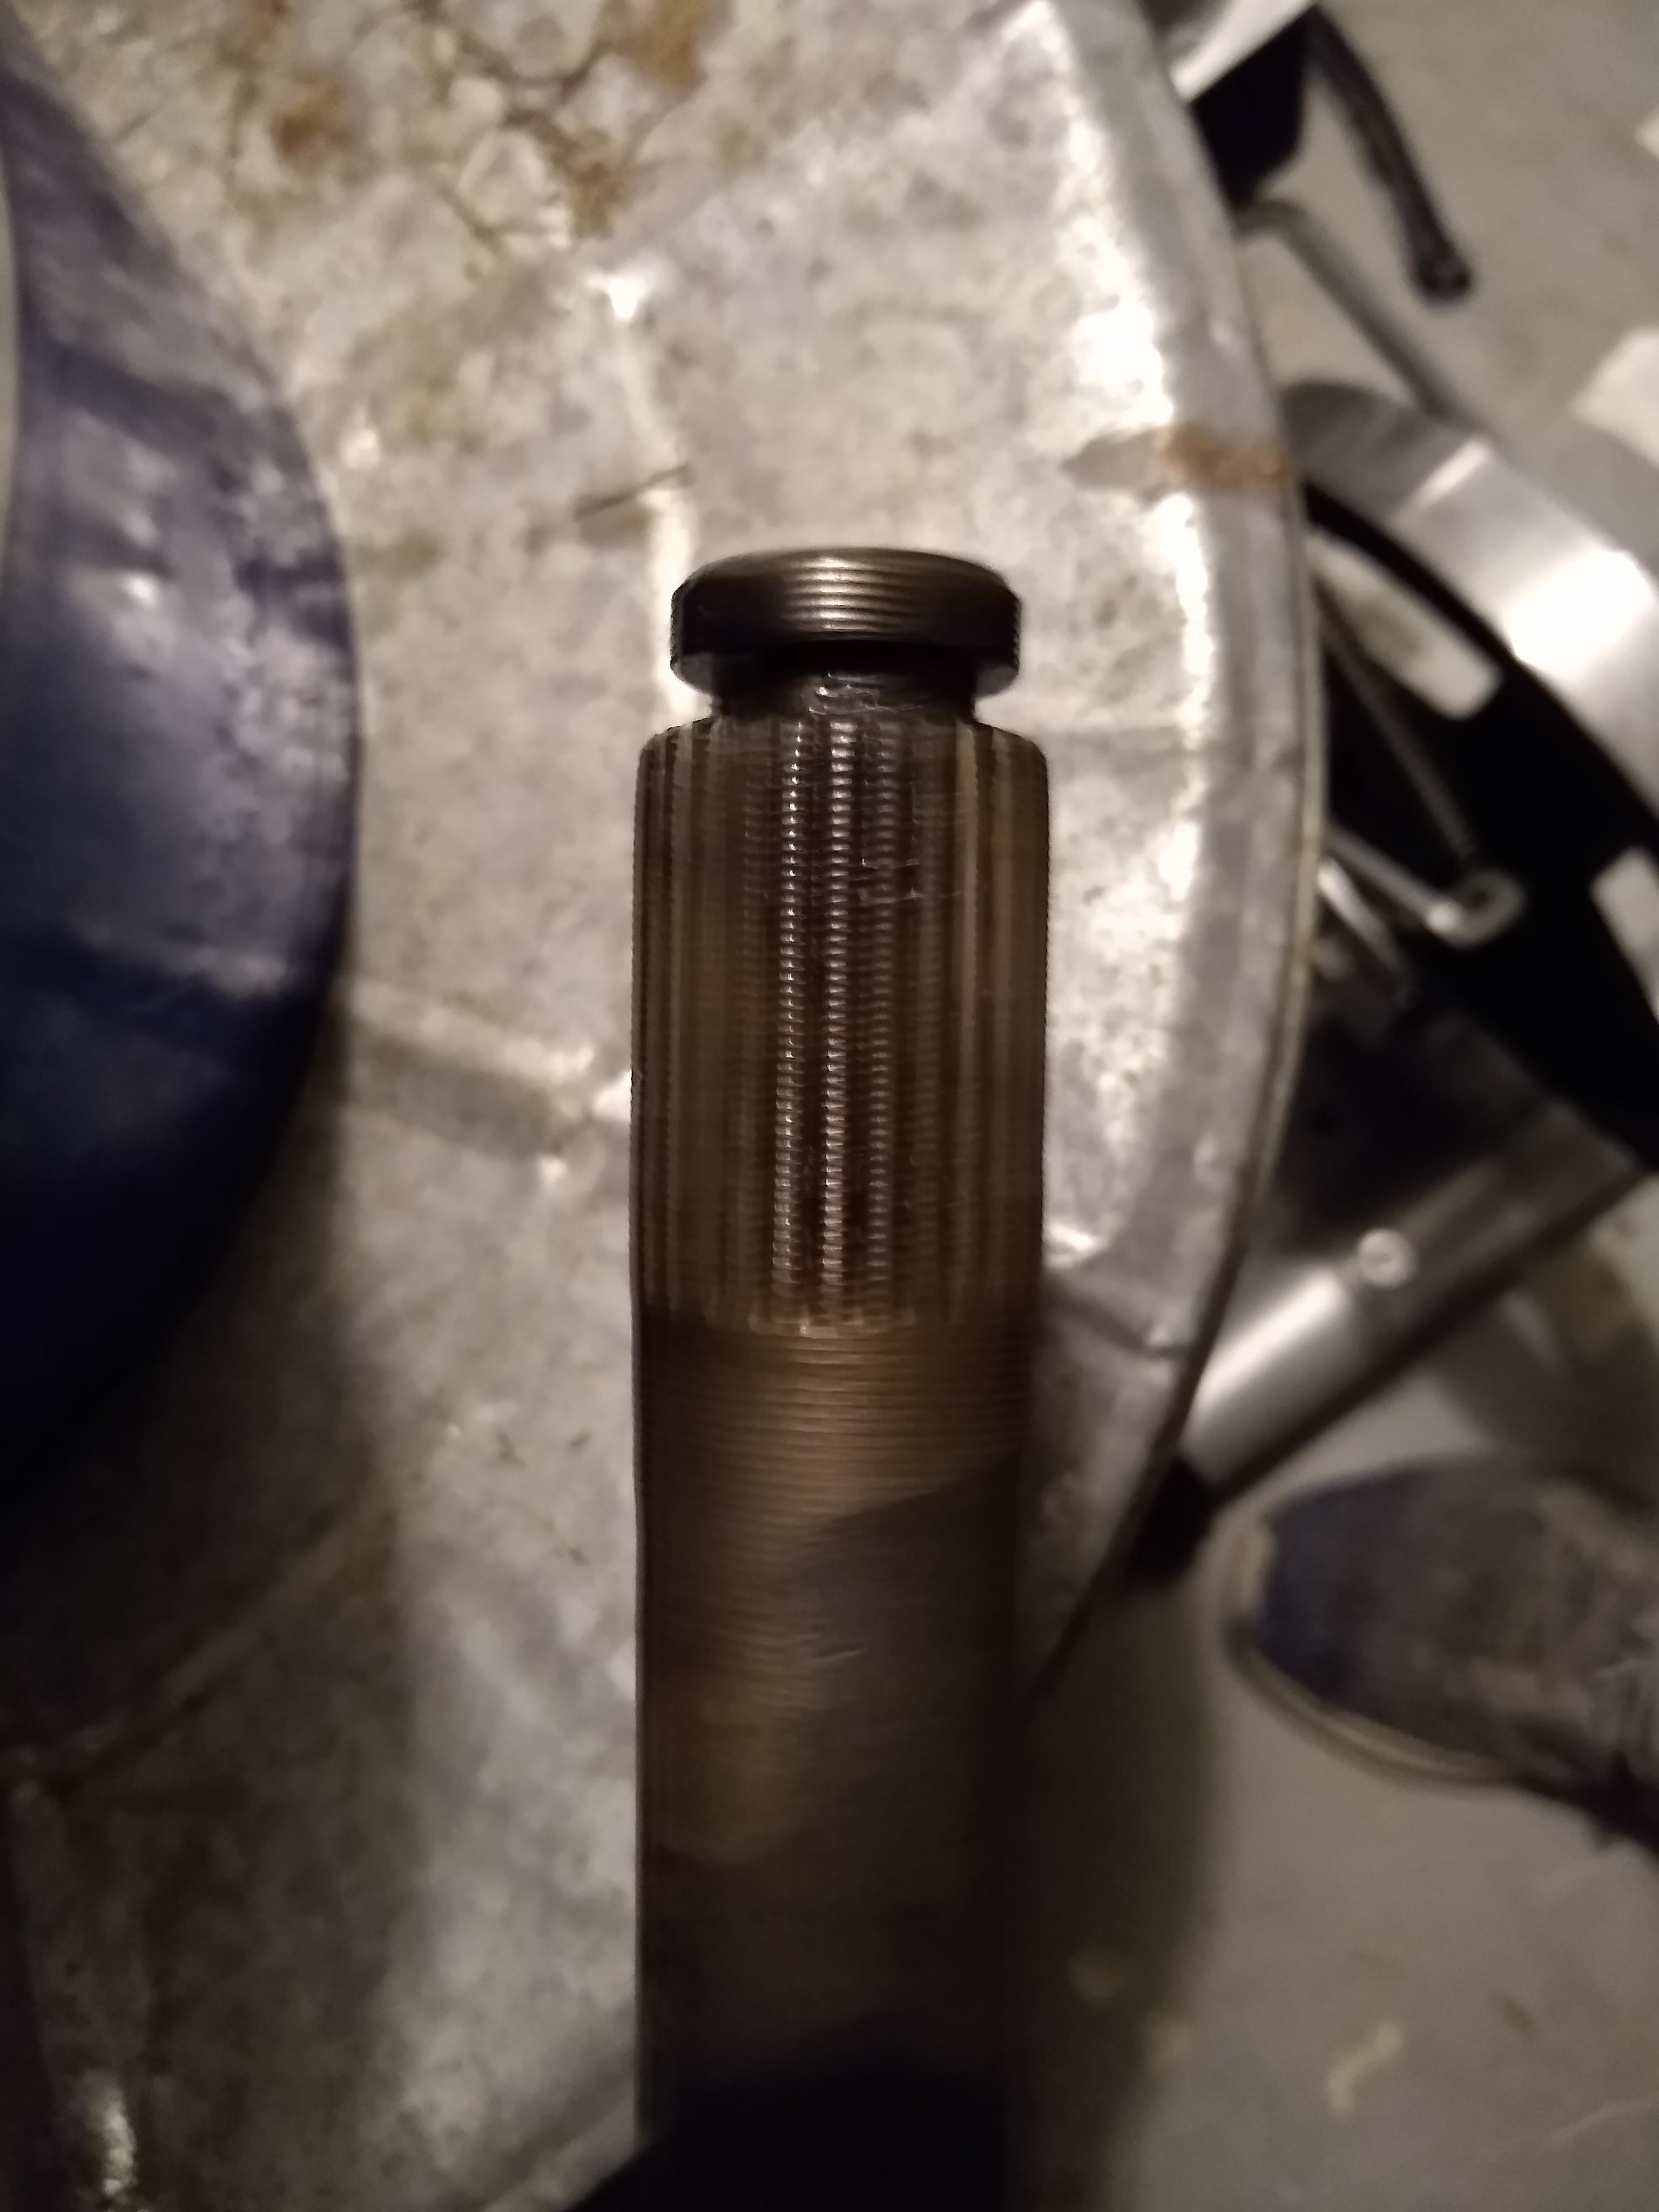
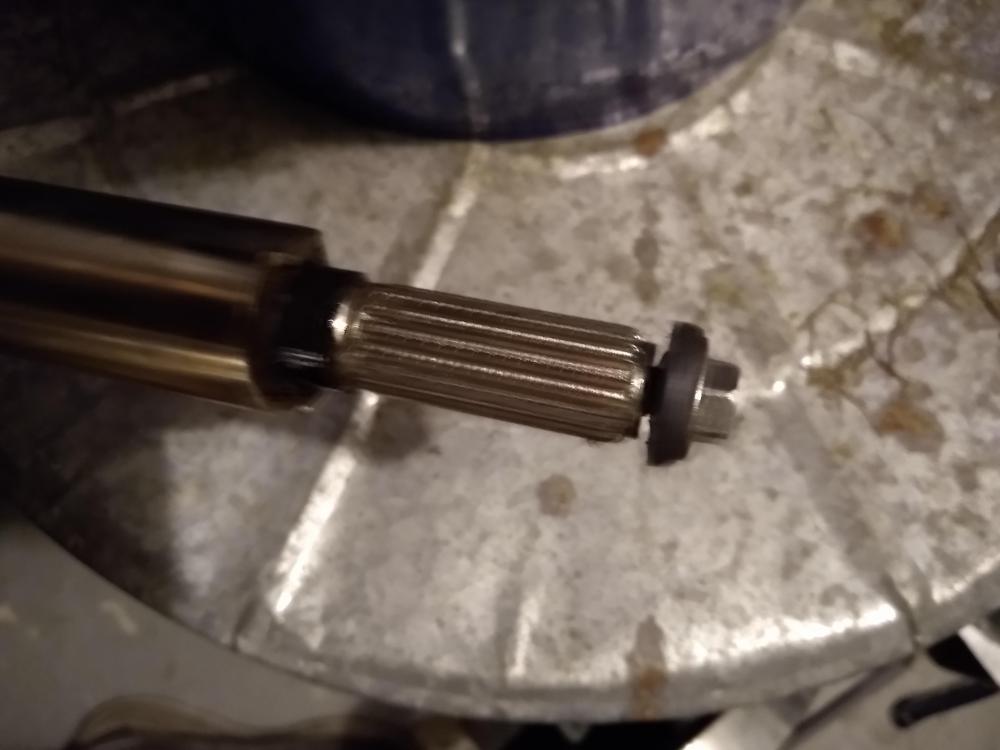
Thanks for clarifying. I was confused by your reply at first, and then I realized that I typed "washing machine" instead of "washer." The first spline picture that I posted is from a washer. Washing machines don't have anything anywhere close to the same size. -
I've seen "cheater" Mokume Gane done this way before. You're basically brazing; you'll still want to clean the materials and use an appropriate brazing flux or the brass isn't likely to wet the copper. You don't get out of the cleaning requirement by not welding! You also need either very good fit up or a fixture (that can take the temperature!) to clamp everything together to ensure good contact. It looks like thick sections and bolts of Austenitic stainless steel would work to hold things in place if you were to have interest in trying a fixture: https://www.nickelinstitute.org/media/1699/high_temperaturecharacteristicsofstainlesssteel_9004_.pdf The contrast can be less distinct if you have appreciable zinc (or whatever is in your cartridge brass) diffusion in the copper, but the examples I've seen were a reasonable approximation of Mokume Gane. I don't know how you would get an appreciable pattern if you don't have a means of working it hot. Perhaps make a way to pre-bend all of the sheets the same way repeatedly and braze them already bent? Any cuts through this would provide a pattern that would depend on the bend pattern. Of course, fit up would be complicated by this approach, as all of the bends or curves would have to be high tolerance to avoid gaps.
-
Although I am quite aware that different steels must quench at different rates in order to fully transform Austenite into Martensite (as opposed to ferrite/Bainite/perlite with no or limited Martensite as each material and rate may dictate), I must admit that I thought "shallow hardening" was just a physical description rather than technical terminology. I did, however, find an interesting NIST paper from 1935 that clearly demonstrates otherwise. Thank you for providing your input, Steve. Note: this NIST PDF is ~26MB! Don't download if you have bandwidth or data constraints. http://nvlpubs.nist.gov/nistpubs/jres/15/jresv15n4p385_A1b.pdf
-
Even though I knew this, I've been looking straight through it. You just helped me visualize a solution to the problem I imagined for myself for my next JABOD (Rev. 1 just rotted out). To paraphrase Glenn, "If you don't make the JABOD, then you don't have to think outside of it."
-
I've never had a need for a shallow hardening steel, so I haven't taken note of them if I have come across any. When I specify a heat treat, I am aiming for certain minimum properties at the center of the stock or part. Have you considered case hardening? It is specifically intended to provide a hard case on the surface. I provided a link describing the Jominy end quench test that shows how "through hardenability" is measured. I recommend that you perform a search for steel with low "through hardenability." https://www.industrialheating.com/articles/92224-understanding-the-jominy-end-quench-test What is "shallow" to you? This information may help others that may know of something that meets your needs.
-
It should work until the day it rusts out. When that might be depends on your local conditions, how you store it, and whether you add water to it. Better to get started now and find a replacement in a few years/decades once it is beyond use. Seriously, the only issue I've had with thin metal for a JABOD is warping it from the weight of dirt/bricks. As long as you brace it well (possibly underneath as well as the sides), I wouldn't anticipate any problems.
-
What it means to be a "Certified Welder"?
Chris Williams replied to OnaMcD's topic in Welding/Fab General Discussion
When I am looking at credentials, I am typically only concerned with whether a welder is qualified (not certified) -- for the process(es), position(s), metal group(s), thickness(es), etc., for the task(s) to be worked and per the specification(s) in the contract and/or drawing. Of course, I've always worked in a niche field, and may not have experience in what you want to accomplish. What credentials you need for a welding business will depend on what sort of welding you intend to perform, who you will be welding for, and where you intend to perform that welding. These three detail will help you to identify any laws, regulations, or typical contract terms associated with those welding applications, for your customers, and for your location. Like everything else in welding, the right answer here depends on the details of your specific situation. -
What did you do in the shop today?
Chris Williams replied to Mark Ling's topic in Blacksmithing, General Discussion
I wasn't trying to complement the pommel if I came across that way. As far as I am concerned, though, design details are up to the maker and/or commissioner. I did find it a curious feature and still do wonder what it used to be.
-
What did you do in the shop today?
Chris Williams replied to Mark Ling's topic in Blacksmithing, General Discussion
What is the pommel? It is reminiscent of the splined part on the end of the output shaft of a washing machine gear box. If you hadn't said it was a lawnmower blade, I would have thought that you forged one of those shafts into the blade with the spline left as a design element. -
Thanks for the video. I was wondering if the angle may cause some stick, and wasn't even considering the other half of the door.
-
I really like the latch design. Is it smooth when starting? Just a clarification for all that will read your post in the future -- a railroad anvil IS one kind of real anvil. What you likely meant was "London pattern" or "southern German pattern" or some other regionally standardized version of commercial anvil. Don't diminish an anvil that may exceed the working area, mass, and hardness of the majority of anvils that have ever existed since iron working began. Masterful work has been done on less.
-
Finally starting my Forge build...
Chris Williams replied to M.G.'s topic in JABOD - Just A Box Of Dirt
Thanks for letting me know such a thing exists so I can keep my eyes open for them, Thomas! -
Finally starting my Forge build...
Chris Williams replied to M.G.'s topic in JABOD - Just A Box Of Dirt
I have been similarly inspired by the Alldays and Onions round bellows. I have been thinking about trying it out once I come across a 55 gallon drum without dents in the side that would bind the piston. I have been too time constrained to put even marginal effort into sourcing one, however. Sonotube just may be the solution to my materials availability (I. e., time-to-source) problem! I think mocking it up with a bean can may help in sizing the moving bits and placing holes. -
Hello from SouthWest Florida
Chris Williams replied to SelfAppointedApprentice's topic in Introduce Yourself
I definitely recommend joining FABA. There is an active group down south (two, actually -- SW, and SE). I've heard some of the southern FABA members gush over their local scrap yard that apparently has a good selection of promising improvised anvils and other materials; I'm sure someone would be able to point you towards it. Some of the regions are hosting virtual meetings right now, but a few are still hosting (or have resumed) in-person meetings. -
Bjorn makes sharp things. My beginners log book
Chris Williams replied to Bonnskij's topic in Member Projects
I used to think that. I've seen some thoughtful discussions on the subject lately and I'm not so sure anymore. I also have a William Foster anvil with deformed (rather than broken) edges and chisel marks on the face that has clearly been softened at some point and that has pitiful rebound, but it forges just fine. I bet it would be improved by hardening (and other restoration), but at what effort? I may get around to it as a project some day, but not from necessity. I'm sure someone will come behind me to explain what I've missed, but I currently think that an anvil needs to do two things: resist movement, and resist deformation or breakage. You get the first one with mass and rigid mounting and the second one with enough but not too much hardness. Use it for a while. If you aren't denting it, you probably won't see appreciable value from hardening it. -
A helpful tip for anyone interested in finding what is in an industrial (or commercial, or household, or other) chemical: search for the SDS. You should be looking at them anyways for the products you use. There can be some obfuscation or omissions of the content and ratios of ingredients to protect trade secrets, but you can usually figure out what the active parts are. This can give you a starting point when trying to home brew. It will also help you understand whether certain chemicals are even safe enough to consider in your mix. Stay Silv Black has Potassium fluoborate 20 - 40%, Potassium tetraborate 20 - 40%, & Potassium difluorodihydroxyborate <20%, for example. The fluorine in these compounds is both effective AND dangerous! Educate yourself on the hazards of chemicals that you buy or make, or find someone qualified to educate you if you don't understand a particular hazard. Most of the fluxes I just looked at were a boric acid/borax mix. Others included or substituted fluoride compounds into this base. I even found two that had silica, and one that had a mix of oxides in addition to the active parts. Sodium carbonate was the base of one high temp flux, with boric acid rounding out the mix on that one. You may even learn about compatibility with your refractory (very much a "maybe" from an SDS, but I did come across some good "do not use with" information). Bottom line is this: flux isn't glue, but an aid. If you use and like borax or borax plus boric acid, then carry on. If the water boiling off from borax bothers you, then buy a commercial one (with NO fluorine compounds!). Either way, check out the SDS, and know what it is that you are using and how to use it safely. *Note: There are specific specialty cases where using the fluorine containing fluxes is warranted, but never for general smithing. The best control of a hazard is elimination or avoidance of the hazard. Don't risk your life and health over convenience or ignorance!
-
I knew your forge is and started talking about your case, and then I went and generalized my question without actually elaborating as such. Frosty's response actually DID answer what I was wondering about, without me actually being clear enough for anyone to know it! Wait a second! ::scurries for tin foil hat:: Take the thing off for just a little while... Sheesh! Anyways, I do still think that side blasts are primarily only susceptible to coal gas explosions by blowing the gas into the forge fire (activating the blower/bellows OR some other pressure differential) or an external ignition source (like a spark). That's what got me to wondering how the bellows that I've read about exploding, exploded. Of course, I didn't know whether those forges were side or bottom blast, leading to my question. I don't think that it is the accumulation of coals/embers that ignite the gas for a bottom blast in the ignition scenario Frosty mentioned, but single HOT coals that immediately ignite the gas upon falling. 750degF is not unrealistic. Restarting the air remains the most likely coal gas ignition mechanism for either type.