.jpg.05d0a17abe476f096b19a30b42da8a47.jpg)
Culver Creek Hunt Club
-
Posts
140 -
Joined
-
Last visited
Content Type
Profiles
Forums
Articles
Gallery
Downloads
Events
Everything posted by Culver Creek Hunt Club
-
I have two nieces going through similar. Thoughts and prayers you her and you, Charles.
-
you are half an ellipse (basically). long axis is 30" (your 15" height) You short axis is 13" (your width.). Thanks calcs to 72.63" for an ellipse. Take half and you get 36.31". 8 segmants of 4.5" http://www.mathopenref.com/constellipse1.html Half of this should get you to outline to fits the facets into.
-
I actually have a drum and was thinking about using it as a base for a grinder since I would need it mobile. What is the downfall as a base? seems like it would be heavy enough.
-
.jpg.05d0a17abe476f096b19a30b42da8a47.thumb.jpg.eadde9489b9f142c242c3dcab7221b8f.jpg) 1/8" snippets. ....what diameter are you using?
1/8" snippets. ....what diameter are you using? -
Christmas ornaments
Culver Creek Hunt Club replied to DSW's topic in Blacksmithing, General Discussion
I have never had much luck trying this unsupported. I have never tried a sphere but have done small ornamental shapes. Seems like I have managed the most "stretch" when it was done against a hard surface. I feel like I could control where I was drawing material from that way. I think this is a great project and since I have so much copper in the décor of my house, I will be watching this progress. Please keep us posted. The other ornaments are wonderful. I like that ideas as well. Thanks for sharing. -
Christmas ornaments
Culver Creek Hunt Club replied to DSW's topic in Blacksmithing, General Discussion
Are you heating the copper up after each run at it with the hammer? -
My first forge build at about 85%
Culver Creek Hunt Club replied to Culver Creek Hunt Club's topic in Solid Fuel Forges
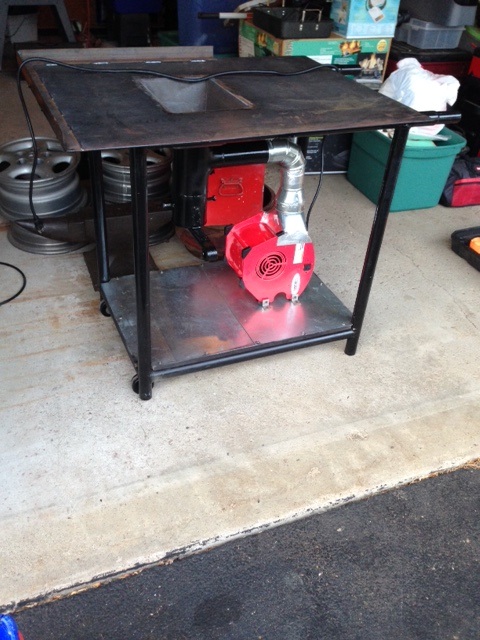
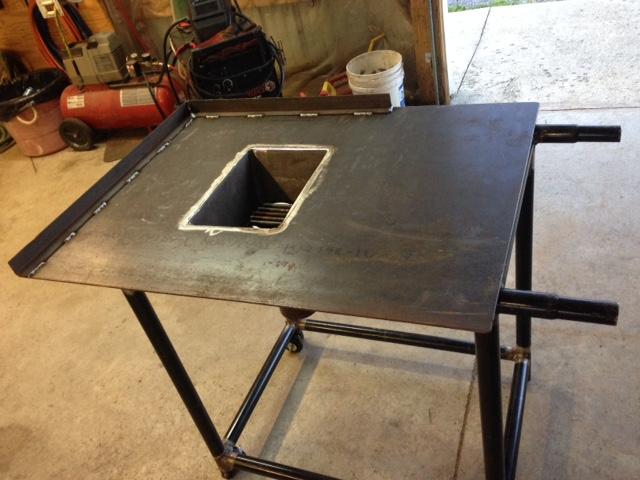
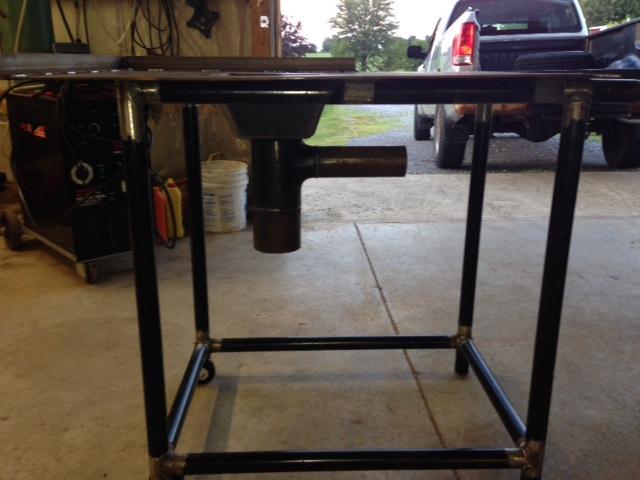
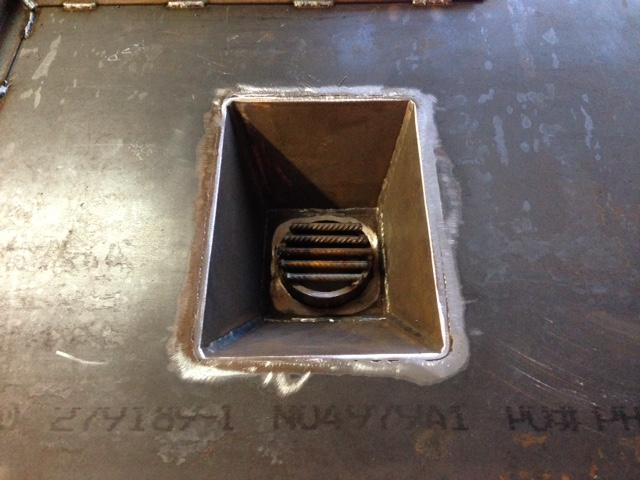
I welded in 4 clip angles under the table for some added reinforcing. It is 1/2" steel on the pot and the table top is 1/4". It is full penetration weld around the entire perimeter. I will be keeping an eye on it for any cracking. if it does I will probably weld on a flange to the pot and angles to the underneath to slide the pot into. I really wanted to maintain a smooth top if I can, or one that is recessed below. Here's hoping. once I am sure it will run as I hope I plan on putting the blower control on the leg that is front and right in the picture. I agree it ahs to be handy and I sure don't want to be bending to adjust it. -
My first forge build at about 85%
Culver Creek Hunt Club replied to Culver Creek Hunt Club's topic in Solid Fuel Forges
Well it is ready to fire up. I have a few small modifications I want to do, like the suggested grate and the blower has a variable speed knob that I would like to wire up a box at the table edge. I want to make sure it works well before doing either. Next up, the anvil stand.
-
I don't know why this immediately popped into my mind as soo as I read your comment all I could hear was this song wit the word Bolt substituted for butt..lol Link removed due to content.
-
? for any woodworkers out there....
Culver Creek Hunt Club replied to SpankySmith's topic in Problem Solving
Basically wood is nothing but a bundle of straws. taking in much larger quantities of the stain as compared to the face grain is what gives it the darker appearance. Any option that lets you seal up the ends of the straws so they don't take the stain up will probably work for you. I think experimenting is the way to go. you will get a different result among species and even in dryness and age of wood. Good luck. -
? for any woodworkers out there....
Culver Creek Hunt Club replied to SpankySmith's topic in Problem Solving
In a pinch I have used a solution made with a water based wood glue and water. about 80-90% diluted. brush on, allow to dry and lightly scuff with sand paper. It basically seals up all the "straws" that make up the end grain and the stain will have a more even appearance. -
Spring Swage Improvement
Culver Creek Hunt Club replied to JNewman's topic in Power Hammers, Treadle Hammers, Olivers
JNewman , any chance you have a pic of this? -
My first forge build at about 85%
Culver Creek Hunt Club replied to Culver Creek Hunt Club's topic in Solid Fuel Forges
I will take a run at a different grate. used up my 1/2" material on the pot so I will probably have to run like this for a short while. I do have a cast iron grate from an old propane grill. Thanks for the input. -
My first forge build at about 85%
Culver Creek Hunt Club replied to Culver Creek Hunt Club's topic in Solid Fuel Forges
I'll have to keep an eye on that. I was really trying to maintain a smooth top. If a crack appears a lip should be easy enough to add. When the pots you referenced broke, it wasn't all at once with the pot falling out, was it? -
Damascus .45
Culver Creek Hunt Club replied to Bubbasan's topic in Gunsmithing, Muskets, Flintlocks etc
That is a beauty!!! -
Thought I would share the build on here. I still have to fab and install the ash dump, the lower shelf and in the blower and electric box. The blower has a dial to increase flow up to 300cfm but I want to wire the control to the side of the forge so I don't have to bend over. The fire pot is 1/2" thick plate on bottom and sides. The front legs have wheels so it can be moved around pretty much just like a wheel borrow. the vertical pipe on the fire pot is 4" the air port is 2" (didn't have a 4x4 tee so worse case I may have to cut off the 2" leg and fishmouth on a 4" pipe.
-
Post vise mount - Am I on the right track
Culver Creek Hunt Club replied to ThorsHammer82's topic in Vises
Eventually. but if there is positive drainage away from it to avoid standing water and the bottom of the post is not sealed so the wood can drain, it is serviceable for decades. I have a 6' shadow box fence that I installed with this method and it is on year 22 with no rot. Had to pull one post to get a bobcat into the back yard and it looked like the day I put it in. reset in a new hole and repoured the concrete. -
Rebuilding a Canedy Otto Leader Forge
Culver Creek Hunt Club replied to Animosh's topic in Solid Fuel Forges
I just Googled your title and many pics came up. I think Randy may be right. From the pics I saw the large sprocket is mounted underneath on a leg clamp and the hole on the pan where you have it mounted may operate a hand pump that runs the sprocket and eventually into the blower pulley. -
Projects for Horseshoes
Culver Creek Hunt Club replied to easilyconfused's topic in Blacksmithing, General Discussion
I get it. just the thought. -
Projects for Horseshoes
Culver Creek Hunt Club replied to easilyconfused's topic in Blacksmithing, General Discussion
Am I the only one that has an issue with making cutlery out of shoes that have been traipsing around in horse biscuits? lol Very nice projects. -
I actually have this one at home and when my forge is done I will be trying it. Description is off though because it isn't 3 speed. it is variable speed and rated to 300 CFM. I am going to duct it and see what happens. I bows hard but not sure how it will do against resistance. I had a 25% off coupon when I picked it up so I figured what the hay
-
Looks very nice, I like it. what did you do to attach the steel to the wood? Did you make nails?
-
Post vise mount - Am I on the right track
Culver Creek Hunt Club replied to ThorsHammer82's topic in Vises
You don't care for conventional pressure treated? -
Post vise mount - Am I on the right track
Culver Creek Hunt Club replied to ThorsHammer82's topic in Vises
Not that familiar with your climate. how deep does the frost get? -
Post vise mount - Am I on the right track
Culver Creek Hunt Club replied to ThorsHammer82's topic in Vises
personally I would be in the ground 50% of your above ground heath to top of the vise. With the diameter you described, I can't see an issue. just don't cup the end of timbers in the concrete. is will create accelerated rot. they have to make it to the ground.