
petere76
-
Posts
745 -
Joined
-
Last visited
Content Type
Profiles
Forums
Articles
Gallery
Downloads
Events
Everything posted by petere76
-

super sucker side draft with a side exit stove pipe
petere76 replied to robodog's topic in Chimneys, Hoods, and Stacks
Robo, Both the Hofi and the super-sucker designs are essentialy straight pipes with full dimension transitions (elbows) . The smoke shelf venturi arrangement seen in old chimneys is a different design. I made a modified super-sucker design around a 10 inch pipe system, it works very well. Simply scale the opening to accomodate the square inch relationship of the uptake piping. Because I operate in a cold climate I fabricated the opening so it can be covered. In the testing, I experimented a bit by reducing the opening and it does increase draft with a smaller opening. However, volumetricaly you get short changed on the smaller opening. The density of coal smoke (heavy) and the introduction of additional local air will quickly convince you to keep the opening as wide as possible. Once these stack configurations are heated up they draw very efficently. Uptakes are mass flow devices. Once heated the gas develops its own force (suction) via acceleration ( F=MA). Just fire up a piece of paper in the stack opening before you start the forge and it will work very well. Good luck. Peter -
Drywall vs metal for interior walls
petere76 replied to urnesBeast's topic in Building, Designing a Shop
Doug, Faced with a similar situation on a 24' x 36 garage I went with standard FG wall insulation, sheet rock painted white (semi gloss) and I sheathed the walls around the forging area with standing seam roofing steel. Heat is not the issue, you dont have design it like a wood stove install. Its the sparks and slag that fly around that cause problems. The steel is cheap enough and readily available at the building supply stores. I overlapped the sheets (2in) and nailed it off with flat head roofing nails. Between the painted white walls and the steel there is plent of refelected light. The semi gloss paint alows for easy blow off of accumulated dust. As an added feature I strapped those wall areas with oak strapping (3/4 inx 2 in). Just rip standard hardwood flooring so you get square edges or rip boards if you want to any convient width. Space the strapping off the bulkhead with oak blocks (3/4") . Pilot drill the oak and use torque type screws to attached the asssembly to the studs. Oak being rather tough it will just shear regular shee trock scrrews. This system offers a rail upon which you can hang any manner of tooling, makes for great storage space and it keeps the deck clear of clutter. You make the hooks to accomodate the 3/4 in strapping. Its an effective an inexpensive storage system. Photo attached. Peter -
Gents, Thank you for all the good ideas. peter
-
Randy, Fill out the regional info so everyone can see where you are from. There could be assistnace right in your neighborhood. The super sucker (side draft) design is available on anvil-fire.com web site. Easy to understand and you can modify same to your specific needs. Before you get too carried away discuss your plan with others and get some feed back. There is a wealth of information on this site for the asking. It can save you time and money in the long run. All the best and good luck. Peter
-
Chalky, Not sure of the composition. However they make great hammers. Also the protocol in lifitng gear world is that once broken they get scrrapped rather than repaired. Not sure if this is due to cost or liability but it may support a composition formula (if you find one). Best of luck with the OEM mfgs. Peter
-
Sal and Ian, Thanks for your thoughts. I have a lot of iron work photos from different places in the world and I try and get good ideas from what I have seen out there. I am more of an nontraditional visitor in that regard, taking pictures of grills gates and and the like. In the world of ever hightened security I get more than a few nasty looks from security personnel. I have done a lot of leaf ghosting (paint overspary) to get local shapes as well. I'll keep looking for that book or catalog I'm sure its out there. Maybe CNC programing guides might be the answer. As a footnote, I recall reading in Dixons " Francis Whitaker's a Blacksmiths Craft Vol I" that the second volume was forthcoming but the publisher (blacksmiths journal) apparently went out of business. Anyone have a lead on this? Peter
-
Gents, I was looking for a good reference book or a web site that features patterns that I can scale for different applications. I usually make my own back plates for door pulls and other surface mounts, nothing too fancy but sometimes I need somerthing a bit different. Fleurs are always challenging for me if I do them freehand, they come out looking a little one sided. When I use a template it works much better. I'm not much of a freehand artist. I'm ok with auto cad or a drawing board but the scaleing on the free hand stuff just escapes me. Any suggestions would be appreciated. Thanks, Peter
-
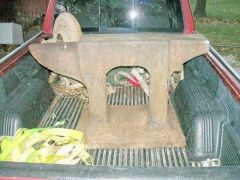 Good for you brohter nice find. I hope you laid it horizontal orr the homebound voayge..that whole G (gravity) and M (metacentric heigth) formula thing might hurt ya in a small truck, i.e. lower is better. All the best, Peter
 -
Fireplace mantel installation
petere76 replied to FieryFurnace's topic in Blacksmithing, General Discussion
Dave, Nice job and good follow through on getting it out to the client. In this business as many others, its produce or perish. You have done well brother. Peter -
Driving down the road, arts where ya find it Mr. Riley. Nice job brother. Peter
-
Dvae, Nice job, Gotta love that flexible modular concept. Looking good. Peter
-
Traditional method: Square stock you do freehand over the anvil (half blows) or in the vice. Always at a high heat. Some folks upset the bend prior and others don't Round stock you need the upsetting style (vice) tool so as not to kill the round stock dimension with hammer marks. IMHO, The more diffcult of the two. Some guys half cut the angle at the mark, and use a glut weld (forge or electric) to make up the difference on the missing material, trim, forge and grind to dimension. Not traditional but accurate, fast and effective. if you have a lot of these to get done...learn this technique. Most of the work comes down to how much time is involved. In many case other than strictly traditional endevours, the more time spent on a project the less you make. Figure out your shop rate, material costs, man hours etc and plan accordingly. Yes...time is money. An interesting mantra to keep in mind, Whats the most expensive thing in the world ...ans. "free time". Enjoy. Peter
-
Naz, If your intention is to keep the heat in the room, keep them close to the wall. If it is strictly a deco decison ...anything goes. I like the forked ends, nice job. Peter
-
Great job on the pictorial. Thank you. Peter
-
Peace be with you as well brother. Peter
-
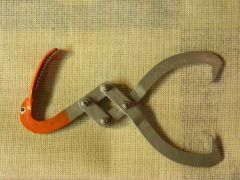 Stewart, They look great . In regard the testing procedure, how do you know what they are rated for? Do you estimate or test them yourself with a dynometer. Peter
 -
Save yourself a few bucks, 10 in will work just as well. Heat is not an issue. Peter
-
Pat, Thats a fine looking smithy you built. Great doors, good sized windows and its very distinctive and classy. As a suggestion for an anvil heater, buy electric strip heaters for motors, Low wattage, little fire danger and if you have any kind of insulation box around the anvil, it will stay very warm on the coldest days. Its gets well below zero in my neighborhood in Jan and Feb so some sort of auxilary heat is required to make both the equipment and the people happy. Peter
-
Mad Dog, At the motor you got the x axis, check the run out in the arbor with a dial indicator. The blade is the y axis. Both these have to be right. Mount a new blade and check the run out on that as well. If the arbor is bent, game over just get a new one and avoid the hassels. If the arbor is good and the blades out. Are you using the right arbor adapters and does the blade have a small metal furrel that interlocks with the adapter? Everything has to be tight and it has to fit correctly. Lacking the right fit up at the blade to arbor cause all sorts of issues, not the least of which is slipping and vibration. Also consider offestting the stock in the vise by placing a piece of scrap behind the working piece. For thin stock consider two long piece of 1 inch tubing on either side of the stock. This may bring the cutting point of contact on your particular machine to a better performing posiion and further reduce vibration. Cut angle iron from the point down, at least for me, it seems to works better that way. Doing it the other way, you can see the blade has a hard time at the juncture of the angle. Ridgidity and alignment are your keys to success in avoiding bad vibrations and getting relatively square cuts. Long pieces of stock need to be supported, they just can't be bouncing in the air off the end of the saw. The saw has to be well secured to something, bolt the thing down or use clamps, this aids in reducing vibration as well. Lastly, blade speed is a consideration. If the saw is bogging down, ease off and get the rotational speed get back up to operating RPM. Cutting slow and forcing the blade with excessive downward pressure will not do you and favors. I have an old POS B&D in the shop and it is has been beat to death for years but it still cuts true and the blades last a while. Hope this helps a bit. Peter
-
Dave, I just built a stand alone coal forge with a side draft style hood. A few suggestions, double up the edges of the plate (table) opening for the firepot. This will prevent any heat distortion. Also with a 36 vs 48 inch table length consider raising the outdide rail edge where you intend to pile the coal. The draft opening takes up space on the table and forces you to one end, 3 feet quickly becomes 2 feet or less, think 4 feet for best results. This will keep the coal on the table as opposed to its falling off. We tend to pile it up and as you shovel under the pile it winds up on the deck. As to the tool racks, you dont need that many in the immediate area where you are working. Accomodate the requisite fire tools and a few task specific tongs. The remainder you can store anywhere in the shop. Too much clutter does not work to your advantage. You want a clear shot at the forge from as many angles as possible, having tooling in the way will on make life diffciult. Important, build in some sort of support for long pieces of stock. Inter fitting tubing or pipe works well as does the swing up versions with a single leg support. Anything to free up your hands and or floor space around the forge. Stock racks work best if they are on both sides. The less dancing about you have to do the better. Photos attached for your review. The job looks great and the design is sound. i'm sure you will be pleased when you lite off the first fire. Peter
-
Hay-Budden anvil catalogue from 1914/15
petere76 replied to Timothy Miller's topic in Anvil Reviews by brand
South Shore, Thank you for sharing the information. Peter -
SS John Brown, WWII Liberty Ship Anvil
petere76 replied to petere76's topic in Anvils, Swage Blocks, and Mandrels
Glen and co, Love those shirts,,, "ho-ah" my brothers. Peter -
SS John Brown, WWII Liberty Ship Anvil
petere76 posted a topic in Anvils, Swage Blocks, and Mandrels
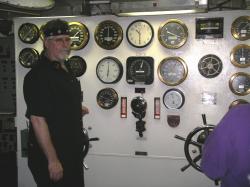
Gentlemen, While on a training exercise we utilized an old Liberty Ship in Baltimore, SS John Brown, I came across this vintage anvil of unknown manufacture just foreward of the after deck house. The anvil was in great shape, painted for protection and mounted on a oak stump which in turn was bracketed and welded to the deck. It was certainly large in dimension. Given the number of these vessels produced in the war effort, there must have been a sizeable gov contract with some manufacturer of the day. It was a great find. Peter -
 Jeremy, Nice design of the mounting plates. How did you connect the standf off piece under the collar, weld or brad? Peter