
petere76
-
Posts
745 -
Joined
-
Last visited
Content Type
Profiles
Forums
Articles
Gallery
Downloads
Events
Everything posted by petere76
-
May peace be with you brother. Peter
-

storage of coal
petere76 replied to the hangman's topic in Solid Fuels: Coal, Coke, Charcoal, Wood, etc
Glen, In regard the 55's do you drill draingae holes in the bottom to dump any water? I have one and was going to use it outside for storage and was not sure about water accumulation. Currently I just stack 50 lb bags inside and dump them into a 20 gal galvy can near the forge. Peter -
 Ouch...looks very effective and its a quality job. Peter
 -
Hang tough brother, more battles lie ahead and we need ya, Peter
-
Don, Recently saw two recovered forgeed pintels from a stone structure, vintage 1890. Tthe mechanical configuration was a piece of flat stock (8-10 inches x 1 inch x .25) that extended into the stone work and then split into a north and south set up (one up and one down) measuring roughly 4 inches each way, As you would suspect, it was rough and judging on the age of the pieces, very effective for its period of service. The vintage piecees are not pretty but they work well. Peter
-
Frosty, Some pics to illustrate a similar approach. Yellow birch is an abundent growth in Maine, cracks a bit when dry but tough as nails. Always take off the bark. All I did was use the router table upsidedwon. Worked great. Peter
-
Hey Bob, No worries brother. We always find the solution; its usually in the last place we all look. Not likely this will be the last time I am on the wrong tack, but its all about the journey, as they say. Will certainly touch base and hopefully splice the main brace when time permits, All the best my friend. Peter
-
Bob, I forged out some set tooling out of scrap masons hammers (stanley) . I anealed at the outset, forged and normalized. Left them on the bench to cool. Later I ground and filed to finish the shape and dressed the edges. I heated to a non mag temp (slightly higher) and i made sure it was uniform shade with no dark spots. Then I quenched in brine, drew to a bluish color and plunge cooled the whole piece. In service the tooling end worked fine but the shaft sections would break. It showed a fine grain structure at the fractures. Not sure where I went askew. As I mentioned I don't so this a lot so there is some trial and much error involved. By comparision, I made some hammers (2 Lb cross peen) out of forklift tines. The stuff was hard to work but easy to heat treat. The hammers have stood the test of time, no problem save for an occasional misguided ding by the this operator. I was down in BB and Scotty for a few weeks visiting friends, stayed at a place over in Bristol. The strippers were running and the weather was fantastic. Peter
-
Bob, Thanks, I'll do a spark test this morning before I invest too much time in this thing. If it is cast I'll just turn something that fits. Given and unkown material like we tend to find in yard sales or at the dump, I prefer anealing over normalizing because with normalizing (air cooled) I have had failures in the past. A simple anealing process using a pail of ash or lime, is more consistent but obviously takes longer. I don't have a control temp oven so the bucket method is my next best thing. Peter
-
Gents. Thanks for your replies. I am sure ths is not cast, most certainly its forged. I too am leaning toward reforging and drifting to a more conventional eye size. There is a makers mark on the bottom but it is not discernable. That said, the next question will be the (always exciting) treating process. I have forged hammers in the past, but I always knew what the material was. For me, this is basicaly a mystery materal, let the guessing begin. I'll go with, aneal, drift the eye , aneal again, forge to shape, aneal again, dress, file grind etc, aneal again and rest. Heat to non-mag solid color no shades, hold for a short time, quench the ends but not the (eye) middle. Allow the piece to rest overnight. I'm thinking this procedure is longer but more of sure thing. I dont do this all the time so any suggestions...just fire away. Photo of sledg head attached or review. Thanks again Peter
-
Josh, Mr. Dereck Glaser, Runs the New England School of Metal Work along with his own personla forge and studio. His resume is extensive and his work is flawless in the European style. Friend, teacher and mentor to many Derek has both supported the arts and the skills of the traditional and ornamental smith. Not just a instructor but a man actively involved in promoting the craft and improving the expertise of all those he meets. Peter
-
Gents, I came across an old sledge (head 4 LBS) . Nicely done but without a handle. The hole for the handle is not oval or square but round. I have seen old wooden mallets with this type fitting but never anything made from iron. The hole is done right with a 1/2 inch center and a taper out to 5/8, in a modifed hourglass shape. I want to put a shaft on this thing but I'm not sure of how to shape the handle so it resists splintering. I can turn it down to a round but that leaves a shoulder and will not last long in service. I can easily forge a new hole in any number of more conventional sizes but I'd like to keep the same lines on the sledge head. Anyone have any experience or suggestions with this type handle configuration? Thanks, Peter
-
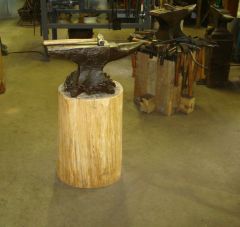 PW 124 #, mounted on a yellow birtch stump.
 -
spears, good proposal, square construction on the box is simply the ease of manufacturing. Its easier to fab square corners then cylinderical transitions, in most shops. Exhaust pipes (uptakes) ...are ready made and can be purchased in assorted diameters at your local supplier. Now we are down to the efficency of the opening vs the draft produced by the available uptake cubic capacity. In the static, I would rely on venturi for the reduction and acceleration. Additionally, the placement of the uptake in regard the pressure losses of the stack would have to be considered. Lacking mechanical assistance (fans etc), all the rules of pipings structural and frictional loss apply (laminar vs turbulant) . Don't forget atmospheric and external structical influences on the exhaust piping. Is the stack high enough above the roof line or the local physical strcutures to be effective. I recently fabbed up a simple square horizontal transition side draft forge. I submitted a few photos and a brief narrative on this site. (solid forge hoods) . The system has worked well in our shop. I am not sure if this site still had it available for review. Peter
-
Traditional smith's cap
petere76 replied to Bill in Oregon's topic in Blacksmithing, General Discussion
Bill, Try looking for a "Landry Cap". they are basically a welders short brined, all cotton cap and very heavy duty. Some were done in multiple colors so you would not loose it too easily. The ones I used to see were sold in and around port Arthur Texas and they were favored by the metal trades and the Engineers on ships. Peter -
My Grand daughter design and forging
petere76 replied to Hofi's topic in Blacksmithing, General Discussion
Sahar, Nice work. The design, balance and visual effect of the gate is very well done. -
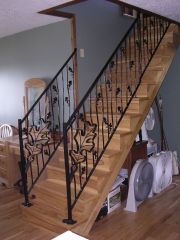 Jeremy, Very professional job. Looks great with the hard wood. Peter
 -
 Garey, CNC or freehand?
 -
Ric, Thanks for the point of contact. Peter
-
Gents, I had the good fortune to stop by a rail road track repair outfit that had set up shop near where I live. The older CMRR lines were being repaired and the crew rented a house and barn for their vehicles and office. I asked the Sec in the office if I could get a few old spikes. About a week later, she got me a few buckets full of used ones. I made her a spike knife for her desk, seemed appropiate. A few weeks later she called me and asked if i could make more knives for the regional director, so he could distrtibute them as Christmas presents. It always nice to a ask and in this case, it pays to take care of the folks that help you out. Peter
-
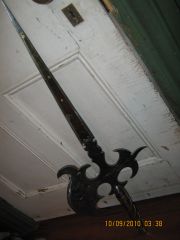
Bentiron, The piece belongs to a good friend. He knows I pound iron and thought I would be able to tell him something of its origin and age. I'm at a loss as to estimating it's age but it does have script that could be attributed to either an individual smith or at least a time period. I have other photos of the back and the back is also engraved and dressed out with gold. The intricate detail of something this small combined with the dimensional effect of the raised mass of iron is visually very impressive. After studying the width and thickness of the blade stock opening, its easy to see how the claims made of the Samauri weapon are suistaniable. Thanks for your information. Peter
-
Gents, Came across this old hand forged and highly decorated hilt. The detail of the piece is amazing considering its size. both sides of the piece are engraved and dressed out with gold highlights. i'm not a sword guy but I can tell this piece has a history. This may be a war souvenier, I'm not sure of its lineage. Any info would be appreciated. Thanks, Peter
-
Good things come to those that wait....great score. Peter
-
dressing up an old anvil with chipped edges
petere76 replied to kcrucible's topic in Repairing and Modification to Anvils
Krucible, Your Fisher looks great as is. Some edge deformity can and does actually work in your favor. I have an older 144 # PW with worn edges that I am currently using. The worn and chipped sections all work for something at some point. I did relieve the sharp edges of the chips with a flap disc to prevent nicking any forged bends on the inside . I also hit he face with a belt sander to clean up some surface corrosion. The fisher should serve you well, good find. Peter -
Let's see your forge doors
petere76 replied to plain ol Bill's topic in Blacksmithing, General Discussion
Pat, Nice job on that door, looks great.