Buzzkill
-
Posts
2,063 -
Joined
-
Last visited
Content Type
Profiles
Forums
Articles
Gallery
Downloads
Events
Everything posted by Buzzkill
-
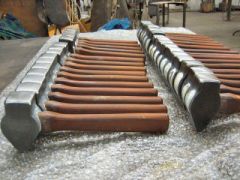
Pancho, I tried to envision how you would stand when using the anvil. In my mind to use the large or small fuller area you would probably stand with your tongs perpendicular to the anvil and swing in line with the hot cut. If you were standing at the hot cut end of the anvil, which would be the closest to your fuller areas, then you'd be swinging directly over the hot cut section. Unless you can get a cover for that hot cut that you know will not come loose while you are hammering I see that as a recipe for disaster. I suggest mounting that rotary bar you have. You can mount that flat like you show in the pictures. You've got a nice large central hole with a bunch of little holes around it. If you can get a decent thickness plate with a square hole in it, you can easily bolt it in place and then have a mount for any hardy tool you want to use. My 2 cents, but someone with more experience might have a better idea.
-
I believe Charles already said to make a cover for it if you include it. You don't want to sever digits on that feature. My experience with this type of thing is limited, but my recommendation is to not include it as part of the anvil. It might be a bit inconvenient to set up a different way to do hot cuts, but it's a whole lot more inconvenient to take your fingers to the emergency room and hope they can reattach them.
-
Due to the nature of king pins they should be wear resistant, and it's probably a safe bet that they are at least medium carbon steel. However, I do not know for sure what is in them or if they will forge well. I can tell you that the S cams will harden and can even crack in a water quench. If you're planning on making a hot cut I guess you don't really need to quench them anyway. I'm not sure if you were looking for leaf springs from a truck or not, but I can tell you they are a lot of work. The 3 leaf springs off a semi trailer are about 3/4 of an inch thick towards the middle and it's a bit of a chore to get them down to workable size. I split a 10 inch piece lengthwise and pounded it out to a kukri style knife, but I haven't gotten the handle on it yet. Another thing to keep an eye out for is the mudflap hangers that are solid square stock and slide into the holders on the back of trucks. They make decent punches, chisels, etc. and can be hardened. He's not talking about the S cams Frosty. He's referring to the 3 round pieces below the S cams.
-
They look like king pins from a large truck to me - in the steering. Can't be sure without better pic angles though. Either way, those and the S cam shafts you picked up should be at least medium carbon steel. I made a flatter from an S cam shaft like you have there. Worked fine, but was a lot of heating and beating without any help.
-
Why not just use a wedge and hammer to start with? if you can get a little separation between the coils then you can probably get hold of it with something and use a pipe cheater to get the extra leverage you need.
-
For when you don't have a Power Hammer?
Buzzkill replied to CAE's topic in Blacksmithing, General Discussion
Use a radius edge on your anvil and lift the stock so it's only touching on the corner then strike with the hammer face half on, half off the anvil. This concentrates the force of your hammer blows in a small area and moves the steel much quicker than if the steel is flat on the face of the anvil. Once you get close to the desired diameter then go back to the flat and true the reins up again. I believe Brian Brazeal has a good tong making video where he starts with 3/4" stock which shows the technique. Of course he makes it look much easier than most of us mere mortals can match. -
Just remember you are going to have 2 inches of blanket plus some coating between the shell and the inside of your forge. I believe the common recommendation is to keep the end of the burner tube back about an inch from the inside of the forge. It's still going to get glowing hot at the tip and eventually have to be replaced, but it's protected somewhat by the blanket and hot face material if you set it back a bit. The angle is mostly a personal preference thing. You'll see everything from the flames pointing straight down at the floor to tangential burner orientation for maximum swirl effect. Frankly I don't know if there's a huge difference in efficiency although it seems a lot of people suggest the swirl is better. If you want a small hot spot then the flame aimed at your piece will provide that, but direct flame contact with your steel can produce excess scaling, especially if you have an oxidizing flame running. If you are referring instead to the burner mounting tube then that should be welded to the outside and does not need to extend into the shell at all.
-
I have to assume you used a full metal jacket bullet for that critter. Nice work as always.
-
If my puttering turned out pieces like that I'd quit my current job.
-
Making a forge from scrap vs buying a pre made
Buzzkill replied to jon taccona's topic in Gas Forges
If you have little to no forging experience and your objective is to make knives you are jumping into the deep end of the pool without learning to swim in the shallows. It's not impossible, but you will be trying to learn a lot of new things at the same time so your failure rate may be higher than you like for a while. If you are focused on knife making I'd suggest that you forget about a traditional anvil for the time being and just get a good chunk of solid steel to work on. A round bar that is 3 inches or more in diameter (or square) set on end will give you a decent work area and won't break the bank. An old hydraulic ram of decent size, a truck axle, etc. can probably be found for significantly under a dollar per pound and will serve you well until you can figure out what you really want. Fifty to 100 pounds of steel - even mild steel - directly under your hammer will do what you need to begin. If you want to get hammering right away you can get by with as little as a hole in the ground, a hair dryer, a piece of pipe and some coal or charcoal. When we start out most of us want to get the perfect setup and the best tools, but the reality is the tools don't have nearly as much input on the finished product as the skill, patience, knowledge, and care of the person using the tools. If you want to go with propane look up Frosty's T burner and search the site and Google for propane forges. There are lots of good plans to choose from. Just stay away from anything that suggests using any type of concrete, plaster of paris, portland cement, etc. for the refractory lining. Those will not hold up to forging temperatures. Spend some time on here reading and you'll quickly find the general recommendations from experienced people that will get you headed in the right direction. Welcome to your new addiction! -
I can't really tell from the picture. Is your ribbon burner tapered or radiused to fit the contour of the forge? I'm curious as to how that would affect the burner function and if any part of the burner head sticking into the forge would decrease the life of the refractory due to thermal shock.
-
 The original posting is now 9 years old. I'm not sure Mr. Hofi has been here for a while. The last post I see on here from him is 2 years old.
 -
US Navy SEAL Trident
Buzzkill replied to basher's topic in Spears, Arrows, Pole arms, Mace/hammer etc.
Thanks for the explanation, basher. Awesome work on the trident. Loving it! Then again, based on your other work I've seen I'd expect nothing less than something darn near perfect - and it looks like you'll deliver again. -
US Navy SEAL Trident
Buzzkill replied to basher's topic in Spears, Arrows, Pole arms, Mace/hammer etc.
Thanks for the link, Steve. I'm still not 100% clear on the purpose of the smaller belt. Is it to prevent belt drift side to side when slack belt grinding or to provide a happy medium between a flat platen and a slack belt with no backing - or both? Regardless it looks like a very useful attachment that I need to look into. -
US Navy SEAL Trident
Buzzkill replied to basher's topic in Spears, Arrows, Pole arms, Mace/hammer etc.
Cool stuff. Can't wait to see the finished product - and more WIP pics I have to ask about the attachment you're using for polishing though. Is the small belt around the 4 wheels to increase resistance for slack belt grinding, or is there another purpose I'm missing? -
If it weren't for customers and employees running a business would be fun. One of my dad's favorite sayings, passed on from an unknown source, is "People will do what you inspect, not what you expect."
-
It's mostly a question of funds. I already have a fair number of the components I'd need to go with propane, so in theory the additional cost would be far less. Besides that I like to build things for myself rather than purchase something already made. I believe Frosty once asked, "Why buy something for 10 dollars when you can build it for 20?" Some of the points latticino brought up have me questioning whether that would be my end result. I'm going to ponder on the whole thing and do a bit more research before going any further with it. I don't want to waste all the time I could be forging only building yet more things for forging. That's kind of like working a lot to afford an expensive car to drive to work. I posted this mainly to have other sets of eyes finding the flaws with the design, but also with the overall concept. I got what I asked for, but welcome additional comments and suggestions as well.
-
Ok, here goes. Rebar isn't your friend here. It is a crap shoot in composition. You don't know if the piece you have will harden until you try, and it may not be the same throughout the same piece of rebar. If you just want to make something knife shaped and aren't worried about it holding an edge then mild steel would be a better option. I learned the hard way and pretty early on that it pays to have a design drawn out on paper or at least well thought out in your head before you start a blade. The idea is to make the steel move how *you* want it to move. As silly as this sounds, another thing I had to keep in mind is what I wanted to accomplish with each heat. Know where and how you want to strike before you remove the piece from the fire. Otherwise you end up wasting time and the steel cools off while you're trying to figure out what you want to do. Having said that, you did make a blade shaped object that will at least look like a knife with just a little refinement. It may not function like a good knife because of the unknown quality of the steel you used. If you are going to put a handle on it then should probably thin out the tang area for balance purposes. Also be careful about putting sharp angles in transitions between widths. These create spots where your blade is likely to crack and break during use. Even if you have to round the corners with something like a chainsaw file after you complete the forging that will help avoid cracks. Assuming you've been bitten by the blade making bug I hope you'll take the time to read through at least the stickies in the knife making section. There's a lot of good info in there that can help point you in the right direction and save you a fair amount of trial and error on your journey. You've got a good first step in there, but if you're like me and you have limited time for forging you'll want to make all of it count.
-
Very nice! Thanks for posting this.
-
Thanks again for the advice. This is exactly the kind of thing I was looking for. The point about the propane potentially backing up is especially appreciated. Somehow that thought didn't even occur to me. You've given me several good points to think about and with the weather starting to be reasonable for forging outside again this project will likely be delayed anyway.
-
Thanks for the reply latticino. There are a couple reasons I want to fairly accurately control the temperature. One is heat treating and the second is to help me with recognizing the color of different steels at certain temperatures. This is still a hobby for me, so I can't dump a lot of money on things like this. I already have an old portable air tank, ceramic fiber blanket, kiln wash, kiln shelf, and the blower. The blower is from a bouncy house type of toy and it will easily blow material on the floor around 15 feet away if it's not restricted. Since it was made for maintaining a static pressure I don't think that it will be any problem. I'm curious as to why wait until the 3 inch pipe to dump the propane in. Won't it mix somewhat through the rest of the system and then even more when the velocity is slowed by the larger opening? I'm not challenging your recommendation; I just want to understand it. The reason for the 1 inch pipe to begin with is mainly cost. A normally closed 1 inch solenoid valve is around 40 bucks. A 2 inch valve is over 200 dollars. I share your concern about whether or not I can get enough air through the 1 inch pipe though. I'll have to look into the zero pressure regulator, but my guess is that's another relatively expensive component.
-
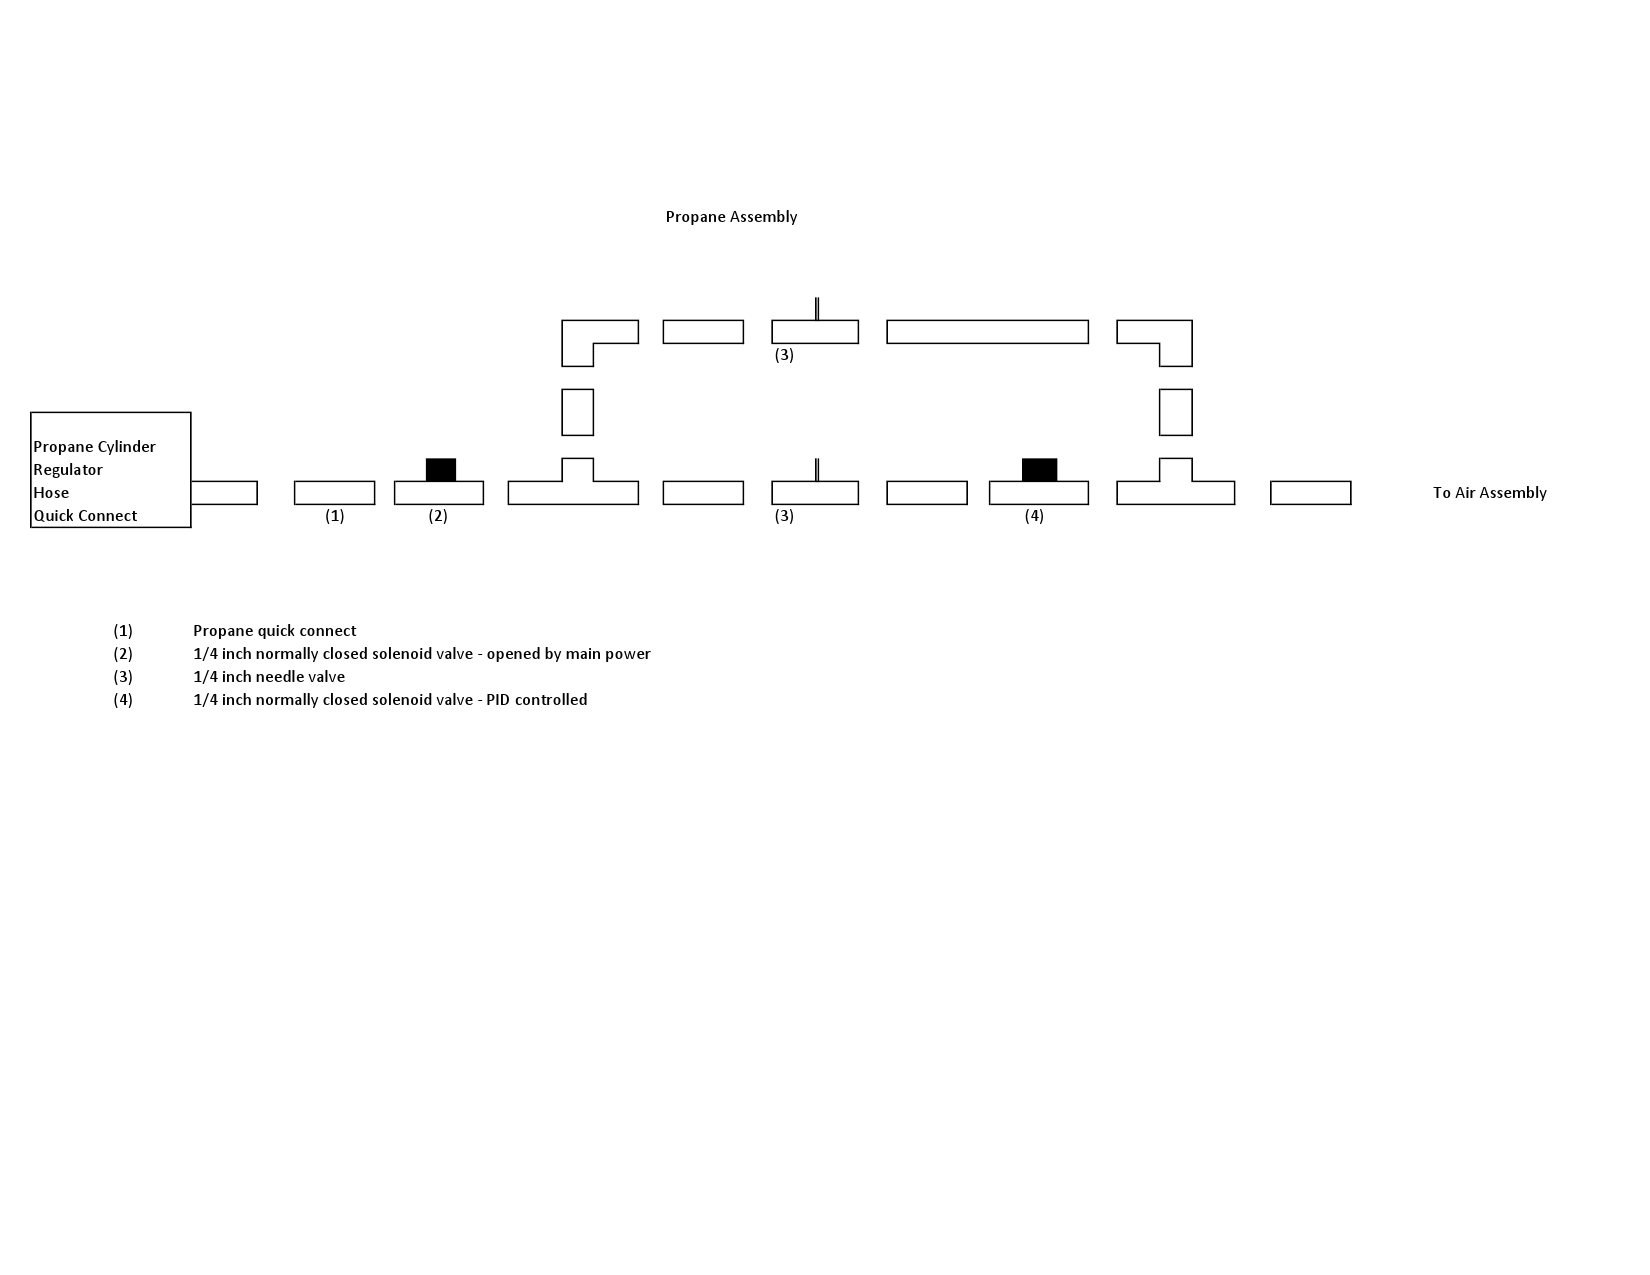
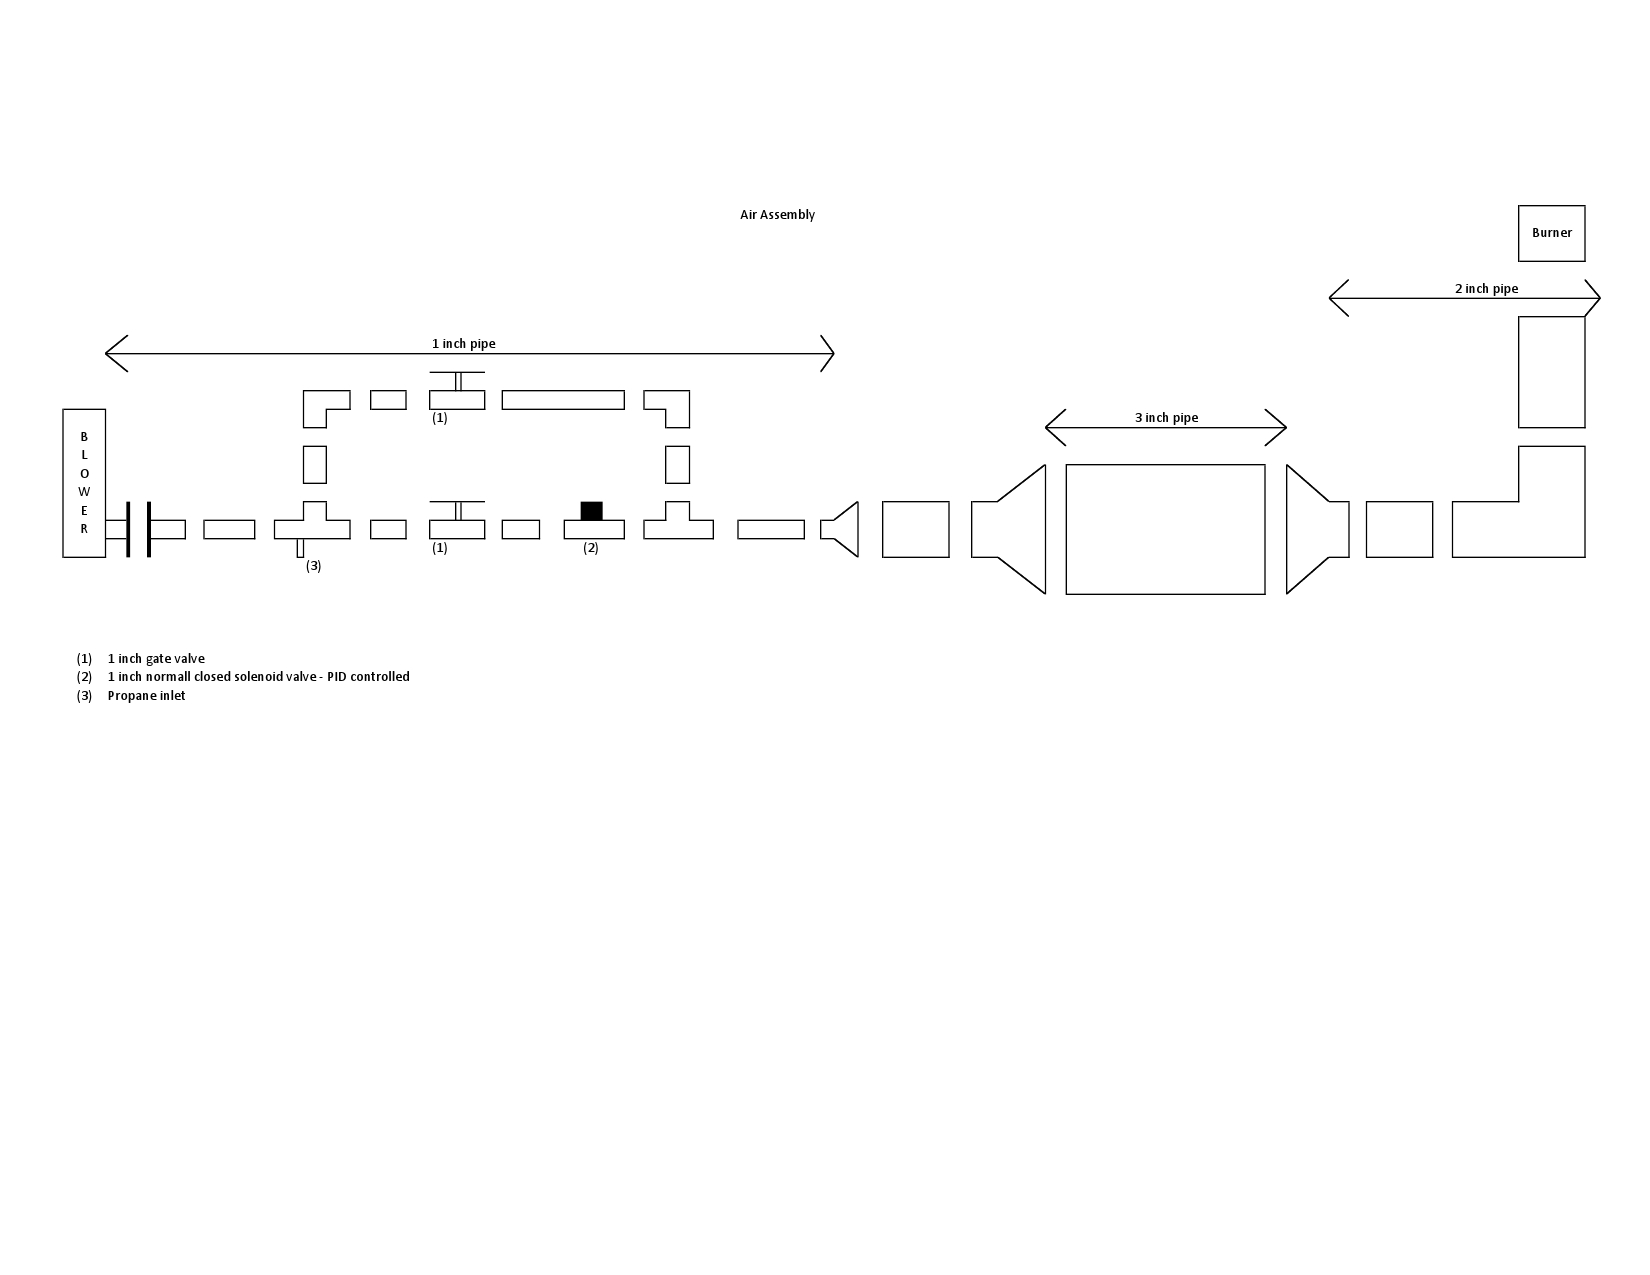
I've been designing a thermocouple/PID controlled forced air/propane forge with the hopes that I can get +/- 10 degrees F accuracy over a range of about 1400 F to 2300 F. As an overview what I'm attempting to do is have an idle pathway each for the propane and the air at just above the lowest settings that will produce a stable flame in the burner. At this point I'm leaning towards a ribbon burner. The main pathway for both would be tuned to a high heat with the atmosphere adjusted how I want it. These pathways would be off by default until the PID sends the signal to the relay which would then open both simultaneously. Hopefully the designs of both will show up well enough on here to make sense. What I'm asking for is any details I've overlooked or any known reason why my design won't work. I already know that to close a rectangle with pipe I'll need a union or at least one fitting and pipe nipple with left-handed threads on one end. The section of 3 inch pipe was included because I read that it makes a good mixing chamber, but I have no experience with that. If you see anything else that may be a problem please let me know.


-
Thanks for the clarification. I tried blocking both (one at a time) on this blower, but I guess the motor is strong enough that I could not detect a change in rpms either way. It sounds like the bottom line is I can restrict either the intake or the exhaust without harming the motor, and that was my main concern. Now I just have to find an inexpensive way to use a solenoid (or other relay-activated electronic means) to open and close the air to set points to move on with my design.
-
I guess I still don't understand this Smoothbore. I thought it was if you closed off the air *inlet* then the impellers weren't trying to push as much air and that would reduce the power used by the motor, but if you closed off the exhaust, the back pressure created more work for the motor. I really do want to understand this because I'm designing a forced air propane forge and I have a blower from the kids bounce toy that has been in storage for a decade. It puts out way more air than I can imagine would ever be needed for a forge, so I need to determine if it's better to restrict the intake or exhaust or if it's better to divert the excess air somewhere.
-
My opinion is pass on this one. Major cracking on the heel, but more troubling is what appears to be a crack across the entire face that is in the sweet spot of an anvil. I'll bet if you were to do a rebound test on it you would not get very good results. If you can pick it up for pennies per pound then maybe, but otherwise I'd recommend waiting for a better anvil.