

Buzzkill
-
Posts
2,065 -
Joined
-
Last visited
Content Type
Profiles
Forums
Articles
Gallery
Downloads
Events
Everything posted by Buzzkill
-
What temperature rating for ceramic blanket is needed?
Buzzkill replied to Danjmath's topic in Insulation and Refractories
In general it should be ok, but as with many things it depends a little bit on the specifics. If you are just planning on general forging it should last a fairly long time. If you plan on doing a lot of forge welding where you get up into the yellow-white heat range it won't last as long. The lining and insulation of a propane forge will have to be replaced eventually due to both mechanical damage and heat issues. 2200 degrees F is higher temperature than you need for anything but possibly forge welding, and with the added protection of the Kastolite I would not hesitate to use it. We normally recommend the 8 lb. density rather than the 6 lb. density though, so you may want to factor that in as well. -
We may not be the right people to ask. We're typically trying to reach temperatures between about 1500 and 2300 degrees F. Burners suitable for forging are most likely far less than ideal for making pizza. Maybe someone on here has experience in that area, but I'm hesitant to give any advice since the application is so much different than anything I've done.
-
Understood. Thanks for the response. I was just wondering if I was missing some other valid way to "fix" cracks. The only thing that ever made sense to me was grinding past the flaw, and even then if there were multiple cracks to me the blade is always suspect and should probably not go out into the world for real use.
-
I agree with the assessment of the blade of course, but I have a related question that's been bugging me for a while. A number of times on Forged in Fire, the judges have talked about contestants addressing/fixing cracks in the blades. Many times to my eyes that's not possible. Cracks along the cutting edge that are visible on both sides of the bevel, for instance, to me are not something that can be repaired, and grinding past the cracks would (again to my eyes) result in a blade unsuitable for the challenges and/or no longer within the specified parameters. Have I been missing something or are there suitable solutions other than grinding to "fix" the cracks in those blades?
-
Help with Newly Purchased Anvil for Christmas
Buzzkill replied to Ugotit22's topic in Anvils, Swage Blocks, and Mandrels
The word underneath is most likely Birmingham. I applied a little Google-fu and came up with this: " Mr. Postman had recorded three Hill anvils. He notes that it seems to be a manufacturer name, and it is listed under the English Anvils section. He didn't have much info on them other than describing them, but they are marked Hill Birmingham with the weight on the other side." -
There's nothing wrong with using the air tank, but I assume you're going to cut it somehow in order to build your forge. If you can cut it, you can always cut a portion out to make it shorter, even if you want to keep the rounded ends. Personally I'm moving away from the rounded ends anyway, but that's a matter of personal preference. If you want as easy to tune as an OA torch then a blown burner is the way to go. Then you can adjust air and fuel as you desire without worrying about jet alignment, tube length, and a few other variables. You just have to adjust one when you adjust the other to keep the same forge atmosphere and you're tied to power with your blower. If the picture I have in my head is accurate then your aiming method should work well.
-
If you're going to have a 15 inch long chamber you'll want more than one burner (unless it's a ribbon burner - and even then maybe more than one). You've probably seen this before, but unless you have a power hammer you'll be hard pressed to work more than 6 inches of material before it cools to the point where it needs to go back into the forge. So, a long forge means you use more fuel to keep the chamber hot and you keep heating/reheating steel that you can't possibly forge before it cools. That potentially means you lose more steel to scale and decrease the carbon content of the steel. In other words, there's no benefit to you or the steel from a chamber that long unless you are doing long twists or something similar which requires long sections to be heated at once. A shorter forge with a pass-through in the back is usually a better way to go. The exception is preparation for quenching things like long blades. However, unless we're talking about swords or very long knives, you can slide the workpiece in and out of the forge to get a uniform temperature before quenching. Trying to temper in a gas forge with NA burners is probably a non-starter though. Once a good NA burner is properly tuned, changing the pressure a little bit one way or the other will not have a significant impact on flame composition. If it's slightly reducing it will tend to stay that way, for instance. The reason is the components are chosen so that as the fuel pressure increases, the amount of air drawn in also increases proportionately. In the range you are talking about (+/- 200 degrees - either C or F) there should not be a noticeable difference.
-
Welcome to the forum. A lot of what you seek has been covered many times on the forum. However, the search function for the forum is less than stellar, so if you use your favorite web search provider and include "iforgeiron" in your search terms you can usually find what you need. I'll start by saying that the steel which RR spikes are made of do not have enough carbon to harden much, if at all. It certainly isn't what you want for a knife that will hold a good edge. There are some RR spikes with "HC" stamped on them which are slightly better in that area, but still don't have enough carbon to harden enough for a good knife edge. What that means is that heat treating will have little to no effect. Gun bluing creates a specific iron oxide coating on the steel, which is more resistant to rust than bare steel. However, this is a quite thin layer (especially if it's cold bluing) which will wear through quickly in use. A quick wipe with oil, or some types of wax, can provide decent protection against rust, but again these will wear off and have to be applied again after use. Look at the pinned/stickies in the knife making and heat treating sections of the forum. Most of your questions will probably be answered there. If not, come back with the specific issues you have questions about and we can help more.
-
Agreed. How far back do you go? The guy who made the SLO? The company who turned the steel into the leaf spring? The business that produced the steel in the first place? The people who mined the ore for the steel? Like I said though, the play is done and it went without incident. I spoke with the director at some length and was comfortable that she understood it is not a toy and access to it needed to be controlled by her. I understand that it still could have come back to haunt me, but I do have a stubborn streak and although I was obviously concerned enough to post the question on here, I still refuse to allow fear of what may possibly happen in the worst scenario prevent me from doing anything. My general theory is don't live in fear of everything, but don't make yourself an easy target either.
-
While it is true that these refractories are not AS susceptible to being affected by borax containing fluxes, they are not immune. As probably anyone who has used Kastolite 30 and is just learning to forge weld can attest, the flux WILL eat into that material a bit. From what I've seen of others on here, and I know is true for myself, there is a tendency to get "flux happy" at the start of your forge welding journey. In my propane forge, which had nearly an inch of Kastolite 30 for the originally flat floor, a trench about 3/8 inch deep developed where excess flux made contact with the floor repeatedly over many more heats than an experienced smith would have needed. So, for those who have enough experience to use the right amount of flux the impact may be negligible, but Kastolite 30 is not impervious to copious quantities of flux and lots of heat.
-
I have used a piece of copper tubing as a file card to clean out the gunk and a vinegar bath to "sharpen" old files with moderate success. Some files are just too far gone to benefit much, but if they are just a little dull or rusty the acid bath can give them some new life. In my opinion it's better than before, but still not anything like a new quality file.
-
Some of my pain was in that area as well, for whatever it's worth. You may have been fortunate enough to just strain the muscles, which should heal much faster if that's the case.
-
This. I developed tennis elbow in both arms from non-smithing activities, but when smithing it was aggravated much more by trying to grip something tightly than swinging a hammer with a loose grip. I had the shot in my left elbow, which significantly decreased the pain for about 3 months. However, when the pain returned it was worse than before. For me this has been an ongoing issue for more than 3 years and although I no longer experience the constant daily pain or feel like I barely have the strength to lift a full glass, my grip strength has not yet returned to nearly what it was before. My recommendation is stop when you start to notice even a little pain. Give yourself time to heal up and search for therapy techniques you can do to help reduce the pain and speed the healing. Research good hammer grip and train yourself to do it that way until it becomes natural to you. It takes a little getting used to if you are used to a different grip, but your body will thank you in the long run. If you notice it in your tong hand (elbow) then you may want to use longer stock that doesn't require tongs or use tongs that have a ring or clip which holds them closed. Either way it will allow you to use a looser grip and not aggravate the condition nearly as much as a tight grip.
-
I believe Mikey explained why flames seem to disappear or change in color and length as the interior of the forge heats up in either his Burner 101 or Forges 101 thread. I don't recall it well enough off the top of my head to offer the explanation. Dragon's breath can be difficult to see in broad daylight especially looking straight into the heating chamber. If you wait till nearly dark and take a picture from the side you'll probably see something different. I just use scraps of my insulating blanket around the burner (outside the forge of course) once I have it aimed the way I want it to seal it off. I hit it with a little bit of rigidizer (fumed silica in water) when packing it in and let it air dry for a while before firing, but you probably don't even really have to wait. BTW, you're braver than I am. The thought of vaporizing the liquid fuel to make a naturally aspirated burner makes me a little nervous. It's probably because I have a limited understanding of what's going on there, but I am impressed with the functionality of your design.
-
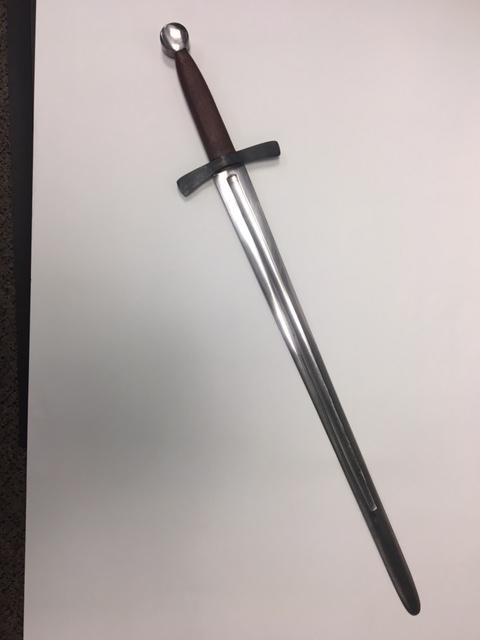
Thanks for all the advice. The play is over. I did give the SLO to the director, but we agreed it would not be used in the combat scenes. It was more or less just scenery in the long run, so I put a fair amount of time into something that I probably could have done in about a quarter as much time. On the other hand it did give me some experience with techniques I would use to make a real sword. Here's what it looked like. It's about 25 inches from guard to tip and about 33 overall. The handle is just wood (not even sure what kind) that I stained. Everything else is steel.
-
Just curious here. Why not heat and fold the angle iron before making the cuts? I think you could cut all 4 "slots" at the same time with a vise and a clamp to keep the two folded pieces tight to each other. I love the innovation. Great idea.
-
DIY anvil stand
Buzzkill replied to American Piddler's topic in Stands for Anvils, Swage Blocks, etc
I have to agree with IF&C. I have made rebar tongs. I have also had them fail in use, and I do not think homogeneous mild steel would have failed. At the time I thought rebar was mild steel (and it may or may not be), so I dunked them frequently to cool them off. I believe this caused them to harden and ultimately break. We use tongs to hold glowing hot steel. Flying hot steel is not your friend. I was lucky enough for it to result in just falling hot steel, but I'd rather trust in the right material than luck. Lesson learned for me. I hope you don't have to learn it the hard way as well. -
It used to bug me too, but then Thomas Powers (I think it was he) explained that the two terms have been used interchangeably for several hundred years in many old blacksmithing books. I think most people will understand that you're referring to the "original" Damascus steel if you use "wootz" to denote it. If you haven't seen it yet, Daniel C has a drool-worthy thread where he has been creating a reasonable facsimile of wootz steel. https://www.iforgeiron.com/topic/53084-first-crucible-steel-run-and-forging/
-
DIY anvil stand
Buzzkill replied to American Piddler's topic in Stands for Anvils, Swage Blocks, etc
Kind of reminds me of a T-shirt we got for my brother a few years ago: "Those of you who think you know everything are really annoying to those of us who actually do." -
All joking aside, rusty is better here anyway. If the bolts are rusty you know they aren't coated with something that will make you sick when they get hot. If you have taps you can make your own threads, but a couple dollars should get you enough appropriate nuts at your local hardware store. If those are galvanized then you'll want to soak them in some vinegar for a few hours to remove the zinc if they will be close to the fire.
-
You mean the bolts you don't have to bolt the pipe to the rotor? And yes, vinegar will remove the zinc coating from galvanized objects. However, I don't think vinegar will remove chrome coating. Just make sure you know what you have before you get started. You're so close now. We'd hate to see you get sick right off the bat.
-
You can always use your sawzall or a hacksaw and cut 4 vertical slots in the pipe. Then you can bend the 4 tabs this creates out and down at a right angle to the main portion of the pipe. This will be easier if you have a decent torch. Clamp the pipe in a vise, set the rotor on the tabs so you line up with the holes in the rotor and drill in place or mark and drill the holes. Taking that mower apart should have given you a few bolts to work with. The rotor has the surface which the brake pads grip in use right? That's a larger diameter than the "bowl" shape which has the holes in it. You make the hole in your table (mower deck) large enough for the bowl portion to fit through, but not the outer ring of rotor. Then you can just set it in place without fastening it at all. Used bricks are normally cheap/free. You don't need a pallet full or anything. A dozen is probably more than enough. Clay just needs to be barely wet enough so it holds its shape and doesn't crumble if you squeeze it in your hand. If you get it right and ram it into place there should be no dirt filled nightmare. To me it still seems like you are making this more complicated than it needs to be. In simplest terms you are making a hole in the ground with an air source. You are just building a table to get that hole up to a convenient working height.
-
I'd recommend bolting the pipe to the rotor rather than welding. You may find it tricky to get good welds. Also, you may want to take it apart at some point to move it or replace parts and bolts make that easier to do. If the hole in the mower deck is the right size you don't need to weld there either. The rotor has a built in "flange" which will allow it to sit in the hole without falling through. Welding the rotor to the deck could be counter-productive since the welding may warp the mower deck and the rates of expansion between the steel of the deck and the rotor are likely to be different, especially at the different temperatures each will experience. Keep it simple here. You're just making a table with a hole in it to fit your fire pot. As long as you make sure the table is sturdy and the fire pot will stay put you're fine. You'll probably want to add clay or bricks to get a level surface higher than the lip on the fire pot anyway, or raking coal in could be a little more frustrating than is necessary.
-
That certainly sounds like annealing. For normalizing you'd heat past critical and allow it to air cool to black heat then heat back up to a slightly cooler temperature than the previous cycle and repeat. I'm curious about what you said regarding the grain structure being brittle. Did you break a piece and look at the grain structure or were you making that determination some other way? "Brittle" and "hardened" go hand in hand usually. However, a large grain structure is far weaker and easier to break than a small, tight grain structure. The only time I've been able to see grain structure without breaking steel is when I burned it. To me it looks a little like cottage cheese as far as texture when that happens. If you saw that while forging then the steel is destined for the scrap bin. The topic title is "Automobile spring." A lot of automobile spring is (or at least was in the past) 5160 steel. However, springs may be some other alloy, especially from newer vehicles. Were you able to verify some way that the steel was in fact 5160? I've forged some coil springs which I worked like they were 5160, but came to the conclusion they were probably not based on how they reacted to the heat treating process.
-
I know I'm late to the party, but I'm going to "+1" this. I can't tell you how many times I've created more problems and work for myself by either continuing to work when I know I'm getting tired and short on patience or by trying to rush on delicate operations. Usually the thinking is something like "I'm almost there. Just a few more minutes and I'll be done, so I don't want to quit now." Either that or I know I have to quit working for a family obligation or something similar so I try to speed up. Inevitably, especially when grinding, a mistake is made that requires more time to fix than if I just set the piece down and came back to it later. It's *really* hard to put small amounts of metal back on, but it takes very little time to take metal off - and mistakes become very obvious in most cases when you're close to final finish.