

anvil
-
Posts
3,246 -
Joined
-
Last visited
Content Type
Profiles
Forums
Articles
Gallery
Downloads
Events
Everything posted by anvil
-

How to erase forge weld seam on an Axe
anvil replied to lshindel's topic in Axes, Hatchets, Hawks, Choppers, etc
My solution is to take a good deep non sparking welding heat with any good flux and very lightly with a 1-1/2# or so hammer and, if its a top seam, lightly chamfer the edges, then forge the chamfers back out. You are really moving a very little material, then moving it back. Most of the time, this is enough to remove the seam. Wire brush after reaching your welding heat, then forge is pretty critical too. To be clear, this is done after you do your initial problem and need to heal the seam deal. -
JLP Blacksmith Teaching Center.
anvil replied to jlpservicesinc's topic in Building, Designing a Shop
Fear,, A strange thing with me has become a fear of heights. I've been driving the Colorado high mountains all my life in every conceivable weather situation and loved every trip. But for some reason these last 5 years a fear of heights has been growing and its becoming worse. Strange, I often pick longer routs just to miss the fear deal. -
What did you do in the shop today?
anvil replied to Mark Ling's topic in Blacksmithing, General Discussion
Shainarue, nice work!. I just finished re-reading the level 2 curriculum and watching his associated vids. Good stuff -
Great start! Scrolling wrench and bending forks( not scrolling tongs) sized for the job are a major part of my tooling! Have fun
-
Anvil Stand Hold Down? Need or not?
anvil replied to FruzzinForge's topic in Stands for Anvils, Swage Blocks, etc
Your usage will answer that. I like having my anvil as clean as possible from misc stuff. You'd be surprised how an obscure corner of your anvil just might have a use if it is'nt covered by something. But that is balanced, so to speak, with keeping any movement of your anvil to a minimum. Any movement is hammer blows being wasted. -
Yea,, its really great watching your project!
-
A reading list is a long thing with much input from all of us. My "go to" is "Plane and ornamental forging" by Schwartzkopf. Easily found via google search. Its a 1910ish school course text book from NYC at that time.
-
Lol, I think the cane was to be a "multi-use" tool after he healed as well.
-
What did you do in the shop today?
anvil replied to Mark Ling's topic in Blacksmithing, General Discussion
Most Every thing I said has to do with the building codes, UBC? As best I know they haven't changed. Again from memory Their are 3 types of defined curved stairway rails, a spiral, a sweep, and a winder. I don't remember the differencs. As I remember all three have this in common for the inspector: the rise and run are named and the measurement is taken "X" inches from the outside edge of the center of the vertical support. Seems that distance was 6 or 9 inches and I don't remember the rise and run at that point. The other commonality was they all three have a fixed radius. I've actually never done a spiral type on my own. I have done a few as a helper for other smiths. Think fireman's pole with a 36" or so tread length that has a section of pipe at the inside of the tread that slides over the center pole. The two I've done on my own were built around an "ugly" log center pole with half log treads mounted to the big ugly via a blind tenon and wedges in the mortise. Both had an ever changing radius and were approved by the inspectors before I did them. On both, the inspector( the same for both) said an ever changing radius did not fit code, but he would approve them anyway as long as I met the rise and run heights from the outside of the "Big Ugly". The inspector may or may not have been the one who associated a volute with a sea shell and that it had an ever changing radius. Beyond that, my last math was sophomore year, '67, engineering at U Colorado and I have very little remembrance from then concerning this. Heres a pic in progress of my second one. It's actually a half rise to a landing, then a straight run to the second floor. There lies the "Big Ugly, the treads and two of the forged iron stringers being fitted. I milled the treads with my alaskan mill and the rest of the log work was done by a good friend. Design by me.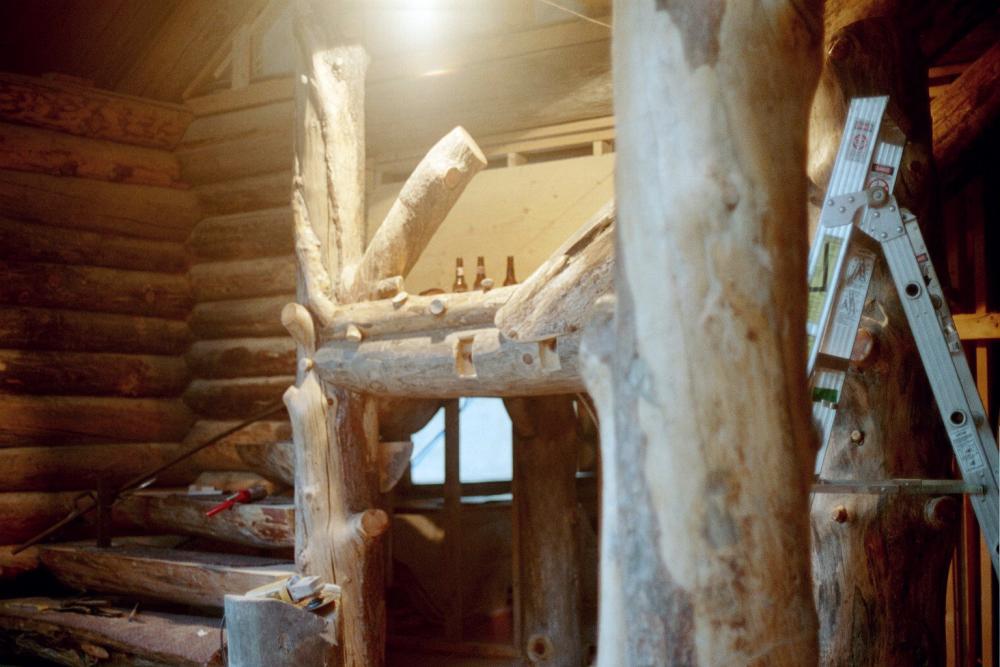
-
What did you do in the shop today?
anvil replied to Mark Ling's topic in Blacksmithing, General Discussion
I think a volute has an ever changing radius, at least thats how I think of it,,, like a sea shell. A spiral on the other hand has a constant radius. There are 3 types of spiral stairs in the building codes(UBC? and all are based on a constant radius, or there used to be,, a sweep, a winder and a spiral. There are no specs for a volute. It's always a trip with the inspectors when getting one approved. Always best done before you start the job. -
The cool thing was the fit of the spirals to the wood cane. The cross sections of my two spirals were slightly smaller than the cane, which, which was tapered. The wood guy literally screwed the cane down into the socket and removed material as needed so there were no gaps between cane and iron and it was slightly inset into the wood. We decided on rivets over screws because of potential wood shrinkage. Rivets could be tightened up whilst screws might strip out. Lol, a good memory from a far away moment in time!
-
couldn't be without a couple sets of dividers of different lengths. Grobet: I saw it laying there and decided to "Grobet" before someone else did.
-
Lol, I have a bunch of those too!
-
I did a foot for a cane once. A biker friend had an accident and his friend, another biker wood carver had me forge the cane end(foot). It was an eagle claw holding a rock/Earth. the top of the claw became the socket and there were two straps that spiraled up twards the handle. He then carved the cane to fit my iron and did a bronze cast harley for the handle. The spirals had rivit holes in that were matched side to side. He then rivited thru these straps to secure it to the cane. Sorry no pics, but a cool project. I hadn't thought of it in years, but the cane talk reminded me. Thanks!
-
May he be buried with his favorite Hammer!
-
I agree with Daswolf and JHCC. The body is most likely wrought iron and there is a good chance the jaws are a high carbon steel. The tried and true anvil repair method by Robb Gunther will work here if you want to fix it. His fix uses two rods that will do well welding wrought and high carbon steel. https://www.anvilmag.com/smith/anvilres.htm
-
nice bunch of stands. My preferred way to mount my anvil to the stand is to inlay the anvil into my stump. You could do the same. All you need is a wood chisel, a hammer and some fine sand. Trace your anvil base onto the stump and chisel it in. I chisel mine about an inch or so deeper than needed, then put the fine sand in the void. The sand does a few things. It is far easier to level your anvil in the sand than to make a level saw/chainsaw cut or chisel the bottom level, and the sand deadens the ring of the anvil. Make it a close fit and you won't need any external fasteners to hold your anvil firmly in place. Rich_c, nice stand. You can make a bracket that fits over your all thread that can hold a hot rasp or a favorite hardy tool.
-
probably not too different than the first pair of tongs I made,,,
-
Dangerous stuff
-
Gresham's law for management?
anvil replied to rockstar.esq's topic in The Business Side of Blacksmithing
Frank Turley once equated Dentistry and Blacksmithing. Both work real close to destruction. Dentists to nerves and pain, blacksmiths to burn point in iron. -
Gresham's law for management?
anvil replied to rockstar.esq's topic in The Business Side of Blacksmithing
Glad you caught the humor. -
What did you do in the shop today?
anvil replied to Mark Ling's topic in Blacksmithing, General Discussion
A lot of good stuff! -
Gresham's law for management?
anvil replied to rockstar.esq's topic in The Business Side of Blacksmithing
Yup, some of my best memories were doing crafts fairs and the best pay was the smile on a ladies face as she walked away with a handfull of "S" hooks. Come to think of it, thats still the best pay! Sheesh, if I wanted to make money,, I could have been a lawyer!!! -
Along with that, the centerline of your material does not change length, thus take your measurements along the centerline. So add 1/8" for 1/4" material, if I understand you correctly.
-
What did you do in the shop today?
anvil replied to Mark Ling's topic in Blacksmithing, General Discussion
Now you will be able to bend the world around your little finger!
